Home pageArticlesWorkshop /IndoorsHow to make a shoe rack with your own hands
We make a shoe rack from ready-made rotating mechanisms, calculate the width and depth of the shoe rack inserts. Addition of the mechanism (fan) and rotary bushings of the folding shoe box...
A large number of shoes at the entrance to the hallway or a mountain of slippers is, of course, not good, and as one of the options, a shoe cabinet, or, in other words, a shoe rack, can come to the rescue.
Many people have probably noticed plastic mechanisms for shoe racks on sale. In this article, I will show the simplest option for making a shoe box made from just such a semi-finished product.
Right away, I’ll tell you my opinion, I don’t really like this option, the plastic is quite thin, it’s brittle, and the geometry of the parts themselves often leaves much to be desired, in short, plastic sides don’t inspire much confidence and, in fact, it’s best to make the sides yourself, from what? From anything, even from plywood, even from the same chipboard.
But, since I had a set of plastic sides in my hands, as they say, we will make it from what we have.
Shoe rack - is it necessary?
In order not to clutter the hallway with a large number of shoes, you need to install a shoe rack.
If relatives, acquaintances and friends often come to visit, having a shelf for storing shoes is a must. With it, your hallway will be transformed into a stylish and comfortable calling card of your home.
Installing a shoe rack helps to maintain the cleanliness of the floor covering, maintain the required level of hygiene and increase health immunity. In addition, a properly made shoe rack can successfully transform the interior design of a hallway.
Shelves and drawers in the closet can be made to suit any type and size of shoes.
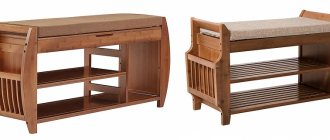
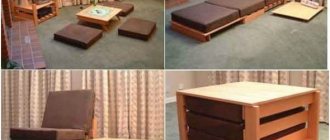
For convenience, the shoe rack is complemented with a soft seat on top. When you come home from work, you can sit down and carefully take off your shoes and put them on the shelf. The presence of such a piece of furniture for small apartments where there is little extra space is a must.
Such chests of drawers always look representative and elegant in the hallway, creating coziness and harmony in it.
Why you should make a shoe rack with your own hands for the hallway
The problem of placing shoes worn at a given time in the hallway can be solved in different ways. Typically, low cabinets with a soft seat are used for storing seasonal shoes and slippers - they are also called shoe boots.
They also design open shelving with shelves for shoes of shallow depth. If you place the shelves at an angle, you can make the rack narrower - after all, its depth is determined by the size of the shoes.
A slim shoe rack is perhaps the best option possible. In the reference book with a list of furniture and interior items, I defined “slim”. Essentially, this is a shoe rack with a rotating mechanism that you can make with your own hands.
Due to the fact that the shoes are in an almost vertical position, the depth of such a cabinet is very small - ideal for small and narrow hallways.
Since a shoe rack of this type is narrow and unstable, it must be attached to the wall. You can make it hanging, which will give the interior an additional zest and allow you to slide something under the body of the cabinet. Often a mirror is hung above a shoe rack, and its lid is used as a shelf for all sorts of small things, which is also very convenient. You can screw hooks, hangers for umbrellas and bags with your own hands to the side of the shoe rack - this will expand the functionality of the furniture and add comfort to the interior of the hallway.
The benefits of making your own shoe cabinet of the desired design are obvious:
- In order to make a shoe rack with your own hands, you can use scrap materials and any leftovers.
- The design of a typical shoe cabinet is extremely simple, and the variety of drawings and photos allows you to choose the best option.
- Since the material consumption is low, as is the cost of the product, such projects are reluctant to be commissioned. You can immediately save yourself time and do it yourself.
Pros of making it yourself:
- exact size taking into account the parameters of the hallway;
- the optimal set of shelves of the required width for your “collection” of shoes;
- sufficient functionality: a regular stand or a cabinet with pull-out shelves - choose according to your taste;
- perfect selection of style and color;
- A stronger and more durable model than temporary plastic stands.
Even a girl can assemble such a stand) You can cut and trim the material for the shelves to order within a couple of days! Even a girl can assemble such a stand) You can cut and trim the material for the shelves to order within a couple of days!
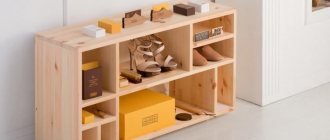
Shoe cabinet in the hallway with folding shelves
Here, I’m sharing my impressions of making a folding shoe rack for the hallway. I purchased the accessories for 50 rubles. per set. But I had to tinker with the rest... I'll tell you the story of its creation.
The mechanism of folding shoe racks is new to me, so I immediately went on the Internet to look for additive diagrams (looking ahead, I will say that I still found a normal additive, but this was after the product was manufactured, and therefore this will be covered in a separate article). We weren't able to dig up anything particularly meaningful. First I found this diagram. And I was happy...
But I was still stuck with the calculations, so the search continued and I found this file “ shoe rack assembly diagram with details . Here I completely relaxed and, rubbing my hands, did not compare both of these schemes. I stupidly took the dimensions, put together a project based on them, adjusted the dimensions to the required room and sent them to cutting. As practice has shown, I got excited.
I’ll immediately make a reservation that in the posted project, as well as in the detailing, the dimensions have already been corrected.
Types of shoe racks
Depending on the design features, they can be open or closed. They are made of metal, natural wood or laminated OSB and chipboard.
Varieties of shoe rack designs.
| Shelf | The open and simplest designs are popularly called galoshnitsy. Shelves can be metal or wood, simple or decorated. The main advantage of shelves is that shoes dry quickly due to effective natural ventilation. An important drawback is that the type of shoes has a negative impact on the interior of the hallway. |
| Wardrobe boom | Quite large vertical multi-tiered products; several rows of slats are placed inside for folding shoes. Sizes are selected individually. The main disadvantage is that the entire shoe rack is closed with an oversized door; opening it requires a lot of free space. In small hallways this creates significant inconvenience; keep this feature in mind when choosing your shoe rack option. |
| Slim shoe rack | It has several small doors installed in separate sections that open by tilting. The original opening/closing principle makes it possible to save free space; this type is considered universal. The slim shoe rack looks great in both large and very cramped spaces. In addition, the presence of separate sections allows you to sort shoes by season of use. |
| Cabinet | One of the prestigious types of shoe racks, significantly expands functionality. It not only stores shoes, but also all accessories for caring for them. Another advantage is that the cabinet has a special place for sitting, which makes the process of taking off/putting on shoes much easier - this is very important for older people. |
| Built-in shoe rack | The shoe rack is built into a large wardrobe where clothes are stored. The furniture is large in size; before making a decision, you need to take measurements of the hallway and decide on the location of its installation. One of the disadvantages is that wet shoes negatively affect the storage conditions of clothes; in a closed volume, relative air humidity increases significantly. |
Open body
- Shelving - they consist of vertical walls connected by horizontal shelves or grids. This is the most common solution. Sections are assembled from wooden boards or chipboard sheets. There are also unusual methods of decorating a furniture set, for example, made of stone or concrete. You can put things on the closed top when entering the apartment. A mirror is placed above it or a hanger is attached. Racks can be narrow and wide, high and low. If strength allows, low ones are installed under the seats. The sides are made straight or embossed. The rounded sides look unusual.
- Benches - instead of solid walls, the shelves are supported by legs connected by crossbars.
- Racks - they differ from benches in the absence of a top.
- Built-in models combined with sliding wardrobes, hangers, mirror panels.
Closed case
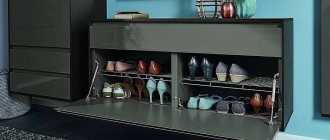
Wardrobes, chests of drawers and cabinets differ from each other only in height. They are shelves with a front and a top cover. It is made with or without sides. Part of the shelving is sometimes left open.
Before you make a shoe rack for the hallway with your own hands, you need to choose the filling for it: stationary shelves and grids, retractable grids - they are placed horizontally or at an angle, or drawers - external and internal.
The front part is covered by a façade of doors and blank panels. There are several types of doors.
Door mechanism options
- Hinged doors are ordinary doors that are attached with hinges to vertical posts.
- Sliding - when opened, the canvas moves to the side, moving along the rail.
- Accordion doors - the leaf consists of vertical slats connected by hinges or a flexible membrane made of fabric or polymers.
- Folding - you can attach holders to them into which shoes and sneakers will be inserted. The simplest option is to mount shelves and limit strips on the bottom of the folding structure that hold the shoes in a vertical position.
Technical solutions can be combined in any way you like, combining racks and chests of drawers, long closed benches and wardrobes. Folding and hinged doors will be well combined in one case.
Types and models of shoe racks
To choose a suitable shoe rack, you need to consider the size and layout of your hallway. These can be vertical or horizontal, closed or open structures. And they all have their advantages and disadvantages.
Open shelving
This is a stationary rack with several sections, which used to be called shoe boots. They are simple, practical, accessible and inexpensive, and the top tier can be used as a seat or instead of a shelf. Shoes are constantly ventilated and dry well, but at the same time dust can accumulate on them.
Photo: nikastroy.ru
Shoe stands
The stand differs from the rack in the absence of any stationary frame structure. These are guides or shelves, the distance between which depends on the type of shoes: low for summer boots, high for winter boots. Most often, stands are metal or plastic, with or without a seat, but they also gather dust and are constantly in sight.
Photo: domechti.ru
Built-in shoe racks
Like any built-in wardrobes, such shoe racks allow you to take advantage of the features of the room. For example, it can be mounted in a useless niche or thus hide wall defects. The design has only one drawback - it is completely stationary and cannot be moved.
Photo: etotdom.com
Closed cabinets
A shoe closet is a separate cabinet with doors in which shoes do not collect dust and are hidden in plain sight. They can be tall and narrow, classic or with vertical doors of different widths. The disadvantages are more impressive dimensions and the inability to immediately hide wet shoes.
Photo: bachhoaxanh.com
Nightstands and chests of drawers
Cabinets and chests of drawers usually differ in size from a closet, so they are suitable for cramped living rooms with low ceilings. Traditionally, chests of drawers are more spacious, and cabinets are smaller. Most often they are closed, but there are also open models.
Photo: oooblagodat.rf
Combined shoe racks
This is the most practical option for individual layouts and interiors, although it will cost more. Such shoe racks combine different types of sections and shelves to store all shoes at once: seasonal, casual and home. Among the disadvantages, in addition to the price, there are also quite impressive dimensions.
Photo: manrule.ru
Step-by-step master class on making shoe racks
Manufacturing takes place in several stages:
- Selection and acquisition of materials and tools.
- Creating a diagram of parts and their production.
- Edging.
- Assembly of shoe racks and installation of accessories.
The first step is to select the material. You need to take into account its strength, as well as ease of use. Usually it is necessary to combine several types of materials for the facade, frame and back of the cabinet. As for the tools, several options are suitable for some tasks, so you should decide in advance which one is better. After preparing the tools, it’s time to create the drawing.
Having a complete set of ready-made parts makes the task to a minimum. But, as a rule, you have to decide on your own sizes and proportions. After this, all the elements are cut out and their edging begins. You can make paper lining yourself. The assembly itself is a relatively simple process. To install the box, it is recommended to use minifixes. At the end, internal elements and fittings are installed.
Necessary materials
The materials for making shoe racks can be:
- MDF board,
- Chipboard board,
- Plywood,
- Tree.
As for plywood, it is certainly one of the most durable materials for making furniture. However, it requires additional processing and painting.
MDF is also highly durable. Its dense structure facilitates the process of drilling and assembling the product. But, often, if you make a shoe rack entirely from MDF, the product turns out to be quite heavy and expensive. Therefore, only facades are usually made from MDF, and the entire body is assembled from chipboard.
When ordering cutting and lamination of MDF, you can additionally choose milling on the plate, that is, using special milling equipment, a relief pattern will be applied to the parts. It will add a special style to your shoe rack.
In this material we will look at the manufacture of overshoes from a chipboard slab with a thickness of 16 mm - for the frame, and 10 mm - for the internal partitions of the overshoes. This material is one of the most budget-friendly on the market.
Due to the fact that chipboards have a wide range of colors, you can choose the color you like most or choose a decor that best matches the rest of the furniture in your home.
Our design involves the use of two colors: dark wenge (for the roof, sides, internal pillar and bottom) and light wenge (for the facades).
Of course, it is much easier to order detailing from a specialized store or workshop, since chipping cannot be avoided when cutting parts yourself. You just need to go to a furniture shop with detailing, and they will also trim them for you.
Tools
When choosing natural wood as a material, you will need the following tool:
- jigsaw;
- a circular saw;
- hand router;
- Sander;
- electric plane.
The process of processing boards is accompanied by the release of large amounts of dust and sawdust into the surrounding atmosphere. Therefore, be sure to use personal respiratory and vision protection, or forced dust removal mechanisms (cyclone, construction vacuum cleaner).
To work with chipboard, MDF or plywood, you will need the same tools as for wood.
In addition to electrical instruments, you need a ruler, tape measure, level, and marking pencil.
Pay attention to the selection of fasteners. This must be a specialized fastener. For wood - confirmations, self-tapping screws with rare threads. For chipboard - completely different fasteners.
After drawing up a drawing of the shoe rack, drawing all the dimensions, indicating communications, passages, as well as places for swing doors, a cutting diagram for the blanks is drawn up. All allowances of 1-2 mm must be indicated. This is necessary to leave a margin of length for the workpieces when sawing. The thickness of the saw blade is taken into account. You can find it out by measuring it with a ruler. Some manufacturers of consumables indicate the cutting thickness on the packaging.
The most suitable material for storing shoes is chipboard. Does not weigh down the shoe rack and is easy to assemble.
Drawing and preparation of parts
First, the dimensions of the furniture are determined. On the drawing you need to indicate the height, width and depth of the product. It should also show the number of sections, their size and location, taking into account the thickness of the chipboard parts. Based on the sketch, you will need to make a cutting map, where all the elements are visible in the required sizes. Parts to assemble the cabinet will include 16mm chipboard pieces for the roof and bottom. The internal stand and side panels are made of chipboard of the same thickness (3 pieces in total) and are the same in width as the previous sheets.
Internal horizontal shelves are created from 2 parts: their thickness and width should have the same value as in the above cases (16 mm and 250 mm). For the facade, four more parts from 16 mm chipboard are needed. We also need internal partitions in 3 different sizes (4 pieces for all dimensions). In this case, a chipboard thickness of 10 mm is required. The back wall is made of one sheet of fiberboard 3 mm thick.
Edging parts
Paper edging is available at home. For plastic, you will need a machine and special glue. The latter will need to be heated to high temperatures for good adhesion between the edge and the part. Visible elements should be finished with a thick PVC edge (approximately 2 mm). So you will need to veneer the roof, facades, sides and bottom. Inside the shoe rack there will be partitions and various parts. They also need to be covered with PVC edges. However, in this case, the thickness of the cladding should be 4 times less (0.5 mm).
If it was decided to send the parts to the craftsmen for appropriate processing, then you will also need to send the details with precise instructions regarding the cladding. The following components are provided for the shoe rack: thrust bearings (6 pcs.), handles (4 pcs.), 4 sets of shoe boots. Plastic sandwiches for the sidewalls are needed in the amount of 2 pieces 192x287x85x16 mm for each set.
Assembling a shoe rack and installing accessories
First, the frame is assembled. It includes a roof, bottom and two sides. You can collect the box for confirmations. However, then the plugs will be visible, so as an alternative it is permissible to use furniture metal corners. Some recommend using minifixes for these purposes; In this case, you will need to know the process of installing an eccentric coupler. After installing the box, you need to install the internal elements. It is easier to screw them to the bottom and sides with confirmations, and with corners to each other and to the roof.
The assembly of the frame ends with the installation of the rear surface. When installing it, you must have a geometric figure with identical diagonals at hand. Next comes the front part and fittings. For the most accurate installation of the facade, double-sided tape is used. After gluing the edges, 2 mm will be added to the facade on each side. Then, after installing the front side, taking into account all the gaps, the fittings are attached. First the handles (after marking the holes), and then the thrust bearings.
How to make pull-out sections for shoes in a closet yourself
Periodic attempts to get rid of the clutter in the lower compartments of cabinets consistently fail. A permanent mess does not give you a chance in this unequal struggle. It seems like just yesterday the shelves were put in perfect order, but a week later it takes an inadmissibly long time to find the right thing. It seems that the wardrobe lives its own life, which is not subject to the will of its owners. The situation can quickly be changed in your favor if you integrate retractable storage systems into the furniture. Some of them can be done with your own hands.
Why do we need retractable storage systems?
The main reason for clutter on the lower shelves of any cabinet furniture is difficult access to the compartments. This is especially true for areas located near the rear walls. In order to extract something from there, you often have to remove things located in the first rows, bend down or even kneel down and get to the desired item on the Nth attempt. This unpleasant procedure is very familiar to each of us. As a result, the lower compartments are used extremely irrationally. To solve the problem, it is enough to install retractable storage systems in these areas:
- shoe racks;
- boxes;
- baskets.
Thanks to their use, everything stored on the lower levels becomes freely accessible in a matter of seconds. To get the right thing, you don't need to take anything out or rearrange objects. All contents of retractable systems are in the free access zone.
Why is it recommended to install shoe racks at the bottom of cabinets?
Shoes for everyday wear are traditionally stored on the lower shelves in most cases. Almost all factory storage systems (folding and sliding) are designed for installation in close proximity to the bottom of the cabinet. This does not mean that all the lower compartments of a multi-door wardrobe need to be filled with shoe racks. It is enough to select one section.
What is a homemade shoe rack?
Homemade shoe shelves have a simple design. Most of all, they resemble roll-out shelves for computer desks. The main difference is the presence of a handle-side in the front plane and a rubber mat. Such shoe racks can be installed from 3 to 5 pieces in one compartment.
Pros of homemade shoe racks
The main advantage of self-made sliding structures is that they can be adapted to the characteristics of a particular wardrobe and provide maximum capacity. In addition, there are several more arguments in favor of homemade shoe racks:
- they can be quickly installed without altering the cabinet body;
- during the installation process, it is not necessary to remove things stored in it from the cabinet;
- Suitable for storing unwashed shoes.
Factory retractable models may not be suitable for the width or depth of the internal compartment in the cabinet. Therefore, when choosing them, buyers give preference to models with smaller sizes. As a result, empty areas remain at the bottom of the cabinet. Folding shoe racks are easier to adapt to the size of the compartment. However, their installation process is quite labor-intensive, and besides, they are designed for storing clean, dry shoes.
Tools and materials for making retractable shoe racks
You can make and install retractable shoe shelves using a drill or a screwdriver and a confirmation drill. You will also need:
- ;; (can be purchased separately or in a set with attachments); (or a screwdriver and a confirmation key);
- awl.
Such a set of tools is available in almost every home. To get spare parts for assembling the shoe rack, you will have to go to the nearest furniture components store. To make retractable shelves you will need:
- guides;
- railing handles;
- laminated chipboard parts;
- confirmations;
- self-tapping screws 3.5×16 and 3.5×30 mm;
- rubber anti-slip mat for drawers.
When choosing components, it is advisable to adhere to several recommendations. Then retractable shoe racks will be easy to use and fit into the design of the closet.
Tool
It is advisable for novice craftsmen to choose a screwdriver for drilling and assembling shelves. It is more convenient than a drill, which is better used by professionals in such situations.
Guides
The best option is full extension ball guides with a closer. They can be replaced with full extension roller models, but this is pointless. At approximately the same cost, roller guides are inferior to ball guides in terms of performance characteristics:
- load capacity;
- smooth ride;
- silent extension.
However, in most cases, conventional partial extension roller guides are chosen to equip pull-out shelves. The example shows an installation with these mechanisms. In general, they cope with the load and work for a long time, but shoe racks on ball guides with closers are much more convenient to use.
Railing handles
The length of the handles must be selected so that it matches the width of the shelf as much as possible. In this case, the front fittings will look great on the structure and will serve as limiting edges. The optimal decor for such roof rails is glossy chrome. It matches the coating on the hanger rods in the closet.
Anti-slip mats
When purchasing rugs, you need to pay attention to the length and width of the roll. These parameters should be such as to ensure a minimum amount of trimming. Rugs can be bought not only in furniture stores, but also in regular supermarkets.
In most cases, cutting shelves does not require a whole sheet of laminated board, so you will have to be content with the leftovers that the company can offer. The laminated chipboard decor does not have to be the same color as the laminated coating of the compartment body. It can be matched to the color of the fiberboard back walls or facades. Any of the above combinations will be appropriate. Moreover, the visible side will be covered with anti-slip mats, so only the sides and edged ends will be visible.
What to consider when designing a shoe rack
The width of each façade is slightly larger than that of half, a third or a quarter of the doorway (depending on the number of sliding panels). This is explained by the design features of the wardrobe. The vertical profile handles of adjacent facades overlap each other, so the overall width of the panels is increased.
When a wardrobe is made to order, the compartments in which the sliding systems are planned to be installed are made a little narrower. Thanks to this slight shift, drawers, baskets, and shoe racks do not rest against the door leaf when pulled out. The stand, slightly moved from the center, moves the retractable systems a couple of centimeters away from the facade, thanks to which the systems function without problems.
In factory and some custom models, internal vertical partitions symmetrically separate the body opening. So that the retractable structures of such models do not cling to the facades. They need to be moved a little to the side. This can be done using spacer strips that need to be screwed to the internal vertical post. Such components are purchased ready-made or cut from laminated chipboard. Most often the second option is used.
How to correctly calculate the size of a shoe rack
The dimensions of the roll-out shelf depend on the depth of the cabinet and the width of the niche. All tolerances are the same, so the calculations are not difficult:
- shelf width - 100 mm must be subtracted from the total depth of the cabinet (sliding systems take up as much space as possible);
- shelf length - from the width of the niche you need to subtract the tolerance for the guides (25 mm) and the thickness of the spacer strip made of laminated chipboard (18 mm);
- length of the side sides - subtract 30 mm from the width of the roll-out shelf;
- length of the rear side - 32 mm must be subtracted from the length of the shelf if the thickness of the chipboard is 16 mm, and 36 mm if a board with a thickness of 18 mm is used;
- The height of the sides is the same and is 60 mm (it is advisable to make the rear side 1 mm lower so that in case of small discrepancies it does not protrude beyond the side rails).
When performing calculations, it is important to choose the correct length of the guides, the pitch of which is 50 mm. There are no guides with a length of 470 or 390 mm. There are 450 or 400 mm models. This must be taken into account when making calculations. Moreover, the shelf can be longer than the guides, but the guides are longer than the shelf - not.
Drilling, assembly and installation of shoe racks
Integrating roll-out shelves with sides into a cabinet is no different from the process of manufacturing any other cabinet furniture from laminated chipboard. It consists of marking, drilling, assembly and installation. The sequence of actions should be as follows:
- Use a corner and a tape measure to mark the shelves in which you will need to drill through holes. On the sides it is enough to make 2 entry points, and at the back it is better to tighten the longest side with 3 confirmations. Prick the marked points with an awl; this will prevent the drill from moving to the side when entering the body of the slab.
Hinged cabinets can be upgraded in the same way. Only in this case, the spacer strips must be screwed not to the internal partition, but to the side post. Otherwise, the racks will rest against the open door.
Manufacturing of the product
It is important to understand that a hand-made shoe cabinet, despite all its advantages, may be inconvenient to use. To prevent this, you need to study all the subtleties of the design and provide for the smallest nuances. The opening door should not interfere with the movement of residents, and the furniture itself should not clutter the hallway. With an ideally thought-out arrangement, you will be able to sit comfortably and put on your shoes, while you will have a spoon and a shoe brush at hand. You also need to consider the ease of maintenance and availability of cleaning products for manufactured furniture. If all these features are taken into account at the design selection stage, then even a cabinet made from scrap materials will harmoniously fit into the interior of any hallway.
Made of wood
From wood you can make the most stable and reliable shoe cabinet in the hallway. To save money, you can use chipboard; the suitable thickness of the boards is 1.5 cm. You will also need special cylindrical strips made of stainless steel, in the amount of 8 pieces. The diameter of the workpieces is 2 cm. The fastening elements required are screws and flanges.
List of necessary tools and auxiliary products:
- screwdriver;
- marker;
- ruler;
- jigsaw;
- sander;
- hammer;
- compass.
The height of the cabinet is chosen arbitrarily; the width is usually made no more than 25 cm.
Furniture manufacturing algorithm:
- Using a jigsaw, cut out the back wall, consisting of several strips up to 22 cm wide, and grind the edges.
- For the side walls, mark 2 identical rectangles, cut them out with a jigsaw and sand them.
- To assemble the shoe rack, places for fastening the flanges are marked, and the side parts are connected to each other using strips.
- The back planks are fastened with nails to the ends of the side walls.
- Shelves are cut and installed, their number depends on the needs of the family, and the width is calculated based on the dimensions of the main product. If the shoe rack itself is 25 cm, then 20-22 cm will be enough for the shelves.
If desired, the finished wooden shoe rack is upholstered in leather or simply coated with paint and varnish.
Cut out the back wall with a jigsaw
Cut and sand two side walls
Using planks, connect the side parts to each other
Attach the rear strips with nails to the ends of the side walls
Cut and install shelves Result
From cardboard
A do-it-yourself floor structure for shoes can be made from ordinary cardboard boxes - shoe boxes or large household appliances. Materials you will need:
- glue;
- sharp knife;
- stapler;
- ruler, marker;
- bright tape.
This model of shoe rack will consist of separate modules made in the shape of triangles. To make one element you will need:
- Place the cardboard on a flat surface and draw it into equal squares with a marker. The dimensions of the sides will depend on the shoe size. For sizes 38-40 it is worth taking squares 60 x 60 cm.
- Mark each piece at 20 cm and make 2 folds on it. Cover the front side with tape.
- Form a triangle, securing the edges with the same bright tape.
- Using the same principle, prepare the required number of modules, for example, 13.
- Glue 4 blanks in a row onto a sheet of cardboard, trim off the excess edges.
- Make two more such rows - one of 4 triangles, one of 5.
- Fasten the blanks together with glue or simply place them on top of each other. A row of 5 modules is placed in the middle.
The disadvantage of this model is its weak stability. The cardboard is very light, the shoe rack can accidentally be knocked over, especially if there are small children and animals in the house. Therefore, many users place such a shoe organizer not on the floor, but in the closet.
Place the cardboard on a flat surface, draw it into equal squares with a marker
Form a triangle, securing the edges with bright tape. Glue 4 blanks in a row onto a sheet of cardboard, trim off the excess edges.
Result
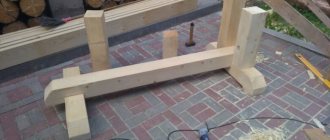
Galoshni-banquettes
To make a simple organizer with a seat and shoe shelves, you will need the following materials:
- finished legs;
- wooden beam of the required size;
- upholstery material;
- varnish;
- self-tapping screws;
- foam rubber
The process of making a galosh is simple, but requires utmost attention:
- They are developing a diagram of the future organizer.
- Using a jigsaw, the base for the bench, as well as the walls and shelves, are cut out of a wooden sheet.
- The edges of all elements are cleaned with sandpaper.
- The frame of beams is connected, the legs are installed. Supports for the shelves are secured with self-tapping screws.
- Check all base elements for unevenness and cracks by applying the corresponding parts to each other.
- The sheets are attached to the frame with self-tapping screws - the structure must have good stability. If required, the wood is painted or varnished.
- To make a shoe shoe with a seat, foam rubber and burlap are cut to the size of the upper part.
- Glue is applied along the edges of the base, onto which the burlap is attached.
- Foam rubber is placed on top and secured with a furniture stapler.
- The last step is to upholster the bench with a suitable material; the protruding edges are fixed to the bottom of the furniture with glue or a stapler.
Additional installed drawers and a tabletop will make the shoe rack more practical.
A shoe cabinet is an important element in the hallway. There are many more schemes and creative models of such furniture that anyone can assemble by hand. The main thing is desire, availability of free time and suitable tools.
Develop a diagram of the future organizer
Use a jigsaw to cut out the base for the bench, walls and shelves
Sand the edges of all elements with sandpaper.
Assemble the frame
For the seat you need a piece of foam rubber the size of the shoe rack
Place a piece of burlap on the foam rubber and glue it around it
Cover the seat with material
Features of assembling racks and cabinets for storing shoes
The assembly rules are not particularly different from other cases, but for shoes it is necessary to provide optimal section sizes. If shelves are made, then in any case they cannot be filled to the top. And if the modules are planned to be square, it is advisable that large shoes be placed there in at least three levels. There should be a total of 10 cm left from the edges of the surface to the shoes on both sides so that nothing falls. Otherwise, the design process is no different from other situations. It should be carried out in a well-lit room. First you need a drawing, and then holes for fasteners are drilled using it. Then the metal corners are fixed.
It is advisable to make cabinets without ordinary drawers, but with special folding doors (up, down, to the side). Accordingly, the pattern of the guides will be different. All fastenings of the cabinet/rack must withstand the load from a large number of shoes.
From ceramic tiles
Like a shoe rack made of PVC pipes, a tile shoe rack is completely resistant to moisture.
In addition, it has good stability. However, such a shoe rack is quite large and heavy.
For example, it will not be easy for a woman to move such a “bandura” from place to place alone in order to sweep away the trash or wipe the floor.
But there is also an advantage to this design - it can be made from the remains of ceramic floor tiles that were left after renovation in the kitchen or bathroom.
The step-by-step process of making a shoe rack from ceramic tiles can be found in this article.
Popular ideas
After getting acquainted with the types of shoe racks, you can move on to studying those options for homemade shoe stands that are most popular among the population.
Wooden cabinet
The advantage of a wooden cabinet is its ease of manufacture. The structure consists of 4 boards connected with furniture screws and thin planks fixed to the facade. It is recommended to paint or varnish the finished product.
Pallet stand
The versatility of pallets has made them a favorite material among craftsmen. They are also suitable for creating shoe stands. To make such furniture, you need:
- disassemble a couple of pallets;
- file the planks to the required parameters, sand them;
- collect several “mini-pallets” at the rate of one product per pair of shoes;
- treat the made boxes with an antiseptic, coat them with varnish or acrylic paint;
- stack “mini-pallets” on top of each other.
Model "Staircase"
This model of shoe rack looks like a ladder, hence the name. Its advantages:
- compactness;
- originality.
To make such a stand, it is equally acceptable to use a factory-made ladder and a homemade one. When making it, it is important to monitor the slope of the steps, otherwise the shoes may stain the wall.
Shoe rack made of profile pipe
The metal model is labor-intensive to create. Only a person who has welding skills can make a shoe rack from a profile pipe with his own hands. Despite this, this product has many advantages:
- small dimensions;
- aesthetics;
- durability;
- good ventilation;
- ergonomics;
- resistance to mechanical stress.
PVC pipe shelf
To create a PVC stand, you need to stock up on PVC pipes. The required diameter is 300 mm, the optimal length is considered to be 250 cm. The prepared material should be cut into ten pieces 250 and 300 mm long, respectively.
The next step should be to wallpaper each section. After this, you need to create the base of the shelf from 4 blanks, and glue the required number of pipes on top (their number depends on the desired capacity of the structure). When the glue has dried, the shelf can be used.
Model "Closet"
For some, the idea of creating such a shoe rack on their own may raise doubts, since this is a very labor-intensive task. In reality, everything is not so gloomy. First you should check the availability of the necessary materials and tools. You will need to buy chipboard, fittings and fasteners. You also need to check whether the farm has:
- screwdriver;
- screwdriver;
- bit set;
- awl and drills;
- corners.
The manufacturing process consists of a number of steps:
- Frame assembly.
- Installation of internal parts.
- Rear wall installation.
- Securing the opening mechanism.
- Installation of shoe boots.
- Installation of facades and remaining fittings.
Cardboard stand
To create a shoe rack out of cardboard, you need a box of a suitable size. It is cut into two parts, having previously sealed the bottom. Using another box, strengthen all the walls. Next, the shelves are cut out and secured to the body. The finished product is decorated with decorative paper or film.
What you need to prepare
The amount of material and set of tools will depend on the chosen design. To make a wooden cabinet you will need the following tools:
- drills (confirmed, 5 or 8 millimeters);
- tape measure (square, ruler) and pencil;
- hammer;
- screwdriver (can be replaced with a drill);
- 4mm hex wrench;
- awl;
- Forstner drill;
- template (its task is to mark for drilling).
Of course, if you are going to make a cardboard shoe rack, the set will be different. But more on that later.
Do you want a more durable and cheaper shoe rack? Use laminated chipboard sheets as the material. In addition, you will need accessories:
- pens;
- euroscrews;
- shoe rack mechanism (if provided);
- screws;
- decorative supports (you can do without them, but with supports the structure will look more solid).
For the carousel shelf you will need metal pins (round shelves are attached to them) and a vertical pin. You don't need any special tools (except a drill). The complete list of materials for the “carousel” looks like this:
- round pins (holders);
- fiberboard disks;
- plastic tips;
- steel tube;
- metal corners;
- screws (plus lock washers for them);
- half a liter of primer;
- machine screws (together with nuts and washers);
- acrylic paint.
More comfortable solutions are also possible (including leather upholstery). Read about this below, as well as about the sizes of shoe racks you create with your own hands.
DIY shoe rack for the hallway
About dryers and shoe drying
A shoe dryer is a small device that fits inside your shoes. It is intended not only to prepare wet boots for use, but also to eliminate bacteria that can provoke fungal diseases. Dryers with ultraviolet radiation are also available for these purposes. They run on electricity and are connected to the network using a cord. The heating temperature reaches 60 °C, and for some modifications - 90 °C. The operating indicator in the above situations will be 5-12 watts. In the past, dryers were almost exclusively metal, but nowadays they are made of ceramic or hidden in a plastic shell. Drying shoes can be done using other methods. It is enough to arrange ventilation: do not close the doors completely, select furniture with “breathing” holes. You should also avoid placing undried boots next to dry ones.
To protect specific shoes from the harmful effects of external moisture, you can use water-repellent compounds!
Advice from professionals
- When making your own shoe closet, start with detailed measurements of the room. The more carefully you do this, the more accurate the drawing will be. Agree, it would be a pity if the finished cabinet covers an existing switch or socket by a couple of centimeters.
- When drawing up your drawing, consider the types of shoes you intend to keep and the number of them. This will help you correctly calculate how many shelves you will need and at what height to install them.
- Design will help simplify graphic programs for designers. They are quite easy to master. They allow you to quickly draw a picture and even make 3D visualizations. If you are not going to stop at a shoe cabinet, pay attention to this opportunity to make the furniture making process easier and faster.
- When choosing legs for a shoe cabinet, choose height-adjustable ones. They are easy to use. Such accessories will help level the height of the cabinet, correcting possible design errors or uneven floors, which is not uncommon.
By thinking about everything and studying the advice of professionals, you will definitely make the shoe of your dreams both practical and beautiful.