The mirror is one of the most important elements of the bathroom. You can’t do without a shower or a washing machine, but it’s absolutely impossible to wash or shave without a mirror. Today the industry offers us a huge number of mirror options. It can be a free-standing mirror of any shape and size, a mirror with shelves, an entire closet with a mirror - it all depends on the budget and wishes for arranging the bathroom.
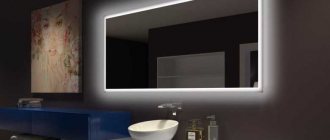
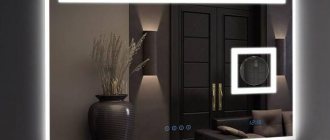
However, one cannot help but note the real trend - illuminated mirrors. If ten years ago they were mostly a desire, now they are used everywhere.
Photos of a do-it-yourself illuminated mirror can always be found on the Internet, and shots of girls near the ideal place for makeup provoke you to want exactly the same solution for your home in the city or country house.
Let's figure out how to make a backlight for a mirror? What may be required for these manipulations? At first glance, it seems that this is a difficult and impossible task - the mission is impossible for a person who has nothing to do with construction and repair work. However, it is not as scary and difficult as it might seem at first glance.
A mirror with light is primarily needed by women; it helps to shade foundation and carry out cosmetic procedures at the highest level. A plus is that lighting the mirror noticeably changes the mood of the entire bathroom, making it more cozy and boudoir-like at the same time.
Brief overview of the article
Incandescent lamps
Regular light bulbs. Light can be provided using several ordinary light bulbs of the required light and incandescent type. They are connected in one chain and turned on through a socket and switch.
In this case, it is necessary to provide a convenient placement of the outlet. It should not be noticeable; this is a stage of planning the entire room and the electricity in it.
If the tiles are already laid, it will most likely be quite difficult to make an additional outlet without damaging part of the tiles.
Drilling holes for cartridges
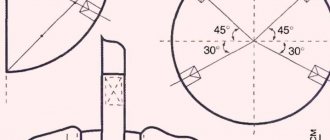
Now you need to mark the places for installing the light bulbs. Usually there are 8 or more.
Measure the length of the board without taking into account the bottom strip, since in most cases it acts as a fastener and there will be no light bulbs.
Then divide the entire distance into equal parts. There should be two light bulbs in the upper corners.
After measuring the width, find the center and mark.
Draw all other holes from these marks, as from the starting points. Next, using a feather drill with a diameter of 38-40 mm, you need to drill the marked areas.
Select this top diameter if you have an E27 chuck. For E14 chucks, a D-26 mm drill is suitable.
Professional carpenters do not use a pen for this, but a Forstner drill.
Secret n. 8 When using a drill, do not go through one tree at a time.
Otherwise, the back side of the board will collapse and the wooden structure will break.
To prevent this from happening, when the tip of the handle begins to be visible on the other side, flip the frame over and start drilling from there. This will make the hole more accurate.
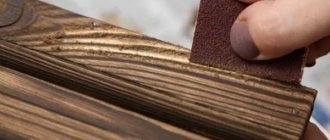
Carefully sand the resulting holes and all boards with sandpaper. You can also round off the ends with sandpaper.
The look will be more aesthetic.
Next, remove all dirt, dust and wipe down the resulting frame for a perfect clean, preparing it for painting.
Diode strips
Option for a bathroom with a finished renovation. LED lighting for the mirror does not require complex manipulations.
Required Items
What to buy? What materials may be required? We check the sheet of necessary materials, the presence of the necessary materials will help you figure out how to properly make a backlit mirror with your own hands and not spoil the whole idea:
- Components for connecting electricity;
- LED strip - a simple way to use - a structure attached to strong double-sided tape. Speaking of LEDs, when purchasing it is worth checking about the moisture-resistant coating;
- Silicone based sealant.
Note!
- Do-it-yourself wardrobe: a review of ways and methods on how to build a stylish and original wardrobe (video and 145 photos)
Do-it-yourself furniture restoration - removing chips and scratches, restoring surfaces. Instructions with photos and video tips
- DIY ottoman: how to make it at home. The best ideas, master classes. Photo + video review of beautiful ottomans
Seeing "in the right light"
This expression carries not only a figurative meaning about an adequate understanding of the situation, but also a direct one. About a real, undistorted reflection.
You don’t want the mirror to flatter or outright lie, do you? This means you will have to bother and look for light bulbs with certain characteristics.
Meet: the primary parameter that you need to pay attention to is the color rendering index. He:
- denoted as Ra or CRI;
- shows how accurately and without distortion the light bulb conveys the real shade of the illuminated object;
- measured on a scale from 0 to 100 (where 100 is the ideal value achievable in bright natural daylight).
So: You need at least Ra 85, and preferably from 90. Then the image is guaranteed not to distort either the colors of the clothes or the shades of make-up products.
Tools
As tools, it is worth preparing a soldering iron and a basic set of tools with a stationery knife, pliers and other tools available in every home kit.
Important: when choosing LEDs, keep in mind that the more powerful the diode, the more electricity it will consume. To understand the power of a meter of LED strip, we multiply approximately 5-6 watts by the total length of the strip.
Which mirror should I use?
There are many mirrors, and their shapes too. Traditionally, the easiest to work with will be a square or rectangular mirror. In this case, the diode strip will need to be attached in straight lines.
If we talk about a round or oval mirror, then it will take a little more time and perseverance to attach the LED strip along a more complex trajectory.
Step-by-step manufacturing instructions
To create a makeup mirror, you will need a reflective surface, wooden beams and minimal woodworking skills. Following the proposed algorithm, it can be made in a few hours.
Step 1. Selecting cutting tools
A properly selected mechanism guarantees high quality of the product. Using a hand saw or chain saw, for example, will not produce a straight cut line. Sharp factory sharpening requires experience. If you apply too much force, you can damage the beam. A hand-held circular saw has a shallow cutting depth. The plane is disrupted if you cut the part from different sides.
Optimal tools for cutting bars
Step 2. Preparing tools and materials
The following parts and accessories will be needed:
- mirror;
- straight wooden blocks corresponding to the size of the reflective surface;
- the wire;
- double-sided adhesive tape;
- paint, stain or varnish;
- furniture corners/brackets;
- lamps;
- cartridges and fuses;
- wire plug.
The list listed includes cartridges. They are selected depending on the type of lamps used and their quantity.
The socket is a device that helps connect the lamp to the electrical network. Made from heat-resistant plastic or ceramics. The last option is used less frequently. There is also a silicone version used in the manufacture of designer structures.
Lamp socket
Separately, the quality of the lamps should be discussed. If the mirror will be an assistant in applying makeup, their power should not be strong. Since the face is a short distance from the reflective surface, intense lighting may cause blinding.
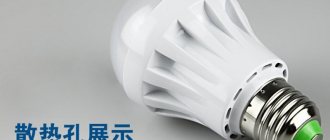
When choosing light bulbs, you need to start from the size of the mirror. The more compact it is, the less power should be. The optimal solution is 3.5 W. It is advisable to purchase the LED version. Performance adjustment is not necessary.
Advantages of LED lamps:
- Long service life of about 2 years.
- Since the bulb is made of plastic, the lamp rarely breaks if dropped on the floor.
- This variety practically does not heat up. You can be sure that your makeup will not run during application.
White light bulbs look good on the dressing room mirror.
LED lamp
Required tools:
- electric drill;
- tool for cutting bars;
- sandpaper or grinder;
- measuring tapes;
- wire cutters;
- miter box or square;
- screwdriver.
Step 3. Making the frame
It is necessary to cut a frame from wooden blocks that matches the size of the mirror. The parts are sawn so that the ends have an angle of 90°.
Cutting bars
Small roughness is removed with sandpaper. First use a coarse abrasive. The final work is carried out with fine-grained sandpaper.
Treated bars
A grinding machine produces less labor-intensive and higher-quality results.
Types of grinding machines
In addition, you need to make recesses for inserting a reflective surface. We fasten the frame using furniture corners or staples.
A fragment of a frame with a mounting hole for a mirror. We fix the frame with brackets
Step 4. Making holes for light bulbs
Making holes for light bulbs. The recesses should be at the same distance from each other. Approximate pitch: 20 cm.
Marking holes for lamps Drilling holes
It is advisable to make holes through. A 40-size drill bit is suitable for these purposes.
The base is prepared
Step 5. Painting the product
At this stage, the frame is given the desired shade. The product can be painted or treated with stain and varnish. The color should match the overall color scheme of the interior.
Paint the frame
Step 6. Arranging lighting
Procedure:
- Place the frame face down on a hard surface.
- Place the sockets with wires into the recesses made and remove the wiring.
- Twist the wiring onto the chuck screw and secure each mechanism to the frame.
- Check the fixation of the installed mechanism and insert the light bulbs.
Along the entire length of the wire, make marks for the locations for the sockets, then expose the wires. Connecting to the socket And assemble all the sockets by serial connection.
Before checking the operation of the lighting fixtures, you should make sure that the wires do not touch each other. If any of the bulbs do not turn on, the wires may need to be swapped.
Ready frame without bulbs Screw in the bulbs and check
Step 7. Fixing the mirror
In addition to making indentations to insert the reflective surface, you can additionally use industrial tape. This will increase the strength of the structure. Polypropylene adhesive tape is suitable for these purposes.
Final frame
This type of tape is treated with a thin layer of adhesive on each side. Silicone impregnation was used as a protective layer. The product has excellent adhesive properties and is resistant to moisture. Provides good adhesion to the surface. The joints are invisible due to the transparency of the material.
Dressing room mirror in the interior
Video - DIY dressing room mirror for a makeup artist
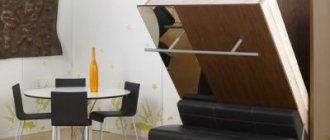
Mirror with internal lighting
Another variation of bringing light to the mirror. In this case, the light will be soft and diffuse. The instructions will coincide with the previous version almost completely.
The whole difference is in the location of the LED strip. In this case, we fasten it from the reverse side. The result is the effect of a floating mirror with soft, enveloping light.
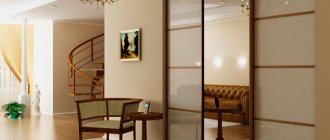
Where else can the technology be applied?
- Bedroom mirror;
- Mirror with lighting for dressing table;
- Luminous mirror wall in the bathroom or dressing room;
- Illumination of individual shelves;
- Light cabinet;
- Creating the effect of a design solution in the corridor.
Choosing to work with your own hands may seem like an unreasonable waste of time. But if you study the market for plumbing fixtures and all related products, you can understand that a high-quality illuminated mirror in a store can be quite expensive, and the size or shape is not entirely suitable for your home and the layout in it.
In this case, creating a mirror with your own hands is an excellent alternative that can help you save money and make the desired item the way it was intended in a specific design project.
Note!
- A simple and beautiful DIY bathroom shelf made of MDF, glass, plasterboard: straight and corner options. Photo instructions, tips, video master class
- How to make a computer desk with your own hands from wood or chipboard. Photo/video master class + description of models
- Do-it-yourself folding table: description of types, calculations and selection of tools and materials. Video master class for beginners
Remember about safety precautions and carry out all manipulations with electricity wisely, everything will work out and the illuminated mirror will delight you for many years!
Features of make-up mirrors
Mostly make-up mirrors are made from the following materials:
- solid natural wood;
- MDF or chipboard;
- aluminum profile;
- plastic.
Installing makeup mirrors is one of the simplest methods of transforming a room.
Initially, they were in demand exclusively in the actor’s everyday life. Makeup was often applied in small closets without bright light sources. Light bulbs installed along the perimeter of the glass sheet were an excellent solution in poor lighting conditions.
A mirror is a good way to decorate a space
Table 1. Important parameters
| Parameter | Description |
| Size | Preferably in full height, but in small rooms the design looks bulky. In such rooms, mirrors up to 1 m in height are preferable. |
| Style concept | Being an accent item, it should fit gently into the interior. It does not look appropriate next to massive furniture, since in such a combination it overloads the space. |
| Accessories | It is welcome to have a table with niches, drawers and other storage systems, as well as a mobile base. The last option is especially relevant for makeup artists. |
This item is actively used by make-up artists and stylists. Bright light removes shadows from the face and makes it possible to correctly apply makeup.
Cosmetics should only be used in proper lighting