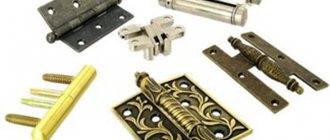
Any furniture is always installed on supports. And the kitchen set is no exception. Considering its dimensions and the amount of dishes it holds, you need to take the choice of legs quite seriously. After all, the foundation of the kitchen must be reliable in order to withstand heavy loads.
The second, no less important criterion for choosing furniture legs for a kitchen plinth is ease of installation and the ability to adjust. That is why height-adjustable structures are considered the most popular today.
Adjustable legs for kitchen set
They allow you to raise the base cabinet to a level that is comfortable for use or ideally match the level of the countertop with the image or with the line of the apron tiles.
Adjustable and non-adjustable legs for kitchen units: rules for selection and installation
It would seem that insignificant details often determine whether the furniture will be comfortable and durable or not. Choosing and installing the right legs for a kitchen unit is not as easy as it seems at first glance. Delving deeper into this question, it turns out that they are very different from each other: high and low, adjustable and not, plastic and metal... So which are better, and are they needed at all?
Advantages and disadvantages
There are no advantages without disadvantages, but kitchen legs have many more advantages than disadvantages.
The positive points include:
There are significantly fewer negative aspects. The main disadvantages can be considered:
Most manufacturers of high-quality furniture make it with legs. Only budget models of headsets of not very high quality are produced on a non-removable base (a box made of MDF or chipboard). Such a support swells very quickly from moisture and loses its appearance. Even the silicone base covers (covers) that are sold to protect the box do not help.
Varieties
The range of supports for kitchen units is very large. You can choose the right size, shape and color to suit any kitchen style. At the same time, kitchen legs can be distinguished according to several parameters.
Form
Modern designers offer an almost endless number of possible options: from the banal to the most non-standard. Conventional cylindrical supports are considered classics, but in addition to them there are:
When choosing the shape of the legs for the set, you need to take into account the supports of the rest of the kitchen furniture. Manufacturers often produce components for tables, chairs, sofas, etc. in one collection. A single style of supports will be very beneficial to unite all the elements of furniture, making the interior whole and complete.
Types of furniture legs are not limited to the above options, but other types are practically not used for kitchen sets. The same wheeled models often cannot withstand the load, so they are used only in isolated cases.
Material
Any of the forms can be embodied in various materials. The most common types:
Often, in order to reduce the cost of the headset, designer metal legs are installed only on the front (visible) part. Hidden supports are replaced with inexpensive plastic analogues. On a volumetric headset, using such a substitution you can save several thousand.
Dimensions. Adjustable and non-adjustable
Depending on the material and manufacturer, the supports are adjustable or non-adjustable. The latter are much more convenient; they allow you to change the height of furniture legs by a distance of 20 to 40 mm (depending on the manufacturer). This is very convenient if the floor covering has differences. With this adjustment, it is easy to level the countertop and cabinets, regardless of the slope of the floor.
Non-adjustable are available in three standard sizes:
If the floor is flat, then in most cases this set of values is sufficient. Plinth strips are produced to suit every standard height. But if there are unevenness and differences in the floor, it is better to give preference to adjustable kitchen supports.
Some models of plastic legs can be cut to the desired height. Theoretically, it is possible to trim supports made of solid wood or aluminum, but the final version in this case does not always look aesthetically pleasing.
Also, the legs can vary greatly in diameter or thickness. This point is also important. The thinner the support, the greater the load will fall on the point of contact between the support and the “floor” of the headset. If the lower base is made of not very strong materials, it may bend at the attachment points under the weight of the kitchen cabinets.
Classic options are: black and metallic shades. Chrome legs come in matte and glossy finishes. In addition, they can imitate various metals with their shades. They come in colors like bronze, gold, silver, etc.
Solid wood supports are usually tinted to match the color of the set, in some cases they are made to contrast in tone with other finishing elements.
The choice of shades for plastic products is limited; usually they are only black, white or brown. This is due to the fact that in most cases they are hidden behind the base, or placed on the side of the rear (hidden) wall.
Tabletop installation
Modern countertops can be made of stone, wood, metal and laminated chipboard or MDF. More rarely, concrete countertops are used, which are manufactured directly at the installation site.
Finished countertops are installed in several stages:
Let's analyze all the stages in more detail.
Preparing the countertop
After manufacturing, the tabletop, as a rule, differs slightly from the specified dimensions. Therefore, before installation, it is necessary to completely adjust it to other kitchen furniture.
This process can be carried out according to the following scheme:
- all kitchen cabinets on which the countertop will be installed are assembled, mounted and, if necessary, secured;
- the surface of the cabinets is leveled. If the furniture is equipped with adjustable legs, then you can place pieces of furniture on the same level using the adjustment method. If there are no adjustable legs, then for leveling it is necessary to place wedges under certain places;
Determining the level of the tabletop position
- We determine the optimal dimensions of the tabletop. Depending on the type of wall covering, the tabletop can be installed close to the wall (smooth apron, wallpaper, textured putty) or with a gap of 5 mm (tiles, uneven decorative finishing);
- mark the cutting lines. The surface of the tabletop in front of the cutting line is covered with masking tape for additional protection;
- The table top is trimmed and holes are prepared for installing kitchen appliances;
Cutting the tabletop to size
- the sections are processed with a file or other tools to remove irregularities.
Removing irregularities and burrs after cutting
Hole preparation
The next stage of installation is preparing the holes for the sink and gas stove. The work is carried out in the following order:
- The location of kitchen appliances is determined. To do this, the tabletop is temporarily installed in place;
- the contours of the sink and stove are indicated on the surface of the countertop;
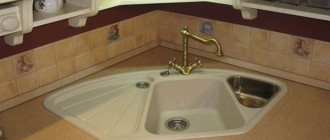
Determining the location of the kitchen sink
- for ease of cutting, it is recommended to remove the tabletop and install it on a stand;
- the surface of the tabletop around the contour is protected with masking tape;
- in several places (at least 4) holes are drilled around the perimeter of the contour, the diameter of which does not exceed 10 mm;
Preparing to cut a hole
- The hole is cut and the sections are processed.
Cutting out a hole for a sink
Holes for the stove and additional kitchen appliances, if any, are cut in the same way.
Installation
Fastening the tabletop can be done in two ways:
- using self-tapping screws (the most common method);
- into grooves on furniture (used individually by prior order).
How to choose?
The main job of kitchen legs is to support the weight of lower cabinets and their contents. Therefore, the main selection criterion should be the reliability and strength of the support. Flimsy models with thin walls can shorten the life of the headset.
When purchasing kitchen legs, they must be checked for defects. There should be no cracks or places with thin soft metal or plastic (the wood is usually solid, so such problems arise less often with it). If the product can be bent by hand, it is unreliable.
Depending on the width of the supported module, a different number of supports are required:
As for the height of the supports, there are no strict regulations, rather wishes.
In kitchens with low ceilings, a set with high legs looks disproportionate. But when choosing the height of the supports, you must first focus on your own height.
It will be inconvenient for a tall person to cook on a low countertop, just as it will be inconvenient for a short person to cook on an excessively high one. Choosing the wrong height can lead to back problems.
If you don’t know exactly what height is needed, it’s better to give preference to adjustable legs. In most cases, a travel reserve of 20–40 mm is enough to adjust the overall height of the cabinet.
Sink mount
The final stage of installation - attaching the sink to the countertop - is carried out in the following way:
- the cut hole around the entire perimeter is treated with silicone sealant. This is required to protect the countertop from moisture;
- a rubber seal (mostly) or a layer of sealant is applied to the edges of the sink;
Sealing the joint using special tape
- Using special clamps, the sink is attached to the countertop;
Fastening the sink with special clamps
- the mixer is installed and connected;
- sewerage is connected.
The installation diagram for the countertop with special grooves, as well as the installation diagram for the sink and hob, are presented in the video.
If you are assembling a kitchen with your own hands, then at each stage you need to remember that all joints: between parts of the countertop, between the sink and the countertop, between the wall and the countertop, are sealed to protect the countertop from moisture.
Source: furni-info.ru
How to screw it to furniture?
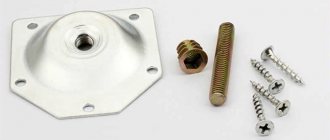
Various manufacturers literally compete in a variety of shapes and designs. But when choosing a non-standard solution, you should remember that the method of fastening will depend on the shape of the legs. Conventionally, all installation options can be divided into three types:
Most ready-made sets that only require self-assembly (from Ikea, etc.) have counters - small diameter holes in the places where the legs are supposed to be installed.
Screw-in legs are installed directly into the countersinks. Other models of supports are fixed so that this hole coincides with the center of the leg.
If the furniture was made to order, and there are no mounting holes for supports in the bottom cover, then you need to choose at what distance to attach the legs of the kitchen set based on three simple rules:
Next, on the bottom cover, markings are made for the legs in the form of crosses (the intersection of the lines should coincide with the center of the support). If there will be a lot of supports, it makes sense to make a template through which it will be convenient to put marks and make holes. In this case, you need to ensure that all supporting elements are at the same distance from the edge.
If the legs are fixed using self-tapping screws, then the length of the fastener should be 3 mm shorter than the thickness of the bottom cover. So, in order to properly screw the legs to a base 18 mm thick, you need 15 mm self-tapping screws.
Source
How to install and secure a tabletop
Fastening the countertop has many different nuances, without knowledge of which it is not recommended to proceed with independent installation. It is also not recommended to install it yourself if the tabletop is made of expensive materials, such as tempered glass, or the cost of installation is included in the price of the furniture. If the decision to install it yourself has been made, then read on.
Do-it-yourself countertop installation
Types of legs
When buying or making a custom kitchen set, you should pay close attention to its base. Usually they are served by legs, which can be adjustable and decorative, or a base. In some cases, the lower modules can be mounted to the wall. This design technique creates the effect of furniture floating above the floor. A similar design is found in modern, minimalist, and high-tech interiors. The base of the kitchen unit must meet the following requirements:
The headset base can have the following options:
If you choose between the first and second options, then it is better to choose a base in the form of panels attached to the legs. This is much more reliable and durable, since a solid base can swell and delaminate over time from constant exposure to moisture.
The legs protect the furniture from moisture and dirt, which means the set will not lose its attractiveness for a long time. In addition, with the help of adjustable supports you can hide uneven floors. The only downside is the need for regular cleaning, since dust will constantly accumulate under the modules.
An additional interior decoration technique can be lighting installed under the bottom of the lower modules mounted on the wall.
Types of plastic plinth for the kitchen and installation features
Kitchen plinth is a strip that helps protect the kitchen floor from dirt in hard-to-reach places. It is attached to the legs of the headset, covering the space under the furniture, where it is almost impossible to reach either with a mop or a vacuum cleaner, which leads to the accumulation of food debris, food debris, dust and dirt.
The gap between the floor and the lower edge of the headset is usually 150 or 100 mm, which is equal to the width of the strip with a seal that prevents dust from penetrating under the headset. Although the most used size is 100 mm.
To attach the plinth, a special clip is used on the furniture legs, which makes it easy to remove the bar if necessary.
Materials and design
The design of adjustable cabinet legs is a screw with a knob that protects the flooring from scratches when moving furniture. At the other end of the support there are special fasteners designed for the base of the cabinet. To adjust the height, you need to twist the screw present in the structure. Adjustment can occur within four centimeters.
Manufacturers offer supports from the following materials:
There are also wood models, but they are rare in modern kitchens and are used mainly as decoration. The price of wooden decorative legs is quite high, but they are not durable, since if they are not used carefully, they can quickly lose their appearance, dry out and become deformed.
Installation
Component manufacturers offer adjustable supports with a height of 10, 12 and 15 centimeters. The adjustment is usually 3-4 centimeters. When installing the legs, you should use some recommendations:
For a kitchen set, there are also certain parameters for installing cabinets that will make kitchen work more comfortable. For example, it is more convenient to use a sink when it is located at a height of one meter from the floor. This will significantly reduce the load on the spine while washing dishes. For a hob, a height of 800 mm is preferable, and for a work surface – 900 mm.
The choice of kitchen legs for a set is very important, because the comfortable use of furniture and interior design as a whole depend on their quality, material and appearance. Kitchen supports do not require special care; it is enough to regularly wipe them with a damp cloth or napkin to remove dust and other contaminants.
Height of countertops in height of floor-standing kitchen cabinets
The height, or rather thickness, of countertops can also be different and there is no need to say that there are uniform standards. The usual height of the economy version of countertops is 26 mm. You can get to a height of 16 mm, which is really bad. More expensive options for ready-made 38 mm countertops. Everything needs to be clarified!
Example
Let's look at an example of what makes up the height of a kitchen cabinet without legs. So, we see:
height of lower kitchen cabinets example
The total height of the cabinet from the floor to the top of the tabletop is 850 mm. At the same time, the height of the tabletop is 20 mm, the height of the plinth is 100 mm. Such a drawing is enough to correctly plan the installation of the kitchen and finishing in height.
Kitchen Basics
Now, taking into account the main requirements, let's consider the options for the basis for a kitchen set.
› Floor-standing kitchen cabinet attached to the wall. This option will give the kitchen set airiness and originality, but for all its splendor, this option has many disadvantages. The wall on which the furniture will be mounted must be perfectly flat and strong in order to withstand the load of the cabinets when breaking. The area of the kitchen also plays a big role. With small dimensions, this option will look simply ridiculous.
› Base . When making furniture, this type of base is used in two versions. The plinth can be attached to the legs hidden behind it and serve as an insert, which will close the air gap between the floor and the furniture, and maybe the base that holds the entire structure on itself.
| Important: Having chosen the base as an independent full-fledged base, you need to take into account that over time, from constant exposure to moisture (which will come from washing the floors), such a base will begin to swell and flake. In addition to the spoiled aesthetic appearance, the base will no longer fulfill its main requirements - strength endurance. |
› Legs for kitchen set. While the base has limitations in matching the desired design (since it is one with the set and must match its texture and color scheme), the legs can be selected in any size, color, shape and material. Such a base will not only withstand any load well, but will also protect the furniture from the penetration of moisture from the floor, which will lead to its destruction. Adjustable legs have become popular for kitchen furniture, which has a great advantage over other types of bases: good stability and load-bearing capacity;
The disadvantages of using legs include dust, which will fall into the open space at the bottom of the cabinets and will have to be cleaned frequently.
What to choose is, of course, up to each owner. The base will not allow dust and other dirt to collect under the headset, but constant mechanical stress will lead to early aging and loss of the original appearance of the headset. The legs visually make the set sleeker and lighter, protecting it from moisture, but the housewife will have to regularly clean and wipe underneath it.
Design and materials of adjustable legs
Supports with an adjustable mechanism are made in the form of a standard screw on which a knob is mounted (its function is to protect the floor covering while moving furniture). On the back of the support, which looks like a nut, there are lugs, thanks to which the leg is attached to the base of the floor cabinet. To adjust the height, there is a screw in the design, screwing it in will raise or lower the cabinet. The maximum height to which furniture can be raised or lowered is 4cm.
| Tip: For more convenient adjustment, you will need two people. The cabinet is initially freed from the things present in it. Then, while one raises the desired angle, the second sets the desired height of the leg. |
Adjustable legs are often sold in chrome or plastic.
You can also find kitchen adjustable legs made of wood, but their use is more often used for decoration and occurs in isolated cases. The designer draws in advance the shape of the leg and the carved elements on it. The cost of the design is quite high, but the product itself can easily dry out and deform. They are produced in combination with other materials.
The video shows the design and materials of the adjustable legs:
Installation work
You can handle the installation work yourself using a drill. Without it, it is impossible to attach the railing to the wall. To work, you will need drills with attachments, a screwdriver, self-tapping dowels, and a level. If you plan to drill a concrete wall, the drills must have pobedite bits. For holes in tiles laid on the wall, you need a diamond tip on the drill.
Having chosen the height at which the railing is hung in the kitchen, holes are drilled in the marked places for the support brackets. The bushings are secured in them with special self-tapping screws and the railing supports are installed. These parts are secured firmly with a hex key. The railing is inserted into the supports. The ends on both sides should be at the same distance from the support. The structure is fixed with special clamps, the ends are closed with decorative plugs.
Why do you need adjustable legs in the kitchen?
The reason for purchasing adjustable legs for a set is most often uneven floors in the kitchen. A big advantage of the design is the ability to install the headset level and so that it does not wobble.
In second place, the reason for the purchase is the height of the lower cabinets that does not meet the requirements. In standard kitchen sets, the height of the floor cabinet is about 90 cm. The calculation includes the thickness of the kitchen countertop, the height of the body and legs. This size is designed for the average height of a woman (165 - 175 cm), in order to make her cooking activities as convenient as possible. These dimensions also correspond to household appliances, which are often built into kitchen cabinets.
Growth may exceed standard calculations. Being behind a low surface for a long time, as a result, the user will begin to experience constant back pain due to the load on the spine. Also, due to the discrepancy in size, your hands will also suffer from fatigue. Adjusting the legs helps avoid these problems by raising the cabinets higher.
| Tip: For people who are short, the lower limit of the cabinets should correspond to the height of the built-in appliances (dishwashers and washing machines). |
And, of course, modern design style also plays an important role in the use of adjustable legs. Many consumers really like it when the working surface of a kitchen set is divided into parts of different heights.
In the video, why do you need adjustable legs in the kitchen:
Upper modules
The individual parts of the headset must be hung so that they are easily accessible to family members. A holistic look of the design is ensured by approximately the same height dimensions of the upper and lower tiers of cabinets, i.e. from 85 to 90 cm. The width of the upper modules, as a rule, is half as much as the lower ones.
In many ways, the location of hanging cabinets depends on the height of the ceiling of the apartments. The standard height of furniture sets for the kitchen is two meters 10 centimeters.
Note!
DIY kitchen: step-by-step instructions, selection of furniture + rules for installing the kitchen
- Kitchen with gas stove: design features, photos of the finished renovation
How to make a kitchen with your own hands - examples of beautiful and modern renovations
The ideal option is to place the upper tier when its height exceeds a person’s height by no more than a quarter of a meter. With higher placement of furniture, you have to use stools to reach the handles of the top row.
In such a case, in a hanging row it is best to store those dishes, objects and appliances that are least often required for work in the kitchen.
Important!
- The border of the handles of the upper cabinets should be located at the level of a freely outstretched arm - this is the most comfortable option.
- Installation of the top row of the headset must be carried out in such a way that access to the ventilation systems is not blocked!
- The standard distance of the kitchen countertop from the lower to the upper cabinets is from 55 to 60 cm, but not less than forty-five! This will make it possible to use it as a work area, and not as a decorative element of the interior.
Installation of the leg and its adjustment
Companies that produce furniture produce adjustable legs of 10 cm, 12 cm and 15 cm. The most common adjustment is 3 cm. Rules that will help you install the legs correctly:
Comfortable height for different surfaces, depending on the type of process performed on them.
Video: how to screw the legs
The video shows the installation of the leg and its adjustment:
If you want to create a spectacular kitchen by installing it on non-chrome legs, there is an opportunity to save a little. To do this, plastic structures are installed in distant corners, and chrome ones are installed in the foreground.
Adjustable legs for kitchen cabinets do not require special care or operating rules. It will be enough to regularly wipe them from dust and possible dirt using a damp cloth. the dimensions of the kitchen furniture and the dimensions of the kitchen corner.
Source
Installing a plastic base
To install the plug under the kitchen furniture correctly, there is no need to study video or photo instructions, although they will help you understand how to correctly assemble all the components for installation.
First, you should choose the most suitable base: it is desirable that it has a seal that will make the gap between the floor and the furniture more airtight. As a rule, silicone sealant is optimal, as it is the most wear-resistant.
The components for installation of any profile include:
- end caps (usually PVC, even for wood planks);
- corner connections;
- snap clips with clamps.
The photo shows elements of a plastic base
So, the installation process is quite simple, regardless of what height the bar is needed - 150 or 100 mm:
We have prepared the fragments, assemble the structure using adapters, insert the clips and that’s it.
- the clips that snap onto the legs of the headset should be inserted into the grooves on the “wrong” side of the plug;
- if it is necessary to rotate the bar, a corner connection is assembled;
- the base simply snaps onto the furniture legs using clips;
- All that remains is to install end caps if they are needed.
In just a few minutes, the kitchen will take on a complete look, and you can easily keep the floor clean.
Source: idealkuhnya.ru
Legs for the kitchen - all the secrets of the correct choice and reliable installation
If you are installing a kitchen yourself or replacing the legs in an old set, then it is very important to choose reliable supports and secure them correctly. In the article I will talk about an inexpensive and reliable option that is used by all the pros and which has proven itself in use. Read the review to the end, and you can easily select the legs and install them.
The legs for the kitchen furniture are hidden behind the plinth to make the appearance of the kitchen more attractive.
Conclusion
Now you know what types of kitchen furniture legs there are, and you can install them yourself. The video in this article will help you understand the topic even better and clearly show some important aspects of the workflow. If you have any questions, ask them in the comments under the review.
Did you like the article? Subscribe to our Yandex.Zen channel
July 23, 2022
Accessories,Kitchen
If you want to express gratitude, add a clarification or objection, or ask the author something, add a comment or say thank you!
Features of the selection and installation of supports
In order for the furniture to stand securely, you need to choose good supports for it. We will look at what options there are so that you can choose a high-quality and durable product for your kitchen.
Types of products and their differences
Currently, the following legs for kitchen cabinets are most often found on sale:
| Illustration | Description |
| Standard round supports . The most common option, which is simple and reliable. Made of plastic, their main advantages are their low price, resistance to humidity and the ability to adjust the height over a fairly wide range, which allows them to adapt to any kitchen. | |
| Metal supports . This option is highly reliable and in many ways resembles the first type of product. Rubber spacers are placed on the supports so as not to damage the floor, and the structure is adjusted using a threaded rod. Corrosion protection - chrome or other coating. Over time, it will inevitably become damaged, so I do not recommend installing this option in the kitchen. | |
| Legs made of plastic and metal . This option combines the strength of metal and the resistance of plastic to moisture. The lower part is made of plastic, the upper part is made of steel, adjustment is made through the threaded joint of the elements. | |
| Non-adjustable metal elements . This option is used only where the floor is perfectly level, and only for furniture in which the supports will be visible. There are a lot of options - from straight, as in the photo, to curved, rectangular and even forged. It all depends on which style suits your kitchen best. | |
| Legs for a kitchen table. They are also worth mentioning, since they relate to the kitchen, although they have nothing to do with the cabinets. They can come in different shapes and sizes, with or without wheels. In the upper part there are always elements for fastening to the tabletop. |
The best option today is cheap plastic supports. In addition to their low price and ease of replacement, they are resistant to moisture, which is very important in the kitchen. And the unattractive appearance can be easily hidden with the help of a plinth panel, which is attached to special clips included in the package.
Special clips allow you to quickly and securely install and remove the plinth
Installation of legs
Let's figure out how to properly screw the supports with your own hands. The instructions for performing the work are simple:
| Illustration | Description |
Everything you need is collected. To work you need the following:
| |
| 1-2 self-tapping screws are screwed in . You need to hold the plinth and support with one hand, and screw in the fasteners with the other. It is important to secure the leg well, after which you can remove the bar and secure the structure to the end. The remaining legs are placed on the front side in the same way. Using this method, you will definitely not make mistakes in your measurements and will position the supports as needed. | |
| The rear legs are attached . They do not need to be placed strictly along the line. You can move the supports 3-4 cm from the edge so as not to get on the floor plinth if there is one. The main thing is to securely fix each element using self-tapping screws. | |
The legs are being adjusted. The sequence of work is as follows: Installation of the plinth stripPlastic supports for kitchen units do not look very attractive, so they need to be covered with a special plinth. The work is done like this: | |
| The base strip is being prepared. It is best to order it ready-made so that all ends are sealed with edges. The height of the element should be 5 mm less than the distance from the bottom edge of the furniture to the floor.
| |
| Latches are being prepared . If you haven't collected all the nodes in advance, do it now. If you collected them right away and hung them on their legs, remove them. | |
| The plinth strip is pressed against the legs and leveled . We place the element on the floor close to the supports, after which we precisely align the edge of the plank with the edge of the furniture. It is best to control alignment using a building square. | |
| Marking in progress: |
Types of base depending on material
Such parts are made from various materials. The most used are plastic strips (PVC), MDF, chipboard and aluminum profile. Depending on the material, the planks have different properties.
MDF plinth
Perfectly suitable for furniture with facades made of the same material, especially since choosing a strip of the desired color for them is not difficult. MDF is quite resistant to frequent washing, but you should still avoid excessive and constant wetting of the surface. Available in any height: 150 and 100 mm.
The MDF base has a huge range of options
Chipboard is an economical option
This material has a number of disadvantages that lead to its rapid wear and loss of external attractive qualities. Chipboard easily absorbs water and odors, quickly darkening with frequent cleaning. As a result, the geometry of the surface is disrupted, and the strip requires replacement, since even the seal does not help, although its initial height is standardly 150 or 100 mm.
Aluminum profile
One of the best options for installing a protective strip between the floor and the bottom of furniture. This is a durable, lightweight option with a height of 150 or 100 mm.
The photo shows an aluminum base
The aluminum base is environmentally friendly, absolutely resistant to moisture and excess water, even in puddles that may form during the cleaning process. This profile is very easily attached to the legs of the headset, for which standard components are used.
Plastic base
Another option, which in its properties is superior to wood solutions for use on the kitchen floor. PVC is affordable and easy to install: installing such a bar is not difficult without special knowledge and skills. As a rule, its standard height is 150 or 100 mm.
This is the most convenient base for completing sets with curved facades, since the material bends easily without the risk of breaking. The color range allows you to choose a plastic strip to match any shade of furniture. It is the plastic profile that can be transparent, which will make the kitchen set more airy.
The mirrored PVC base also looks interesting, making the room visually more spacious, although it is important to keep it absolutely clean.
In the photo there is a mirror base
An aluminum profile can also be like this, but it is more expensive, because it is superior to plastic in terms of wear resistance and strength. But it’s easier to select a variety of components for a PVC plug.