Recently, cabinet furniture has become a popular type of home furnishings. This is due to the versatility of the design. There is no need to look for additional furniture components in the form of cabinets, cabinets and chests of drawers, because everything is already in one assembly. There is no need to spend days shopping, looking for furniture sets that match each other in style and size. This is the best way to combine harmonious design and excellent functionality in your living space.
There is no need to look for additional furniture components in the form of cabinets, cabinets and chests of drawers, because everything is already in one assembly.
The advantages of such furniture do not end there. It can combine both a service buffet and a bar, a bookshelf, a cabinet for television equipment, a mirrored dressing table and much more. Some versions of such furniture can be freely combined with each other. They are reminiscent of a construction set, because you can arrange the accessories the way you want. There are also monoblock types, which in pairs bring a strict and conservative contribution to the interior of the room.
This is the best way to combine harmonious design and excellent functionality in your living space.
And its beauty is that, regardless of its apparent bulkiness, it can complement the room with its lightness, or, conversely, ground the interior with clumsy severity. It all depends on the whims of the owner of the furniture product.
There are also monoblock types, which in pairs bring a strict and conservative contribution to the interior of the room.
The main compositional task is to combine the interior of the room into one semantic picture, to bring together scattered containers for household utensils. The main thing in choosing and designing a room is a harmonious design and dimensions suitable for the size of the room.
It all depends on the whims of the owner of the furniture product.
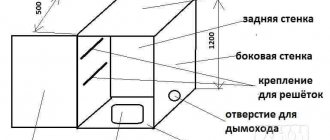
Variety of wall types
A wall of furniture in a living room can consist of countless variations of individual components. But basically it always has the same structure.
Making a slide with your own hands will not be a problem, because it is a combination of compact and harmonious elements.
The lower base most often consists of cabinets. They are made of durable and stable materials, as they support the weight of the entire structure. They serve as a stand for TVs, decoders, stereo systems, flower arrangements and other decorative items. Drawers in cabinets are most often made in folding or pull-out versions. They are perfect for bedding and underwear. It is important to understand that the lower tier is a place accessible to children and pets. Do not place bars with alcoholic beverages, first aid kits, flammable substances or other dangerous items in cabinets.
Some versions of such furniture can be freely combined with each other.
The middle part usually houses racks, display cases, cabinets, shelves for dishes, books, and jewelry. This tier is the best place to place alcoholic drinks. Some designs include the presence of a mini refrigerator, stylized as an ordinary cabinet made of standard material. In general, walls can hide behind a simple device many interesting and varied mechanisms that simplify life and storage of things.
Replace all old wiring and insulate everything thoroughly.
The upper area is usually occupied by mezzanines and cornices, which serve as conductors of lighting. Lighting lamps and diode strips are hung there. Multi-colored ribbons are often used, which gives the wall a new look, but this color introduction does not suit classic and antique designs. Speakers or suspended video equipment are sometimes built into the upper tier.
The main compositional task is to combine the interior of the room into one semantic picture, to bring together scattered containers for household utensils.
The living room and hall are the central place in the apartment and the best place to install a wall of furniture. Modern materials allow the imagination of designers to run wild. They create ever more whimsical and elegant designs, using a combination of the latest technologies and materials. But this option is not suitable for everyone. What if the room in which you plan to install the product has non-standard dimensions? Or are none of the options on the market suitable for you? In such a situation, you have to act independently and design the structure individually. The wide variety of models often raises many questions about installation. It is not always clear how to make and install a product, and in what sequence to perform the actions? But installing such accessories is not difficult to implement.
The main thing in choosing and designing a room is a harmonious design and dimensions suitable for the size of the room.
There is no need to overpay and call a specialist. You need to understand that behind the abundance of shapes and designs lies the same principle of construction and installation. Any person who has the slightest understanding of carpentry can make this type of furniture, adapting it to any room. There is no need to look for special, rare and expensive tools. Everything you need can be purchased at every hardware or construction store. All you need to do is strictly follow the installation instructions, and the result of independent work will be indistinguishable from professional work.
Materials for making a wall with your own hands
A wall of furniture in a living room can consist of countless variations of individual components.
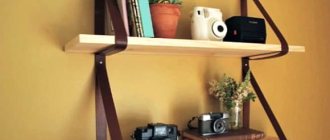
Hanger in the hallway
One of the simplest products that you can make yourself, even for a novice craftsman, is a clothes hanger.
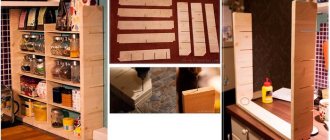
Step 1. A design drawing is prepared. This stage is extremely important for calculating the necessary materials and correct manufacturing of the structure.
Hanger drawing
Step 2. Prepare the components: boards (4 main and 2 crossbars), hooks for clothes and bags (four large and 2 small), self-tapping screws for attaching the structure and hooks. The boards can be solid or glued together from lamellas.
Boards and hooks for clothes
Step 3. You will need tools: saw, jigsaw, blowtorch, grinder (you can get by with sandpaper), screwdriver. In addition, you need to prepare PVA glue, varnish and a brush for applying it (or spray).
The edges need to be rounded with a jigsaw
Step 4. The planks are cut to size. For greater aesthetics, it is recommended to round the edges with a jigsaw.
Step 5. The wood is burned black using a blowtorch. This technology can significantly increase the durability of wood and resistance to adverse influences (climate, fire, insects). In addition to improving the functional characteristics of wood, firing helps make it more expressive, as the structure of the wood is more clearly revealed.
Burning wood with a blowtorch
Important! Firing can begin when the fire turns purple (firing with a yellow flame will produce soot). When exposed, the fire should be directed perpendicular to the bar. When working with an open flame, it is necessary to pay attention to fire safety.
Gasoline blowtorch
You don’t have to burn the sides of the planks, in which case the design will be more attractive.
Step 6. The burned boards are treated with sandpaper or sanded.
Sanding burnt boards
Step 7. All structural elements are ready for assembly.
All elements are ready for assembly
Step 8. The boards are fixed with self-tapping screws. The joints are treated with glue for greater strength.
The boards are assembled into a single structure
Step 9. Varnish is applied. To do this, use a sprayer or a regular brush. It is recommended to apply several layers with the obligatory drying of each previous one.
Applying varnish
Step 10. The finished hanger is attached to the wall. Hooks for clothes are fixed.
Finished hanger on the wall
Step 11. Small hooks are attached to the bottom of the two slats, on which you can hang keys or bags.
Small hooks at the bottom for keys and bags
The presented hanger option is one of the simplest. You can complement the design with a shelf for hats.
The result of the efforts spent is obvious. The result is a comfortable piece of furniture that perfectly matches the style and color of the hallway design.
Simple hanger in the hallway
Wood
Throughout history, the most popular material in manufacturing has been wood and its analogues in the form of fiberboard, chipboard and plywood of various thicknesses. This is a very versatile method that allows you to make slide walls of any complexity. Wood goes well with other materials, such as glossy and frosted glass, chrome surfaces, metal, gold-plated and silver-plated frames. This material looks great in both modern designs and classic and vintage styles. Wood and fiberboard can be given almost any texture and color. You can do this even without professional machines - with your own hands. The tree also looks great if it is sheathed with plasterboard inserts. In this option, the rear panels are not installed, or they are fixed in the form of a decorative element. You can make a slide wall with your own hands in an unusual style. You can harmoniously dispose of the abundance of cabinet shelves by building a whole labyrinth out of them. The design looks very cozy. Wood is the most pliable option for making a wall with your own hands.
The lower base most often consists of cabinets.
Materials for production
There are several options:
Edged board
Not the best material due to the fact that it may not cope with dynamic loads from playing sports. It should only be used if you have a limited budget.
The thickness of a standard wooden bowstring should be 40 mm. It is better to make it a composite of two boards glued together with PVA glue. When purchasing, lumber is inspected from all sides for the absence of cracks, falling knots, rot and other defects.
Rough lumber
Glued laminated timber
One of the most reliable. This wood is durable and can easily cope with all loads. The disadvantage is the high cost. It’s easier to buy a ready-made store ladder and mount it on the wall.
The wood fibers in laminated timber are directed in different directions, which strengthens it
Plywood boards
Expensive, but as an alternative, you can use technology that will help make strong bowstrings from inexpensive plywood, which under normal conditions is not able to support loads.
You will need a sheet of material 6 mm thick and long, comparable to the design bowstrings. Strips are cut, which must be impregnated with a water-polymer emulsion (WPE). This composition will increase the strength of plywood. It is safe for health and inexpensive. The entire staircase requires no more than 4 liters.
Glued plywood boards
Metal pipes
Their stairs will be the most durable, but working with this material is the most difficult. Preference should be given to metal when creating powerful structures for serious sports.
The grip on metal surfaces is more reliable. The material will not weaken, the crossbars will not begin to scroll.
Other materials
For wooden structures for crossbars, you need to buy ready-made round slats or order turning of wooden beams.
The wood should be dense: beech, larch, oak. Each rail is checked for damage.
Round wooden slats
Additionally you will need:
- PVA glue;
- strong ropes;
- metal anchors;
- steel corners;
- bolts;
- impregnation;
- gymnastic equipment, for example, rings.
Drywall
Suitable for façade views. The most economical and pliable material. Drywall slides do not stand out from the overall mass of the wall, being its continuation. Suitable for minimalist design. Combines with large glass planes. The wall can take on almost any design, so electronic devices of different sizes can be built into it. In this type of construction, the most important thing is the correct design of the frame. The entire array rests on it, so the frame must be strong and reliable in structure. It is necessary to draw accurate drawings of the location of the slats and frame profiles. The disadvantages of this option are the fragility of the material. The installation must be approached very carefully.
It is important to understand that the lower tier is a place accessible to children and pets.
Using lining
Partitions made from lining not only look attractive, but are also inexpensive. Of course, you need to try to fit such designs into the house according to the style of the room. To avoid thinking about how to cover a partition in a wooden house, use clapboard.
The installation of such a partition can also be carried out on the second floor of a wooden house, since the new wall will not have too much weight. It will be based on the same frame, which can be sound and heat insulated. The outside can be finished with clapboard, which is installed on vertical or horizontal posts. They should be positioned perpendicular to the sheathing.
"Masonry"
The most expensive but durable method. These options are used in homes. Both sandstone and granite are used. Most often, they create a frame base, and then cover it with plasterboard.
The material can be used either from your own production or purchased.
A do-it-yourself slide wall is best made from wood. The variety of this material will allow your imagination to truly unfold, and the many ways to process it guarantee you a quick and high-quality result.
The middle part usually houses racks, display cases, cabinets, shelves for dishes, books, and jewelry.
The wall manufacturing process includes:
- Creating a sketch.
- Calculation and purchase of materials and components.
- Preparation of electrical wiring behind the façade of the future wall.
- Assembly of the entire structure.
We wish you fruitful work!
By following the list step by step, you can bring to life a product of any style, reproducing all the planned details.
In general, walls can hide behind a simple device many interesting and varied mechanisms that simplify life and storage of things.
Mandatory requirements
Wooden interior partitions, first of all, should be as durable as possible, and secondly, they should preserve as much free space in the house as possible. It also happens that partitions are erected for the purpose of changing the purpose of the premises. Thus, it is prohibited to place a bathroom in the place where the neighbors have a kitchen below.
Zoning in general should be approached with caution and attention. For example, if your kitchen has only one natural light source in the form of a window, blocking it with a new wall located parallel to the window is prohibited. The base must be as strong as possible, since it is this that will support the entire weight of the partition in the house.
Designing a sketch from scratch
Has the same meaning as a drawing of a building in architecture. Calculation and arrangement of the exact dimensions of the structure will affect the amount of purchased wood, the compatibility of different parts of the wall, its durability and resistance to mechanical deformation. The drawing should be drawn up taking into account the maximum use of the material, because every centimeter of unused wood is money thrown away. Also, a correctly drawn up drawing in advance, which takes into account all the little details and nuances, will save you from the need to redo or finish it during installation. It is necessary to carefully measure the dimensions and calculate the area of the required material. If you doubt your paper design abilities, it is better to entrust this task to knowledgeable people, because the drawing is the basis of the entire product.
The upper area is usually occupied by mezzanines and cornices, which serve as conductors of lighting.
Important! When measuring, it is necessary to take into account not only length, width and height. A very important parameter is thickness. If you forget about it, you will get a lot of problems with “inconsistency” of drawings.
Speakers or suspended video equipment are sometimes built into the upper tier.
Construction features and safety issues
Partitions made of wood are not load-bearing, which is their advantage, because minimal requirements are imposed on structures. They can be made from any material, including the one you have enough money for. An additional advantage is that the structure does not have to be taken into account when calculating the load on the foundation. It is lightweight and can perform many different functions, for example, soundproofing a space.
If you want to install a partition in a wooden house that has just been built, it is better to start such work a year after the building was erected. This is due to the fact that it will shrink, so the partition may warp and change its original linear parameters.
A wooden partition in a room can perform almost one single function - zoning, but this does not mean that there are no requirements here at all. Firstly, the structure must be not only stable, but also durable. Secondly, it should also be made safe from a fire protection point of view. Thirdly, if rooms are separated and operated at different temperatures and humidity levels, the partition must have thermal insulation qualities.
DIY wall - what materials and tools will you need?
The main tool set looks like this.
- Tools for measuring - rulers, tape measures, plumb lines, levels, squares and much more.
- Tools for installation - drill and drill bits for it, screwdriver, electric jigsaw, hammer drill, polyurethane foam.
- For cleaning - grinders, emery boards, spatulas, primer, epoxy glue.
- Screws, bolts, nuts, seals of all kinds and sizes.
The living room and hall are the central place in the apartment and the best place to install a wall of furniture.
The material can be used either from your own production or purchased. The first one is more difficult - you need to understand the types of wood species and how to process them. If you are planning to make substantial furniture, it is best to use hardwood. These are larch, birch, beech, oak, maple, elm and many others. Such breeds are an expensive pleasure, but if properly processed, they are an ideal option for centuries. You can make a solid product in a classic or country style from oak and larch. Expensive breeds have a beneficial effect on human health, so if you are interested in a DIY baby wall, this is the best option. Also, when arranging a children's slide, it is not recommended to use a large amount of paints and varnishes of non-natural origin - your child will subsequently have to breathe toxic fumes.
The wide variety of models often raises many questions about installation.
The second option is to order the required sizes and shapes in advance from handicraft workshops, and then just install them. This option is not as labor intensive on your part. However, in the end you may not get what you expected. After all, good carpenters can be counted on one hand. Therefore, contact already proven furniture workshops. This option involves ordering a variety of wall elements. They can be made from fiberboard or from natural solid timber. You can use ordinary wooden beams, or replace them with special metal profiles. Also required are trims, hinges and closers (optional).
All you need to do is strictly follow the installation instructions, and the result of independent work will be indistinguishable from professional work.
How to make a frameless partition
A frameless timber partition is laid with your own hands, starting from the bottom. Waterproofing should be placed between this layer and subsequent ones. The bars are separated from each other by jute fiber, which will provide sound and heat insulation.
When installing a partition in a wooden house, you need to take care of strong adhesion of the elements to each other. For this, metal or wooden dowels are used. The distance between them should be about 150 cm with a deviation from the edges of 150 mm. Installation of partitions may involve the use of square timber with a side of 100 mm. The surface of the wood is sanded after completion of installation work. And then you can think about how to sheathe a partition in a wooden house. This could be decorative plaster or, for example, liquid wallpaper.
Installation
First of all, in accordance with the product drawings, the frame is installed. It is the main support and load-bearing structure of the wall. Guides made of timber are attached to the walls, to which the shelves are attached. Then the entire wall is covered with decorative panels. They can be made of any material of your choice. It is best to make cabinets from glued wide boards. If fiberboard is used, it is better to cut out the parts and elements with a jigsaw.
Then they begin to fine-tune the product. It is carefully polished, smoothing out all the irregularities and making the transitions smooth and uninterrupted. If desired, you can make decorative cutting of patterns on wood. This option is perfect for a classic or ethnic style. For classics, discreet, strict fittings in strict colors are best suited. For a Provence style interior, it is best to use light colors, even snow-white. Paint and varnish play a big role on wood, so before applying the helmet it is necessary to properly sand and prime the furniture. You can make excellent carved doors for cabinets that hide the joints and seams of the structure. All decorative items are best secured using epoxy glue. For noble decor, it is better to use red or black wood, depending on the possible price tag.
You can harmoniously dispose of the abundance of cabinet shelves by building a whole labyrinth out of them
The wall in the hallway, first of all, should be spacious. All elements must withstand the weight of both clothing - jackets, fur coats and coats, and shoes. Most often, such furniture in the hallway is made elongated parallel to one of the walls. This solution allows you to place as many things as possible. The main difference between the wall in the hallway and its counterpart in the living room and hall is the greater practicality of the former. All elements must be clearly organized and not take up much space. The design and mechanism for opening cabinet doors must be calculated so that they do not interfere or block the passage. Doors that move along the door on special roller guides are best suited. Often a wide mirror is installed on the entire leaf of such a door. This greatly increases the usability of the hallway. It is best to install furniture at the full height of the ceiling, because you can place a lot of unnecessary things on the upper shelves. Such a product will play the role of a kind of warehouse in the apartment.
A correctly drawn up drawing in advance, which takes into account all the little details and nuances, will save you from the need to redo or finish it during installation.
In turn, the slide is distinguished by its ease of production, functionality and possible volume that can be placed in it. Making a slide with your own hands will not be a problem, because it is a combination of compact and harmonious elements. An ideal option for small apartments, when every centimeter of free space counts.
When measuring, it is necessary to take into account not only length, width and height.
Here are the basic rules and tips for installing a wall in your home. We wish you fruitful work!
Construction of stairs
Based on the characteristics of the main structures, it is clear that from the above it is easier to make wall-mounted and portable complexes yourself.
Wood is usually used as a material. If you know how to work with welding, you can also use profiled pipes.
Primary requirements
To ensure safety, the wall bars must meet a number of requirements:
- the minimum length of the ladder rungs is 55 cm. If there is free space, it should be increased to 80;
- the maximum distance between the rungs should be 40 cm. For children's stairs, the recommended value is 15-20 cm;
- the first step from the floor should be at a greater distance than the space between the rungs;
- The diameter of the ladder rung for adults should be 40 mm. This is important, since it is inconvenient to hold on to a thin part. For children, the diameter is 24-30 mm;
- the number of crossbars is not regulated. The length of the structure is divided proportionally, according to the planned step. But climbing stairs for a child should be a full-fledged physical exercise, so 10-15 steps should be mandatory.
Drawings of a metal wall bars with dimensions
All parts of the wall bars are load-bearing. Even when performing slow and calm exercises, they are exposed to dynamic and static loads. The greater the mass of the athlete, the higher his activity, the larger they are.
Therefore, each part of the structure must withstand loads without being damaged, which is prescribed in GOST R 56435-2015.
Shop ladders are tested at the factory before they go on sale. It’s more difficult with homemade ones, but it’s also worth performing a test load.
Within 5 minutes, each ladder rung must withstand the following vertical loads without deformation or destruction:
- For a standard ladder suitable for use by adults – 180 kg.
- For children's sports ladders – 150 kg.
- For children's home stairs - 120 kg.
The strength of the attachment to the wall is also checked. To do this, apply a horizontal load to the points shown in the following diagram
The crossbars are checked for rotation. A rotational load of 50 N/m is applied to each for 5 minutes.
Compliance with general safety requirements is important:
- All surfaces must be smooth, as roughness can cause injury.
- The structure should not contain protruding parts with sharp edges or ends.
- All welds are made smooth. Remove scale and drops of metal.
- The corners of any part in the structure must be rounded with a minimum radius of 3 mm.
All corners and edges are rounded - All bolted connections protruding 8 mm or more above the surface must have end protection in the form of plastic caps
Protective plastic cap
Sticking, pinching and crushing of body parts (head, neck, fingers) as a result of deflection or deformation of structural elements under load in holes, areas of equipment and gaps provided by the design are not allowed.
When designing a ladder drawing, it is important to consider all orientation and height options when assessing the possibility of entrapment. Such work imposes responsibility on the designer.
In the absence of the necessary knowledge, it is better to use ready-made drawings and diagrams that have been tested.
If the design contains adjustment devices, it is necessary to exclude the possibility of their arbitrary adjustment. Compliance with these requirements is carried out by visual inspection.
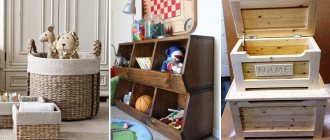
Stool made from waste boards
Often you have to deal with a situation where there are unnecessary boards lying around at the dacha that no one needs. Instead of throwing away your junk or burning it, you can do something different.
Old boards can be put to good use
Four parts are cut out from lying around old boards: a seat, sides and a lintel.
Side of the future chair
The resulting workpieces need to be processed - sandpaper will come to the rescue. It is also recommended to round the edges to improve aesthetics.
All parts are processed with sandpaper
Now you can assemble a chair from smooth parts without irregularities and burrs.
Assembled chair from old boards
The structure remains to be treated with protective impregnation. If desired, it can be coated with a decorative composition. With very little effort and spending a minimum of time, you can make a simple but reliable chair, sitting on which you can fry kebabs and weed the beds.
In addition to the proposed options for making furniture yourself, which are quite simple, you can also try more complex designs: chests of drawers, wardrobes and even a kitchen.
Do-it-yourself wardrobe - photo
Quite often in our homes there are interior items that have lost their appearance, but it’s a pity to throw them away. Armed with patience, imagination and the necessary materials, furniture can be restored.
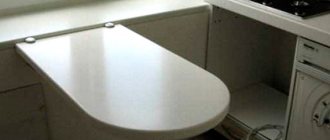
Making room for the TV
Our mentality is that the TV is usually the main part of the living room. In most cases, this is a solid panel that is placed on the wall or in the center of the room, on a stand. Near her, family members, guests, friends, acquaintances sit in comfortable chairs or on the sofa, and watching TV shows or a movie is accompanied by an active exchange of opinions.
This type of interior can be considered optimal for several reasons:
- original design solution;
- creating a visual illusion of more voluminous space;
- long and narrow furniture goes well with a flat plasma TV panel and tall sound speakers;
- a well-chosen stylish bedside table favorably complements the overall look of the living room;
- departments and drawers filled with necessary things are an example of functionality.
Either way, purchasing this piece of furniture will greatly improve the appearance and functionality of your living room.
Average prices in the Russian Federation for the construction of wooden load-bearing walls
The cost of constructing wooden load-bearing walls from different materials will vary. Prices are per 1 cubic meter:
- Glued laminated timber - from 4650 rubles.
- Unplaned timber – 3800 rubles.
- Rounded log – 5200 rubles.
- Profiled timber - 4650 rubles.
The final cost will also be influenced by the complexity of the work and the region where the construction site is located.