To create a car bed with your own hands, you will need a drawing with dimensions, as well as a little imagination and a desire to surprise your baby. In addition, for many parents it becomes a big problem to put the child to sleep, and therefore the best solution would be to make a car bed that has an unusual appearance and will definitely encourage the child to lie down as soon as possible. In addition, you don’t have to spend a lot of money on purchasing such furniture - using a drawing and instructions, you can make such a design yourself.
DIY car bed: drawing with dimensions
What types of car beds are there?
Before you start making a bed, you need to choose a suitable model. In the assortment of furniture stores you can find several varieties of unusual children's and teenage beds that resemble vehicles. It’s curious, but there are options not only for boys, but also for girls.
Table 1. Types of models
| View, illustration | Description |
| Basically, “machine” type beds are chosen specifically for boys. These can be racing or police cars, various jeeps (they will require more free space), as well as characters from the popular cartoon “Cars”. |
| Usually, beds for girls are made in the form of convertibles with various patterns in the form of flowers and bright designs. You can choose the option of an unusual carriage-shaped bed - they are often painted in pastel, delicate colors that fit perfectly into the interior of a young lady’s bedroom. |
| This bed model is best suited if two children live in the same room. You can make a structure in the form of a double-decker bus or a large truck. The main advantage of this model is that it allows you to save free space, because not every room allows you to install two separate beds for children. |
Table 2. Types of beds that differ in design features
| View | Description |
| Caracas on legs, which is reinforced by horizontal crossbars | In its manufacture, bars with a diameter of 5-7 centimeters are used, and their joints are reinforced with corners. On such a frame it will be possible to place all structural elements, including the frame, headboard, etc. The main advantage is that a bed of this type can be made at home, because its assembly diagram is very simple. In addition, instead of legs, some craftsmen use wheels, and then the structure can be moved around the room. |
| Frame and frame as a whole structure | In this model, the main load will be placed on the sides, back and legs. To further strengthen the product, you can install various cabinets and drawers. In general, this type of car bed duplicates classic furniture, and there is nothing complicated in assembling it either. |
Decoration
In order for the boy to be satisfied with the assembled “car”, it is beautifully decorated. Decorative elements are made from the same material as the main product. They can be decorated with multi-colored self-adhesive film. Some parts can be painted with rich, durable acrylic paints using a spray gun or a spray can. And sometimes a simple brush comes to the aid of a master. Volumetric car beds are most often painted in rich red or blue and decorated with white stripes.
The wheels can be cut out of chipboards and painted black, and inexpensive plastic caps can be used to decorate the center.
The wheels do not need to be painted or decorated separately, but can be painted on the side parts. You can also paint the car bed in assembled form.
The car bed is decorated with emblems, inscriptions, moldings or stickers. The sides are decorated with decorative overlays, which are screwed with self-tapping screws 80 mm long. The lower edge of the lining is located at a distance of 41 mm from the floor level.
In place of the headlights, holes are cut out for low-voltage LED spotlights. In this case, the “car” will have luminous headlights. The final appearance of the design depends on the imagination of the craftsman.
What materials are used to make the bed?
Since we are talking about a children's bed, with which the child is in direct contact for a long time, you should pay special attention to the choice of materials for its manufacture. It is important that they are as durable as possible and safe for the baby’s health. In order to make sure that a particular material is safe, you will need to ask store sellers for the appropriate product certificates.
Table 3. Types of popular materials for making a bed
| View, illustration | Description |
| This is the safest and most durable material, which is best suited for making children's furniture. At the same time, it is important to choose a high-quality array that has been treated against fungus, otherwise the product will quickly become unusable. One of the disadvantages is that natural wood is less easy to process and it will not be easy to cut out shaped parts from it. Of course, you can buy softer types of wood, but they are no longer very durable. |
| This is a more suitable material, which is often used for the manufacture of any shaped structures. The only downside is that some cheap copies are toxic, because they are made from synthetic resin and sawdust. Therefore, when choosing a material, you need to make sure that it is environmentally safe - pay attention to the relevant certificates that the seller must provide you with. |
| A more expensive option compared to chipboard, but absolutely safe. It is easy to process, which is why in recent years MDF has gained particular popularity among furniture makers. In terms of its qualities, it is not inferior even to natural solid wood, and in some areas even surpasses it. Thus, MDF has good resistance to humidity and high temperatures. |
In addition, parents should take into account that a large load will be placed on the children's bed, because kids often like to arrange various games in their sleeping place. Therefore, the thickness of all elements of the crib must be sufficient to support the weight of not only a lying, but also a jumping child.
Video - What to look for when choosing lumber
Authors' Comments
For a clearer understanding, please read the authors' comments.
Since two people with different education, from different fields of activity and different experience were involved in the development and manufacture of a children's bed, deviations from the project began at the very beginning of the assembly.
1. The metallized edging included in the project was not available for sale; it had to be replaced with laminated chipboard (beech) close to the texture; The same fate befell the reinforced eccentrics (more precisely, they were on sale, but in wholesale quantities) - they had to be replaced with regular ones (this change is reflected in the design documentation).
2. It was proposed to fasten the beam for fastening the lath holders not from the inside with 14 screws each, but from the outside with only 5; At the same time, cover the countersunk holes (in which the screw heads are buried) with epoxylin.
The proposal is justified - the total twisting length in the second case is slightly less than the total length of the first option, but in this case the beam is attracted to the sidewall with great force and there is no need to glue the beam and the sidewall and, therefore, to prepare the surface of the sidewall for gluing.
3. Points not reflected in the documentation:
- install dowels with glue,
- fix the lath holders with a furniture bracket of 11-12 mm (quite enough - a longer bracket and, accordingly, a larger diameter can split the lath holder),
- The design documentation states, however, I repeat - the batten should not stand up in the batten holders by surprise, it should be able to move within 5 mm.
4. For a person familiar with the oracle sticker, this operation will not cause difficulties.
- the surface must be smooth and clean,
- the sticker must be guided through the water - this makes it easier to smooth the film and expel air bubbles,
- the film with the applied pattern is very unstable to mechanical influences (I do not rule out that printing on other, more resistant media is also possible), so a transparent oracal was glued on top of it (the so-called “cold lamination”); Notes specifically on this point - the sticker should also be placed on water; It is advisable to use boiled water without impurities (we had some streaks under the oracle, the nature of which we could not determine),
- As a squeegee, use a fairly hard (and clean, free of foreign inclusions) felt; using a rubber squeegee can cause streaks and scratches in the drawing.
5. The profile was glued with Titan glue along the untreated (in the sense of unedged) end; I’m almost sure that this glue is far from the best material, but... “I made it from what I had...” (there was nothing else at hand and accessible...). The very presence of this profile is explained by the need to protect the edges of the films (patterned and transparent) from scuffing, which could ultimately lead to their (the films) peeling. During the work on this item, the following considerations arose:
- It would probably be more correct to first glue the 0.4 mm PVC edge, then apply the design, and only then sculpt the profile - this way the adhesion of homogeneous materials would certainly be higher.
- It would probably be more technologically advanced to apply the design using ultraviolet printing (however, the resistance of such a design to mechanical influences is unknown, and the cost of the issue is unknown...).
- the feasibility of using a T-shaped mortise profile is, in my opinion, questionable; I'm not sure if this is a better solution.
That's how all the comments are.
PS: The designer does not want to give away full-color and full-size drawings suitable for printing (tiff, 300dpi) for “just like that.” So either use jpg, or draw it yourself, or something else (for example, buy it).
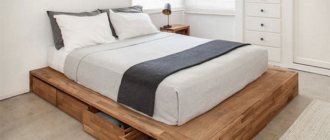
Optimal bed size
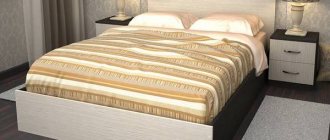
It is important to make the most comfortable bed for a child, which means it must be spacious. So, the optimal width of the product should be about 100 centimeters, and the length should be at least 160 centimeters. It is worth considering that some mothers sometimes like to lie down next to their child to read to him at night or just to be together. Therefore, it is better to make the length of the structure about 200 centimeters, so that it is comfortable not only for the baby, but also for the adult.
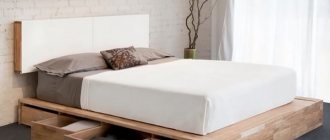
It is important to correctly calculate the size of the sleeping place, in accordance with the age of the baby
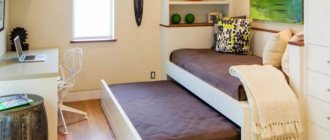
If you are going to make a bed in two tiers, then you should take into account the height of the ceilings of the room, because the distance from the bed on the top floor to the ceiling should not be too small. For a child who will get the second floor, it is important not only to lie comfortably, but also to sit without touching the ceiling. At the same time, it is important to make the highest possible sides on the second tier so that the baby does not fall out of there.
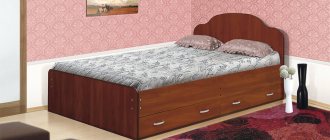
The child will definitely be able to appreciate the spacious bed-car
What's wrong?
RESULTS й или знакомÑÑ Ð¸Ð» UR оваÑи-маÑÐ¸Ð½Ñ Ñвоими ÑÑками, ÑеÑÑежи лÑÑÑе Ñо SOS °Ð½Ð¸ÑÑ. ROOM RESULTS Ð¾Ð¼Ð¾Ð±Ð¸Ð»Ñ Ð¸ изголовÑе. ROOM, ROOM ROOM, ROOM ¶Ð½Ð¾ обойÑиÑÑ Ð¸ одной ÑаÑÑÑÑÑ, но маѸна Ñогда "Return" ASSESSMENT. RESULTS димое, но еÑли много ÑнÑÑзиазма, Ñо поп RESULTS ºÐ»Ð°. OPTIONAL CONDITIONS колеÑами и SMALL. RESULTS ÑÑÑ Ð½Ð¸Ð¶Ðµ оÑÑаÐ"ÑнÑÑ, ÑÑÑÐ¾Ð±Ñ Ð² Ð½ÐµÑ Ð±ÑÐ" о Ñдобно забиÑаÑÑÑÑ. RESULTS ASSOCIATED.
Schemes and design drawings
Before starting to manufacture the structure, it is necessary to draw up a detailed drawing or take a ready-made version. So, the design of the product may have additional drawers and other elements - it depends on the overall design of the room and your desire.
Having chosen one or another model, you should take the drawing as a basis, and then use it to prepare patterns on thick cardboard. They will be needed to prepare wood parts.
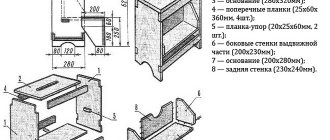
Cutting diagram
In our case, we will use the following cutting scheme. You must first prepare cardboard patterns according to these dimensions (this is not a mandatory step), or contact a professional workshop. If you choose the second option, you are more likely to get perfectly smooth parts.
If it is not possible to contact the craftsmen, then it is recommended to cut the material with an electric jigsaw. Using a handsaw can damage the edges of MDF, resulting in unsightly chips that will be difficult to disguise with anything. In addition, there will be a lot of dust in the apartment from such a process.
It is better to entrust the cutting of parts to professionals
RESPONSIBILITY
RESEARCH °Ð»ÑÑиков, ÑодиÑели ÑÑÐ °ÑаÑÑÑÑ Ñак пÑеобѰзиÑÑ ÐºÐ¾Ð¼Ð½Ð°ÑÑ, ÑÑÐ¾Ð±Ñ ÑебÑÐ½ÐºÑ Ð± Ñло инÑеÑеÑно Ñам пÑоводиÑÑ Ð²ÑµÐ¼Ñ. RESULTS ARE RESPONSIBLE. RESULTS the вовÑÐµÐ¼Ñ Ñна. RESULTS °Ð»Ñное меÑÑо, Ñо лÑÑÑе вÑего пÑедÑÑмоÑÑеÑÑ Ð´Ð¾ ASSURANCE °Ð½ÑÑво длÑÑебенка лÑбого возÑаÑÑа. 0.95 м до 1.2 м, в Ð´Ð»Ð¸Ð½Ñ Ð¶Ðµ деÑÑкР°Ñ кÑоваÑÑ-маÑина должна бÑÑÑ Ð½Ðµ менÑÑе Ð¿Ð¾Ð»Ñ ÑоÑа меÑÑов, а Ð¼Ð¾Ð¶ÐµÑ Ð´Ð¾ÑÑигаÑÑ Ð´Ð°Ð ¶Ðµ 2.4 меÑÑа. RESULTS RESULTS. RESEARCH ROOM ÑÑа, и пÑи ÑÑом не иÑпÑÑÑваÑÑ Ð´Ð¸ÑкомÑоÑÑа.
RESULTS ROOM µÐ½Ð¸Ñ . RESPONSIBILITY ½Ð¸Ð¼Ð°ÑÑÐ¾Ñ 1.5до 1.9мввÑÑоÑÑ. RESULTS ½ÐºÑ на веÑÑнем ÑÑаже не пÑиÑлоÑÑ Ð½Ð°Ð³Ð¸Ð± RESULTS.
Making a car bed with your own hands
As with the manufacture of any furniture, you will first need to prepare all the materials and tools. So, in the process we will use the following:
- jigsaw;
- circular saw;
- screwdriver;
- drill with a set of drills of different diameters;
- sander;
- milling equipment;
- file;
- clamps;
- brush;
- MDF and plywood sheets;
- adhesive tape;
- furniture fastenings;
- glue;
- paint.
Most assembly tools can be found by any owner.
Step-by-step instruction
Making the sides
Step one: on an MDF panel (1.9 centimeters) you need to schematically display the car exactly according to the drawing. So, you should draw all the details, including bumpers, glass, hood, trunk. If you already have ready-made cardboard patterns, then it will be enough to just attach them and outline them.
It is necessary to prepare an MDF sheet
Step two: it’s better to start drawing from the rear bumper. So, you need to move carefully so that all the lines are neat. If you need to display rounded details, you can use all kinds of objects for such purposes. For example, these could be cans of paint of various sizes.
Drawing the lines of the structure
Step three: now we need to draw the hood. Since it has a curved shape, you will need to use a round object to draw it. The best solution would be to draw a flexible wooden stick.
You need to fix the stick with a clamp and then draw the hood
Step four: using a jigsaw, we will need to cut these blanks exactly along the contour (the blade should be slightly higher than the markings). Next we will need to sand the edges. If you have minor deviations from the intended lines, do not worry. The main thing is that all the details turn out to be as smooth and identical as possible.
We cut out the parts exactly along the lines - this should be done carefully so as not to spoil the design
Step five: all fresh cuts will need to be sanded. Curly protrusions are processed using a grinder with an emery attachment.
Finish the edges with a sander
Go along the edges of the internal holes with a file and then with fine-grained sandpaper
Making symmetrical parts
We have only prepared parts for one side of the car bed. Now you should make symmetrical parts for the other side. Let's take a closer look at this process.
Step one: finished, we could cut out exactly the same parts for the other side using a jigsaw. To do this, it is enough to leave a few millimeters on each side (taking into account subsequent sanding). However, professional craftsmen consider such actions inappropriate. You can make perfectly symmetrical parts using hand-held milling equipment using an edge finishing attachment. To begin with, we will prepare the sidewall parts in this way, and only then we will move on to others.
The use of milling equipment will allow you to quickly obtain the required number of workpieces
Step two: you need to place the previously prepared side frame of our bed with the second (draft) side frame on a flat table. Now they should be connected on the other side using clamps.
Now you need to install the facing attachment into the milling machine and thus cut out the perfect edges of the rough part. The advantage is that this is all done very quickly.
Making the body
Step one: you need to attach the prepared template to the remaining MDF sheet. It should be moved so that it hangs 50 millimeters above the sheet. Now it should be outlined along the contour with a simple pencil, thanks to which we will get the body part.
We trace exactly along the outline of the template
Step two: we need to map the openings for the car windows. In order to make them, you need to use any round object with a diameter of 50 millimeters. This could be a jar lid or similar items.
Making round corners
Step Three: Next we have to carefully cut out the window openings. To do this, you will need to drill a hole in the MDF sheet and place a jigsaw blade into it.
Cutting out holes for windows
Now, as in the previous case, we will use a file to make these holes perfectly smooth. Then you need to align the two panels (window and side panel), secure them with clamps and trim the edges with a router. Next, for the other side of the bed we need to prepare another window panel. This also needs to be done using a milling machine.
Making wings and wheels
Step one: we have to transfer the outline of the car wing onto the MDF sheet. In this case, you will also need to cut out the part with a jigsaw and then sand the edges. This template will then be used to make the remaining wings. Now it is necessary to connect the parts of the wings using self-tapping screws so that they cannot move during processing with a milling machine. In the future we will cover these holes with putty.
Tighten the screws
Trimming the edges
Step two: using a compass, draw a circle - this will be the tire of our car. One more circle should be made inside, after which it will need to be cut out with a jigsaw. Next, the internal hole should be carefully sanded. For these purposes, you can use various devices, including a file and sandpaper. The main thing is that the part turns out smooth. Using this blank it will be easy to make the remaining tires.
Cutting out the tire
Step three: we begin to make wheels for the car. We will make 6 holes in them for fastening bolts. It should be borne in mind that these holes must form an even hexagon, so it is important to correctly calculate the location of these points using a compass. This is quite simple to do - we need to draw a circle in the middle of the wheel, its radius will be 6.35 centimeters. Now you need to stick a compass into one of the intersection points and mark the point with the back of the compass. The remaining values should be obtained using the same principle.
We designate the points
Now you can connect these two parts with self-tapping screws through the prepared holes
As in previous cases, we need to achieve smooth edges, so we process them with a milling machine. Then the wheels and tires should be disconnected. All these parts must be numbered. In addition, using a router, you need to make the edges smooth.
Treating the surface
Assembling the sidewalls
Step one: first you need to assemble some parts of the structure, and then unscrew the fastenings just before painting the bed. This way we can connect the painted parts without damaging the coating.
We need to cut a beam with a cross-section of 50×100 millimeters for the parts of the support, partitions, frame, seat and pipe of the machine. Next, all the bars (except for the exhaust pipe part) should be laid out inside the sidewall of the structure and secured with adhesive tape. In this case, there should be space between the support and the partition for attaching a sheet of plywood. Now you need to unfold the sidewall and cut out holes of the required diameter for the screws.
Leave space for plywood
Now the body needs to be installed in place and secured with screws and glue. All screws should be secured from the sidewall.
Next, you need to make holes for fastenings in the pipe blank. After which it will also need to be carefully sanded.
Step two: next you need to unfold the sidewall so that the body part is in front of your eyes. This will allow us to mark the place where the wings are fixed.
Determining the location of the wings
Then you will need to glue the pipe block and the wing blank to the side with adhesive tape, and then secure it with screws. The same actions will need to be duplicated with another part of our machine.
The basis
Step one: you need to prepare a plywood base and support bars.
Preparing the details
Step two: these bars must be connected to the plywood using the same principle, using fasteners and adhesive tape.
A piece of wood should be used to determine the correct location of the holes.
Spoiler (headboard)
Step one: you need to cut out the spoiler blanks according to the parameters specified in the diagram.
Cutting out the details
Step two: Now we will need to make rounded edges, then sand the parts, after which we can assemble the base of the headboard using fasteners and wood glue. Next you need to make plywood partitions. We will fix one of them on the base of the headboard.
As a result, our spoiler should be symmetrical to the sides of the structure
Seat
We have to make elements for the base of the seat from bars, as well as parts for the back from a plywood sheet.
It is necessary to secure these parts together
Making a box and a bumper
Step one: you need to cut out the parts of the box from MDF (according to the diagram), and then sand them. All edges of the drawers are also processed with a special attachment for the router.
All parts of the structure should be assembled and secured with screws
Step two: at the end we will need to make a car bumper. This bumper will then be installed on the box
Handle mounting diagram
Painting and installing the bed
As we said earlier, in order to paint our car, we will have to disassemble the mounts. Choose a paint based on its non-toxicity parameters; the shade of the future crib can be discussed with your child or matched to the interior. After painting, the bed is covered with several layers of varnish. When all the parts are dry, you need to assemble them in accordance with the diagrams.
Assembly diagram No. 1
Assembly diagram No. 2
Authors' Comments
For a clearer understanding, please read the authors' comments.
Since two people with different education, from different fields of activity and different experience were involved in the development and manufacture of a children's bed, deviations from the project began at the very beginning of the assembly.
1. The metallized edging included in the project was not available for sale; it had to be replaced with laminated chipboard (beech) close to the texture; The same fate befell the reinforced eccentrics (more precisely, they were on sale, but in wholesale quantities) - they had to be replaced with regular ones (this change is reflected in the design documentation).
2. It was proposed to fasten the beam for fastening the lath holders not from the inside with 14 screws each, but from the outside with only 5; At the same time, cover the countersunk holes (in which the screw heads are buried) with epoxylin.
The proposal is justified - the total twisting length in the second case is slightly less than the total length of the first option, but in this case the beam is attracted to the sidewall with great force and there is no need to glue the beam and the sidewall and, therefore, to prepare the surface of the sidewall for gluing.
3. Points not reflected in the documentation:
- install dowels with glue,
- fix the lath holders with a furniture bracket of 11-12 mm (quite enough - a longer bracket and, accordingly, a larger diameter can split the lath holder),
- The design documentation states, however, I repeat - the batten should not stand up in the batten holders by surprise, it should be able to move within 5 mm.
4. For a person familiar with the oracle sticker, this operation will not cause difficulties.
- the surface must be smooth and clean,
- the sticker must be guided through the water - this makes it easier to smooth the film and expel air bubbles,
- the film with the applied pattern is very unstable to mechanical influences (I do not rule out that printing on other, more resistant media is also possible), so a transparent oracal was glued on top of it (the so-called “cold lamination”); Notes specifically on this point - the sticker should also be placed on water; It is advisable to use boiled water without impurities (we had some streaks under the oracle, the nature of which we could not determine),
- As a squeegee, use a fairly hard (and clean, free of foreign inclusions) felt; using a rubber squeegee can cause streaks and scratches in the drawing.
5. The profile was glued with Titan glue along the untreated (in the sense of unedged) end; I’m almost sure that this glue is far from the best material, but... “I made it from what I had...” (there was nothing else at hand and accessible...). The very presence of this profile is explained by the need to protect the edges of the films (patterned and transparent) from scuffing, which could ultimately lead to their (the films) peeling. During the work on this item, the following considerations arose:
- It would probably be more correct to first glue the 0.4 mm PVC edge, then apply the design, and only then sculpt the profile - this way the adhesion of homogeneous materials would certainly be higher.
- It would probably be more technologically advanced to apply the design using ultraviolet printing (however, the resistance of such a design to mechanical influences is unknown, and the cost of the issue is unknown...).
- the feasibility of using a T-shaped mortise profile is, in my opinion, questionable; I'm not sure if this is a better solution.
That's how all the comments are.
PS: The designer does not want to give away full-color and full-size drawings suitable for printing (tiff, 300dpi) for “just like that.” So either use jpg, or draw it yourself, or something else (for example, buy it).
Let's sum it up
Making a car bed is not only an opportunity to give an unusual gift to your child, but a great way to enliven and decorate the interior of a room. In addition, any parent can cope with such processes - they just have to stock up on all the necessary equipment and lumber.
The range of children's furniture is now huge, each manufacturer offers many models to suit every taste. But if you have carpentry skills, even basic ones, you can make everything yourself, and such products will cost several times less. For example, you can find out how to make a bunk bed with your own hands on our website.
ROOM
RESULTS RESULTS - RESULTS. RESULTS RESULTS, но и как ноÑники. OPEN ROOM, RESULTS . RESULTS RESULTS . RESULTS ±Ð½Ð¾ÑÑÑ Ð¿Ð¾ÐºÑпаÑÑ ÐµÑÑ Ð¸ комод. RESULTS ROOM ¼, ккоÑоÑÐ¾Ð¼Ñ Ð ±ÑдÑÑ ÐºÑеп¸ÑÑÑÑбокÑеÑÑÐºÐ°Ñ Ð³ÑÑÑа, ÐºÐ°Ð½Ð°Ñ Ð¸Ð»Ð¸ даР¶Ðµ бÑÑÑÑÑÑ.
RESEARCH °Ð»ÑÑиков, ÑледÑÐµÑ Ñакж ROOM ROOM ROOM RESULTS ÐÐ ¸Ð³ Ðена. RESEARCH sir ¾
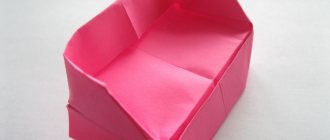
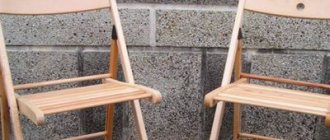
Description of work
You should start working with measurements. If there is a specific room where the chair will be placed, then we can determine the width of the product, its length when assembled and unfolded. The decision is individual, so the length can be tailored to the height of a particular person. In addition, the height of the back and armrests is important.
Knowing the dimensions of the chair-bed, it is easy to calculate the consumption of materials. For clarity, you need to make drawings of the chair-bed with your own hands and indicate all dimensions.
Materials and tools
We determine what materials are needed to make the frame; only durable ones will do:
- 10 mm plywood for the folding part;
- Chipboard (laminated chipboard) for sidewalls with a thickness of 18-20 mm;
- Fiberboard or hardboard on the bottom;
- bars on the frame of the folding part.
Many people prefer laminated chipboard - an inexpensive, low-toxic, easy-to-process material that will last at least 10 years. Comfort when using the chair depends on the quality of the internal filling. It is better to sheathe the frame with foam rubber. Use only solid sheets of foam rubber, then the seat will not sag and will retain its shape and appearance longer.
You will need a set of tools:
- stapler with staples;
- screwdriver;
- hacksaw (jigsaw);
- scissors.
To mark parts, use a large metal or wooden ruler, tape measure, or sharp pencil. To assemble the frame parts you need to have screws and glue.
Case manufacturing
Based on the diagram, we cut out the parts of the chair body and the folding part; we take the dimensions of all parts from the drawing. We cut 4 squares out of plywood. 3 pieces will go to the sleeping part, one will go to the back. The cut can be done with a hacksaw or jigsaw.
- 6 pieces for the longitudinal part of the berth;
- 7 pieces for crossbars;
- 4 pieces for folding legs.
Mark the connection points of the parts and drill holes with a drill. We cut out armrests from chipboard, which we bolt to the main part of the structure. All parts are fixed using furniture screws into pre-prepared holes of smaller diameter. Foam rubber is glued to the sides, back, and parts of the bed.
Sheathing
There are many types of materials for covering upholstered furniture. This is a practical, easy-to-clean flock, and velor is not inferior to it in strength and color fastness. Upholstery made of tapestry and jacquard will look good in the interior. Nowadays chenille is a popular type of jacquard.
We cut the fabric, taking into account the thickness of the foam rubber and the dimensions of the structural parts. We disassemble the chair, cover each element with a piece of fabric, and fix it with a stapler. The body is made; to start using the chair-bed, all that remains is to connect the parts.
Choosing a model
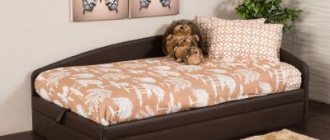
There are different types of beds that are ideal for a particular situation. First you need to decide what kind of car it will be. The entire “vehicle fleet” of beds is conditionally divided according to certain criteria: size, age category and functionality. Replicas of real cars are designed for children aged five years and older, as they have low sides, which do not guarantee that the child will not fall out of the crib at night. Sometimes moving elements are mounted on such “transport”, which makes them even more similar to real cars.
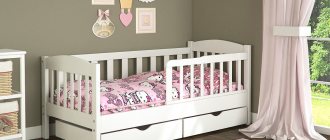
Perhaps sometimes it is better to go with a simplified version. This children's bed-car is more like a toy car or a cartoon character. These options are ideal for children at a very young age. These cribs are the safest because all the corners are smooth and the sides are high enough to prevent the baby from falling while sleeping. Children from one and a half years old can become the proud owners of their first car.
If you have several children, you may need to fit a double-decker bus or even a locomotive into the room. Such children's beds in the form of a car allow you to rationally use the entire space of the room. You can also create a loft bed: made in the shape of a van, it allows you to use the lower tier for sleeping and the upper for entertaining. Or vice versa: the sleeping place is equipped at the top, and the play area is located below.
Carpentry work
To bring the idea of a baby crib to life with your own hands, you need to prepare its details.
First you need to make slats 80 cm high. The rods of the crib will be made from them. Their width and number can be changed at will, but usually the number of rods is a multiple of 30.
Using a router, you need to cut grooves on each rail to install the bottom of the crib. It is better to make grooves at 2 levels in order to lower the bottom of the crib a little with age and thereby increase the height of the sides, protecting the growing baby from falling out of it. All rods should be thoroughly sanded.
Next, you need to cut 4 arcs for the sides from plywood 24-30 mm thick. When connecting, the arcs should form 2 circles with a diameter of 60 cm. The ends of the parts also need to be thoroughly sanded, and holes for the slats should be made using a router at an equal distance from each other.
From plywood of the same thickness, you need to make and sand 4 pieces to create the sides. The length of the segment should be 60 cm. Holes for the slats are also cut on them.
According to the diameter of the inner circle of arcs, you need to cut a circle from plywood 10 mm thick and cut it exactly in the middle. You also need to make a rectangle 60 cm long and a width corresponding to the diameter of the plywood circle cut earlier.
Using a different arrangement of modules, you can assemble both a round crib for a baby and an oval bed for an older baby. The parts are fastened together using PVA glue, skewers and self-tapping screws. Afterwards the crib is primed and painted in any color you like.