Icer
1619 0 0
Icer November 10, 2018Specialization: master in the construction of plasterboard structures, finishing work and laying floor coverings. Installation of door and window units, finishing of facades, installation of electrical, plumbing and heating - I can give detailed advice on all types of work.
Today we will figure out how to assemble an office chair yourself. There is nothing complicated in the process, the design of all options is identical, and if you understand the general principles, you can easily cope with the assembly process of almost any model. You will also learn about the main features of this furniture option and its most common modifications.
An office chair is a convenient design for work, which will not be difficult to assemble
Possible difficulties
It happens that when disassembling office furniture it is inconvenient to unscrew the short rear fastening screw. In this case, it is recommended to replace the screwdriver with a screwdriver.
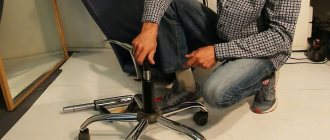
If the gas lift moves away from the piastra with great difficulty, using a bronze or wooden drift will help solve the problem. It should be remembered that strong impacts may cause the plastic cross to burst.
It happens that when replacing or repairing rollers, a metal rod gets stuck in the cross. This often happens if the office furniture has never been disassembled, since over time all the fastenings become compacted. In this case, the use of technical lubricant will help eliminate the problem.
Experts do not recommend repairing a worn pneumatic cartridge. This part can only be replaced. The device contains compressed air pumped into a chamber under high pressure; its accidental release can cause serious injury to a person.
The swing mechanism is also rarely repairable. Usually it is changed immediately, but the main difficulty is that it is very difficult to find this spare part. In this case, the best solution may be to purchase a new office chair.
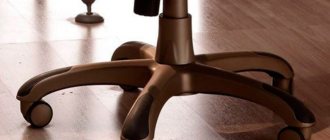
Before disassembling office chairs, experts immediately assess the condition of the crosspiece. Inexperienced users often change a shaky base. However, it can last for several more years. In order to secure the chair support in a stable position, it is necessary to insert a metal pin into its rod and seal the connections.
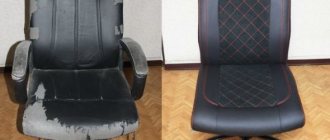
You can also repair minor damage to the upholstery yourself. To do this, you need to use a furniture stapler. Cleaning of contamination should be carried out before dismantling and repairing the product. Also, before disassembling computer chairs, they are usually vacuumed.
In order not to waste time on frequent repairs of rollers, you can install special plugs - gliders - instead. However, with them it will be more difficult to move furniture on the floor than with wheels. The plugs are attached to the sockets according to the same principle as the rollers. The use of gliders allows you to reduce the height of the chair.
In order to avoid frequent breakdowns, it is recommended to choose high-quality furniture from well-known manufacturers with a warranty period of at least one and a half years. If the malfunction is serious, it is better not to risk disassembling the office chair at home, but to seek the help of a qualified specialist.
Inconveniences during disassembly
State of the cross
Office chair gliders
Self-installation
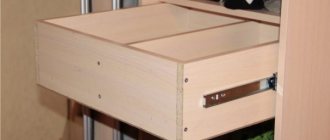
The whole process begins from the lower moving part. Under no circumstances should you start assembly from the seat, because... then there will be complications in the final configuration. Also, we must not forget that assembly is carried out not on the floor, but on a surface (it is advisable to use a box, since its physical parameters are ideal for the future chair).
you need to find a cross. Usually it has from 4 to 6 blades, but sometimes there are 8. It turns over and lays on the box. The surface must be soft, because you will have to apply force to get the roller into place (you need to press until it clicks). If the roller does not go, then there is no need to increase the pressure, and most likely there is a groove in the design so that it can simply be loaded without a click. Thus, you need to install all the rollers - with a full hand, each one takes no more than 5-10 seconds; The shock absorber has the form of a tube and a synthetic enveloping material. The shock absorber is installed with the open tube facing up (towards the seat). During installation, minimal free play is possible (it will eliminate itself during operation), but it is better that it does not exist; the glass is going. Typically, the kit comes with 3 through cylinders, which fit into each other according to size. Alternatively, they can be put on the shock absorber in turn from smallest to largest
The function of the glasses is 90% visual and 10% safety (if something unexpected happens, there will be a chance to carefully get out of the chair without getting any injuries).
At this point, the supporting part is considered completed, and you can proceed to the chair itself. It’s already visually clear where the fulcrum will be and what to expect in the future, so the procedure is as follows:
- the seat is turned over with its “front” side on the box, and in the center of the base there is a platform for the mounting system. This system will ensure a reliable transition from the chair leg to the seat (it is advisable to purchase a metal base, but this is not always possible, so you need to carefully look at the quality of the plastic). All fastenings are made using screws, the number of which is from 4 to 8 (when applying the plate to the seat, the holes will match perfectly);
- the armrests will serve to connect the seat to the backrest. To install them, you just need to move the seat a little to the edge of the working surface and you can screw it on (if the assembly takes place on a box, you don’t even have to move it, because the dimensions of the box are specially made by the manufacturer for ease of assembly). To fix each armrest, 2-3 screws are provided;
- the entire resulting composition is moved to the edge of the box so that only 2/3 remains on the surface. The backrest is applied to the armrests from the inside, and fixed in the manner described above. At the same stage, it is imperative to check the quality of all threaded connections of the chair, because then such an opportunity will no longer arise;
- all visible places of bolted connections are closed with special plugs that match the color of the armrests. No tools are required here, but you will have to apply force (sometimes until it clicks - you need to look at the plugs).
Once the top and bottom parts have been assembled, they can be joined together. To do this, simply install the shock absorber into the tube (do not confuse it with a lever, because in some models this is possible - if you press the button too hard, it will press through, but this will be a reason to purchase a new chair).
Attention! All components are in stock
Our Telegram channel https://telegram.me/chairspb
Preparing for work
Before you start assembling, you need to find out if everything is in the package. Typical kit:
- wheels - their number depends on the modification of the chair;
- cross with overlays;
- lifting mechanism and casing;
- seat, back (separate or monolithic), 2 armrests;
- a set of bolts and other fasteners;
- a specialized wrench if suddenly the fasteners have an internal hex hole.
Take a closer look at the elements. They must be undamaged, without scratches or abrasions. If everything is in order, you can begin the assembly procedure.
Step-by-step instructions for assembling the chair
Assembly will be quick and enjoyable if you follow the sequence we suggested.
Install the rollers into the slots
With a little force, insert the wheels into the holes on the chair legs
First, install the rollers into the crosspiece - to do this, insert them with the rods into the holes on the lower surface of the crosspiece and press firmly until they click. You can use a rubber mallet, but it is not recommended to hit the plastic parts of the parts too hard.
After all the wheels have been inserted, place them on the floor and press the entire body onto the legs of the office chair
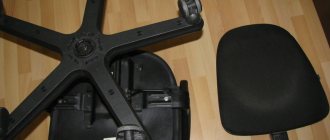
Prepare the seat
Attach the piaster to the bottom of the seat using bolts
Attach the backrest adjustment mechanism to the back of the seat and the piastres to the bottom.
IMPORTANT! When installing, make sure that each screw is equipped with two types of washers - flat (it increases the contact area of the inner surface of the head) and lock - to prevent the nut from unscrewing. Manufacturers offer various options for devices that regulate the position of the backrest and seat to suit the characteristics of the spine of a sitting person.
The most common:
Manufacturers offer various options for devices that regulate the position of the backrest and seat to suit the characteristics of the spine of a sitting person. The most common:
- piastra – can only regulate the vertical displacement of the seat and backrest relative to the floor, used in conjunction with the FDA;
Piastre mechanism for office chair - PVM (spring-screw mechanism) - reliable and unpretentious, adjusts only the angle of inclination and the distance of the backrest relative to the seat, used together with a piaster in inexpensive models;
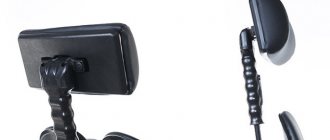
Spring-screw mechanism for swinging the chair - Top gun - provides “swinging” of the monolithic seat with an angle from 95 to 130º, but at the same time the legs can come off the floor and the chair can tip over. When choosing such a product, give preference to a mechanism on bearings with a tilt axis shifted to the edge and a working position lock;
Top gun swing mechanism for office chair
- synchronizing mechanism - under the influence of the gravity of a person’s weight, it automatically changes the angle of the seat simultaneously with a change in the seat position, the most expensive solution for top managers.
Synchronizing mechanism for an expensive office chair
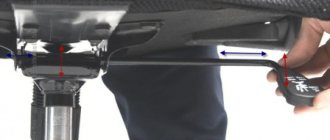
The correct location of the socket and adjusting screw is indicated by the arrow
When installing, please note that the seat for the gas lift rod should be directed forward, and the adjacent adjusting screw with a plastic handle should be directed back. Insert the armrest brackets into the side slots and tighten with screws
Installing armrests on both sides of the chair
Put the backrest on and tighten it with the adjusting screw.
Installing and screwing the backrest of the chair
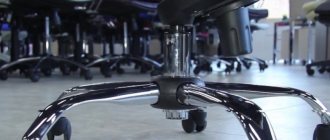
Install the gas lift into the crosspiece
Assembled casing-cover and gas lift - shock absorber for the chair
Remove the protective caps from the ends of the gas lift and insert it with its base into the upper central hole of the cross. Assemble the casing - it is often made of several parts connected according to the principle of a telescopic pipe and put it on the gas lift. Insert it into the center hole of the cross. You have assembled the load-bearing part.
We assemble the supporting part - insert the gas lift into the crossWe install the casing in place and get the finished lower part
Connect both parts of the chair
Carefully place the office chair seat onto the shock absorber
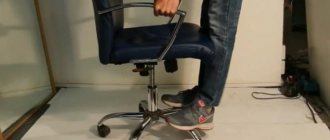
Place the seat on the gas lift rod and press firmly or sit on it - this is necessary for a strong fixation to occur.
Press with your hands to ensure fixation occurs.
Carry out assembly quality control
We sit down on a comfortable chair and check the success of the assembly
While sitting on a chair, press down on the piastres lever. The seat will lower. Pull the lever up. If there is a return to its original position, then the assembly was successful.
So, you assembled a new office chair without the help of your boss, and now you won’t give it to anyone.
Black office chair assembled
Design Features
Before assembling an office chair, you need to familiarize yourself with its main features.
The main feature of such furniture is the mechanisms installed in it. They are used to manually adjust the angle of the backrest and seat. Some types of chairs have a special swing system that allows you to set the product to any position. With its help, it is possible to adjust not only the angle of inclination, but also the rigidity of the rear backrest swing. Also, office chairs have a gas lift, which is responsible for adjusting the height.
Preparatory stage
Before starting work on assembling a chair at home, you need to decide on the basic parameters of the future product. You should start with the appearance. In accordance with the style of the room where the upholstered furniture will be installed, a suitable model is selected.
It is advisable to study the range of finished products in exhibition halls or look at photos in catalogs. In the first case, you can clearly see and touch the planned model, but the search will take some time. In the second case, the time spent will be minimal, but the final appearance may differ significantly from the desired one.
Having studied the range of chairs and decided on the model, you can begin preparatory work. First, you should measure the place where you plan to put the furniture and calculate the dimensions. To avoid mistakes in fitting parts and not to forget anything, competent drawings and diagrams are drawn up.
The generally accepted ergonomic seat height is approximately 45 cm, its width and depth vary from 40 to 45 cm. The height of the backrest from the floor should be about 1 meter. For comfortable sitting, a slope of 3 cm is made from the edge to the back.
To make a drawing of a chair on a sheet of graph paper or graph paper, a completely finished model is initially drawn, after which the following are depicted separately:
- back;
- side detail;
- seat;
- armrests.
When schematically modeling, it is necessary to take into account the thickness of the material from which the chair will be made. Synthetic and natural fabrics have different parameters, which can affect the final collection of parts. After completing the drawing, it is advisable to draw part templates on cardboard and cut them out. This will make it possible to try on life-size dimensions and project the necessary elements on the material.
For components, you can go to the construction market or a specialized store. You can also order materials for delivery, but in this case it will not be possible to visually evaluate their appearance and quality.
Characteristics and dimensions
Now it's time to thoroughly study the dimensions of the chair.
To begin with, let us recall the main characteristics specified by the manufacturer:
| Chair upholstery material | Polyurethane (eco leather) |
| Filler material | Polyurethane foam |
| Armrest material | Cast polyurethane, foam rubber, eco leather |
| Cross material | Metal |
| Wheel material | Plastic, silicone |
| Tilt mechanism | Simple |
| Footrest | Availability |
| Recommended load | 100 kg |
| Gaslift Class | 3 classes |
| Chair weight | 17 kg |
For greater clarity, we present the dimensions for each component separately.
P/S It is worth considering the possible errors of various roulettes. Therefore, the indicators may differ from the manufacturer’s measurements.
Back dimensions
Seat dimensions
Height from floor
Armrest sizes
The total height of the armrests from the seat is 26 centimeters, while the total length of the “shoulder” to the edge of the pillow is 29 centimeters.
Pillow sizes
Common breakdowns
As noted above, an office chair is a rather complex device and any of its structural elements can fail.
Damage to the cross
The problem with this element may be destruction at the junction of the beams. The material from which the cross is made is important here.
As a rule, the base is a hollow structure into which a polypropylene pipe of suitable size and cross-section can be inserted. It, in turn, must be rigidly fixed to the base and the damaged beam.
In order to dismantle the crosspiece of an office chair, you need:
- Remove the rollers. As a rule, they do not have a rigid fixation and are quite simply removed from the mounting sockets. To illustrate the process, it is recommended to watch the video:
- Dismantle the piastra. Fastening to the seat is done “on a cone”. Disconnection from the gas elevator is carried out by tapping on the attachment point. The correct process for disassembling an office chair is shown in the video:
- Remove the retaining clip located in the recess on the top of the hydraulic lift.
- Knock out the gas lift to repair or replace the five-arm.
The process technology and dismantling device are shown in the video:
Destruction of the swing mechanism
If the chair does not hold the “horizon”, then the problem is most likely in the destruction of the swing mechanism.
Fastening to the seat is done with four screws using a shaped screwdriver. The element is dismantled as follows:
- The bolts that secure the rocking mechanism from the seat are unscrewed
- The gas lift is knocked out of the device mount.
This element is made of metal.
It should be noted that most chairs originating from the Middle Kingdom are not suitable for domestic spare parts. This concerns, first of all, the swing mechanisms (size discrepancy).
- Chinese mechanisms: 200 x 200 mm.
- Domestic: 200 x 150 mm.
In order not to re-drill holes when replacing an element, we suggest using adapter plates. How it looks assembled can be seen in the figure below.
Air chuck failure
The pneumatic cartridge of the chair is a two-chamber structure filled with air. When you press the adjustment lever, the valve stops the flow of air between the chambers.
If, when pressing on the valve, the gas lift rod does not extend, it means that the integrity of the piston, seal, etc. is compromised.
The dismantling process is described above. To clarify the process, watch the video about replacing the gas cartridge on office chairs:
A fairly common cause of gas lift failure is the bending of the adjustment lever, which does not allow pressing on the cartridge valve. In this case, the repair can be easily carried out independently: you need to bend the lever to its original state.
Photos of frameless furniture with your own hands
https://youtube.com/watch?v=wZ_YQvpZHPM