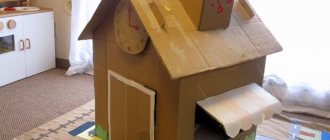
No matter how spacious the home is, and no matter how thoughtfully the owners approach its arrangement, there is often not enough storage space in it. After all, over time, both the composition of the family and the habits of its members change, so the house becomes overgrown with all sorts of necessary things that need to find a suitable place.
Useful things for the home with your own hands
To do this, it is not at all necessary to buy a new cabinet or squeeze an additional module into the kitchen. You can do a lot with your own hands without spending a lot of money and turning things that have become unnecessary or leftover building materials into useful devices. Or creating unique decor for your home from them.
Crafts from jars
Every home accumulates a lot of jars - glass and tin: from canned food, condensed milk, paint, etc. Don’t rush to throw them away, it’s better to see how many useful things you can make for your home from them.
Using tin cans
- Shelves for hats, gloves and scarves in the hallway. Glove rack
- Shelves for towels in the bathroom.
Towel storage - Storage system for neckerchiefs and scarves in the dressing room. Storing neckerchiefs
- Wall organizer for sewing supplies or yarn. Organizer for sewing accessories
You can also attach tins to the kitchen wall above the work table to store cutlery. But this is not very convenient.
It is better to make a kitchen organizer desktop, with vertically standing cells.
Kitchen organizer made from jars
Step 1. Wash and dry the jars thoroughly. Then, if they have sharp, jagged edges, file them down.
Step 2: Paint the tins in your desired color to match your other kitchen decor and leave to dry completely.
Step 3. Cut a rectangular piece from a board or chipboard 5-8 cm above the jars. Its length should be equal to the sum of the diameters of all containers in one row. Paint this piece too and dry it.
Step 4. Punch a hole in the top of each can with a nail, using a block of wood for support.
Step 5. Assemble all the parts by screwing the containers to the wooden base on both sides with screws.
Step 6. For ease of carrying, attach a handle from a piece of leather belt to the end of the base using screws and washers.
Manufacturing process
Such tins are suitable not only for storing small items. They make interesting vases or flower pots in eco-style. To do this, just paste them in a circle with small twigs or fasten ordinary wooden clothespins to the sides.
Vase made from a jar and clothespins Decorating a jar with twigs
Video – DIY crafts from tin cans
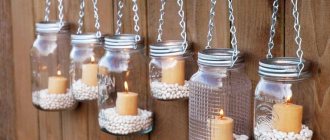
Idea for storing in glass jars
Depending on the size, glass jars can be used to store cereals, spices, stationery, buttons, small fasteners and many other things. But standing on a table or in a drawer, they take up a lot of space and can fall and break.
A great idea is to hang these screw-top jars from the bottom of a shelf or hanging cabinet. What do I need to do? Nothing special: just punch a few holes in the lids and screw them to the shelf from below. And then screw the cans into them counterclockwise.
The idea of storing small items when there is a lack of space
To remove a glass container, just grab its bottom and turn it in the opposite direction.
The second life of baby food jars Organizer for storing cereals Glass jars are also useful in the workshop
Yard and garden
When decorating your home, you shouldn’t forget about what’s outside. Let's start with the entrance area. From concrete blocks and a couple of wooden slats you can make a cute and comfortable table where flowers, a watering can, a lantern or anything else will live.
By the way, you can make various benches from concrete blocks, decorate flower beds, build a barbecue, and even make flower pots. It all depends on your imagination.
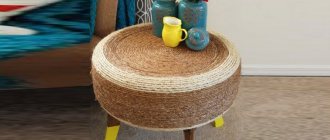
You can also make stylish ottomans and armchairs with your own hands. You need old tires, liquid nails and thick rope. The finished structure can be painted in any color. These ottomans are suitable for both indoors and outdoors, because they don’t mind rain.
Boxes or pallets made of wood can serve as the basis for a garden cabinet. Here you can store various flower accessories, pots, watering cans and other tools. And if you leave a flat work surface on top, you can make something or replant flowers.
What could be unusual in a flower pot? It would seem - nothing. However, here you can surprise everyone. Plant succulents in a birdcage. When they grow, it will be very beautiful. And instead of a regular hanging pot, you can use an old chandelier.
An ordinary children's inflatable pool can be used as a sofa. Just put a blanket or blanket inside and cover the sides with pillows.
It’s so beautiful to use candles in the garden, but they are constantly blown out by the wind. To prevent this from happening, you can make candlesticks from empty tin cans or ordinary glass ones. You can decorate everything with stones or ribbons if desired.
These, of course, are not all ideas for home and garden, only a small part of what you can do with your own hands. You just need to not be afraid to experiment and fill your home with cute and beautiful things.
Crafts for phones
Mobile phones, tablets, laptops and other electronics have long become an integral part of our lives. But progress has not yet reached such heights that it works smoothly without recharging or connecting to the mains. As a result, our houses are tangled with wires, which not only create interference, but also do not look aesthetically pleasing.
This problem can also be solved with the help of simple DIY devices.
Charging point
Several devices can be charged simultaneously in the house. In order not to look for a free outlet or trip over wires, you can make a compact charging point for all devices from an ordinary shoe box.
It needs to make several holes in the front wall to output the “tails” of the charges, and one in the back for an extension cord with several sockets. Decorate the box as you wish.
Charging point
Hanging case
If the sockets in the house are located high, you can get rid of the appearance of hanging wires using a hanging case made from a container for shampoo or household chemicals of a size suitable for the phone.
Step 1. Cut off the neck of the bottle, leaving a pocket for a phone with a high back wall. We cut a hole in it in the shape of the charger.
Marking and cutting along the line
Step 2. Wash the resulting cover to remove chemical residues and wipe it dry or let it dry.
Step 3. Use fine sandpaper to sand the cut edges and erase the text and drawing from the surface.
Sanding
Step 4. Decorate the case in any desired way: paint, cover with fabric, use decoupage techniques, etc.
Decoration
The result of the work is in the next photo.
Photos before and after
Fast, easy and practical.
DIY home crafts for the bedroom
Garlands and photographs will help you decorate your bedroom walls in an unusual way. But you don’t need heavy frames with glass or any special things for this. Photos can be posted on fishing line, string, or directly on the wall using double-sided tape. And single-color garlands will create an atmosphere of comfort and romance.
Shelves of unusual shape will add freshness to the interior.
Great idea for girls to organize their decorations. You will need branches, cords and decorative nails. The latter need to be stuffed onto branches at the required distance and hung on the wall with laces.
The new is the well-forgotten old. It's the same with decor. You don't have to buy a new chest of drawers or cabinets when you have an old one. You can simply paint it. And then your favorite thing will serve you for many more years.
To save space, there is one very simple “trick” - a shelving wall. This will help get rid of most of the closets in the room.
Add some magic to your bedroom with cotton clouds and garlands.
An old ladder can serve not only as a clothes hanger, but also as a library shelf. This solution seems strange, but just try it – it’s really convenient.
The most important element of the bedroom is the bed. A large double bed is a dream. However, such a thing is often expensive. Don't despair, because making your own bed frame is not at all difficult. Using wooden slats of different thicknesses, self-tapping screws, saws and stain, you can make the bed frame exactly the way you want.
Crafts from old leather belts
Belts made of leather or high-quality leatherette can last a long time even after they are no longer worn. The buckle is cut off from them, folded into a loop and screwed to the wall. It turns out to be an unusual, but very convenient holder for newspapers, magazines, skeins of yarn and other small items.
New life for old belts
If you fasten two such loops at the same level and insert a rectangular plank into them, you will get a hanging shelf.
Hanging shelf
Note. When attaching leather to a wall or other hard surface, you need to place a washer under the head of a screw or nail.
Pieces of leather belts will also come in handy when making a tray if it is customary in the family to serve breakfast in bed. In addition to them, you need to prepare a large cutting board or furniture board, a small piece of plastic pipe and glue. As well as a hacksaw or jigsaw, sandpaper and finishing materials.
Tools and materials for making a tray
Step 1. When using a board or furniture panel, the material must be sawn to size and sanded until smooth. You can paint it, varnish it, paint it, burn out patterns or inscriptions with a special device. In a word, the decor is at the discretion of the manufacturer.
Step 2. When the board has dried after finishing, legs made from pieces of plastic pipe about 5 cm long are attached to it in the corners. Before gluing, they are sanded and, if desired, painted in the color of the wood.
Making the legs Attaching the legs
Step 3. Cut two strips from the belt along the length of the narrow side of the tray or a little longer for ease of grip, and fasten them along the edges with screws.
Tray with strap handles
Living room
Getting a stylish shelving unit quickly and inexpensively is no problem. Use wooden boxes. They can be arranged as you need, making shelves of various sizes. There is another plus - you can put together such a cabinet with your whole family and have a lot of fun.
Using the same principle, you can make a desktop. You will need modular shelving from Ikea, a table top, slats, screws and some paint. The number of shelves and the shape of the entire table depends on your needs.
In general, the use of wood in the interior is one of this year’s highlights. Wooden pallets, parts from old furniture, ladders, branches, etc. are used.
Hanging shelves will help make your living room more interesting. You can use both ropes of different diameters and belts.
A cornice is always a very expensive pleasure. But if you have a non-standard window and only need to order the appropriate size, then it turns into a complete pain. The simple solution is to use small-diameter plastic water pipes. You just need to paint them in a color that suits your interior.
Another life hack on the topic of curtains. How to decorate a window without using a cornice at all? You will need a wooden lath and a lot of hooks for clothes. Don't forget to sew the loops to the curtain.
You can zone the space in different ways: walls, screens, curtains. There is another way - jute cords. You can use any other materials like ribbons or colored fishing line.
Case for seasonal clothes
Storing seasonal clothes often becomes a problem if there is no room for them in the closet. You can solve this by making a folding trunk covered with a nice fabric. It can be placed on a closet, on a shelf or under a bed. Things will not be visible, but protected from dust, and the case itself will not spoil the interior. When the need for it temporarily disappears, when folded it will take up minimal space in the closet.
Storage cases
To make it you will need: fabric, corrugated cardboard and sewing thread.
| Image | Description |
| We decide on the dimensions and cut out a rectangle from the fabric, the width of which is twice the height of the trunk plus the hem, and the length is equal to the perimeter plus seam allowance. Fold the fabric in half widthwise and sew the edges. |
| We divide each side of this ring into three parts: one wide (the side of the case) and two identical narrow ones for the folding end. We sew the fabric along these marks, making pockets. |
| Step 3 | We insert corrugated cardboard rectangles into the pockets, fold the fabric inward and glue them. |
| We manually sew the fabric bottom to the box. The seam can be closed with braid or tape, gluing it around the perimeter. |
| Step 5 | We paste over or cover with fabric a rectangle of cardboard according to the size of the bottom and put it inside. |
| Step 6 | We make the lid by cutting out the part shown from cardboard. We trim it with fabric on the outside. |
If you lift the hard bottom vertically and place it close to the side, the case will easily fold down to a flat state. You just need to press inward on the stitching lines at the ends.
We sew a hanging trunk for storing things (click on the image to enlarge) Hanging trunk for 6 shelves
Hanging open trunk
Make it yourself or still buy it?
“When you make crafts for your home with your own hands, you create their decor and design yourself”
There is no need to be afraid to take on a task that seems overwhelming at first glance. Anyone can create beautiful home decor with their own hands. It’s easy to make things to decorate your interior. You don’t need to have any special professional skills for this.
Something else is important here. What we create with our own hands is unique. Crafts bring individuality to the home interior and allow you to diversify the atmosphere, filling its atmosphere with notes appropriate to the occasion and mood.
Home decor will add personality to the interior
When you make crafts for your home with your own hands, you create their decor and design yourself. Whether you like it or not, you put a part of yourself into them, so these products will always emit a special warmth, which turns the house from an ordinary living space into a cozy nest. Creative crafts differ in purpose. See how you can use them to decorate your home yourself in the photo. Your creations can be:
- original furnishings;
- storage systems for household items;
- simply decorative or themed decorations.
Original DIY home decor
And this despite the fact that you can create home decor with your own hands from scrap materials, that is, without investing special funds in decorating the interior. Almost every housewife has a box with a collection of buttons, kept just in case, fabric scraps, knitting threads, old beads. Where there are students, there is certainly colored paper, markers, and watercolors. Take a look at the kitchen, there will also be something for a creative person to profit from. Bottle caps, disposable tableware - all this is also useful for implementing DIY home decor ideas.
Decorative panel made of wine corks
Interior novelties and homemade little things can also be assembled from natural materials, threads and glue.
Don’t think that only experienced designers can create miracles. When creating presentable objects, you just need to use your imagination and not be afraid to combine materials of different textures that seem incompatible. In general, experiment.
You can also look for interesting DIY home decor ideas using improvised materials on the Internet. To make the product individual, just add a couple of touches from yourself to an existing project. Even if you have to tinker with the first craft, work on subsequent ones will go like clockwork and less and less time will be required to create them.
Hallway hangers
It is impossible to place a full-fledged wardrobe for outerwear in a small hallway. You have to be content with a wall hanger with hooks. And here you can get creative so that from the very threshold the guests understand that they are lucky to meet extraordinary people.
Hooks made from forks Hooks made from twigs Hanger made from old skis
Handicrafts for the New Year
- DIY Christmas toys for the Christmas tree
- DIY Christmas wreath
- DIY New Year's ball
- DIY New Year's crafts from pine cones
- DIY New Year's crafts for 2022
Source of inspiration: pinterest.ru
Republished on December 17, 2022 due to additions to the material.
Add to bookmarks
Wooden office organizer
This model is good because it provides for placing not only pens and paper on the table, but also a mobile phone.
To make it you need wood glue and three rectangular bars 2-3 cm thick, one of which is slightly longer than the others.
Wooden organizer
Tools you will need:
- jigsaw or hacksaw;
- drill;
- bit;
- hammer;
- vice or any load;
- sandpaper;
- pencil with ruler.
Step 1. On one of the short bars, mark a groove or slot for the phone according to its dimensions.
Marking the slots
Step 2. Using a jigsaw, we cut through the block from the end, hitting the chisel with a hammer and hollowing out the wood between them. We grind the entire workpiece, including the internal surfaces of the slot.
Notching a groove
Step 3. Glue this block with the same one and leave it to dry, holding it in a vice or placing it under a weight.
Gluing
Step 4. Mark the second slot - for paper or notebooks, making a line across the block. We decide on the number and position of holes for writing instruments.
Marking hole positions
Step 5. We saw the glued bars along the transverse line. We select a drill of the required diameter and drill through the holes in accordance with the markings.
Drilling holes
Step 6. Glue the resulting two parts to a long block, aligning them at the ends. There should be a gap between them that will serve as a paper holder.
Connecting elements
Step 7. Decorate the organizer according to your preferences.
Painting in bright colors
Textile
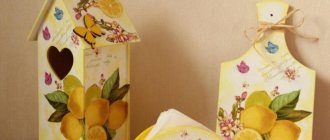
With the help of leftover fabric you can make so many items that it would be very difficult to list them all. The simplest souvenirs include:
- Kitchen towels. They can be decorated with the initials of the future owner or with embroidery on a specific theme.
- Aprons.
- Potholders. Such souvenirs in the style of patchwork look especially unusual.
- Rugs.
- Tablecloths. And it is not at all necessary to be able to embroider with satin stitch or cross stitch, as they did in the old days. A cheerful tablecloth can be created using multi-colored scraps.
- Pillowcases. These items can become part of a sleeping set or decorate decorative pillows.
- Original curtains made from strips of fabric or ribbons.
For those who have been working with fabric for a long time, it will not be difficult to sew a bedspread with lush puffs or elegant folds. And beginners can make a cozy cape in a minimalist style.
Ribbons will help make flowers of incredible beauty, which are used to create brooches, headbands, hair ties, and bracelets.
Organizers for spools
Those who sew a lot accumulate an incredible number of spools of thread of different colors and thicknesses. Keeping them in a heap in a box means wasting time searching for the right reel. And in bulk at the bottom of the box it’s too wasteful.
The most convenient organizer for spools is individual pins. And it’s as easy as shelling pears to make from a board or piece of plywood and nails, hammering them in at small intervals. If such an organizer will be stored in a desk drawer, you can stop there. If it will always be in a visible place, you should think about the decor.
The most convenient spool organizer
We offer two solutions for this problem. The first is extremely simple: you need to cut out a piece of polystyrene foam the size of any beautiful box, put it on the bottom and insert toothpicks.
The second will require a more detailed description.
Step 1. On a rectangular sheet of plywood, make markings so that the distance between the points in all directions is slightly greater than the diameter of the coils. In order not to lose the markings when painting, we fill small holes with a couple of hammer blows on the nail.
Holes made
Step 2. We measure out the decor from foam or polyurethane moldings, cut the ends at 45 degrees and glue them around the perimeter. Then we paint the structure. If the decor is very embossed, it will be more convenient to use aerosol paint in a can.
Painted decor
Step 3. Drive long nails into the marked holes.
Hammered nails Beautiful and convenient organizer for threads
Advice. If you are hanging this organizer on the wall, drive the nails in at a slight angle to prevent the spools from slipping off.
This is just one of the options. It can be modified or the shape of the structure can be changed by cutting out any shape from plywood.
Figured thread organizer
Materials
Any materials can be used as sources. They could be:
- wood, in all its manifestations: sticks, boards, saw cuts;
- textile;
- yarn;
- paper.
As decoration you can use:
- lace;
- ribbons;
- beads;
- coins;
- rhinestones;
- shells and everything else that has not yet found its place.
Crafts for the kitchen
The most functional and filled with things room in the house is the kitchen. Maintaining order in it all the time is the most difficult thing. We suggest making a stand for dishes and pockets for kitchen utensils for it.
Dish drying rack
It can be easily made from several wooden clothes hangers.
Dish drying rack
To make this model you will need a handful of small self-tapping screws and eight hangers from which you need to remove the hooks. And also remove the crossbars, leaving only two hangers undisassembled.
Next, three pairs of products are fastened to each other with a valet using self-tapping screws. Single hangers are installed between them, and the entire structure is fastened with the previously removed crossbars. They are attached under the crosshairs of hangers connected in a pair and along the outer edge.
If the hangers have recesses in the hangers, the crossbars are inserted into them. If not, they are screwed together with an overlap or the hangers are modified before assembly by making landing grooves.
Drainer. Application
Advice. In order for the dryer to last a long time, it must be coated with a water-repellent agent - paint or varnish.
Pockets for kitchen utensils
If the kitchen set is not equipped with a drawer for cutlery and small utensils such as ladles and spatulas, they can be stored in cute pockets made from wooden cutting boards and fabric. It can be replaced with kitchen towels or napkins, or even better - oilcloth, which can be easily washed if necessary.
Pockets for kitchen utensils
Step 1. Prepare everything you need in addition to the basic materials: glue gun, stapler with staples, scissors, tape for masking staples.
All you need
Step 2. Lay the board on the fabric and cut it along the contour, making allowances of 2-3 centimeters on all sides.
Uncover
Step 3. Fold the bottom edge of the fabric and fasten it with a stapler to the bottom edge of the cutting board, stepping back 1 cm from it.
Fastening fabric along the bottom edge
Step 4. Lay the fabric on the board and shoot the sides, gradually tucking the edges inward. At the same time, make sure that it is not stretched and does not fit tightly to the board, otherwise the pocket will turn out tight and you will not be able to put anything in it.
Fastening the fabric on the sides
Step 5. Lay the braid over the fastening line, masking the staples, and glue it with hot glue using a gun.
Fastening the braid
The pocket is ready, you can hang it on a hook and use it.
Original vase
The house needs not only useful things, but also those that simply give joy and good mood. Therefore, finally, we suggest making an original vase for small flower bouquets. This will take no more than a minute, and the only tools you will need are scissors.
Materials for making: a glass cup and a balloon. It is better to take a dense, opaque one with a matte texture. You need to cut off the tip with scissors, stretch it and pull it onto a glass, after dipping it in soapy water or lubricating the outer walls with oil.
You need to cut off the tail and pull the ball onto the glass
All! All that remains is to tuck the protruding tail inside, pour water into the container and place the flowers.
All that remains is to wrap up the protruding edge of the Vase from a glass and a ball
Such vases can be made at least every day, changing shape and color. Taking a balloon with a congratulatory inscription, you can give an original bouquet to your mother or teacher for her birthday.
Multi-colored vases Festive decorations made of balloons
Hallway
Even the simplest entrance area can be made functional and stylish. Wood paneling will bring a fresh touch to the interior. Not only is it simply beautiful, it is also convenient. On the panel you can screw hooks for bags and jackets. You can also make a small shelf on top for useful little things.
There is also an interesting solution for small apartments. Shoe rack, hooks and cabinets can be combined into one organizer.
An ordinary front door can also be made into a stylish element with the help of wooden trims.
To keep your shoes out of the way and not dirty anything, you can make an unusual stand from a wooden box and stones. So even after a walk in the rain, your hallway will remain clean.
By the way, instead of pebbles, you can use an artificial mat made of plastic grass.
An old ladder can be used as a shoe rack. Now all the shoes will be at hand.
For a couple of years now, it has been fashionable to make all sorts of household items from wooden pallets. In the hallway you can use them as shoe stands. You can make a shelf on top for small items or just put flowers, and attach hooks for umbrellas on the sides.
There is a small life hack for pet owners. To keep dog or cat bowls out of the way, mount them on a separate shelf in a closet or under a countertop.
Surprise your guests with a non-standard approach to such an ordinary thing as coat hooks. Wooden slats, branches, screws, a little imagination and voila! The unusual hanger is ready.
Colored paper
An interesting option is to decorate the wall with colored paper. A “blank” wall, without windows and doors, is suitable for this. Buy several sets of paper in all the colors of the rainbow at the store. The sheets are attached directly to the wall with glue or a stationery pin. Arrange the composition with irregular shapes, but maintaining the order of the colors of the rainbow.
Rainbow made of colored paper on the wall with a transition to the ceiling
If there is a closet near the wall, no problem. Its outlines can be played out in the same way. Use a corner of the room. Place this composition on two walls at once.
Another option. Cut out a pattern or tree from colored paper. This can also be done in the corner of the room. Glue the trunk, branches and leaves. Make the latter in a bright shade. This work of art is perfectly complemented by open shelves located on the continuation of tree branches. Use bright, contrasting colors. The dark green or brown color of the tree branches will go well with bright pink leaves and white shelves. Additionally, attach a birdhouse to the tree.
Tree made of colored paper on the wall of a children's room
Tree on the living room wall with photos from a family album
Paper origami looks great on walls. Glue colorful butterflies in a flock of rose flowers. In bright weather, when the sun's rays hit, the composition will cast beautiful shadows.
A flock of butterflies seemed to flutter out from behind the back of the sofa
A butterfly is made in 4 steps from colored paper
You can cut out contour butterflies from cardboard and decorate them to your taste
The ceiling can also be decorated with paper origami. Glued figures are hung on strings. At the same time, the composition made with figures at different heights looks beautiful. The color range is varied.
You can make paper cranes with your children
Snowflakes “Ballerinas” made of white paper
See alsoHow to make blinds from wallpaper with your own hands
Photo printing
There is nothing easier than ordering photo printing with any designs and patterns in any size. And then act at your own discretion and do not deny yourself anything.
Stickers, comic book frames and posters are all the rage, brought with them by the pop culture trend. Print your favorite images onto vinyl and cover your refrigerator, cabinets or walls.
Do you want to paint a surface, but lack the skills? Print interesting drawings and patterns, because modern materials allow you to get the most natural picture.
Printed paintings are actively used, be they reproductions of artists or their own photographs. And to make the composition look fresher and more modern, compose the canvas from several volumetric blocks instead of a continuous array of photo wallpaper.
Photo: mapwood.ru Photo: mychatte.ru Photo: dizainexpert.ru
10 cool ideas on how to decorate your apartment for the New Year
Smartphone holders in 5 minutes
Perhaps almost everyone has a smartphone. But there are no holders for them. What if you need it, but don’t buy it by hand? Easily!
This is the kind of holder made from office clips in one minute. But take stronger clamps so that they hold well.
A sleeve and 4 stationery needles will also work well. You can paint it to your taste.
Another option: you will need a pen and some reliable clothespins.
A convenient pocket for charging a smartphone can be easily cut out of an empty shampoo or shower gel package.
And if you have some fabric and a love for needlework, you can sew such a pocket.
Decorative jars
Ordinary kitchen jars can also be used. Wash them thoroughly and fill them with whatever your heart desires. For the kitchen, for example, jars with cereals, pasta of various shapes and shades, with all kinds of spices, herbs and dried fruits are ideal. This decor is also very functional!
For a children's room, you can make a classic snow globe or a decorative aquarium in a jar, in which artificial algae is filled with ordinary colored water.
Collect a whole fairy forest in a jar using dried moss, twigs and flowers. Even decorative sand or pebbles, laid out in layers, look fresh and interesting.
Photo: wedmegood.com Photo: tesa.com Photo: belaruspartisan.by
Photo: my.mail.ru
Herbarium in the interior
With all the eco-trends and fashion for natural materials, the same elegant natural jewelry is especially appreciated. And what could be more natural than a beautiful decorative herbarium collected with your own hands?
Dried flowers and leaves look great in frames, and especially in compositions of several mini-paintings. You can also use them to collect dead wood and romantic bouquets in decorative vases. It looks interesting to applique or paint all kinds of surfaces using stencils of dried flowers and leaves.
It is recommended to collect plants in dry weather, choosing only healthy and intact specimens. Cut stems that are too thick lengthwise, thoroughly clean the excavated plant from soil, and dry all cut leaves from moisture.
It is better to dry the herbarium in a separate folder and under a strong press. This can be a heavy book or special boards tied with ropes. Periodically change the liner sheets with which you place the plants so that they are always dry.
Photo: mykaleidoscope.ru Photo: ekocollection.ru
Photo: livemaster.ru
Decorative pillows
One of the most functional accessories is not only practical, but also surprisingly cozy. These are not only sofa cushions, but also backings for chairs and armchairs, bedroom decor, and decorations for the nursery.
In addition to ordinary rectangles and squares, it is easy to sew bolsters, round pillows, Turkish pillows, pillows with buffs, and complex geometric shapes. Romantic hearts, funny little animals, elegant flowers, luxurious velvet with tassels, delicate silk with lace - don’t limit your imagination!
Photo: russianstartuprating.ru Photo: pinterest.com Photo: hozyaika-mama.ru