A child in the house is not only joy, but also additional worries, especially when the child begins to walk and play with toys. After all, quite often toys are scattered throughout the house and they have to be removed more than once a day. That is why you need to organize their storage and a do-it-yourself toy basket is one of the best solutions.
Advantages of a basket or box
Both for the mother of a small child and for him himself, a basket or box for dolls and cars is the most suitable option, proven by more than one generation. The most important thing is that it’s easy for mom to simply collect and put them in a basket; at the same time, at a very early age, you can teach your child to collect his own things, helping his mom with this.
For a child who has just started walking, a basket is the best solution, as he can easily find the toy he wants without any extra effort. Boxes with lids in this case are not so practical; not all children will be able to open them, and in addition, the lid can often cause pinched fingers in small children, even if shock absorbers are used on it. Therefore, it is not advisable to use containers with lids.
Of course, you can just use a cardboard box or basket, but you will have to store the toys for more than one day. Therefore, it is best to put in a little effort and make a toy box with your own hands, and guarantee their use for several years. After all, a cardboard box will not be durable, since most children prefer it as a toy and you will have to change it almost every month. Therefore, it is best to make a box from wood or plywood; it will be reliable and will serve you for many years.
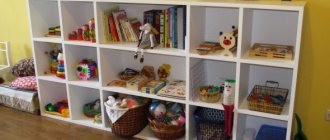
Organizers for children's rooms
With minimal sewing skills and a bit of imagination, you can please your child with functional and ergonomic organizers for toys - hanging fabric “containers” divided into several sections, or simply small bags made of colored felt, sewn together if necessary.
The advantage of this storage method is its compactness: organizers hang on the wall, the side wall of a cabinet or bookcase. They are convenient for storing not only toys, but also socks or handkerchiefs. By the way, we recommend choosing open shelves or shelves for toys, without doors, which children do not always get along with.
But not only baskets, drawers and organizers are used to store toys in the nursery. Chests, hanging bags, colored buckets, ottomans with pockets, trunks, stylized suitcases will certainly interest the little family member and awaken his interest in order. In addition, toy bags or toy nets, due to their soft shape, can easily be “hidden” in closets, pull-out shelves, under beds, which is convenient when there is a shortage of free space.
Plywood box
The easiest way to make a toy box is to simply make it yourself from plywood. Plywood is a strong, inexpensive and durable material that will last you for decades. It is easy to work with and does not require any special tools.
We will not describe how to make the box itself, because this is a task that even an absolute beginner in carpentry can handle. After all, it’s enough to simply cut out the bottom and side walls and just screw them together with screws; such boxes are the best option for children’s toys.
If you want the box to decorate your interior and at the same time please your child, you should pay attention to its decoration. After all, even such a material as plywood can be transformed in thousands of ways. These can be stickers, pictures, just cover them with stain, you can even let the child paint his own box. Any of your design ideas can easily be realized in this product.
The only thing you need to do is to avoid sharp corners and burrs on the box, so be sure to sand it down and round all the corners. Especially if your child is small, this will help you avoid many injuries. It is for this reason that it is recommended not to install a lid, because it can also pinch a small child’s fingers.
Creative DIY storage
Modern furniture for a children's room is very functional, but it is not suitable for everyone and in most cases is quite expensive. You can show your imagination and create special storage devices yourself. The child can also participate in this, which will contribute to creative development.
If you have an old Soviet suitcase lying around on the mezzanine, you can put it to good use by attaching legs or furniture wheels. You should decorate the outside of the product with fabric or paint it with paints, change the upholstery inside and the unusual piece of furniture is ready.
Also, don't throw away shoe boxes. They can be excellent containers for storing various small toys, books, and creative items. You can cover them with colored paper or magazine clippings, paint them with bright colors and write on them about the contents.
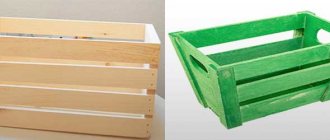
Please note: when painting containers and boxes, it is better to use acrylic paints or art paints in a spray can. They are not washed off with water, and such storage devices will last longer. You can use wooden vegetable boxes to store toys
You need to attach furniture wheels to the bottom for convenience, and sand the box itself with sandpaper to remove any unevenness and paint it. The baby will be able to transport such a piece of furniture with him from room to room.
You can use wooden vegetable boxes to store toys. You need to attach furniture wheels to the bottom for convenience, and sand the box itself with sandpaper to remove any unevenness and paint it. The baby will be able to transport such a piece of furniture with him from room to room.
As you can see, the choice of storage systems for toys is quite extensive. The main thing to consider is safety.
Watch an interesting video about storing toys in a children's room:
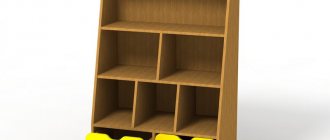
Toy cabinet
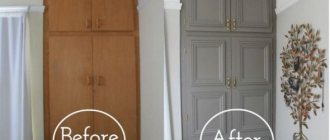
When the children in the family are over five years old, they need to be taught order, so the wooden box with toys needs to be replaced with more modern options. This could be a chest of drawers or your own personal closet for storing toys. You can either make a closet yourself, or simply make a compartment in the furniture that is in your apartment.
Making a toy compartment in an existing closet will be the easiest, since you can simply create a vertical partition to prevent toys from falling out, and teach your child to put them there when he is not playing with them. But since children always have a lot of clothes, not every family can afford to use up useful closet space just to store toys. Therefore, we have to make a separate cabinet. It is he who takes the place of the toy basket and thanks to this there is free space in the room.
The design of the cabinet, as well as the material of manufacture, can be very diverse. But it is best to make the option from wood, plywood or chipboard, since these are environmentally friendly materials that do not have harmful fumes, and accordingly they are excellent for children's rooms.
It is best to make a cabinet with a drawer at the bottom and an opening door at the top. You can store soft toys at the top, but at the bottom there are just small toys that are hard to put away every day. This toy storage cabinet is suitable for almost any child. True, the size of the closet itself depends on the number of toys that the child has.
You won’t have any problems with making it yourself, since you can buy accessories and materials in almost any store of this type, and the only tools you will need are a jigsaw and a drill to put everything together beautifully.
Making a storage box
It’s good when you can allocate a separate room for the nursery.
Then the presence of drawers is assumed in children's furniture. But if this is not possible, you have to optimize your living space. And preferably at no additional cost. Let's try to make a storage basket with our own hands. What is the difference between a box and a basket? A box is the same container, but requires a lid. And the basket is open, with handles.
Master Class
For this we need:
- Durable box.
- Stationery knife
- Glue
- Scotch
- Remnants of wallpaper or self-adhesive film
- Fabric, lace
If you don’t have a suitable box at home, you can visit the nearest store
It doesn’t matter if it’s grocery or household. Get acquainted with the back room worker, the guys who work there are usually very responsive
It’s good if you have a tape measure or a tailor’s yardstick in your pocket.
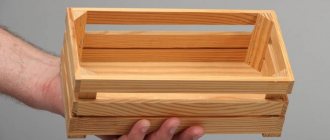
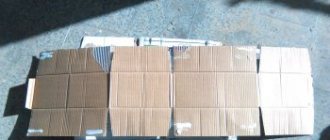
Of course, a wooden box would be stronger and more durable. But fruit boxes are usually not very durable and have splinters. They teach how to assemble a three-dimensional box from a flat blank in third grade labor lessons. The size of the box that will turn into a toy basket is determined by the size of the child. He will carry it himself. It’s unlikely that a two-year-old can handle a refrigerator box.
The thickness of the corrugated cardboard the box is made from will determine its durability. Even if a child accidentally sits on it, it will not break immediately.
If the box does not have holes for carrying, you will need to cut them. To do this you will need either a stationery knife or just a kitchen knife. It should be comfortable for children's hands to carry the toy basket.
Cover the bottom of the box with several layers of tape. A lot of grief comes from accidentally falling out of the bottom.
Glue, preferably PVA. It adheres wonderfully, dries quickly, can be washed with water, and does not leave marks if the work is not done very carefully. But it’s even more economical if you’ve just completed a renovation and still have some wallpaper glue left. Don't pour out excess! Pour it into a mineral water bottle; it will come in handy more than once in a family of handicrafts.
The outside of the box can be covered with self-adhesive film. It is sold in hardware stores that sell wallpaper. Often even by footage. If you have several boxes of the same size, the external design will help you determine the target accessory at a glance: where are the cubes, where is the LEGO, where is the railroad, and where are the doll household utensils.
Instead of film, you can use the remains of the wallpaper that covered your room. Then the box will not be conspicuous. And to determine what exactly is stored in it, paste pictures from donated boxes with construction toys, or advertising booklets, or thematic clippings from children's magazines.
The DIY storage box is ready. The design clearly indicates that we have a scattering of building material in it, can we load it? Wait! For a box with small parts, an insert is absolutely necessary! Yes, one that will allow you to send the entire construction site into a box with one easy movement.
To do this, you will again need some sewing skills and about a square meter, or better yet one and a half, of fabric. You can reuse old organza curtains, or a raincoat, or a sheet. The main requirement here is lightness and strength.
We cut out a circle with a diameter equal to or slightly larger than the perimeter of the box in height. We make a hem around the circumference to insert the lace. We leave holes at opposite ends of the diameter. In each of the holes we insert a lace slightly longer than the circumference, with a lock at the end. If we now pull both ends of the lace in different directions, our circle will turn into a small bag.
All the parts lying on it will be inside and together, without loss, together with the bag will move into the box. The reverse process is just as easy and simple - the sack is taken out of the box and laid out on the construction site. And here any part is much easier to find than in the box.
For doll outfits, a chest will be more convenient. After all, in any fairy tale, all valuables and gifts are stored in a chest. A hinged lid is perfect for this role. If you cover it with shiny self-adhesive, then Koschey the Immortal himself will envy such a chest.
For every small toy, you can make a small organizer with your own hands from fabric - based on a plastic five-liter bottle. This will also show the child ways to solve environmental problems - recycling.
Why is it important to use special furniture
From childhood, they try to surround a child with care and comfort, so his toys are also an important part of his education and upbringing. Thanks to toys, you can teach your child many things and, most importantly, simple order in the room.
It is no secret that children copy the behavior of their parents and when mom or dad simply collects toys in a box, the children will naturally see this. As a result, they will simply develop the habit of putting their things away. The closet is the next stage of learning, since you will need to not only throw toys there, but also arrange them.
Making both a box and a cabinet for toys is not difficult, since this is not full-fledged cabinet furniture that stands in the living room or hallway. Therefore, you should not immediately look for options in the store, since you yourself can easily cope with the manufacturing task. And most importantly, all the furniture you make will be ideal for you both in size and functionality, since you will make it especially for yourself. It is rare to find such a combination in stores, since they will only offer you standard furniture options.
Some tips for beginners
The most important thing you should remember is that you are making furniture specifically for children. Therefore, if, for example, you are making a chest, then you definitely need to put shock absorbers on its lid, since children at any age can simply pinch their fingers. On hinged cabinets, it is also advisable to use mechanisms for soft opening and closing of doors, since this is also a high-risk area.
No matter how beautiful the sharp and even corners are, it is advisable to round them for children's furniture. Even if a child accidentally hits such a corner, it doesn’t matter, he won’t cut the skin, but just get a bruise on his forehead. And this is not such a big problem, since simple bruises do not leave scars.
You should pay special attention to the quality of materials. After all, children are very mobile and they don’t yet know how to handle things carefully. If a simple box has a sufficient margin of safety, then the fittings should be as reliable as possible. Since the service life of the entire structure depends on this. Therefore, you should not save on this accessory, because such savings will result in large expenses.
Otherwise, you can choose the design, material and manufacturing method yourself. The most important thing before starting work is to think through the design of your product, and based on this, buy the materials necessary for manufacturing. And the most important thing is not to rush in your work, since haste never leads to good results.
Balcony racks - varieties
Such furniture is divided into several types, depending on what function the racks will perform.
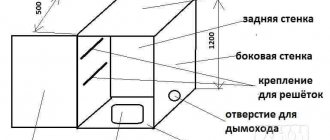
Traditional. This type of design is distinguished by the fact that it has a standard shape and the shelves are open. It is mounted along the entire balcony wall. Owners can store any household items, canned goods or food for future use on such a rack. Each shelf is secured with brackets.
Low. Ideal for open balcony views. Typically, such models are located around the perimeter. The top of the product can be used according to your taste: as a shelf, a small sofa, or a tabletop. Angular. This type of shelving is used by loggia owners. It saves space. The name itself speaks for itself. The design consists of corner shelves, also attached with brackets to two walls. Built-in. This design is suitable for balconies with niches. It is in this space that the shelves are hung.
Requirements for the manufacture of structures
Balcony shelving
To make a balcony rack with your own hands, you need to think through all the details. First of all, you need to consider what you will store on the shelves and what weight these items will have? This must be taken into account in order to correctly calculate the load.
The balcony rack must meet the following criteria:
- Strength.
- Safety (reliable fastenings).
- Resistance to external factors (temperature fluctuations and humidity).
- Capacity. The product's dimensions must correspond to the space and not clutter it up.
- Ease of placement during use. The rack should not interfere with the penetration of sunlight and artificial light.
The balcony needs to be glazed, since wooden structures are not suitable for open spaces, and even if they are installed, they will not last long. A replacement can be a shelving unit made of plastic, glass, or metal.
DIY metal structures
The rack is made of metal and can withstand heavy loads, this is its superiority over wooden structures. To make a rack from this material yourself, you will need power tools (grinder, screwdriver), a hacksaw for metal, a tape measure, screwdrivers and an iron square pipe.
- The number of parts of the same length is calculated, then using a grinder we cut the structural elements according to the intended markings.
- To create the frame, we prepare: 6 pipes of 3 meters each and 8 fastening elements (three-sided, corner and clamping).
- An ordinary plywood sheet of standard sizes will make three shelves. It is best to choose a sheet with a thickness of at least 15 mm.
- Before cutting, the parts are aligned and measured using a bench square.
The metal shelving can be installed separately from the wall or attached to the back of the wall. This design is more reliable and safer.
To assemble a metal rack, the parts are inserted into fasteners to form a rectangular structure. Dimensional control is required, fasteners are adjustable.
The next stage is securing the frames to vertical racks. In this work you will need a tape measure and a building level to check the horizontal position. All that remains is to assemble the structure using bolts. The product is painted to protect against corrosion.
DIY wooden rack
Before you start making a wooden rack with your own hands, you need to carefully develop its design and draw a drawing. You need to take into account the location of the shelves and their size in order to already know what material and what quantity to purchase. For shelves you will need: chipboards or plastic, aluminum. For fasteners: confirmats 5x70 mm, corners 30x30 and self-tapping screws 4x16.
The first stage is cutting the shelves and processing the edges with film or sandpaper. Then we drill the fastenings for the shelves to the wall (should be marked in advance). Next, all that remains is to hang the shelves in their intended places. If doors are expected, then they are hung too. You can make hinges to fold the shelves when not needed.