Odors during cooking do not always cause discomfort. However, they can be quite persistent and unpleasant until they dissipate naturally. A special device called a “hood” will help quickly rid the kitchen of unnecessary odors.
During the installation process of existing models that can be purchased on the market, various problems may arise. The simplest thing that can cause discomfort and non-acceptance is bulkiness, dimensions inappropriate for the interior of the kitchen. Therefore, many do not dare to install such a unit for themselves.
Proper installation by third-party technicians can be expensive. Therefore, it is important to understand how to make a hood with your own hands and consider possible design options. Which can greatly help you save your money and avoid unnecessary purchases.
How a kitchen hood works
According to sanitary standards, in the kitchen the air exchange rate cannot be less than 10. For this purpose, the room has ventilation ducts with natural or forced movement of air masses. The efficiency of the first type is low, so a kitchen hood is installed above the stove.
The main purpose is as follows:
- purification and filtration of air masses;
- protection of all kitchen surfaces from the deposition of grease, condensation and soot;
- removal of odors and smoke generated during cooking;
- removal of moist used air from the room;
- the device prevents contaminated air masses from entering neighboring rooms.
The operating principle of a kitchen hood depends on its design. Varieties connected by pipeline to ventilation ducts simply remove contaminated air masses from the room through the ventilation system outside the house. They only have grease filters. Models that are not connected to the ventilation system are equipped with multi-stage filters. They purify the air masses circulating in the room.
Kitchen hood design diagram
Before you make a hood in the kitchen, it is worth understanding its structure.
It consists of the following parts and mechanisms:
- all structural elements are located inside the case;
- a fan is needed for air circulation;
- gearbox;
- control system;
- air ducts of round or rectangular cross-section;
- filtration system;
- connecting elements;
- swivel elbow;
- wall plate for fixing in the kitchen.
The following parts are used in the electrical circuit:
- Exhaust fan with electric motor. This is the main part necessary for the movement of air flow through the filtration system. An electric motor is an asynchronous motor with several speeds. To change the rotation speed, different connections of the stator windings are used. Typically tangential or axial fans are installed.
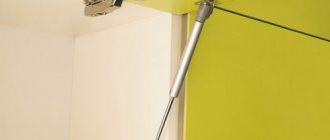
- Speed switches in the form of sliders or buttons allow you to quickly change network parameters and apply voltage to the motor winding. Expensive models of hoods have backlit touch switches.
- Any type must have grease filters installed. Coarse filtration devices trap grease, and fine filtration devices are needed to eliminate odors. Carbon filters help further disinfect the air.
Tips for use
In some cases, even after installing the hood, smoke may remain in the gazebo. Usually this does not indicate an incorrect hood or its incorrect installation. In some cases, the lack of draft in the hood is caused by low smoke temperature. This usually happens at the beginning of the cooking process. The situation is solved by heating the air and the hood as the fire flares up. If, after the temperature has reached a good level, combustion products still remain in the gazebo, it is necessary to analyze whether the height of the hood pipes is correctly selected.
The extreme point of the exhaust pipes should be higher than the roof ridge. There should also be no tall objects nearby that could reduce the draft in the hood pipe. Typically, a height of three meters from ground level is sufficient for the exhaust pipe. The problem does not always lie in the height of the exhaust pipe. It may be in cross section. That is why, when designing the assembly, it is necessary to take into account that the optimal side size for a square hood is 26 cm. The round pipe that extends beyond the roof from the hood must have a diameter of at least 15 cm.
Electrical installation features
Wiring for the installed equipment is planned and laid in advance.
Depending on the method of connecting the hood to the electrical network and the comprehensive design of the kitchen, the solution to the issue may be as follows:
- The standard electric cord for range hoods is quite short. Therefore, when connecting a plug to a socket, the latter must be provided and installed in advance. Wiring or an extension cord with a socket can be carefully laid behind furniture or covered with a PVC box.
- The connection via a machine (permanent) is made in a phase break.
- Grounding is always connected first.
The second and third points are mandatory.
Installation of forced ventilation with exhaust
Before you start installing a hood in the kitchen, you should read the manufacturer’s recommendations, they are in the instructions.
After this, view the equipment of the device and purchase:
- air duct;
- adapters;
- clamps;
- sealant;
- scotch;
- fasteners.
As for air ducts, they are made of heat-resistant plastic, metal, and corrugated foil. Corrugation is more convenient to install because it is flexible, but it is installed only for short lengths. This is due to the fact that the air flow encounters strong resistance, so the hood works longer.
Mounting the hood to the wall
When considering how to properly make a hood in the kitchen, the master needs to decide on the design features of the device. The simplest option is wall mounting.
The work is performed as follows:
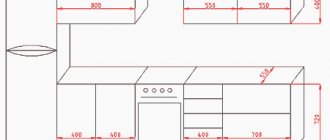
- Mark the fastening points between the stove and the hood. The optimal height is considered to be 700 mm. Measure the fastener zones - there will be 4 points in total.
- Make holes using a drill. Screw in the screws and secure the device.
Almost all products have a similar design, so fixation will not cause problems. In the case when the natural exhaust hood in the kitchen is supplemented by a fan, the device is mounted in the outlet channel of the shaft and connected to the power supply. This is the simplest option for arranging an air exchange network.
Connecting the hood to the house ventilation duct
Installing a kitchen hood involves connecting an air duct to a ventilation duct.
A few rules will help you do everything yourself:
- The outlet fixed to the wall must be the same diameter as the outlet opening itself. Parts can be sealed with masking tape or sealant.
- To carry out the hood, plastic ready-made parts are used for ventilation in the bending areas. Using a corrugated air duct will eliminate the need for joining elements - this design bends in any direction.
Fixation with clamps and adapters. All parts are selected with the appropriate dimensions. It is forbidden to pinch the air ducts and leave free space in the fasteners. In the first case, the network itself is deformed; in the second, the risk of depressurization due to vibration increases.
Ensuring air flow
Supply ventilation can be natural or forced. Natural is the flow of air through a window, window, door. Forced – installation of blowers, valves or ventilators. The latter are available in wall and window versions and are structurally a lining with an external and internal part. Ventilators allow limited air flow and can be adjusted manually or automatically.
Install the devices in a wall or on a window. It is more convenient to install a window device; you do not have to drill into the wall. But you can do without installing complex models, for example, if there is an inlet valve in a sealed PVC window. Regular ventilation will help, both in the kitchen separately and in the entire apartment in general.
Why do you need ventilation in the kitchen?
The main function is to maintain normal air composition. It cannot be performed by other devices: humidifiers, air purifiers, etc. During operation, the air in the room undergoes changes:
- increasing the concentration of harmful substances emitted by decoration, furniture and any other objects;
- as a result of gas exchange in a person’s lungs, carbon dioxide accumulates in the room, and the percentage of oxygen decreases (the same thing happens when burners burn);
- heating devices also affect the quality of air;
- microscopic lint from textile and wool products, particles of the epithelium of pets constantly fly in the air, which is harmful to health;
- condensation formation.
These changes in the air do not mean that you should stop keeping pets, fabrics, etc. in the house. A negative effect is created only when the concentration of harmful substances is critically exceeded
Therefore, it is important to create an outflow of dirty air and an influx of clean air. This is the function of the air duct in the kitchen.
Ventilation features
When installing a hood, you need to choose the right air duct. In practice, the following types of ventilation systems are used:
- Corrugated sleeve made of aluminum. The main advantage of such a model is the ability to change the shape for acceptable parameters. The material bends well, which makes it possible to make a ventilation duct with turns in the right places. The disadvantage of the product is the creation of noise during the passage of air flows. In addition, grease, dust and dirt constantly settle on the surface of the corrugated sleeve. It needs periodic cleaning to remove dirt.
- A round plastic air duct is assembled from several parts (adapters, angles and couplings). The connection of all parts is carried out using shaped parts. To prevent tears, the joints are coated with special glue, then additionally secured with self-tapping screws. The main advantage of such a system is considered to be silent operation.
- Square plastic ventilation ducts are made of polyvinyl chloride. The product in question has the same characteristics as the previous type.
The plastic models of air ducts are supplied with additional parts that can be used to install the most complex engineering systems. Such products are characterized by high cost and complex design; their installation must be carried out by a professional.
Save
Sheathing of frame structure
Sheathing an assembled umbrella with gypsum board or fiberboard is not difficult. To do this, the parameters of each plane are measured, after which their figured dimensions are indicated on prepared sheets and then cut out. Then each cut out element is applied to its own area and attached to the frame with self-tapping screws. The most difficult task is to secure the back wall of the hood.
Now all joints are sealed using moisture-resistant putty. It is used to process both the external surfaces of the cladding and the joints of parts of the structure at the joints. The joints do not need to be filled with silicone sealant.
Surfaces are brought to maximum evenness. To do this, they are treated in several layers with putty solution. The leveling process is carried out in the following sequence: primer layer - putty layer - primer layer - putty layer. The main thing is that each subsequent layer has time to dry well. After the last layer has dried, all surfaces are sanded with fine-grain sandpaper. The surfaces are then primed again one last time. After final drying, painting is done.
Step-by-step execution of work
Hood location
Before starting installation work, it is necessary to carry out calculations. Each type of hood should be located at a different height. Above the electric stove, the device is located at a height of 65 to 75 cm. If the stove is gas, then the height of the hood must be increased to 75-85 cm. These standards must be taken into account in order to properly install the exhaust system.
The standards are aimed at providing comfortable conditions for cooking and preventing fire hazards.
Regardless of whether a dome hood or another is used, all work can be divided into three main stages:
- attaching the hood to the wall;
- connecting the device to the ventilation system;
- connecting to the electrical network.
Mounting the hood above the stove
Regardless of which hood was chosen, it should be mounted as securely as possible on the wall. To do this, you need to use dowels of a suitable length. Fastening must be carried out at the required height. If the hood is positioned too low, the appliance may be damaged by the hot air generated by the stove. If the distance is too large, then the fumes during cooking will disperse throughout the room, not reaching the hood.
Further work on installing the hood
Ventilation duct arrangement
After the hood is fixed to the wall, you can begin further work. If the hood involves exhausting air outside, then it is worth connecting it to the ventilation shaft. In this case, it is necessary to use special pipes. They can be made from various materials. Today, the most popular option is plastic products. They are very practical and have an attractive appearance. Such channels can be smooth or corrugated. It is worth giving preference to flat options, since they create less noise during operation and do not obstruct the passage of air.
All joints between plastic channels must be sealed with silicone sealant.
This will prevent exhaust air from entering the room. Attach the plastic channel to the wall using special clamps.
Electrical connection
It would be correct to make a separate outlet for connecting the kitchen hood. Its location should be foreseen at the stage of repair work. This will allow you to hide all the wires in the wall, and they will not spoil the appearance of the room. If the socket was not installed initially, it can be installed later. In this case, the wire can be hidden under the kitchen unit or simply covered using special plastic elements.
A separate power point allows you to use the hood no matter how many appliances are turned on in the kitchen at the same time
When performing all work, you should pay attention to the wires and auxiliary elements
Features of installing a built-in hood hood
Installation of a built-in hood has some differences that are important to know about. In order to correctly install such a device, you must first determine the height of its location. Unlike a dome hood, the built-in version is attached not to the wall, but to the kitchen furniture
In this way, the device is practically invisible and does not violate the integrity of the appearance of the kitchen unit. Thus, not only a flow-type hood can be attached, but also recirculation options
Unlike a dome hood, the built-in version is not attached to the wall, but to the kitchen furniture. In this way, the device is practically invisible and does not violate the integrity of the appearance of the kitchen unit. Thus, not only a flow-type hood can be attached, but also recirculation options.
Types of fastenings
According to the installation method, a homemade kitchen hood is divided into 4 types:
- Wall-mounted. Attach to the wall above the stove.
- Corner. Installed in the corner of the kitchen.
- Built-in. They are built into a wall cabinet above the hob or into a table located near it, and the product is also installed in a decorative fireplace dome.
- Ostrovnaya. Attached to the ceiling.
When attaching the product, take into account the following: the distance between the equipment and the electric stove must be at least 70 cm, gas - 80 cm.
Mistakes when installing a kitchen hood
1
Some people, of course, leave a grille for natural air movement, but still manage to block it with the air duct itself.
2
Recommended dimensions for round air ducts are d=125mm. For rectangular ones - 204*60mm.
3
In most cases, this is prohibited by the rules. Specific points will be given below in the text.
You can, of course, lay a separate box along the facade straight to the roof. But is it worth it? Although in restaurants and cafes located on the ground floors of high-rise buildings, this solution is widely used.
By the way, the ban on venting air to the street through a wall does not apply to private houses, but only to high-rise buildings.
4
First of all, this will affect the noise. Although, of course, the turns themselves are not the greatest evil. And sometimes you can’t do without them.
It is the turns that follow one after another, without acceleration sections, that are dangerous.
5
Remember that a productivity of 200-300 m3/h is quite enough to effectively remove all odors, with minimal load on the ventilation of the house.
6
The installation height directly depends on what kind of stove you have - gas or induction hob.
7
Believe me, sometimes this structure has to be disassembled.
8
Why this is a mistake, and when it is still possible to do this, is discussed below.
9
As a result, connecting it haphazardly, through carriers and extension cords. Do not forget that in the end this is not a portable device, such as a fan, heater or mobile air conditioner.
This means that the wiring for it needs to be done stationary and wisely.
10
It must be embedded and installed in compliance with the appropriate angles and inclinations. Otherwise it will work every other time.
In general, installation of a hood can be divided into two main stages. The first is its connection to electricity. The second is the air duct structure and everything connected with it.
Let's look at each of them separately.
Hood manufacturing process
It can be divided into stages:
Scheme of the hood operation.
The first stage is the preparation of materials and equipment. If something from the above list is missing, you should visit a hardware store. Equipment can be rented. The second stage is applying markings. In order not to spoil the aesthetic appearance of the room, you should carefully take measurements. It will be necessary to arrange not only the hood. You should also place an air duct. It can be carefully disguised using drywall. The simplest marking option is obtained when the hole for ventilation is made from above the slab. When the hole is located elsewhere in the kitchen, you will need to place a box in which the air duct pipe will be laid. Advice! If you plan to finish the ceiling with plasterboard in your kitchen, you can partially hide the air duct under it.
The third stage is creating a frame for the air duct. This will require galvanized metal profiles. Using anchors, they are secured along the entire perimeter of the future air duct. It's good if the pipe runs in a straight line. In cases where this option is not possible, the profile should be fixed with bends in the required places. Markings for the air duct are applied on the ceiling. The first profile, which serves as a start, is laid down in several separate parts. They are attached using self-tapping screws. The fourth stage is the completion of work on arranging the plasterboard box. To complete the work, you will need to attach a second panel from the primary profile to the already completed hanging parts. You used it as a starting point for work. When the lower part is ready, transverse type strips are mounted on it. They should subsequently be covered with plasterboard. The fifth stage is the formation of the kitchen hood body. So, when all the rough work is done, you can begin arranging the hood itself. The lower part of the future appliance is fixed to the kitchen walls. It is also made from a profile. If your kitchen has a niche for the hood, this will make the task even easier. Otherwise, you will have to additionally attach the lower part to the main box from the sides. All parts of the hood are cut from a metal profile and connected to the lower part. To make the structure more rigid, you will need to strengthen the sides with jumpers. They are also made from a profile. Stage six - connecting the air duct to the ventilation system
To complete the procedure for finishing a kitchen hood, its body and the box in which the air duct is located are sheathed with plasterboard. Then putty is applied to the finished structure. With its help, fasteners and plasterboard seams are masked. After this, the hood can be painted. Some prefer other options for decorating this kitchen appliance.
Layout of sockets in the kitchen.
This type of design is perfect for both active and passive hoods. If you choose the first type, you will need to install an electric motor inside the housing. It will need to be connected to the network.
The second version of a homemade kitchen hood is made of plywood. This hood is used only for active type appliances.
DIY metal version
The metal structure is an exhaust hood, the principle of operation of which is extremely simple. It collects combustion products and removes them from the room through a pipe. Such an umbrella must be very smooth, since any roughness reduces its effectiveness. If you prefer a metal umbrella, you must also provide it with a wide opening.
To make it you will need a sheet of steel, angles (made of metal), a riveter, rivets, screws, a welding machine, a grinder and a drill.
Now as for how to do it:
- The first step is to create a drawing and put on it all the dimensions according to which the hood will be designed.
- Now we make the frame. First, blanks of the required length are cut from metal corners. We alternately weld the lower and upper parts of the frame, and then connect them into one structure.
- The frame of the exhaust pipe itself is assembled from the corners.
- Treat the seams left after welding. They are polished using a disc and coated on top with a special varnish to prevent metal corrosion.
- Let's start covering the finished frame. We cut out the metal sheets and make bends, having previously laid the sheets on the workbench.
- We use a drill and make mounting holes to securely fasten the casing.
- Finally, a riveter will help cover the frame with sheets of metal.
- The final touch is the application of an anti-corrosion coating, which increases the service life of your structure.
Many people are interested in how such a hood is attached. This can be done either using racks or using hangers. The first ones are made of brick or iron. You can also add an interesting iron element - massive chains on which the hood will be attached.
Purpose of kitchen ventilation
During the cooking process, a whole bunch of dangerous chemicals are released into the air.
Among them are:
Carbon monoxide (CO), better known as carbon monoxide. An extremely toxic substance, even in small concentrations leading to severe poisoning of the entire body. And when the concentration of CO in a person’s blood reaches 5 ml per liter, almost instantaneous death occurs. The main danger of carbon monoxide is that it has neither color nor odor. Therefore, its dangerous concentration can be detected only by a sharply deteriorated state of health - a severe headache accompanied by vomiting. CO is released during any combustion, including when frying food on a stove fire.
- Natural gas (propane, butane, methane) is another dangerous chemical component present in the kitchen. It is commonly used as an energy carrier for gas cooktops. But in high concentrations it can not only cause human poisoning, but also cause fire and explosion. Every year, hundreds of people around the world become victims of gas leaks that could easily have been avoided with an effective ventilation system.
- Carcinogens are volatile substances released into the air when foods are fried or fats are burned in a frying pan. This is the same child that stands in the kitchen while preparing food, and then settles on the walls and ceilings of the room with a greasy coating. Carcinogenic substances, although they cannot lead to immediate death of a person, like CO or propane, are capable of accumulating in the human body. When these substances enter the liver, kidneys, and lungs, they ultimately cause severe pathologies, including cancer.
- Water vapor is released when cooking soups or boiling a kettle. By itself, it is absolutely harmless to humans. But in high concentrations it condenses on the walls and ceilings of interior spaces, causing the appearance of fungus and mold. The fungus significantly reduces the service life of finishing materials, and can also affect the load-bearing elements of the building structure. Microscopic spores released by mold into the air cause severe allergic diseases - dermatitis, asthma, chronic bronchitis.
Air removal system parameters
To determine the most important dimensions of pipes and air intakes, you will need to perform a small calculation in the following order:
- We determine the amount of air flowing through the kitchen ventilation per unit of time;
- Knowing the cubic capacity of the kitchen air space and the recommended air speed values, we calculate the cross-sectional area and the recommended diameter of the air duct.
This is enough to build simple ventilation in the kitchen. As a rule, a kitchen ventilation system is assembled from two independent subsystems - natural and supply and exhaust. Both schemes are calculated based on the maximum air exchange rate in the isolated kitchen space. For a private home, according to SanPiN 2.1.2.2645-10, the air in the kitchen atmosphere should change from 3.5 to 5 times per hour, depending on the type of stoves and ovens used.
If the kitchen is planned in the form of one large studio or pavilion, or a semi-open veranda, the gas exchange rate can be reduced to 2.5-3 times.
How do kitchen hoods differ from air conditioning systems?
There is a significant difference between kitchen hoods and air conditioners. As you know, air conditioning systems absorb air from a room and return it cold or warm. Such air is very dry and harmful to health, since various odors, microbes and carbon dioxide, which is formed when exhaling, are not removed from the apartment.
There is a significant difference between kitchen hoods and air conditioners.
And the illusion of fresh air appears due to the fact that its density increases as it cools. While the kitchen hood removes air containing harmful substances and bacteria, thereby maintaining a healthy and fresh atmosphere in the apartment.
And the illusion of fresh air appears due to the fact that its density increases as it cools.
Note! If an air conditioner is installed in the kitchen, then there must be a ventilation system to maintain natural air exchange
Varnishing stage
Answering the question of how to make a kitchen hood, let's consider the varnishing stage. For this purpose, you should use a varnish that boasts its fire-resistant qualities. It has simple but mandatory requirements:
- it must withstand operating temperatures up to two hundred degrees;
- could interact with wood products.
The boards must be properly prepared, that is, dried. For this purpose, we hang the material over the stove. The boards should be dried before you start sawing them. Afterwards, you can lay the soil necessary to protect against rotting processes and various pests.
The first layer of varnish is mixed in a ratio of one to four with solvent. This solution must be used to coat the wood after priming. This is done for the purpose of subsequent reliable settling of the varnish, otherwise the bottom layer will begin to peel off from our exhaust device.
After this layer has completely dried, it will be possible to carry out work on creating a dome. It is also worth noting that specialized products can be used to speed up the drying process of the varnish.
Creating a hood dome
Homemade plasterboard hood
Tools and materials
The easiest way to make a hood is to build a corrugated pipe with an electric fan into a kitchen cabinet located directly above the stove or hob. But such a hood cannot be called beautiful - which means we will take a different, more complex, but more productive path!
Frame elements
To make a passive dome hood we will need:
- Moisture-resistant drywall - from this we will make a box to house the air duct and the dome of our hood itself.
- Galvanized metal profiles for the frame of the box and dome.
- Perforated metal corner for decorating the corners of our hood.
- Corrugated pipe - air duct.
- Fastening elements.
- Insulating material for wrapping corrugated pipes.
- Putty and paint for finishing the dome.
Corner overlay
The set of tools with which we will make our hood will be familiar to anyone who has ever worked with drywall:
- Hammer.
- Screwdriver.
- Metal scissors for cutting profiles.
- Tape measure and level (preferably laser).
- Spatulas and brushes.
When everything is ready, you can start working.
Manufacturing
We begin work on the manufacture of the hood by marking the room. We will need to place on the wall not only the hood itself, but also the air duct, which we will hide in a plasterboard box to ensure the aesthetic appearance of our kitchen.
The easiest way to mark is if the ventilation hole in the kitchen is located above the stove itself. If the hole is to the side, you need to mark on the wall the position of the box for laying the air duct.
Hood placement diagram
When we have decided on the placement of the air duct, we proceed to making a frame for it:
- We attach a starting profile made of galvanized metal to the wall at the level marking the lower surface of the air duct box. To fasten the profile we use anchors with a 6 mm plastic sleeve.
- We also attach the starting profile to the ceiling according to the markings we applied. If we plan to make the air duct box curved, we cut and bend the profile before fastening it.
- From the starting profile, we lower several vertical fragments of the main profile down, attaching them to the starting profile using self-tapping screws.
Drywall box
We complete the formation of the frame for the box by installing another panel of the starting profile on the resulting hangers. We install transverse strips on the lower part of the resulting profile, which will then be covered with plasterboard.
You can study in more detail the technique of working with drywall and the profile for it by watching video instructions on the Internet.
Making the hood body
The box is ready - it’s time to move on to making the hood itself:
- From the starting profile we make the lower frame of our hood, securing it to the kitchen walls. The easiest way to attach the frame is if we install the kitchen hood in a niche - otherwise the side parts of the frame will need to be additionally attached to the box.
- We cut out the frame elements of our future structure from the main profile, and use them to connect the box with the lower frame, as shown in the photo.
Hood frame
To add rigidity to the structure, we reinforce the side surfaces of the hood with transverse bridges from the profile.
The frame is ready. Now all that remains is to attach the air duct from the corrugated pipe to the ventilation hole - and you can cover the dome with plasterboard.
To prevent the air duct from making noise during operation, we wrap it with batting or other soundproofing material.
Hood finishing
We finish the hood as follows:
- We cover the air duct box and the hood body with plasterboard.
- We protect the corners with a metal perforated corner.
- We putty the resulting plasterboard structure, masking the joints of the plasterboard sheets and the locations of the fasteners.
- We paint the hood in the color of our choice or finish it in another way. Our homemade kitchen hood is ready.
Exhaust after putty
The advantage of this technology is that this instruction is suitable not only for the manufacture of a passive hood, but also for the manufacture of an active type hood. In this case, it is enough to install an electric motor inside the housing at the entrance to the air duct and connect it to the network.
Selection of materials
It is recommended to mount a metal hood strictly in the center so that it hangs over the equipment. The pipe is covered with a visor to prevent moisture from entering. The material commonly used is copper or stainless steel, which resist corrosion best. Such materials can be used for a long period of time.
A metal hood is the most acceptable option; it is relatively inexpensive and has excellent performance characteristics.
Red or fireclay bricks are also used for hood, which have no less good technical characteristics. The mortar used for masonry is made in proportions of 1: 3, where 1 is cement of a grade of at least 400, and 3 shares are sifted sand.
Accessories
The following components are required to create a hood for a large barbecue:
- pipe;
- spark arrester;
- grease trap;
- fan with motor.
All components are collected from different sources. A brazier fan can be purchased at a store; a spark arrester and a grease trap can be easily made from a metal sheet. The most important element is the pipe, which must correspond to the operating power of the device. If the cross-section is too small, combustion products will enter the room, which is extremely undesirable. Before creating a hood, you need to make a detailed drawing and carry out careful calculations.
Construction of drawings
A correctly drawn up drawing is a guarantee of flawless operation of the device for many years. The cross-section of the pipe and the weight of the barbecue are the main parameters that must be taken into account when developing the plan diagram. You should start drawing a drawing with a sketch and drawing the basic dimensions of the barbecue. Based on these numbers, it will be possible to further calculate and draw the hood. A correctly drawn up drawing will also allow you to calculate the amount of material required. Avoid overspending.
Assembly Instructions
- First, the dome is assembled. Then the pipe is assembled and secured.
- After completing the welding work, the seams are processed with a grinder. The finished surface is coated with a fire-resistant anti-corrosion primer.
- Then you should mark the metal that will be used to cover the exhaust hood. Sheets are bent at the corner of the workbench. The metal is attached to the base using rivets and bolts;
- It is recommended to place a metal plate (size 98 x 35 cm) diagonally into the dome, which will help improve traction. The distance from the edge should be about 1.5 cm; the plate will be attached to these edges.
- The base is mounted on the grill using anchors or special screws. Afterwards the dome is installed and the pipe is secured with rivets.
The pipe can also be made of brick, but in this case it will weigh much more.
It will require a massive, solid foundation to avoid deformation or distortion during operation. Exhaust hoods made of bricks are created according to a simple principle: a metal frame is welded, which is lined with fire-resistant material.
Often the hood can be decorated with wild stone. A metal umbrella can also be covered with wooden panels; There must be a thermal gasket between the panels and the metal.
Standards and requirements for kitchen exhaust systems
The air duct of the kitchen hood ventilation system has a square or round cross-section with a width or diameter of 130 mm. If the exhaust equipment is installed away from the ventilation shaft, the air duct in the room is mounted using a corrugated pipe, which can be steel, aluminum or plastic. The most common choice is aluminum.
Aluminum corrugation has an aesthetic appearance. It is cheaper than the steel version and much stronger than its plastic counterpart.
Recommendations for choosing a hood:
Depending on the length of the ventilation duct, the required fan power is determined. An axial device mounted on hoods of a low price category is effective only when connected to a short ventilation duct through the wall. If the channel is long and has several turns, the power of such a fan will not be enough to remove polluted air outside. The type of exhaust unit - flow-through or recirculation - is selected depending on the distance from the stove to the ventilation duct (or its presence)
However, even if the ventilation duct is far away or absent, a flow-through type can be installed. The required power of the unit is calculated taking into account the cross-section of the corrugated pipe connecting the hood to the ventilation. Pay attention to the noise that the device will produce. The noise level of the exhaust system should not exceed 58 dB
The noise level of such equipment, which does not disturb comfort, is 44-46 dB.
The color, design and shape of the equipment, as well as the type of control, are chosen according to personal preferences.
If you do not take into account the rules for choosing the power of the unit, the device will consume a lot of resources, producing low efficiency. The power of the exhaust device is measured in m³/h. Many are sure that the more power the hood has, the better, but this opinion is wrong.
The purpose of the unit is to remove unnecessary odors and impurities from the air, and not to ventilate the room. Since the capacity of a pipe with a diameter of 130×130 mm is 400 m³/h, a hood with a higher power will be useless.
The height of the hood above the stove depends on the type of hob. SNiP standards for hoods: above gas stoves - 750-850 mm, above electric stoves - 650-750 mm, above combined stoves (where there are gas and electric burners) - 700-800 mm. The inclined hood is mounted at a distance of 550-650 mm from the working surface of the gas stove, 350-450 mm from the countertop with an electric stove and 400-500 mm from the combined hob.
To install a kitchen hood through a wall, you will need a device with certain characteristics. A hood that is too powerful makes a lot of noise, leaving some of the combustion products inside the room
When using any hood, the exhaust shaft must be anti-corrosion painted every three years.
Preliminary calculations
Before making a kitchen hood with your own hands, you will have to perform some calculations. First, calculate how much air needs to be purified. This parameter depends on the size of the room.
Calculate the volume of the kitchen by multiplying the length by the width and height. Then the resulting result is multiplied by a special coefficient from the SNiP tables.
In a house with a gas stove, a coefficient of 20 is used (it is believed that gas pollutes the air more, since additional combustion products are released), with an electric stove - 12.
The resulting number indicates the required extraction capacity in cubic meters per hour. Thus, the formula is obtained:
P = (a × b × c) × K
Then they move on to calculating the electrical part. As a rule, all household units consume no more than 1 kW/h and require wires with a cross-section of 2.5 square meters. mm, used in apartment lines, so they can be freely connected to simple household sockets.
There is no need for separate grounding for the hood. However, in new buildings a separate two-core wire is installed directly under the ventilation.
The dimensions of the air ducts do not require complex calculations. They must comply with one simple rule: be no larger than the ventilation hole of the common house duct.
When designing, the pipe must be laid with a minimum number of turns. Each angle reduces the performance of the hood.
How to ensure air flow into the apartment
The supply of fresh outdoor air to the apartment for kitchen ventilation can be organized in two ways:
- window supply units;
- wall supply devices.
The installation of the window valve will have to be entrusted to specialists. And installation of a wall supply valve can be done by any home craftsman.
Window ventilation valve
These are simple and inexpensive devices that are now an essential element of kitchen ventilation systems in modern homes. The valve ensures normal air flow, blocking street noise.
Supply valves are installed on the window sash or frame. A window in the kitchen of an apartment, equipped with a ventilation supply valve. will never fog up. The neat and small valve is almost invisible, does not allow dust to pass through and does not cause air cooling.
You can not only make ventilation in the kitchen, but also equip it with such technical “bells and whistles” as hydroregulation of the inflow. There are supply valves with this function on sale. They open and begin airing precisely when soup is being cooked or pies are being baked in the kitchen, that is, the air humidity is increased. The sensor reacts to the humidity level and changes the flow area.
An additional acoustic visor can be purchased for the valve, which absorbs street noise.
A wide range of supply valves allows you to choose one suitable for any window profile: white, black, oak or teak.
But in order for the supply valve to perform its function efficiently, it is necessary to ensure the outflow of air from the kitchen.
Wall supply ventilation valve
supply valve device
Wall supply valves are also called “Finnish vents”. This is a small device that is not difficult to install, but without it, proper ventilation in the kitchen is impossible. The wall valve allows air into the room, trapping insects, dust and drafts.
The advantage of wall valves is that they are easy to install. There is no need to call a specialist and spoil the plastic window profile.
Other advantages of wall valves:
- does not use electricity;
- absorbs noise;
- has a small size and nice design;
- easy and quick to install.
There are wall valves with air filtration and automatic air supply based on hydroregulation. The intensity of the air supply can be adjusted manually by closing or opening the curtain.
Once every 6 – 12 months it is necessary to clean the filters by rinsing them with warm water.
Installation of a wall supply valve
Before installing a ventilation valve in an apartment, you need to choose a suitable place in the kitchen. It is better that the valve is not too conspicuous. Many people choose a place near heating radiators. The air coming from the valve will be preheated. The main criterion for choosing a location is the presence of access to the street for access to fresh air:
- A hole is made in the wall slightly larger in diameter than the valve pipe. A small margin is necessary for the correct placement of the pipe;
- The pipe is inserted into the ventilation hole in the kitchen. The cracks between it and the wall become foamy;
- The excess piece of pipe is cut off (usually it is sold in a standard length of 1 m). The outside of the pipe should be flush with the surface of the wall, and inside it should protrude no more than 1 cm;
- In pre-marked places, holes are made for fastening the housing;
- Filters are inserted (if they are provided for in the design), and an external grille is installed;
- A rain deflector is installed on the street side to prevent moisture from entering. If you drill a hole with a slope towards the street, a rain deflector is not needed.
Proper organization of passive supply ventilation in the kitchen is possible if air outflow is ensured.
Why does the check valve sometimes not work and close?
On the kitchen side, a check valve is mounted on the tee.
In the factory version it will be quite long. In this case, it is better to shorten it so that this “gun” does not stick out too much. The valve is inserted inside a section of a standard air duct d-125mm, and this air duct is put on and siliconized onto the tee.
If this whole structure seems too cumbersome to you, and the protruding pipe with the valve is not very aesthetically pleasing, you can do it a little differently. You make the air duct not with a round pipe, but with rectangular channels.
In this case, you install the above check valve on a straight section, as close as possible to the turn.
You can't achieve a factory connection here, so you'll have to farm collectively. Buy a rectangular tee with a round outlet on one side. Next, this round timber is cut off and a check valve is glued in its place.
The valve is placed strictly at an angle (2 degrees). Otherwise, it will open every once in a while or not open at all.
Many people have encountered this problem and easily solved it this way.
The damper itself is also mounted with a vertical deviation. The upper turning point, based on the hour dial, is at 13.00 (1 o'clock), and the lower one is at 17.00 (5 o'clock). This is if your flow direction is from right to left.
Otherwise, the circle is placed at the 11 o'clock - 7 o'clock position.
For more reliable operation and stable opening of the damper, you can stick some kind of weighting material (no more than 2 grams) on one side. Glue it close to the edge.
By the way, do not throw away the previously cut round pipe. It is tightly inserted onto the valve from above, after which a decorative grille diffuser is mounted on it.
What nuances might there be with this method? If your hood stands exactly above the entrance to the ventilation shaft, and the duct pipe goes straight, without any turns in the horizontal plane, then the valve installed on such a straight section does not work normally, at least at 1st speed.
You will simply have nowhere to get the increased pressure to close it. The air will fly through this “turn” in a straight line. You definitely need an angle.
The valve cover and its rotating mechanisms are easy to clean and do not be afraid of them becoming overgrown with grease. For this to happen, you will have to fry huge wild boars on the stove and stew them in your oven for several hours a day, no less.
If you don’t want to see a protruding “hollow” under the ceiling at all, then, as an option, you can install a tee so that the middle elbow rests against the wall, otherwise, where the valve is located, it would look to the side. In this case, also close the hole with a decorative cover.
Everything will look much nicer. However, due to the additional rotation, the performance of natural ventilation will deteriorate slightly. And the grill will reduce it by another twenty percent.
In addition, it will no longer be possible to clean the channel by hand or with a vacuum cleaner. But many do this deliberately and even hide the entire structure in a wooden or plastic box.
As they say, beauty requires sacrifice.