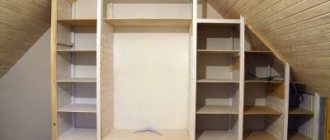
If the closet is large, then finding the right thing in it is problematic. Therefore, a backlight is built inside the case. For convenience, it is better to install a motion sensor in the closet, which will automatically turn on the lighting.
- Advantages of lighting in such places
- Necessity
- For sliding wardrobes
- dressing room
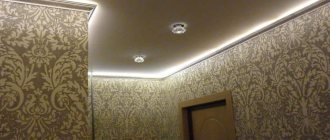
- Hallway
- How to install
- Installation sequence
- Types and methods of connecting with your own hands
- Contact when opening doors
- Wired with motion sensor
- Wireless with motion sensor
- Possible options for installing backlight using sensors
- Wardrobes
- Hallway
- Recommendations for self-installation
- Video showing the ease of use of cabinets and drawers with their own lighting
Backlight selection
Types of spotlights
Incandescent lamps are absolutely not suitable for lighting in a furniture cabinet. The efficiency of such light bulbs is extremely low; a large percentage of energy is spent on thermal radiation. This leads to an increased fire hazard, fading of the fabric, as well as damage to the material from which the furniture is made.
To illuminate the interior of the cabinet, the following types of spotlights are recommended:
Halogen lamps
They have rather low productivity and service life. The advantages include low cost and power supply from a low-voltage network.
Fluorescent lamps
Their performance characteristics are better than those of halogen ones, but there is a significant drawback - the release of mercury vapor in the gas mixture.
LED strips
They already have a number of small LEDs built into them. They come in a variety of colors, which is a plus for mood lighting.
LED bulbs
Ten times more powerful than halogen. Service life - up to 30 thousand hours. The disadvantages include the high cost.
LED backlight
Let's talk more about LED backlighting. It is divided into separate LED spotlights and LED strips, including RGB - capable of changing their color depending on the mode selected on the control panel. Tapes are much more convenient from both a decorative and operational point of view.
They are quite flexible and easy to install by hand. However, there are also difficulties. Firstly, for the LED strip you need to buy an additional power supply separately. Secondly, the tape either must initially be equipped with protection against dirt, or in addition to it you will have to buy a protective corner that prevents contamination. If these measures are not followed, the tape will quickly fail. And the complete set is quite expensive.
Cabinet lighting from Ikea
The innovative lighting system from Ikea stands out. NORFFLI LED lighting is equipped with a sensor, thanks to which the light turns on when the cabinet door is opened and turns off when it is closed. A micro switch allows you to change the automatic mode to normal - then the light is on constantly or completely off.
Recommendations for self-installation
In order for the installation to be correct and quick, and the lighting to fit the specified parameters, you must follow the tips:
- All lighting components must have waterproof protection (covers). This will extend the life of the device and ensure safety.
- It is important to ensure the tightness of the structure so that dirt, dust and moisture do not get there.
- The joints must be sealed to prevent moisture from seeping into the sensor and wiring. This significantly reduces the service life of the devices. To do this, the structure is placed under a protective cornice, which is usually laid along the inner corners of the cabinet.
- It is better to avoid using incandescent lamps. They consume a lot of electricity and negatively affect the operation of the sensor, since the heat from them helps turn on the backlight.
It is better to use copper wiring as aluminum, since aluminum requires special handling. In addition, the temperature inside it may rise, which reduces the accuracy of the backlight sensor.
Having a backlight with a motion sensor is a very convenient, modern option.
Preparation for installation
Technical requirements
When installing the lighting yourself, you must comply with the requirements to ensure comfortable and safe use of the equipment.
Lighting for a furniture cabinet must comply with the following standards:
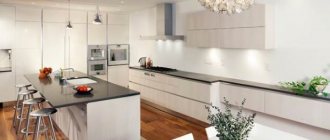
- the degree of illumination for the hallway is not lower than 50 Lux, for the dressing room - not lower than 75 Lux, for the kitchen - not lower than 150 Lux;
- since there is a possibility of direct contact during operation of the backlight, a reduced voltage should be used to power it;
- wires must be connected to the lighting system in one of the following ways: crimping, soldering, terminal connection;
- if the backlight is powered from a standard network with a voltage of 220 V, the network must be protected by an RCD, which will ensure that the lighting is turned off if the insulation is broken;
- The lighting should not be too bright and comfortable enough for the eyes.
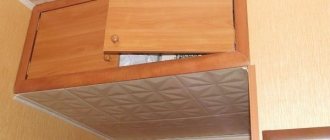
Recessed furniture lamps
They are installed in pre-cut holes, which are usually located on the canopies of cabinets. There are rotary and stationary types of mortise lamps, using halogen or LED lamps. If the thickness of the lamp is slightly greater than the thickness of the panel in which it is mounted, spacers are installed in the upper false panel of the built-in cabinet. In this case, the back of the lamp, when heated, does not come into contact with the ceiling.
Manufacturing materials are reflected in the cost of the lamp. For production they use: glass, gypsum, plastic, metal and wood.
If you don’t want to embed lamps into furniture, then you can use special lampshades to install them.
Choosing a mounting location
What kind of LED lighting would you install in your closet?
ExternalInternal
The installation result directly depends on the correct choice of location for installing the lighting system. It is important to consider the type of room (hallway, kitchen, wardrobe, bedroom), type of furniture (dressing room or kitchen). Also, depending on the location of the devices, cabinet lighting is divided into internal and external.
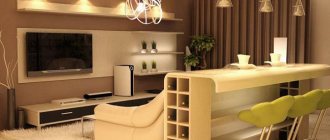
External lighting
External lighting is provided by embedding lamps in furniture elements. Soffits can be placed on the doors and open shelves of the cabinet, as well as on the protruding canopy above the doors (if there is one). Soffits can be built not only into cabinet elements, but also on the surface above and below it.
Before installation, you need to check how this lighting will affect the appearance of the furniture. In the wrong place, open lighting can ruin the overall impression of the cabinet design.
Interior lighting
There are several principles from which to proceed when choosing the location of the backlight:
- On the top surface of the cabinet in the middle. Suitable for large internal compartments.
- On the front edge of the shelves. Used for multi-tiered cabinet sections. Such equipment will ensure uniform illumination of all shelves.
- On the rear top edge of the shelves. Suitable for small compartments, as it provides sufficient lighting and visually expands the space.
- On the side walls. Suitable for both low and high sections.
Expert opinion
Korzhavin Daniil Dmitrievich
Designer of stylish home furniture
The lighting should be located so that doors and drawers do not touch lamps, switches or wires. In addition, the lighting system should not interfere with the free use of the interior space of the cabinet.
Switches for sliding wardrobes
Switches for lighting furniture and wardrobes can be divided into:
- mechanical
- contactless (touch) switches.
Let's look at specific examples of wardrobe lighting devices, without focusing on the manufacturers, because in general they are similar.
Mechanical switches
Mechanical switches - here mechanical action is required to turn the wardrobe lighting on and off.
| Rice. 1. Mortise mechanical switch |
The switch can be mortise, inserted into a pre-drilled hole, or overhead, triggered by direct contact with a person’s hand, or triggered when the door is pressed against the pusher when closing.
| Rice. 2. Switch activated when the door is closed |
There are options for swing doors and sliding doors.
| Rice. 3. Switch operation diagrams for swing doors and compartment doors |
Inventory
To install a lighting system, you must first draw up a power supply diagram for the devices. Batteries, lamps and switches should be marked on it. It is most convenient to make a drawing on the cabinet diagram that comes with it. The next step is to transfer the markings to the cabinet frame, marking the places where the wires will be laid and where the lighting fixtures will be installed.
To carry out installation work, the following basic equipment is required:
- LED strips or individual spotlights;
- cables (the determining factor is power consumption);
- 12 V power supply;
- controller (when connecting a color RGB strip);
- light box (for completing closed LED strips);
- flux, solder and terminal connectors (for making electrical connections);
- switch or control panel (for manual control of the backlight);
- motion sensor (to create “smart” lighting with automated on/off).
Also during installation you will need the following tools:
- drill with attachments;
- screwdriver or screwdriver;
- construction stapler;
- stationery knife;
- soldering iron;
- pliers;
- wire cutters;
- scissors.
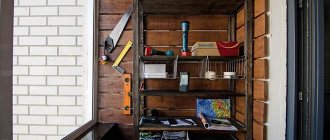
Installing lamps in a closet with clothes: do-it-yourself installation
If the closet is large, then finding the right thing in it is problematic. Therefore, a backlight is built inside the case. For convenience, it is better to install a motion sensor in the closet, which will automatically turn on the lighting.
Installation step by step
After all the preparations, you can begin installing the lighting. We will analyze cases with individual spotlights and LED strips separately, since each type of lighting has its own characteristics. If you purchased a ready-made lighting system, for example NORFFLI, installation is carried out according to the instructions included with the product.
Installation of individual spotlights
The entire installation consists of the following steps:
- Carefully drill holes at the installation points. To avoid damaging the chipboard, advance the crown slowly and without jerking. Before doing this, fix the center with a drill.
- Mount the switch on the cabinet as high as is comfortable for you. If there are children in the house, it is necessary to place the switch at a height inaccessible to them.
- Strip about 1 - 2 cm of the cable on both sides to connect the equipment.
- The wires must be inserted into the terminal blocks of each lamp, as well as the switch, and then secure them. You also need to connect a converter if you have a step-down power supply. If there are no pads, you can solder the wires with a soldering iron.
- The next step is to turn off the mains voltage and connect the lighting to the apartment circuit.
- Insulate all connections. Upon completion of work, make sure that the cable is intact around the perimeter.
- Check the functionality of the lighting equipment.
LED strip installation
The tape is much easier to install.
However, installation is not carried out in one stage. If you want to integrate an LED strip into a cabinet, here is a step-by-step action plan:
- Cut the piece of tape to the length you need (there are special marks on the strip for this).
- A plastic strip is needed under the tape. You can attach it by gluing it to liquid nails or double-sided tape.
- Drill a hole in the cabinet wall for the cable.
- From the input, route the wires to the location where the tape is installed. For this purpose, it is best to choose a corner of the cabinet. Install cable ducts that will hide the wire.
- Stick the LED strip on, then connect it to the cables and switch.
How to install
To prevent the backlight from turning on every time you open the door, you need to decide on its type and characteristics. It is important to correctly calculate the direction of installation of the device and the angle of action.
There are three types of lighting inside the cabinet:
- directional – has a certain coverage area;
- scattered - used as a decorative element;
- changeable by program - settings are preset for it.
Thus, if the cabinet does not block the lighting of the room, then it is recommended to install the lighting deeper, closer to the back wall. Then it will work later and highlight only those areas where it is dark. Otherwise, closer to the door so that the backlight works immediately when it opens.
Advice! If you need to install a programmable lighting option, the photocells are attached in two places: one near the door, the other to the wall.
Installation sequence
The best option would be to install lighting at a height of 300-400 mm from the floor. The location should be such that most movements occur through the sensitivity zone and not near the detector.
What to especially pay attention to when choosing lamps and fixtures
Of course, it is important to take into account your wishes and preferences. But there are a number of parameters that also require attention:
- Interior Design. If the room is already decorated, the illuminated cabinet should fit harmoniously into it. Even small lamps should be chosen taking into account how the room is decorated.
- Area and level of illumination. Bulky lamps will make a small room even smaller. If, on the contrary, it is large, small light sources will look extremely ridiculous.
- If we talk about choosing lamps, it is important to take into account their power, brightness, and color.
And, naturally, you need to decide in advance on the acceptable price. It is worth remembering that cheap products from unknown manufacturers quickly fail. Therefore, experts recommend choosing high-quality lamps that can perform their functions uninterruptedly for a long time.
LED lights
The source of light in them are LEDs. The design of such lamps includes: a base, a metal case (serves as a radiator), a board with diodes, an electronic driver (converts power) and a translucent plastic hemisphere.
Main advantages of use:
- Long service period. Conventional incandescent lamps are designed for 1500–2000, fluorescent lamps - 7000, and diodes can withstand up to 50,000 hours of operation.
- Economy. In terms of energy consumption, LED lamps are 2 times more economical than fluorescent lamps, and 10 times more profitable than conventional lamps.
- Quality of light. The glow from the diodes more accurately conveys the spectrum of sunlight, therefore it is natural and safe for human eyes. Such elements do not produce invisible flicker that is harmful to vision, like incandescent lamps. And LED lights do not produce ultraviolet radiation.
- Security Level. Fluorescent lamps contain mercury, which requires their special disposal, separately from household waste. For diodes this procedure is not necessary.
LED lights most commonly used in wardrobes
- Sets containing 3 round lamps.
Each lamp contains 19 diodes with a power of 1.14 W. The total power consumption of the kit is 3.42 W.
- LED lines.
- Faro LED lamps.
They are distinguished by their autonomy and lightweight body, which contains three bright LEDs inside. They are placed so as to provide maximum illumination of the contents of the drawer in the wardrobe. A lamp like this was invented specifically to perform this function. A special sensor and electronic chip automatically turn on the light when the drawer is opened or pulled out, and the light turns off after 15 seconds if there is no movement. The lamp is designed for 20,000 such operating cycles. It is easy to install, because it is attached to the inside of the drawers using an adhesive base, and runs on AAA charging elements.
Types of power supply systems
There are two types of cabinet lighting power supply:
- from the household electrical network - a reliable, but not the most convenient option. In this case, you will have to think about how to hide the wire. In addition, the backlight will not function in the event of a power outage;
- Autonomous - lamps are powered by batteries or rechargeable batteries. The first option is more budget-friendly, but the batteries are durable and guarantee high-quality power supply for the backlight.