Do you think that knitted potholders are a thing of the past, that no one decorates the kitchen with such accessories anymore? But you are mistaken, on the Internet we found many beautiful potholders, potholders of unusual shape, the kind that any needlewoman would not be ashamed to show off. We bring to your attention a selection of the most interesting models of knitted potholders.
What materials should I knit a potholder from?
The purpose of any oven mitt in the kitchen, in addition to aesthetic beauty, is to protect the housewife’s hands from hot pots and pans. Therefore, when knitting potholders, choose threads of medium thickness; they are most suitable for our purpose.
It is better to make the tack two-layer, i.e. you need to knit the front and back sides and sew them together. If, in your opinion, the resulting potholder is a bit thin, then insert a layer of 2 layers of flannel or 1 layer of padding polyester inside for compaction.
Don't forget that each potholder must have a loop. It can be knitted with knitting needles from a hollow cord and sewn to the main part.
Techniques for knitting potholders:
- knit or purl stitch, so you can knit potholders from fashionable T-yarn;
- jacquard potholders (look especially impressive with New Year's patterns);
- potholders with shadow patterns;
- potholders knitted in a circle;
- potholders with arans and braids;
- potholders combined with fabric.
We do not urge you to knit potholders, because now such a selection of different kitchen accessories is available in stores. We just want to emphasize that knitted accessories in the apartment emphasize the unique style of each housewife and create coziness in the house.
Preparing for work
It is advisable to carry out all preparatory activities in advance. This will save time during creativity: during the work process, everything you need will already be at hand. You won’t have to be distracted by searching for this or that material.
Yarn selection
It is important to pay attention to the color of the yarn and its density. Too thick will be difficult to work with, and thin will allow heat to pass through. The color is chosen taking into account the type of product or the wishes of the kitchen owner. Experienced craftswomen select the shade of the threads so that the finished product matches the rest of the interior details.
Handicraft stores are replete with a variety of yarns. For knitting potholders, it is best to choose:
- Cotton – has been used for over 150 years. The products are durable, such potholders are not afraid of frequent washing. High-quality threads retain bright color for a long time.
- Linen is a durable natural material, but difficult to dye. These threads are suitable for lovers of natural colors.
- Bamboo is a pleasant thread with good strength. Working with such threads is pleasant and easy, but the cost may seem high.
Synthetic and woolen threads can be used to knit potholders. In the case of synthetics, it is worth buying threads from trusted manufacturers. A product made from low-quality yarn may become covered with pellets over time.
Types of hooks
The hook number is chosen depending on the thickness of the yarn. Manufacturers usually indicate the number of the suitable knitting tool on the label. For example, for wool No. 7-8, a hook No. 4-5 is suitable for yarn with a double thread of medium thickness.
Scheme
The schemes allow you to get the job done quickly and efficiently. If desired, you can deviate from the existing requirements. Finding patterns is not difficult; today there are many options for knitting patterns for almost any item. All you need to do is find the one you like and start crafting. Even a beginner can crochet potholders with diagrams and descriptions.
Simple diagrams describing the technology of work depending on the type
There are a huge variety of patterns for crocheting potholders. Below are the most popular ones.
Round
The easiest way to knit a round potholder. This model is suitable for those who have just begun to learn the basics of working with crochet. First, 3-4 air loops are collected, connecting into a ring. Then, by adding them, each row is knitted with any of the columns.
Add 1 loop after 3 knitted ones. Thus, each new circle of loops will be wider than the previous one. The process continues until the desired size of the product is obtained. A round potholder can be plain or colored.
It looks beautiful when a plain circle is tied with a brightly colored thread.
Square
Square potholders are even easier to knit with your own hands than round potholders. First you need to decide on the size. Square shaped oven mitts are easy to use.
The pattern looks like this: the desired number of air loops is cast on (focus on the size of the thread so that it is enough), and then, followed by alternating or repeating the stitches, knit until the product follows the pattern, with the same width and height.
When looking for information on how to crochet a potholder for beginners, you should pay attention to the square model, and specifically to the variety of its colors.
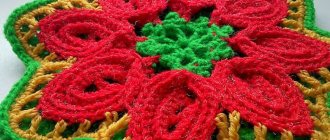
Flower
Beautiful potholders are easy to crochet in the shape of a flower. Even a beginner can successfully handle this model. Schemes with descriptions are presented in the table below. By alternating yellow, white and black threads you will get a daisy.
Loop designations:
- B – air;
- 1H – with 1 double crochet;
- 2H – with 2 yarn overs;
- B - without a crochet.
| Row No. | Column type | Number per row | Note |
| 1 | IN | 8 | – |
| 2 | 1H | 18 | – |
| 3 | B, attached to B | 24 | Four loops fall on three loops of the previous row. |
| 4 | 1H | 18 | The place of fastening is skipped. |
| 5 | 2H | 18 | – |
| 6 | B | 24 | – |
Heart
Do-it-yourself potholders in the shape of a heart are knitted mainly with double crochets and single crochets. Original potholders are made on the basis of 30-34 air loops. This interesting thing is knitted according to the following pattern:
- We cast on 34 air loops.
- Then we tie 15 with a single crochet, skip 5 and finish the rest with a single crochet.
- At the turn of the arc, we make 7 double crochets so that the hook turns in the opposite direction.
- Using the same pattern, we continue knitting on the other side until the desired size of the item is obtained.
- You should add 5 air loops from the bottom and the same number from the top of each row.
- The product is made in 6 or 7 rows.
Handicraft will become more interesting if you use red and white threads in combination with the step-by-step instructions provided. To ensure reliable items, knit with thick threads and crochet number 3-4.
We knit three identical plies
We knit two products with different shades. We connect the elements in a checkerboard pattern.
Strawberry
The strawberry potholder is knitted with three colors of thread: red, white, green. The berry itself is made from red thread. The seeds in the strawberry are embroidered with white thread in the form of small dots over the entire area of the product. The pattern for crocheting a strawberry potholder is presented in the table.
| Row No. | Column type | Number per row |
| 1 | IN | 5 |
| 2 | B | 7 |
| 3 | B | 9 |
| 4-40 | B | +2 to the previous row |
Green thread will be needed for the tail. Leaves can be knitted in the shape of triangles, connecting them together. A more difficult option is to make a paper pattern of a leaf. Using it, knit several identical parts and sew them. The finished leaves need to be sewn onto the strawberry.
Sheet
Knitted potholders in the shape of a leaf are best decorated in any shade of green, yellow, orange or red. This product can be used to complement a flower pot holder or any other pot holder for hot dishes. The sheet is not knitted with thick threads; its pattern is presented in the table.
| Row No. | Column type | Number per row |
| 1 | IN | 3 |
| 2 | B | 3 |
| 3 | B | 5 |
| 4, as well as all even numbers up to 20 | B | Repeating the amount of the previous row. |
| 5, as well as all odd numbers up to 21 | B | + 2 to the previous row. |
| 22 | B | Repeating the amount of the previous row. |
| 23, as well as all subsequent odd numbers | B | – 2 from the previous row |
| 24, as well as all even | B | Repeating the amount of the previous row |
Watermelon
Beautiful potholders are made in the shape of berries. To create an interesting “watermelon” product, you will need round blanks. How to make a potholder in the shape of a watermelon:
- It is necessary to knit a circle of red yarn until the desired size is obtained.
- Then you should disconnect the red thread, tie a white one and knit 2 rows of stitches in a circle. Oven mitts may involve changing threads.
- Then you need to tie a white circle with two or three rows of green thread, this will be the watermelon peel.
- All operations can be performed using a crochet hook of the same number. The main thing is that the thickness of the colored threads is approximately the same
- Then we will make black grains. They can be multi-colored - black and brown. The best grains are simply elongated drops knitted with dark thread, located between the middle and the edges.
You can sew a potholder for the kitchen with your own hands using this pattern if you have threads of the desired colors and a sufficient number of knitted parts. Sewing potholders will not take much time, you just need to make the correct and beautiful stitches.
Sunflower
Knitting potholders of different models is very similar. We also make sunflowers in the shape of a black circle. Then, along the entire perimeter, we crochet patchwork inserts in the form of petals with yellow thread. They should be short and consist of three to four loops in one row.
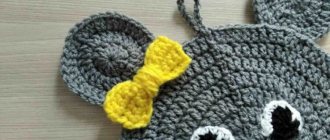
Piglet
An original and funny pig potholder, knitted in any shade of pink. To create a product in the shape of piglets, a large circle is made of yarn. It creates the outline of the pigs' faces. Then they knit a small circle - this is the future patch.
Eyes and ears can be cut out from the fabric of the desired color, and then sew them to an already knitted face. If desired, the ears can be knitted by first cutting out a template of the desired shape from paper. Before sewing all the parts, it is recommended to wash this patchwork potholder. This is necessary so that all parts fit equally.
Afterwards, the parts are sewn together, and the nickel is tied with light pink thread.
Mitten potholder
Sewing a mitten potholder is done using patterns. A sheet of paper should be cut into squares. You will need two figures. To make a mitten in the required size, we cut out the mittens.
Patterns and manufacturing diagrams
The main task is to come up with and implement the design of the future craft. Not only beautiful textile remnants are suitable for this purpose, but also various shapes - circles, hearts, squares, mittens, pumpkins, butterflies.
The sizes of the product vary depending on functionality, so it is preferable to make a solid set for all occasions: several circles or squares, a mitten, decorative cute things that lift your spirits.
To sew a mitten, prepare a pattern of the required size in advance so that after finishing the work your hand can fit freely inside. For square and round crafts, pieces of canvas measuring 20x20 cm (or others according to your desire and taste) are suitable. A strip of fabric for the loop is required - 8x12 cm.
When making potholders, it is important to accurately select textiles and heat insulators in order to protect your hands from burns. The right solution would be to use natural materials - linen, poplin, chintz, soft flannel
As an internal heat insulator, you can use synthetic winterizer, batting or an old terry cloth. When sewing a textile item, it is necessary to leave 6-10 mm on the seam.
Crocheted oven mitts for the kitchen
Good afternoon, dear needlewomen, all readers and friends of the blog!
I haven’t had any new ideas for knitted potholders for a long time, but we often need them for the kitchen, since the old ones quickly become unusable if used for their intended purpose.
Today I have an interesting selection for you: crocheted potholders. They are made of circles, completely simple, but so cute, funny and cheerful: these are potholders in the form of fruits, berries and citrus fruits, as well as in the form of animals.
I found the photo in various Internet sources, and knitted the potholder in the shape of a frog myself.
They are so easy to knit that you don’t even need patterns. And I will describe some points.
Crocheted oven mitts for the kitchen: a description of the general principles of knitting
You can knit potholders from any yarn: thin or medium thickness; usually we use the leftovers we have accumulated, since the consumption is not at all large.
What can be made from leftover yarn?
- We choose the color of the yarn to match the natural color of a particular fruit.
- The hook naturally matches the thickness of the thread.
- As you can see in the photo, the basis of all such crocheted potholders is a circle.
You can knit in single crochets or single crochets at your discretion. It is better to tie the last row with single crochets, at the same time making a loop: a chain of VP and connecting ones along it.
And although I’m talking about potholders, such products are also suitable for hot pads.
How to knit a round part of a potholder
Everyone probably knows the rules for knitting a circle. But not everyone, especially beginners, knows one small nuance of a perfectly even circle.
- The principle most often used is that when knitting a circle, increments are made evenly, first in each stitch, then through one stitch, in the next row - through two stitches, through 3, 4, 5, and so on.
- At the same time, if you adhere to generally accepted patterns and always make increases in the same place, then the circle will not be round at all, but with wedges, since between the places of increases, knitting in a straight line will increase.
- Therefore, I would advise making increases row by row in different places: either at the beginning of the row, or in the middle part between the places of increases.
- In other words: we start one row immediately with an increase, and in the next row we do the increase not immediately, but through several knitted single stitches.
- Let's say, if the 3rd row began like this: 2VP, 2SC in one column of the previous row (increase), 1 SC and so on, then in the 4th row you should knit like this:
- 2VP, 1 RLS without increase, 2 RLS (increase), 2 RLS.
- 5th row: 2 VP, 2 RLS (increase), 3 RLS.
- 6th row: 2 VP, 2 RLS without increase, 2 RLS (increase), 4 RLS.
- 7th row: 2 VP, 2 RLS (increase), 5 RLS.
- 8th row: 2 VP, 3 RLS without increase, 2 RLS (increase), 6 RLS.
- 7th row: 2 VP, 2 RLS (increase), 7 RLS.
- 9th row: 2 VP, 4 RLS without increase, 2 RLS (increase), 8 RLS.
- With this knitting the circle will turn out even, exactly round.
Leaves
You can knit simple leaves to all potholders using the same pattern:
Here we collect a chain, knit single crochets and double crochets along it according to the pattern on one side, then turn the knitting and knit stitches on the other side.
Knitted citrus and fruit potholders
- Potholders in the form of slices of citrus fruits or fruits and berries are knitted with threads of different colors.
- For example, for a watermelon the center is red, then rows of crimson, white and green.
- In the photo shown, when knitting potholders, rows of single crochets and rows of single crochets alternate.
- For kiwi, you can use pistachio, white and green.
- After the circle is knitted, seeds are embroidered on it with black or brown threads.
- Using the same principle, you can knit an orange, lemon, grapefruit and other potholders by embroidering “vein” lines on them.
How to correctly attach a thread of a different color
I would like to immediately recommend that you correctly carry out the transition from one color to another.
If you attach a thread of a new color at the beginning of knitting the corresponding row, then at the junction there will be an unsightly “protrusion” of the color of the previous row (circled in red in the photo).
To prevent this from happening, we do the following.
At the end of knitting a row, before connecting the last stitch with the first one in the circle, attach a thread of a different color, insert the hook under the chain loop of the beginning of the row, grab a new thread and pull it through the loops on the hook.
Oven slices of orange, lemon
Such cute slices. I imagined how beautiful they would look in the kitchen, such decor made from different citrus fruits.
- For tack in the shape of an orange, use threads of light orange, white and bright orange; for lemon – two shades of yellow and white.
- After the circle is knitted, it is folded in half diagonally and connected by tying it with single crochets.
- For the “veins,” chains of air loops are knitted and sewn.
Funny potholders with eyes
Crocheted potholders can be decorated not only with leaves and embroidered seeds, but also to create a fairy-tale image by sewing or gluing eyes, a nose and even blush on the cheeks.
Potholders with shadow patterns
Kitchen items with the so-called shadow pattern look very interesting.
By matching it to the color palette of your kitchen or home, you can get a very harmonious design. In addition, the same potholders can be made using a simple hosiery method by changing the color of the yarn to create a pattern.
Video: Shadow pattern “Sponges”
Knitting potholders
Home Handicrafts Handicrafts for the home Knitting potholders
Decorate your apartment for the New Year - knit a potholder with the Norwegian “Snowflakes” pattern.
Knitting pattern for potholders {jcomments on}
| Useful links for needlewomen
| |
| Crochet blanket 2022 Crochet blanket 2022 ... Read more 1494 | Curtain made of floral motifs Curtain made of floral motifs A bright curtain-curtain in the kitchen that creates a rainbow mood. Do you want to transform your kitchen for spring and fill it with bright colors? … Read more 5855 |
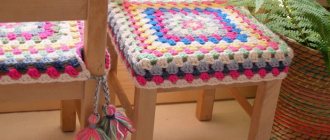
| Crochet cup Crochet cup A crocheted tea pair can become an exquisite decoration for the interior of your living room or bedroom. A tea pair consists of a cup and saucer. From such... Read more 6468 | Crochet Flower Potholder Crochet Flower Potholder If you want to decorate your kitchen with bright colors, knit potholders using bright yarn in the shape of a flower. To knit this flower potholder, they used... Read more 4975 |
| How to make pompoms? How to make pompoms? We offer you ideas for original pom-poms that you can make with your own hands. To make pompoms you will need different yarns... Read more 4817 | Crochet swan Crochet swan An original vase in the shape of a swan is crocheted. The gentle and sophisticated swan raised its wings, as if preparing to take off. Swan... Read more 6898 |
| Bag for needlework Bag for needlework A real find for needlewomen who like to spend every free minute knitting: a bag for needlework that can easily be put on ... Read more 11021 | Crochet rug pattern Crochet rug pattern A rug designed for a room is crocheted. The rug has an oval shape with rounded edges. It is better to knit such a rug from threads ... Read more 23003 |
| Knitted boxes Knitted boxes Having such a creative skill as the ability to crochet or knit, you can knit not only things for yourself and your entire family, but also various ... Read more 25180 | Crochet fillet napkin Crochet fillet napkin A rectangular napkin is crocheted using the fillet lace technique. The napkin is crocheted. The napkin is crocheted with an ancient ornament using ... Read more 13271 |
| Crochet children's pillow Crochet children's pillow Crocheted "Bear" pillow. To knit a pillow you will need two colors of yarn: bright yellow and brown. Round pillow. … Read more 11146 | |
| Crochet Hare Pillow Crochet Hare Pillow Children's pillow in the shape of a cheerful hare is crocheted. The pillow is round in shape; large bunny ears, legs and ... Read more 11724 are knitted and sewn onto it separately. | Rug with Popcorn pattern Rug with Popcorn pattern A charming round rug is knitted with the “Popcorn” pattern. The pattern chosen for this rug turns out to be voluminous, so this rug is very... Read more 36322 |
| Crochet Cat pillow Crochet Cat pillow Two pillows in the shape of black and white cats are crocheted. Simple mother-of-pearl buttons were used as eyes and nose, and the mustache was embroidered with contrasting ... Read more 32341 | Crochet egg stand Crochet egg stand For the holiday of Easter - a crocheted egg stand. The stand holds its shape well and is knitted from yarn in several bright colors. … Read more 16117 |
| Patterns for crocheted curtains Patterns for crocheted curtains Curtains for a modern kitchen made from fabric can be decorated with crocheted motifs. This is a great idea to make... Read more 13232 | Crochet boxes Crochet boxes Boxes for storing various small items are crocheted. Both boxes are cylindrical in shape and have a lid. The lid of the box is decorated... Read more 32782 |
| Crochet blanket and pillows Crochet blanket and pillows A bedroom set consisting of a blanket and pillows is crocheted from square motifs. Such a blanket and pillows can become a real decoration... Read more 50290 | Blanket and pillows knitted Blanket and pillows knitted Blanket and pillows are knitted from square motifs. The set is knitted from white yarn. The size of the blanket is 80 by 128 centimeters, with a binding the size ... Read more 21892 |
| Crochet coasters Crochet coasters Beautiful coasters of various shapes are crocheted from white yarn. The selection includes stands of various shapes - there are round ones, in the form of... Read more 18879 | Crochet basket patterns Crochet basket patterns Crochet baskets are a fashionable and modern addition to the interior of an apartment. The tall basket can be used as a vase for sweets. Wide… Read more 26821 |
| Crochet a hot stand A hot stand in the shape of a polygonal star is crocheted. You can knit it in different sizes and use it as a stand, from small to … Read more 24576 | Crochet owl patterns A knitted owl in the interior is a fashionable addition to your home. You can use the crochet owl pattern to knit potholders for the kitchen. Decorate a shelf in the kitchen... Read more 19583 |
| Knitted blanket A warm blanket with a pattern of intertwined loops is knitted with knitting needles. Pattern for knitting a blanket with knitting needles... Read more 34697 | |
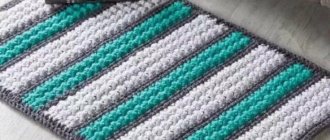
| Knitted rug A rug made of square motifs arranged in a checkerboard pattern is crocheted. Crochet rug pattern... Read more 44622 | Crochet curtains Bright curtains and curtain tiebacks with the “Hearts” pattern are crocheted. Patterns for crocheting hearts... Read more 25226 |
| Potholders with knitting needles Potholders with an ornament, which is obtained by alternating purl and front loops, are knitted with knitting needles. Patterns for knitting potholders. … Read more 24179 | |
| Crochet baskets Crochet baskets will come in handy for storing various small items - cosmetics, craft items or jewelry. Crochet basket pattern... Read more 49125 | |
| Crocheted pillowcase An openwork pillowcase will become a worthy decoration for your living room. Crochet pillowcase pattern... Read more 67037 | |
| Crochet "Snowflake" napkin A crocheted "Snowflake" napkin can decorate your apartment for the New Year or become a New Year's gift for loved ones and friends. Crochet napkin pattern... Read more 34178 |
Little tricks
If you don’t have the skill to knit an ornament yet, you can cheat and imitate the ornament by using embroidery techniques. In this way you can get real tartan and very complex checkered patterns. Initially, a fabric consisting of alternating colored stripes is knitted. Then, tracks imitating loops are embroidered on top of the canvas in a vertical direction.
Using embroidery - a secret method for beginners
By alternating the “face” and “wrong side”, you can get any ornament
In the same way, you can simply knit the fabric with purl stitch. Then a pattern is embroidered on top - be it a Norwegian star, animal figures, flowers. It turns out very beautiful and very simple. If everything is done carefully, the thing will look like a real ornament.
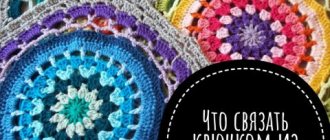
A selection of 20 patterns of potholders with knitting needles, Knitting for the home
Do you think that knitted potholders are a thing of the past, that no one decorates the kitchen with such accessories anymore? But you are mistaken, on the Internet we found many beautiful potholders, potholders of unusual shape, the kind that any needlewoman would not be ashamed to show off. We bring to your attention a selection of the most interesting models of knitted potholders.
What materials should I knit a potholder from?
The purpose of any oven mitt in the kitchen, in addition to aesthetic beauty, is to protect the housewife’s hands from hot pots and pans. Therefore, when knitting potholders, choose threads of medium thickness; they are most suitable for our purpose.
It is better to make the tack two-layer, i.e. you need to knit the front and back sides and sew them together. If, in your opinion, the resulting potholder is a bit thin, then insert a layer of 2 layers of flannel or 1 layer of padding polyester inside for compaction.
Don't forget that each potholder must have a loop. It can be knitted with knitting needles from a hollow cord and sewn to the main part.
Techniques for knitting potholders:
- knit or purl stitch, so you can knit potholders from fashionable T-yarn;
- jacquard potholders (look especially impressive with New Year's patterns);
- potholders with shadow patterns;
- potholders knitted in a circle;
- potholders with arans and braids;
- potholders combined with fabric.
We do not urge you to knit potholders, because now such a selection of different kitchen accessories is available in stores. We just want to emphasize that knitted accessories in the apartment emphasize the unique style of each housewife and create coziness in the house.
Potholder with knitting needles, models from the Internet
Potholder knitted in the round
Every housewife in the kitchen must have 1 or 2 potholders for hot items. You can buy potholders in a store, or you can knit them yourself. We found an interesting master class on knitting potholders with knitting needles in the round. In addition, you will learn an interesting way of knitting, which may be useful for knitting round parts of products or hats.
Potholders knitting patterns
Pot holder in the shape of an orange
Bright towels in the shape of a juicy orange, lime or lemon will be an excellent decoration for your kitchen. It is very easy to knit such a potholder; even a novice needlewoman can cope with this task. It is recommended to use yarn made from natural fibers such as cotton, linen or bamboo. The main type of knitting is garter stitch.
Dimensions of potholders: diameter 20.5 cm.
Source: https://knitka.ru/22655/prixvatka-spicami-podborka-modelej.html
"Kitchen Show"
Children also love to spend a lot of time in the kitchen, helping their mother with housework, drawing at the kitchen table and admiring the fire when there is a snowstorm and cold wind outside. If the housewife has a lot of funny oven mitts, then you can play real kitchen plays with your baby, give the accessories names, and come up with a new, exciting fairy tale every time.
It’s worth tying up two similar kittens to show children a fun puppet theater in the evenings. According to the pattern, where each cell is a loop, you can knit or crochet cats, just changing the colors and maintaining the outlines. On the finished product, embroider a cute face, paws and tail along the lines of the design, make eyes from felt or four buttons.
With skillful hands you can make a lot of fun oven mitts for the kitchen, the main thing is that they are made with love and a good mood!
Heart
This pot holder would make a nice gift for Valentine's Day.
To make it you need to take:
- fabric with a “heart” print in two colors - for the central part and the sides;
- plain fabric - for the lower parts;
- synthetic winterizer, thermal synthetic winterizer or flannel;
- ready-made binding or strip of fabric (4 cm wide) for its manufacture;
- decorative button;
- threads to match the color of the material, sewing tools.
Description
We cut out the templates according to the proposed sample.
We mark and cut out the blank according to pattern A. To do this, fold the fabric in half and apply the pattern to the fold line. If desired, you can make the pattern in a full spread and cut the fabric in one layer
Please note that there is no need to provide allowances when cutting. It is advisable to take into account the direction of the grain thread indicated on the patterns.
Similarly, we cut out the second blank from a plain fabric.
Using the same template, we cut out a blank from padding polyester.
The following photo shows a set of blanks prepared for this stage.
We fold the top and bottom parts with the wrong sides facing each other, placing padding polyester between them.
Using the second template, we cut out blanks for the upper side parts from printed fabric, and from plain fabric for the lower side parts.
Having folded the side parts in pairs with the wrong side facing each other, we secure them with pins.
We process the straight edges with bias tape. To perform this operation, it is better to use a decorative stitch.
We cut off the excess pieces of binding.
Fold the potholder - a heart, connecting the upper and lower parts
We pay attention to the combination of elements along the contour. If necessary, you can adjust the dimensions by cutting off excess
We connect the parts of the potholder with pins.
We process the perimeter of the product with trim. You need to start processing from the top center. At the same time, we leave a small area open in the center. This is where we will sew the loop. The following photo shows how to properly make the joint. We do not fold the beginning of the binding; we lay it over to the other side. We fold the end of the binding and lay it on top.
We make a loop from a strip of binding 15 cm long. To do this, fold it in half and sew it with a decorative seam. We insert the loop from the back, oriented downward, bend it upward, hiding the cuts, and attach it together with the finishing facing. Iron the finished potholder.
Sew on a decorative button.
The potholder is ready!
Pages: 1
Heart
This pot holder would make a nice gift for Valentine's Day.
To make it you need to take:
- fabric with a “heart” print in two colors - for the central part and the sides;
- plain fabric - for the lower parts;
- synthetic winterizer, thermal synthetic winterizer or flannel;
- ready-made binding or strip of fabric (4 cm wide) for its manufacture;
- decorative button;
- threads to match the color of the material, sewing tools.
Description
We cut out the templates according to the proposed sample.
We mark and cut out the blank according to pattern A. To do this, fold the fabric in half and apply the pattern to the fold line. If desired, you can make the pattern in a full spread and cut the fabric in one layer
Please note that there is no need to provide allowances when cutting. It is advisable to take into account the direction of the grain thread indicated on the patterns.
Similarly, we cut out the second blank from a plain fabric.
Using the same template, we cut out a blank from padding polyester.
The following photo shows a set of blanks prepared for this stage.
We fold the top and bottom parts with the wrong sides facing each other, placing padding polyester between them.
Using the second template, we cut out blanks for the upper side parts from printed fabric, and from plain fabric for the lower side parts.
Having folded the side parts in pairs with the wrong side facing each other, we secure them with pins.
We process the straight edges with bias tape. To perform this operation, it is better to use a decorative stitch.
We cut off the excess pieces of binding.
Fold the potholder - a heart, connecting the upper and lower parts
We pay attention to the combination of elements along the contour. If necessary, you can adjust the dimensions by cutting off the excess. We connect the parts of the potholder with pins
We connect the parts of the potholder with pins.
We process the perimeter of the product with trim. You need to start processing from the top center. At the same time, we leave a small area open in the center. This is where we will sew the loop. The following photo shows how to properly make the joint. We do not fold the beginning of the binding; we lay it over to the other side. We fold the end of the binding and lay it on top.
We make a loop from a strip of binding 15 cm long. To do this, fold it in half and sew it with a decorative seam. We insert the loop from the back, oriented downward, bend it upward, hiding the cuts, and attach it together with the finishing facing. Iron the finished potholder.
Sew on a decorative button.
The potholder is ready!