In the vast majority of cases, the floor is used as the base for the refrigerator. But the floor covering does not always allow the unit to be placed correctly so that it stands level, stable and without distortions. When the floors in the room are uneven, a refrigerator stand is the solution. Such designs have several design options, each of which is provided for certain circumstances. About how to choose the right stand for a refrigerator and what types of such designs there are, further in the material.
- 8.1. Video: How to install a regular refrigerator in a closet
When is a refrigerator stand necessary?
Such structures are a specialized layer that is placed between the floor covering and the bottom of the refrigerator. The supplies have several purposes, the main ones being:
- Level the floor covering. Designs in the form of cabinets are rarely used, but this option is possible when the height of the ceilings and the refrigerator cabinet do not “conflict.”
- Reducing the vibration level involves the use of specialized materials that have the ability to dampen mechanical vibrations. It is advisable to use in the case of units that are installed on uneven floors or are excessively noisy during operation.
- Increasing the level - this option is advisable in cases where the parameters of the refrigerator are small - this way it is possible to adapt the unit to a certain person’s height.
Attention! It is not always advisable to place the refrigeration cabinet on a “pedestal”, since sometimes the height of the unit does not allow any elevations to be placed below, or the structural characteristics of a particular model do not allow the use of any substrates.
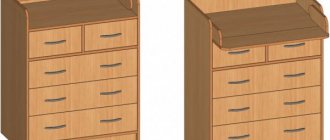
Base
Take seriously the choice of the type of cabinet base:
- Legs. Typical supports that are placed at the corners of the frame. In principle, they can. But they must be metal. At the same time, strictly select short and wide options. This is the only way to ensure stability of the cabinet. You'll have to level the floor. After installing the refrigerator, any instability is undesirable;
- Place directly on the floor. The most common option. In this situation, there is no need to remove minor curvatures in the floors. True, if the differences are significant, then you cannot do without a screed. Maximum stability;
- Base system. Used quite rarely. The main emphasis lies on the sidewalls of increased length. They can be combined with legs. A plinth strip with a width of 7 cm or more is attached to the front. With a smaller value, the strip will simply crack when fastened. It also partially takes on some of the load. Has an additional decorative function.
Types of refrigerator stands
Refrigerator pads are a fairly rare occurrence, since the need for them arises infrequently. There are several varieties of these designs:
- Foot pads are several small components that can be placed under each support of a refrigerator. They often have anti-vibration properties and are used to reduce the intensity of vibrations.
- Metal mesh - mainly used to stabilize old Donbass refrigerators.
- Cabinets are plastic or wooden boxes of different parameters. Most of them are complemented by specialized drawers on wheels. Such designs can also be used for storing various household products that do not need to be kept at low temperatures.
It is necessary to choose a specific type of substrate on which the refrigeration cabinet will be located in the future based on many factors, including how stable the unit can stand in this case. All additions, for example, drawers and the like, are auxiliary parts that are not the main functional purpose of the structure.
Base
You need to take seriously the selection of the type of bedside table base:
- Legs. Typical supports that are placed at the corners of the frame. As a rule, they can. However, they must be made of iron. At the same time, strictly choose short and wide options. This is how you will be able to ensure the durability of the cabinet. The floor will need to be leveled. After installation of the refrigerator, any instability is undesirable;
- Placement directly on the floor. The most popular option. In this situation, there is no need to remove minor distortions in the floors. Although if the differences are significant, then it is hardly possible to do without a screed. Greatest durability;
- Base system. Infrequently used. The main emphasis lies on the sidewalls of increased length. They can connect to the legs. A plinth strip with a width of approximately 7 cm is attached to the front part. With a smaller value, the strip will simply crack during fastening. It also takes on some of the load. Has an additional artistic function.
Installing a cabinet under the refrigerator is a significant step, regardless of its modest size. Not only the correct kitchen interior, but also the safety of the equipment will depend on it. Beware of plastic, wobbly structures. It's like a pedestal. This is exactly how a bedside table should look - solidly and with all seriousness.
In the next article we will talk about the topic of a TV stand in Ufa. Let's try to describe this topic in more detail.
Five cool German refrigerators of 2022
label
model, cabinet, bedside tables refrigerator, refrigerator
How to use the space under the cabinet
This design option is one of the most common, since it can be assembled even at home, without using any highly specialized tools - a standard repair kit is enough. The functionality of the cabinet is mainly focused on providing support for a refrigerator or freezer, but is not limited to it. The internal space of such a stand can be used to solve a variety of problems:
- storage of products (potatoes, carrots, bulk, etc.);
- places for construction tools;
- It is possible to place small stationary household appliances in the cabinet.
Conventionally, refrigerator cabinets can be divided into three categories:
- steel sheet products;
- cabinets made of plywood or chipboard;
- solid wood stands.
Steel cabinets are the most durable and reliable option, virtually not subject to deformation, which can withstand a heavy unit. Plywood or chipboard cabinets are not capable of supporting heavy units, so they need to be reinforced with corners and sheets of metal. Solid wood cabinets are rare, since wood is an expensive material that can be used for the manufacture of other products.
Equipment
Refrigerator cabinets typically use only one element of the storage system – a drawer. It can be 1 large or 2 located in a vertical stack. There are 2 types of extension device:
- Rollers. Most often mounted in metal versions of cabinets. Guides are attached to the sides for moving the rollers. They slide out easily, but with systematic overload there is a risk of deformation of the guides. This will cause the drawer to get stuck. To clean inside you have to squat. The box cannot be pulled out completely without the risk of damaging the rollers. In this regard, lower rollers are preferable. They cut into the bottom of the section and partially protrude. The bottom of the drawer moves directly over them when pulled out. Such a mechanism is extremely difficult to break, and the efficiency is no less than with side fastening;
- Special emphasis. Used in cabinets made of wood materials. A narrow bar on the side of the drawer moves with emphasis on a bar attached to the body. The drawers pull out with force. Especially when loaded. This process can be facilitated by rubbing the grooves with paraffin or wax. Instead, you can use regular laundry soap. The box can be pulled out completely. This will make cleaning easier;
- Metal basket. Very comfortably. Additional ventilation is provided for stored vegetables. They are usually made high, so several side rails are mounted at once. In this case, they give additional rigidity to the basket.
How to choose a refrigerator cabinet
Before purchasing a stand, you need to consider what requirements it must meet. It is possible to choose the right design by following these recommendations:
- The cabinet must easily carry the weight of the refrigerator. I recommend choosing metal structures, since analogues made of plastic, even high-strength ones, can only be used in the case of light-weight units. An alternative to metal structures are wooden ones, which can be made to order from a craftsman.
- The cabinet must have maximum functionality, so it is preferable to choose designs in which it is possible to keep various items or use them as periodic food storage.
- The stand is not only a support, but also one of the elements of the interior, so its design must have common features with the style of the room.
A stand for a refrigerator is an alternative option for optimizing its location in the room. When purchasing such structures, they are assessed for strength and only after that the external appearance data is considered.
Reference! A good option is a built-in refrigerator and a stand for it. Then it does not violate the integrity of the interior design of the kitchen and allows you to save meters of space in usually small rooms.
First stage: cleaning
When cleaning the refrigerator, many housewives do not pay enough attention to cleaning the rubber seals. It is not enough to simply wipe them outside. The most vulnerable place is the folds. Residues of food accumulate in them, forming a sticky mass. The rubber sticks together and the gap does not close completely.
To check the serviceability of the refrigerator rubber bands, you need to insert a piece of paper between the door and the refrigerator. If it comes out easily, it means that the seal has stopped performing its functions.
Before proceeding directly to restoring the tightness, the rubber bands must be washed thoroughly. For this:
- We remove crumbs and other debris with a dry ear swab or an old toothbrush. We make sure that nothing remains in the grooves.
- Prepare a solution: 100 ml of water, 2-3 drops of dishwashing detergent and 1 teaspoon of ammonia.
- Dip the ear stick (brush) into the solution and thoroughly wash the folds.
- Wipe everything with a cloth soaked in clean water.
- Blot the moisture with a dry cloth.
Sometimes a thorough cleaning of the rubber band is enough to restore its tightness to the door. For example, if there was something sticky inside and the folds stuck together strongly.
You can wash the seal with ordinary soapy water. The main thing is to clean all the grooves well. In general, the procedure should be carried out regularly - at least once every 2 weeks. Dirt causes rubber to become hard faster, lose its shape, and become covered with cracks.
Attention! To clean rubber seals, under no circumstances should you use products containing solvents or caustic substances (concentrated alkali, acid).
Handmade refrigerator stand
It is often difficult to part with old items, even after purchasing new ones with similar properties. So, there is no desire to throw away old furniture quite often. Such elements are often accumulated on balconies “just in case,” in the hope that over time they can be used somewhere useful.
From old furniture, which is assembled from ordinary chipboard, it is possible to assemble a simple cabinet for a refrigerator. Such a solution is advisable when the refrigerator is low; in order to get food out of it, you need to “bow” to it. So, by disassembling several pieces of furniture, selecting the most complete and suitable parts from them, you can make a fairly strong and large cabinet, in which, among other things, you can then equip shelves for a variety of necessary items that are not needed in constant access.
Application of wire mesh
The wire mesh was attached to the back of the frame. I used a large roll of chicken wire and simply cut what I needed using wire cutters. Everything was secured in place to the wood frame using a furniture stapler.
And at the very end I screwed the handle on. A few finishing touches and everything was ready.
I would like to know your opinion about this design. Did you like her? Would you like to make exactly the same in your kitchen? Or maybe there are any comments about the work? Share your impressions in the comments to this post. I would love to read each of them.
Making a refrigerator cabinet from an unused cabinet
To convert an old cabinet into a cabinet for refrigeration equipment, you need to prepare a certain set of construction tools, as well as collect the required materials:
- screwdriver or screwdriver;
- Chipboards from unused furniture;
- rotorizer;
- screws with a large head;
- furniture confirmations;
- construction tape;
- simple pencil;
- Fiberboard sheet for the back panel;
- plywood sheet for a retractable drawer;
- roller guides for the drawer (2 pieces for each drawer);
- overhead loops - two pieces;
- melamine edge tape - to cover the ends.
After preparing everything you need, the process of assembling a cabinet for a small refrigerator is quite simple, the main thing is to follow a certain sequence of actions.
Determining the parameters of the future product
First you need to decide on the parameters that are selected for the dimensions of the refrigerator with a margin of one centimeter on each side. An additional margin must be given at the back so that the refrigerator cabinet moves 5-10 cm away from the wall. This way, proper cooling of the unit will not be affected. Based on the height of the refrigeration cabinet, a similar parameter for the cabinet is selected so that the unit corresponds to human height.
Advice! It is advisable to make a preliminary sketch of the future design on paper, subject to each of the parameters.
Cutting a chipboard sheet into parts for a refrigerator cabinet
The rotorizer is used to cut out two vertical walls, a pair of horizontal shelves and a top cover for the cabinet. Depending on the height of the door, and also taking into account the lower distance from the shelves, there may be unused space that is not blocked by the door. This space can be used for the equipment of a drawer.
After cutting out four walls for a drawer of the required height, it is assembled. It should be taken into account that the last front part must be cut out only after the cabinet has been completely assembled, since the height of this element may differ from the other walls.
For a cabinet, 40 confirmations may be enough, but it is better to take it with a reserve. The screws are suitable for size 4.2 * 16, and the guides for the drawer are selected according to the depth of the bedside table under the refrigerator cabinet. About 10 m of melamine tape will be enough to cover the ends. All visible external ends are covered with this tape when using an iron.
Assembling a refrigerator cabinet
All components are assembled in a random order - it is determined based on your own preferences. The back wall is screwed onto the back of the cabinet with screws. In order for the structure to be able to dampen vibrations of the refrigeration cabinet that will stand on it, the internal shelves and lid must be fixed by 5 confirms on one side, this will allow you to assemble a strong and reliable structure.
For the base of the drawer, it is permissible to use 4 mm plywood, which has one-sided lamination. At each corner you need to put two confirmats. For such a drawer that slides out, specialized roller guides are needed - in such a design it is permissible to use the cheapest products. They are attached to the finished frame - on the sides and inside, where the drawer will be placed.
It is advisable to attach a comfortable handle to the drawer, as well as to the door of the main compartment of the cabinet under the refrigerator. The result is a fairly strong and durable product, which is easy to design so that it fits organically into the interior design of the kitchen.
Attention! When working with construction tools, you must strictly follow safety regulations.
Ideas and examples of designing a kitchen niche
Modern colors, details and accessories will turn the “Khrushchev” niche into a pleasant detail of the interior of a small kitchen.
Open shelves
A simple and practical option is open shelves. The wall of the Khrushchev refrigerator does not need to be insulated, and design and installation are simple and quick.
This solution will help save space in other kitchen cabinets - the shelves are suitable for storing dishes, containers with bulk products and much more.
Open shelves will make a small kitchen comfortable and very functional. The interior looks light and airy. Modern materials for kitchen shelves and shelving are metal, wood and glass.
Drawers
The design of a small Khrushchev kitchen should be as convenient and functional as possible. Rearranging a niche into a unique chest of drawers is a stylish and modern solution.
The built-in drawers under the window will not be too deep, but are suitable for storing cutlery and small kitchen utensils.
Cupboard
The niche under the window can be converted into a traditional kitchen cabinet for dishes. There are many solution options - simple opaque doors, glass, with LED lighting.
It will not be possible to store large pots in such a cabinet, but cups, jars, and glasses will fit there comfortably and compactly.
This option is perfect for embodying kitchen interior design ideas in a minimalist style.
Minibar for alcohol
An unusual stylistic solution is to convert a niche into a minibar.
In addition, during the cold season, the niche will fulfill its original function for the bar - cooling.
Mini-cellar for storing canned food
There is also the functionality of a Khrushchev refrigerator - a cold pantry. This reconstruction option is a great space saver, and preservation will always be “at hand.”
Tabletop
Using a window sill as a countertop is one of the current kitchen design trends for 2022 - 2022. The trend is perfect for small Khrushchev-era kitchens.
Article on the topic: How long does cheese soup last in the refrigerator?
There are many solutions - you can install a sink, make a regular work surface, or use it as a place for small kitchen appliances (coffee maker, toaster, microwave, etc.).
The option with a sink looks comfortable, aesthetically pleasing and economical. Before dark there is no need to turn on additional lighting - the window provides enough light.
A work surface instead of a niche significantly saves space and frees up space for the refrigerator - this is important for small kitchens in Khrushchev-era buildings. Cabinets, drawers or a mini-pantry will fit well under the countertop.
Work area - hob
This option is only suitable for induction hobs (gas pipes cannot be moved).
The window takes on the function of natural exhaust and ventilation - this is convenient and practical. Space is also saved, since the rest of the kitchen can be used for large household appliances, for which proximity to the stove is undesirable.
Eating area
Comfortable, convenient and stylish – this is exactly how an original window-sill table will look in a small kitchen.
It is possible to make such a table in any color, from almost any material (wood, chipboard, artificial stone, marble, quartzite) and any shape that suits the interior of the kitchen.
A window sill table can be small and compact, suitable for one or two people.
For large families and groups of friends, there are larger options.
And such tables fit quite well into classic interiors.
The main thing is that there is a niche for feet, which significantly saves space in the kitchen.
Khrushchev refrigerator
You should not abandon the original purpose of the niche - using it as a cold storage room is still relevant today.
To arrange such a pantry, shelves are made inside and doors that close tightly. The Khrushchev refrigerator made of modern transparent materials, metal and glass looks very attractive.
Heating radiator
One of the classic solutions for filling a niche is a radiator. This solution is practical and compatible with a tabletop or window-sill table.
Article on the topic: Which refrigerator is better Sniga or Atlant
If a regular window sill or table is provided above the niche, installing the radiator is the same as in any other place in the apartment.
In the case of a “closed” radiator (when it is located under the countertop and closed with doors), it is necessary to additionally install a radiator grille in the window sill (table, countertop) for air circulation.
Radiator grilles look aesthetically pleasing and do not spoil the overall appearance of the kitchen interior.
Open space under the window sill - no grill needed.
Soft window sill
An original idea is to make a window sill into a place to relax or additional seating.
Refrigerator chest with drawers
Modern refrigerators with swinging upper doors and practical drawers below began to be called “chest of drawers” refrigerators. Often such units are designed in the Side by Si style and often have a pair or one sliding section. There is also another option for refrigerator-chests - these are units built under countertops with retractable sections, but there are no upper doors. The main unifying feature of these two different refrigerators is the presence of retractable drawers, which are located one below the other.
A multi-door refrigerator-chest with external decorative trim made of expensive wood species complements virtually any room well. Such a unit can contain not only compartments for fish and meat products, but also a wine cabinet with practical shelves for bottles in a horizontal arrangement. There may also be other sections intended for the following:
- cheeses;
- cigars;
- vegetables, fruits, berries, herbs.
Such a unit may have an ice generator that dispenses crushed and cubed ice drinks and water through the door. The large door can accommodate a small bar with snacks and drinks on a pull-out table. It can be supplemented with expensive electronic devices, including a TV and a microcomputer. Such a BHP in the “chest of drawers” version not only maintains suitable conditions for preserving the freshness of food products, but also has additional convenience for the user.
Reference! Multi-chamber refrigerated cabinets of this type are produced in different depths, heights and widths. Due to the retractable drawers, the BHP-“chest of drawers” is able to accommodate more food products compared to an ordinary classic free-standing unit of similar dimensions.
The disadvantage of such refrigerators is the great technical difficulty in ensuring thermal insulation of the openings of the drawers. Insufficient sealing does not guarantee the required level of cold retention, which is especially noticeable in the case of frozen foods. This is the main reason that drawers are used for drinks, vegetables, wines and other things that need to be kept at positive temperatures.
Drawers, which are used for frozen storage, are mainly closed with auxiliary doors to reduce heat inflow and increase the efficiency of BHP during operation. In this position, this refrigerator becomes an ordinary single-door or multi-door combined freezer-refrigerator equipment in the cabinet version with external doors.
The simplest chests of drawers include freezers and refrigerators manufactured in the 90s in the form of a table with retractable drawers. Thus, such samples include three-chamber units with a retractable bottom drawer for vegetables, herbs and fruits - Ariston ENF 335.3X and Stinol-104.
One of the modern six-chamber “chest of drawers” refrigerators, the Sub-Zero PR048, looks similar to old-fashioned furniture, which has massive legs and two hinged doors at the top, and a couple of rows of drawers at the bottom. Among those built under the countertop, the Ariston model (in Europe - Scholtes) and Liebherr KIUe 1350 are presented on the domestic market. Sub-Zero units from the 700 series are less common.
What's hidden behind the facades: content that will surprise you
Before you order kitchen supplies, conduct an audit - literally count all the plates, cups, cutlery, cutlery, cooking utensils, and also make a list of groceries that you are used to always keeping in stock. And take a look at our checklist to choose the most convenient kitchen storage systems.
Dinnerware in the lower section
As a standard, the dish drainer is located above the sink. But more and more people are ordering lower storage systems for plates, saucers and cups. This is especially convenient for families with children and those who simply cook a lot.
Article on the topic: How to make pizza from what you have in the refrigerator
The fact is that with such storage organization, it is easier to put the dishes back in place from the dishwasher - there is less movement in the lumbar and shoulder spine (therefore, you get less tired). You can also entrust this to a child aged 6-8: it will be interesting and not difficult for him to do it.
For those who wash dishes in the sink, bottom drying will also be more convenient: water does not flow down the elbows into the sleeves (this problem is especially acute for people shorter than 175 cm in height).
It is recommended to make the lower dish dryer in two tiers - in the first roll-out drawer, immediately under the countertop, place the dishes that you use most often; in the lower one - those items that you use less often (salad bowls, extra glasses, etc.)
Secret niche for household chemicals next to the dishwasher
Typically, household chemicals are placed under the sink, next to the trash can - and often everything is there, from fairy supplies to anti-scale and pipe cleaners. Finding dishwasher tablets is inconvenient (especially if you have to hold the tight dishwasher door with one hand).
And no matter how carefully you try to use the trash can, some splashes and crumbs still fly away, and in order to remove them, you have to take out all the household chemicals and grind them from time to time. At the same time, dedicating a separate large cabinet for chemicals does not seem to be rational, and storing it next to food products is impossible.
An ergonomic solution is to make a small cabinet, literally 20 cm wide, next to the dishwasher, and order the facade covering the door to be wide. As a result, household chemicals get a separate compartment - they don’t get in the way under the sink, and it’s more convenient to charge the dishwasher.
Article on the topic: How to make melt water in the refrigerator
Drawer under the oven
If you buy a compact oven, you can build a pull-out storage system underneath it for frying pans and saucepans up to 25 centimeters high. This is better than putting the dishes in the oven - you don't have to put them on display every time you decide to bake something.
This drawer is also convenient for storing molds for lasagna, casseroles, cakes and muffins. Please ensure that the drawer extends completely and does not sag under the weight of the dishes - such pull-out storage systems are available from Blum and Boyard.
You can also build a drawer under a standard height oven (50-60 cm), but not deep. It is suitable for storing foil, baking paper, etc.
Retractable mesh filling
Such a storage system can be high (as in the first photo) or located strictly under the countertop (photo below). It is important that with one movement you have access to all content.
The grid does not block the view - and you don’t have to search for anything for a long time, violating the created order. Opened it, took it out, put it back and closed it. Adjacent storage elements remain in place.
Drawers in the column under the oven
Build the oven into a column at eye level, and place drawers of different depths below, depending on storage tasks. This is an ideal solution for compact kitchens, since pull-out storage systems are always more functional than hinged ones.
Please note that in this kitchen the designers designed a very narrow (40 cm) cabinet under the sink. This is enough for a trash can - and thanks to this solution, it was possible to integrate a refrigerator, a freezer, a hinged cabinet for dishes and a column with appliances and drawers into a fairly small kitchen (2.5 linear meters).
Withdrawable systems of the “magic corner” type
Recently there has been a tendency to make linear kitchens - corner ones take up more space. But if you need a large kitchen, make sure that the corner under the sink is functional.
Article on the topic: Whose refrigerator is it produced?
The basic option is a rotating storage system for dishes. In this case, the trash can is placed in a cabinet nearby, and the corner is used for storage.
European brands like Blum have more complex roll-out storage systems - they cost from 10,000 rubles and must be ordered separately.
Low cabinets on gas lifts
Previously, the organization of storage in the top row was not diverse - cabinets were hung at the same height, and there were several shelves behind the facades. With the advent of systems on gas lifts (which rise upward), storage can be adjusted to suit you - as is more convenient.
Option #1: Hinged cabinets of standard height ≈ 70 cm + additional cells ≈ 40 cm on gas lifts right under the ceiling.
You get functional storage for things you rarely use. And also - dust will not accumulate on top of the headset.
Option #2: Two rows of cabinets ≈ 40 cm each on gas lifts
The kitchen looks sleeker and lighter - reminiscent of the Italian style of the 70s. At the same time, storage is more functional than in one line of tall cabinets: in one cell you can place glasses, in another - shelf-stable products (storing them in one cabinet is illogical and unsightly).
Drawers of different depths with built-in filling
The standard situation with kitchens of the 2000s is that you order boxes, and then look for the filling yourself. It doesn’t fit exactly in size, you have to put something on the sides so that the filling doesn’t move out, but in the end you still can’t keep track of order.
Nowadays, manufacturers of roll-out storage systems such as Blum or Boyard produce their own line of dividers, boxes and inserts for convenient storage in drawers. Look how they fit perfectly:
There are special dividers for lids (note the organization of storage in the bottom drawer in the photo):
Article on the topic: How long does fried fish last in the refrigerator?
In addition, boxes can be ordered not only in different depths, but also in different widths. Narrow, 40 centimeters, but deep (25-40 cm) drawers are convenient for storing plastic lunch containers, a juicer or a compact food processor.
In the kitchen with the photo below there are 7 different drawers in width and depth of the drawers. Evaluate their multifunctionality:
A word from the designer of the “Kitchen Factory”:
To make the set truly convenient, it is better to meticulously count all the utensils, groceries and other items that you store in the kitchen before ordering it. Give up what you don’t use (donate it, give it away on forums or sell it on Avito). And then - think over a place for each thing: such preparatory work + competent filling behind the facades will allow you to no longer suffer from cleaning the cabinets. It will be much easier to maintain order - and to teach children to it.
Results
A stand under a refrigerator is sometimes the only option for comfortable use of this household appliance. It is possible to buy a ready-made cabinet or make it yourself from available materials. Often such a structure is made in order to raise the unit relative to the floor to the level of human height. Also, a similar trick, specifically a refrigerator under the cabinet, is used to maintain the overall interior design of the kitchen. This is often used in cases where the only option for harmonious placement of the unit is to integrate it into a piece of furniture and decorate it to match the overall style of the room.
Video: How to install a regular refrigerator in a closet
Watch this video on YouTube
Video: How to install a non-built-in refrigerator. Detailed description
How to install a non-built-in refrigerator. Detailed description
Watch this video on YouTube
Do you want to understand better than others?
- Do-it-yourself refrigerator box from improvised materials - proven technology - The best materials for a homemade refrigerator If you have the knowledge and all the necessary spare parts, making a functional homemade refrigerator is quite easy. You should start...
- Making a homemade camping refrigerator with your own hands - When going on a picnic, country house, car trip or just fishing, you need to take care of the safety of perishable foods in advance. This problem is especially acute...
- DIY ice fishing box from the refrigerator freezer? — You can make a fishing box with your own hands from the body of a freezer that is no longer working. This solution is quite simple in terms of manufacturing and economical...
- Shelf for LG refrigerator above the vegetable drawer - Shelf for LG refrigerator ACQ85653502 above the vegetable drawer Description: Shelf above the vegetable drawer for the LG ACQ85653502 refrigerator. Original shelf from LG...
- How to make a compressor from a household refrigerator with your own hands - The compressor can be used for a variety of purposes and industries. It can be used for inflating wheels on a car, for airbrushing, painting parts, and more. Having…
Causes and signs of wear on the seal on the refrigerator
It’s easy to understand that it’s time to change the rubber band on your refrigerator based on the following signs:
- Ice or snow deposits form on the inside wall of the refrigerator opposite the door.
- The presence of condensation and water inside is a consequence of warm air getting inside.
- Ice on the freezer door.
- The internal temperature is not low enough.
The most common reasons are the following operating conditions:
- Mechanical damage due to careless handling of equipment.
- Drying of rubber due to long service life.
Replacement of the rubber band on the refrigerator door is required if it is completely or partially worn out. With minimal damage to the seal, repairs can be done. To understand what needs to be done in a particular case, you cannot do without a test.
How to test:
- Take a sheet of paper, bring it to the body and close the door tightly.
- Pull the protruding piece. If the paper can be pulled out without much effort, the problem is obvious, because the rubber around the entire perimeter should fit snugly.
- Repeat the procedure at the top and bottom of the door.
Is it possible to put hot food in the refrigerator: warm soup, food and food in a pan
Another way to assess the tightness of the internal chamber of the refrigerator is to put a switched-on flashlight inside and carefully inspect the door around the perimeter.
If there are gaps between the housing and the seal, light will be visible at their locations.
Installation of a new seal
It is not enough to choose a good material to replace one that has become unusable; you also need to know how to replace the seal. It is better to install the new rubber band in the same way as the old one was attached.
- When installing with glue, the surfaces to be bonded must first be degreased. You should choose only a high-quality product and follow the instructions for its use, because... Different adhesives may have their own operating characteristics, for example, different hardening times, etc.
- If the seal is screwed on, you may need to use larger diameter screws if the holes for them have become loose over time.
As soon as the glue has dried, or the elastic band is completely fixed in other ways, the refrigerator can be plugged in and continue to be used for its intended purpose.
The first time after the new seal has been installed on the door, you should carefully monitor the refrigerator in order to detect cracks or places where the rubber does not fit tightly that may not have been noticed during installation. You can make sure that everything was done correctly if the door begins to open with visible force after replacing the seal.
Why do you need to change a faulty rubber seal?
The seal is an important element of the refrigerator, which ensures the tightness of the food storage chambers and the tight fit of the unit doors to its body.
If the sealing gum loses its qualities, then gaps form. Through them, air penetrates into the refrigerator, which has a higher temperature than that maintained inside the storage chamber. The unit itself may simply break down over time due to overvoltage of the compressor. After all, in this case he begins to work for wear and tear.
Specialists from service companies note that most of the malfunctions are associated precisely with leaky seals. Failure to diagnose the problem in a timely manner can lead to serious problems in the operation of the refrigerator.
Warm air enters the gap formed due to defects in the seal. It contains water vapor, which, when cooled in the form of condensate, will settle on the walls of the chambers and subsequently turn into ice. Over time, its layer will increase.
Due to the formation of ice, energy consumption increases. The compressor turns on more and more often, but it also works less efficiently. Sooner or later, due to increased load, it will definitely fail. And replacing it is a more expensive “pleasure” compared to replacing the seal.
Timely diagnosis of the problem will eliminate the need to shell out more money for expensive compressor repairs, call specialists, or take the refrigerator to a service center. You can carry out the replacement yourself, without turning to professionals. This approach will significantly reduce the cost of repairs, which is also important. The main thing is to choose the right seal and install it on the door.
Where can I get a new seal for the refrigerator door?
For those who live in large cities, finding a seal for their model of refrigeration unit will be much easier. In any case, you can always choose a similar one in width and volume.
There are universal seals on sale. They consist of several longitudinal sections, which are cut off in the required quantity if the elastic band is too wide.
How to adjust the temperature in the refrigerator and freezer: 'Atlant', 'Samsung' and others
Signs of seal failure
You can understand that the sealing rubber in the refrigerator needs to be replaced with the naked eye. Over time, it dries out, becomes less elastic, and cracks. This is due to the temperature difference between the refrigerator compartment and the kitchen, as well as purely mechanical damage due to regular use. But even if, at first glance, such signs of failure of the rubber seal are not yet visible, but cold air is clearly blowing from the door, and ice freezes heavily on the inner walls, then repair work is also necessary. Otherwise, more and more warm air will get inside, which the device will need to cool, which will ultimately lead to overloads and breakdowns of the motor, as well as excessive energy consumption.
Repair with improvised means
This method does not require replacing the worn part. This is its advantage. It is also worth noting that since you will solve the problem yourself and with the help of available materials, the percentage of successful repairs is much lower than if you turn to professionals. But material costs are also much lower, which is important.
There are several methods that became popular during the Soviet Union, when due to the shortage of certain things and materials, it was still not customary to throw them away. Well, let's look at the methods for repairing the refrigerator seal with our own hands.
Using boiling water
First, remove the rubber band from the refrigerator door. This process can be quite difficult. More precisely, there can be 2 ways:
- Modern refrigerator manufacturers attach this part to foam, in which case it will be easy to remove.
- In Soviet units, the elastic band is screwed on with nails, and it is quite difficult to remove it. Therefore, you should remove it very carefully so as not to deform it. Otherwise, you will have to buy a new one.
So, let's move on to the actual processing of the material. Everything is extremely simple. You just need to scald it with boiling water and leave it in hot water until it cools completely. This way you can restore the rubber band on the refrigerator.
Important! After applying this method, the rubber swells and becomes more suitable for use.
Dry it well and hang it back. After this treatment, the part will begin to fit tightly to the door and its tightness will not be compromised.
Using paper or other available materials
This method will only work if the deviation from the door does not exceed 2 mm. Therefore, to begin with, it is worth measuring these discharges (this is important).
After this, you can take a piece of paper, cardboard or other similar materials and place it under the place where the elastic comes off.
Important! Naturally, this method will not solve the problem forever, but it will allow you to forget about the sticking rubber band for a short time, which means you will gain time.
Change door location
You can try moving the door to the other side. This will help you hide the damaged rubber band and use the good one. Just be sure to prematurely pay attention to the location of the furniture in the kitchen. Will it be convenient for you to open the door if you change its direction? After all, it may happen that you have re-hung the door, and now you realize that it is inconvenient to open it and you need to change the location of all the kitchen furniture.
Important! It is also worth noting that the result from this method is not one hundred percent, but 50 to 50. So before you rearrange the kitchen and remove the refrigerator door, keep in mind that everything may not work out. In most cases, the result depends on the age of the unit and the degree of wear of its components.