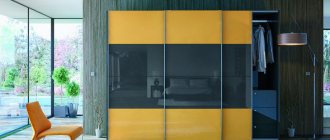
Hello visitors to the site “Secrets of the Master”! Quite recently, in the article “Calculation and assembly of doors for a wardrobe”, I promised to talk about some methods for independently finishing cabinet facades. As you know, the main and most common filling of a sliding wardrobe system is a mirror or glass. And how this mirror or glass is processed will subsequently affect the overall appearance of any wardrobe, i.e. no matter how bizarre its geometry is in shape, the main advantage and beauty is still the façade (face)!
In fact, there are quite a lot of processing methods. From the simplest to the most complex, high-tech and costly. I think there is no point in talking about everyone, because not everyone will be able to process glass/mirror with sandblasting or a special alkaline suspension, engraving or silk-screen printing at home. Therefore, we will consider a couple of options for the simplest and at the same time quite beautiful decoration of wardrobe doors, which any craftsman can do independently.
How to update an old cabinet?
In any home, the closet occupies a very important place.
It is a pity that over time it loses its original appearance: the appearance of cracks and faded paint make it unattractive, it goes out of fashion and looks out of date. We have to think about his future fate. There are at least two ways out of this situation:
- buying new furniture;
- updating an old closet.
With your own hands you can give your wardrobe a new life, turn it into a unique object, while saving significant money.
Make your own cleaning solution
Gather the necessary ingredients. Most ammonia-free cleaners use mild soap, such as baby soap, as well as water and disinfectants such as alcohol. These are the three main components. Distilled water should also be used when mixing ingredients. It does not contain impurities such as calcium and limescale, which can leave spots, streaks or streaks on the glass. These products can most likely be purchased at a home improvement store or in the supply section of your local grocery store. You will need:
- baby soap;
- distilled water;
- isopropyl alcohol (91% is preferred, but a lower percentage will do);
- container with sprayer.
How to restore?
Any antique cabinet requires a little restoration, which will significantly improve its appearance.
You can restore the wardrobe yourself if you use the advice of experts:
- A metal brush is used to treat decayed wood, after which the dead tissue is removed.
- The fine dust formed in this case is washed off under running water.
- Sometimes there are holes from nails, some unevenness and cracks in the wooden elements of the cabinet. All this must be cleaned with a spatula. It is necessary to apply several thin layers of putty to match the wood. Each layer must dry before applying the next.
- Then dry all layers in fresh air for 1-2 days. Do not dry wood in the sun.
- Sometimes there are metal parts in furniture that have become covered with rust over time; such places should be treated with a special solution.
- The restored surface can then be painted or decorated at your discretion.
- A self-adhesive film that imitates wood, stone, or metal is perfect.
Home window tinting
The south and east sides of the house are most exposed to sunlight entering the room. This can lead to undesirable consequences: fading of interior decoration, interior items, fading of curtains and hailstones. On the ground floor of a multi-storey building, you can hide what is happening from unwanted views in this way.
Tinted windows in the house have a stylish appearance, they look beautiful, unlike curtains, they do not turn the room into a closet. It is enough to give them a light tint, or apply photo printing on film as an interior decoration, which will make a pleasant aesthetic impression.
How to paint?
A cabinet that has gone out of fashion, but is still quite strong and will last for many years, can simply be repainted. In this simple way, a new design of cabinets, chests of drawers and any other old furniture is created. In this case, we are talking not only about giving freshness to dull surfaces, but also about completely replacing the color scheme, which will add originality to the product. Painting is the most common option for updating an old item. Despite its simplicity, it is necessary to approach this process correctly. For a long-lasting result, you must first prepare the furniture walls.
Below is a step-by-step master class.
It will help you to carry out high-quality and competent painting at home:
- it is important to first clean the surfaces of paint residues: one layer will easily remove the sanding disc; special brushes can handle several layers as an attachment;
- all walls, doors and other parts must be sanded manually or using a tool;
- leveling occurs by applying a primer or putty to hide defects that have arisen during many years of use;
- you need to wait until the leveling layer has completely dried, and after that you can start painting;
- To apply a layer of paint on all sides, take a brush, roller or sponge; however, it is faster to use a spray gun or spray gun. With this method, the paint is applied under pressure, so the doors, shelves and walls inside the cabinet are well painted;
- As a rule, several layers of paint are applied. This ensures rich color and good surface preservation. It is better to paint the cabinet with acrylic, alkyd enamel or other high-quality paint;
- the paint must be allowed to dry completely, after which a layer of varnish can be applied. It makes the cabinet look glossy and shiny. If you prefer a matte surface, you can skip varnishing. However, the use of this coating has a protective function, prevents abrasion and gives the tone greater depth. You can use not only glossy, but also matte and silky finishes.
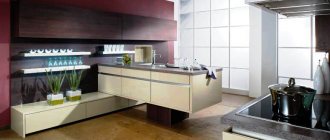
Versatility
You can use smart partitions for business or to delimit space in an apartment: you don’t have to build a wall or install bulky structures. It is enough to install glass that can become dark when you need to remove something from your eyes, or, on the contrary, become transparent if you need to visually enlarge the space.
This solution is perfect for skylights. You don't have to think about how to darken them, insulate them or isolate sound, since the film copes with all these tasks perfectly.
Decor
If you decide to keep and decorate an old cabinet with your own hands, you can decorate it in different ways. There are many techniques that are used for decoration.
Decorative plaster
This is a rather complex decoration option. First, a product covered with old paint must be treated with sandpaper. Using a stencil, it is necessary to apply decorative plaster to the volumetric elements on the cabinet facades. The stencil itself must be removed before the plaster dries. Then the uneven parts are smoothed using a spatula. Finished decorative elements are varnished or painted; gilding or antique patina is possible.
Photo printing
A sliding wardrobe or just an old wardrobe can be greatly updated with photographs or photo wallpaper. Any photographs are enlarged using large format printing in a printing house. The surface is decorated with a panel or a collage of photographs, most often these are sliding wardrobes with smooth doors. However, the service of such printing is expensive, so a budget option is often used - photo wallpaper, which is sold in any repair store. Choose a wide variety of themes - nature, beautiful cities, animals and much more. If you use starch-based glue, you can later change the boring pattern.
Stained glass film
You can decorate an outdated piece of furniture yourself without having any special skills. It’s very easy to stick stained glass film, which is fashionable this season, onto the glass cabinet door. This will add presentability to old furniture. In addition to its decorative function, the film protects the glass from impact and scratches. Removing the film is very simple, and this decorative technique looks very impressive, because the imitation is as close as possible to real stained glass.
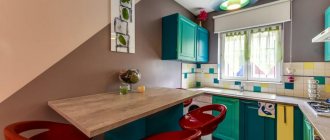
Method No. 4 Sliding wardrobe with stained glass windows - economical option
Only very wealthy people have the opportunity to decorate wardrobe doors with stained glass windows. We offer a decoration method that will allow you to experience all the delights of stained glass decoration without significant costs.
The technology is extremely simple. A translucent stained glass film with an adhesive surface is applied to the mirrored door of a sliding wardrobe. The film transmits light, which returns to us through reflection. The result is a glowing effect similar to reflection from colored glass. Applying stained glass to a wardrobe mirror is as easy as a regular vinyl sticker. Check out the decorative effect.
Useful tips
It’s a pity if you have to throw away old but high-quality furniture, especially wooden ones. But such products can be updated and used for more than one year. To choose the right decoration method, it is important to take into account the material and degree of wear of the old cabinet.
Natural wood
Previously, wooden furniture was made of very high quality. Before updating, remove dust with a dry cloth. Then check the fasteners and if they are broken, they need to be repaired or replaced. It would be nice to treat the inside of the cabinet with an antibacterial agent; a more budget-friendly option is simple vinegar. It will destroy the unpleasant odor.
Then the choice of decoration method is made.
- Toning. First, all surfaces are leveled using wood putty, matched to the color of the cabinet. After the layer has dried, uneven areas are sanded with sandpaper. Treated and even surfaces are treated with a special structuring tinting for wood. Choose a decorative tinting color darker than the original shade of the cabinet. This treatment will completely transform the appearance of the product.
- Aging. Furniture made from natural wood can be “aged”. The antique-worn effect of the cabinet surface is achieved as follows: light wood tone is painted in any dark shade depending on the color palette of the room. Then, after the paint has completely dried, you need to rub several fragments with a candle, after which light paint is applied, for example, beige, white, cream. When the second painted layer is rubbed with sandpaper, abrasions will be visible through some light areas. which are darker. When decorating a dark cabinet, make craquelures. To do this, apply craquelure varnish to the surface. After it dries, small cracks form, which are highlighted using dry pigment or oil paint of the desired shade.
Epoxy resin
Epoxy resin hardens quickly in open air and creates a beautiful translucent coating. By itself, it gives a golden or amber tint or creates the effect of glass or ice.
Deep cracks or noticeable defects on the surface of the cabinet can be filled with colored sand, small shells or any other decorations - and filled with resin on top. And small cracks will literally come to life if you add luminescent powder to the epoxy.
Photo: vk.com
Photo: usamodelkina.ru
How to decorate a closet with your own hands?
Every Russian family has, or once had, an old Soviet wardrobe. Someone said goodbye to this a long time ago, throwing it in the trash. Did you know that this work of art of Soviet thought can be given a second life? If this article had fallen into your hands earlier, your old closet would have shone with new colors. And for those who still have a “Soviet centenarian” left somewhere in their dacha, there is an opportunity to create original cabinet decor with your own hands and complement the interior of the apartment with a truly designer attribute.
Any furniture gets old over time, but don’t rush to throw away a shabby cabinet - you can not only bring it back to life, but even make it better and more original
What film to protect from the sun
For this purpose, there is a film coating with special properties - athermal. Its main task is to protect the room, furniture, decor and people in it from exposure to sunlight and heat. Athermal film reflects the bulk of ultraviolet radiation, making sunlight soft and diffused, pleasing to the eye and not harmful to furniture.
It also has additional advantages:
- retaining heat indoors in winter . Double-glazed windows with film do not allow warm air from the rooms to pass out.
- protection of indoor plants on the windowsill . They do not burn under scorching rays and grow in a comfortable atmosphere.
- maintaining privacy, protection from prying eyes from the outside . Mirror film applied to the windows will not allow you to view the interior of the house from the street. Although everything will be perfectly visible from the inside. But keep in mind that mirror coating is effective only during the day; in the evening its properties are almost lost, and the windows need to be covered with curtains.
- original decor . Photo printing can be applied to the films, so they additionally decorate the interior and make it individual.
- protection against splinters in case of glass damage . All of them will remain on the film and will not fly apart. Using a tinted window is safe and easy!
- protection from vandals and thieves . There is a special type of window film that has armoring and impact-resistant properties. They strengthen the glass and make it difficult to penetrate from the outside.
Today you can choose a film coating with several properties at once and thus protect yourself from the sun, heat, and other unpleasant phenomena. The degree of darkening of the house can also be selected in advance.
The big plus of films is their affordable price and durability. Correctly applied to plastic windows, it will serve for years, protecting and shading, without requiring special care.
A film that protects from the sun is very useful in country houses and in the countryside. Where it is not possible to install air conditioning or it is irrational to do so. With the help of film on the windows you can protect yourself from the summer heat and heat.
Cabinet restoration methods
At the moment, there are many suitable acrylic paints, adhesives and impregnations available, thanks to which you can decorate a cabinet with your own hands without any problems.
Beautiful country style wardrobe with lightly worn elements
There are several ways:
- Painting the front and side walls of the cabinet in different colors.
- Decoupage of facades followed by application of varnish.
- Pasting with paper or vinyl wallpaper (photo wallpaper).
- Matting glass cabinet surfaces. And when using patterned stencils, you can make unique patterns on glass.
- Do-it-yourself patination of the frames of the facades, as well as the internal open and side surfaces of the cabinet.
- Artificial aging of wood.
- The application was applied to glass facades.
- The use of decorative plaster or polyurethane foam to make patterns on cabinet facades.
For your information. Initially, patination (patina) was an independent process. A layer of patina formed on the metal parts of the furniture, as well as on wood and glass.
Painting is the simplest solution that gives a lot of visual options
Wallpapering the back wall and drawers of the cabinet
Decorating a closet with textile wallpaper
An alternative to wallpaper - self-adhesive film
The choice of method for restoring an old cabinet with your own hands depends on the personal preferences of the residents, as well as the interior style of the room where it is planned to be located. The material from which the cabinet is made is also of great importance. You will not be able to age chipboard facades.
Window and mirror tinting
This method in modern art design pursues completely different goals than in the case of tinting car windows. With cars, everything is simple: tinting is needed to protect from prying eyes and bright sunlight. In the case of artistic processing, more complex problems can be solved. First of all, this is the formation of the internal appearance of the room, corresponding to the chosen interior style.
Tinting glass as an interior element is a change in the degree of its transparency or reflectivity. The desired effect is achieved in three ways:
- spraying a metal or oxide coating onto the surface;
- sticker ;
- coloring of the material during its production.
All three types of these glasses have completely different consumer properties. Thus, painted glass with amalgam on the back side can turn into a beautiful tinted mirror, and glass with a polymer film has a wide spectrum of ultraviolet and infrared radiation transmission. Coated glass is called architectural glass, as it is mainly used for finishing facades and windows.
- Example of tinted glass of different colors
Red glass partition Blue glass door Windows in the building are covered with films of different colors
Antique restoration
This method is more labor-intensive than the one described above. To decorate an old antique cabinet, only natural wooden materials are suitable. There is no need to completely disassemble the cabinet. But you will have to move it outside.
Attention. The aging process of wood is accompanied by a large amount of waste wood shavings and dust.
Rust must be removed from metal parts. Large wood defects are covered with putty
Panels and frames are cleaned of old varnish and paint. Then they need to be carefully sanded. In the process you will need to use:
- sandpaper of different grain sizes or a sanding machine;
- metal brushes with thin wire, synthetic or abrasive-polymer brush, as well as a sisal finishing brush;
- tourist gas can with burner;
- stains, impregnations or natural oils for wood.
An aged wood surface can be obtained using the brushing technique.
You can learn more about the wood aging method by watching a video on YouTube.
After sanding, the resulting wood is treated with colored stain, waited until it dries completely, and then varnished.
Using this method, furniture becomes age-old. This method is perfect for decorating the surfaces of cabinets with your own hands in Country style.
This wardrobe will fit perfectly into the rustic interior of a living room or bedroom.
Brushing
The easiest way to update an old cabinet is, oddly enough, by aging it. This type of furniture is especially good in luxurious classic interiors, Provence, loft and any other styles that tend to be retro.
To make scuffs look natural, choose the right places for them. Furniture gets worn down most quickly where it bears a load or is constantly touched: edges, corners, handles, tabletops, protruding relief.
Mechanical abrasions are created using brushing technology: the surface is treated with a hard metal brush, which removes paint and soft fibers. The technology is good for cabinets made of larch, pine, ash or oak.
Photo: hammer-shop.ru
Photo: stamwood.ru
Restoration in Art Deco style
Art Deco gained its greatest popularity at the end of the twentieth century. The characteristic features of this design are luxury, shine, and high cost of finishing materials. The colors of the interior and furniture are predominantly white, black, and gold. Accenting with purple, red, green and brown colors is allowed. Black and white portraits of famous people of the past would be appropriate here. This style is inherent in the gangster layers.
Stylish dark purple wardrobe with golden elements
In DIY furniture design, this direction can be expressed in different ways. Regarding cabinets and chests of drawers, these can be either plain facades and panels painted with acrylic paint in one or two colors, or decorated furniture using decoupage.
Decoupage napkins or film are a universal and practical way to give the interior and furniture a creative look. Its shapes, patterns, colors, prints are widely represented in paint stores. In Art Deco, these could be the same faces of the bandits of the past, or, as has become very fashionable, the figure of the unforgettable Marilyn Monroe.
First, the entire cabinet is painted in primary colors. To make the borders clear, use masking tape.
Then the panels are decorated using decoupage technique
The final stage is applying a protective layer of varnish
It would be interesting to use a special varnish that has crackle properties when covering decoupaged furniture facades.
Tinted film on the door
Decorating door glass using tinting has been popular for a long time. In addition to traditional glass painting, another method is used, which is to apply a tinting film to the door. Its cost is less than dyeing, so this method will help you get a beautifully designed canvas and save your budget. Glass tinting products add extra strength to glass.
A canvas with glass tinted in this way looks stylish and attractive, looks impressive in a room with a fashionable design, in which minimalism and rigor predominate (high-tech, functionalism).
Tinted door covering
Beginning of work
Do-it-yourself cabinet decoupage should begin with a thorough inspection of it. Be sure to pay attention to defects; they will need to be worked on separately and removed from the surface. The most convenient way would be to disassemble it, remove the doors and install updated fasteners. The inside of the cabinet is also inspected and processed. For fun, you can take photos before and after work, which you can later show to your friends and family.
Before decorating the cabinet, you need to sand off the old paintwork. This will help avoid detachment and unevenness in the future. A master class from famous carpenters advises covering the entire wooden surface with varnish so that subsequent shades of paint do not change their color as they are absorbed into the wood.
Upholstery
An interesting and unusual decoration for an old cabinet is upholstery with a different material. But this should be the most ordinary cabinet of a simple shape and without relief decoration. Instead of stained fabric that cannot be removed, use dermantin, leatherette and their variations for upholstery.
Regular glue is suitable for attaching the canvas - the main thing is that there are no bruises or air bubbles. Decorate the edges, corners, ends and other areas with decorative nails and rivets. This type of finishing will take a lot of time, but it will fit luxuriously into English interiors or lofts.
Photo: arivamebel-ekb.ru
Surface decoration
There are many DIY ways to update your cabinets. The most popular, even today, is painting cabinet furniture. The decor of a sliding wardrobe or a standard version simply cannot do without painting, and bright colors will help the old product sparkle with new colors. In order for the paint to last a long time and look beautiful, you need to follow the rules:
- Preferably use acrylic paints;
- sand the surface well;
- eliminate in advance any imperfections that become visible after painting.
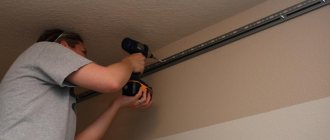
Self-installation of tinting films
Material and tool
In order to cover a window with a high-quality film with a tinting effect with your own hands, you will have to look for a tool in advance.
For such an operation you will definitely need:
- construction knife (but you can also use a retractable stationery knife);
- rubber spatula;
- a spray bottle to spray the soap solution;
- and, of course, high-quality tint film in the right quantity (it is rarely sold by the meter, more often in rolls).
Application process
The entire process of covering glass with film can be divided into 2 main stages:
- Preparing for installation.
- And the actual installation.
At the first stage, you will need to take the necessary measurements in order to know how much to cut from the roll in length. If the width of the film is not enough for the width of the glass unit, you will have to carry out more complex cutting to avoid unsightly overlaps.
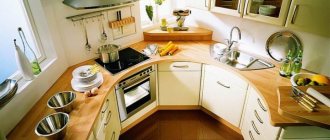
Kinds
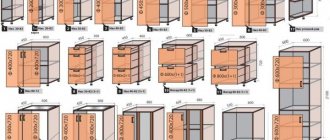
There are several types of wardrobes:
- The built-in wardrobe is mounted between the walls or placed in a niche. This structure has no floor and roof.
- The case version may have different dimensions, the number of doors also varies. Such models are placed near the wall.
Review of the main models of sliding wardrobes, advice on selection and placement.
The shape of the wardrobe can be angular or linear. The first option is placed exclusively in the corner, which allows for more efficient use of the room area. Such structures are made in the form of a triangle with two doors; L-shaped models are popular (often with a large number of doors). There is also a trapezoidal cabinet, which is more spacious.
The linear model is located in a straight line along the wall. Such furniture can be equipped with a different number of doors. Designers still advise placing a moderate number of mirrors. It is better to combine such surfaces with inserts made of leather, bamboo, frosted glass, and photo printing. Otherwise, the room may create an uncomfortable atmosphere.
Hull
Built-in
Straight
Angular
Step-by-step instructions for decoupage
Before starting work, thoroughly prepare the surface intended for decoupage.
Step 1. Wash it with soapy water or a special glass cleaner.
Step 2. You will need regular alcohol. Apply it to the canvas and wipe with a dry cloth to degrease the surface.
Stage 3. Dry the prepared canvas thoroughly.
Applying an image to a canvas using decoupage
Stage 1. Carefully cut out the elements of the design. If it consists of many small parts, it is not necessary to cut out the entire image. You can divide it into components.
Cutting out an image
Stage 2. Glue is applied both to the glass sheet and to the prepared drawing. It is important to spread it in a thin layer so that it is not noticeable when it dries.
Stage 3. The prepared image is applied to the glued surface. Using a paper towel, apply pressure to remove air bubbles.
Stage 4. After this, a layer of varnish or glue is applied to the finished drawing. Remove excess with a wooden stick. Your decoupage is ready.
How to elegantly age an image
If you want to give the image an antique effect that will emphasize the design individuality of the interior in Victorian, country, or shabby chic style, then it is not so difficult to do. We offer ways to get the desired result.
The effect of antique decoupage from scrap materials
Prepare a decoction of onion peels, freshly brewed coffee beans or strong tea. Just hold the image for a while in one of the proposed compositions.
The effect of antique decoupage from artistic materials
Pour turpentine into a suitable container and add literally a couple of drops of oil-based paint in the color of burnt sienna. Keep the image there for a while. In this way you can achieve the effect of ancient parchment.
The effect of antique decoupage from building materials
Add a little bitumen to white spirit until a pale color is obtained. Apply the resulting composition to the pasted image. To get a cracking effect, go over the image with a metal brush.