A kitchen set, as a rule, includes all kinds of cabinets (including wall cabinets), various cabinets, a sink and other functional panels and pencil cases. And if there are usually no difficulties with the arrangement of floor cabinets and cabinets, then when it comes to hanging elements of the set, many “fall into a stupor” because they do not know where to start. Let's look at all the nuances of such fastening and the errors that arise during the work process before hanging kitchen cabinets on a mounting rail.
Tips for hanging cabinets
There are several rules for how to attach kitchen cabinets to the strip.
- The height of the wall cabinets should be such that adult family members can freely take the item on the top shelf from the floor.
- Cabinets must not block ventilation outlets.
- The fastenings must be as strong as possible so that the cabinets can withstand quite a lot of weight - their own, food and kitchen utensils.
Disadvantages of hinge mounting
- In order to hang the cabinets perfectly level, you need to carefully mark them.
- This fittings are quite unreliable and cannot always withstand a lot of weight.
- Even under the weight of its own weight, cabinets with this type of hanging very often break off the hinge attachment point on the back wall.
- It is almost impossible to hang wall cabinets this way alone.
But this type of mount has, perhaps, only one advantage – low cost.
Attaching the mounting rail
Before hanging cabinets on the mounting rail, you must install and secure it correctly.
The first thing you need to pay attention to is the mounting height. The standard height for attaching kitchen cabinets to the strip is considered to be within 50-60 cm from the countertop of the lower cabinet. A closer distance to the working surface of the tabletop will make it more difficult to work on it. Usually a woman spends more time in the kitchen and she is the mistress there, so the height should first of all be comfortable for her. In addition to the height of the shelves itself, take into account their depth, since in deep cabinets the height of the canopy will be slightly lower than in standard ones in depth. When all these values are taken into account, you can proceed directly to the installation of the rail.
On the wall, use a pencil or marker to mark the resulting mounting height. At this height, place the mounting rail for wall cabinets against the wall and mark all the holes that will need to be drilled.
It should be said that the standard length of the mounting rail is two meters. If you will hang cabinets at a distance from each other, then the rail must be cut into lengths according to the dimensions of these cabinets. There is no need to cut the strip to hang a row of cabinets.
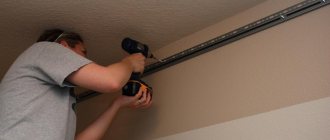
Start making holes for the mounting rail for kitchen cabinets from the outermost one. After this, having slightly secured the rail, place a level on it and strictly follow it, make a hole from the other edge. Next, you need to drill a hole in the middle to secure it, and then do all the rest. Then you need to insert plastic dowels into these holes and secure the mounting rail for wall kitchen cabinets with screws or self-tapping screws. At the end of the work, check the level of the rail fastening again.
Other types of fasteners
To hang several rather heavy cabinets on self-tapping screws already screwed into the wall, you can attach a strip to their back surface. This flat piece has a slot that resembles a keyhole in configuration. It is selected so that the diameter of the widest part of the hole is slightly larger than the head of the screw. The narrow part of the hole should be slightly larger than the diameter of the thread. When hanging the cabinet, the head of the self-tapping screw enters the wide part of the slot, and then moves under weight into the narrow zone, ensuring reliable fastening.
If you need to fix a fairly heavy object on the wall, made with plasterboard sheathing, then you can first make a hole with a diameter of ≈ 3 cm in the area of the fastening room, through which a solution can be introduced into the empty space, allowing you to create a strong bridge to the wall.
You can simplify the process if you correctly calculate the length of the screw. In order for the kitchen wall cabinet to be firmly fixed, several values are added up: the thickness of the drywall, the gap from the finish to the wall, the layer of plaster, the depth of the hole in the wall itself.
Fastening kitchen cabinets
Fastening kitchen cabinets to the mounting rail is done using awnings. In order to install them, you must first remove the back door of the cabinet and fit the canopies tightly into the far upper corners of the cabinet. It is necessary to try on the canopy in such a way that the hook, which will cling to the mounting rails for kitchen cabinets, protrudes slightly outward (about four millimeters).
After you are sure that everything is done correctly, use a thin drill to make a hole in the side wall of the cabinet to attach the canopy. To strengthen it, you can secure the canopy not with self-tapping screws, but with a through screw and nut. The disadvantage of this method is that the screw heads will be visible on the side walls. You can fix the canopy on the end cabinets with a screw, placing it not in a through hole, and make a screw fastening on the remaining cabinets. Do not overtighten the screws to avoid cracking the cabinet walls.
When installing, please note that the canopies are divided into “right” and “left”.
After the awnings are secured, it is necessary to nail the back wall of the cabinets with thin nails, first cutting out holes for the hooks using metal scissors or a jigsaw. All you have to do to hang the kitchen cabinets on the mounting strip is hook the awning hooks onto it.
It would seem that there are no particular difficulties with hanging kitchen cabinets, but this work has its own nuances. Let's look at them now.
Computer table for a small room
This option is designed for a small room; for example, this computer table is generally located in a built-in wardrobe. The step-by-step photos show the dimensions, but you can change them so that the system unit fits into the “leg” of the table. In general, they can be made quite spacious so that nothing unnecessary is stored on the table. In this case, the tabletop for the keyboard is not retractable, but this is also a matter of taste; if you slightly reduce the working area of the lower tabletop and install a retractable shelf on runners, it will be retractable.
Photo source www.ana-white.com
Large computer desk with bureau
This table is well suited for a work office, especially if you store documents at home. Of course, there are no bells and whistles here, not even a retractable table top for the keyboard, but it is simple and reliable. The design is simple, step-by-step photos show how to make a tabletop; in this case, the bureau drawers were purchased separately, although you can do it yourself.
Photo source overthebigmoon.com/diy-file-cabinet-desk-blendtec-giveaway/
Large, beautiful and inexpensive computer desk
It’s hard to buy a computer desk at a reasonable price and one that satisfies all your needs, the author of this photo offers an excellent alternative - to make a beautiful and inexpensive computer desk with your own hands. The design consists of four parts.
- table top
- 3 cabinet drawers (for miscellaneous accessories, computer cables, etc.)
- filing cabinet for 2 drawers (boxes the size of folder files)
- printer cabinet.
The idea is to do just that, because the table can be transported and can easily be installed in a new place; repairs and rearrangements are unpredictable. The author chose a fairly simple design, the manufacture of which does not require any special tools or expensive materials, except that you will have to turn to a neighbor or a workshop to cut the wood. Here below are the tools that the author used.
Materials:
- 3 sheets of MDF (you can use maple veneer plywood, but it is 3 times more expensive)
- 2 sheets of 1/8 MDF or fiberboard - wood glue
- hole filler
- 5 pairs of drawer roller slides
- 7 drawer handles - 1 pair of cabinet door hinges
- 4 liters of primer
- 4 liters of paint
- brushes and rollers.
For the assembly procedure, see the step-by-step photos; if you are interested in the nuances, you can read in detail on the source website, link under the gallery.
Photo source www.instructables.com/id/great-looking-inexpensive-computer-desk
Working computer desk studio
The desk is a little bulky, but if your work involves a computer, almost everything is provided here. It is unlikely that you will be able to buy such a model in a store, and making a computer desk with your own hands will cost five times less. In addition to boards and plywood, you will need tie screws, nails and wood glue. Special tools include a circular saw and a grinder.
Photo source: jackdanielsrecordings.com/my-diy-studio-desk-build/
Adjustable computer desk
An interesting idea for a computer desk; in a store you are unlikely to find a model with an adjustable tabletop height. There are some, but basically you have to disassemble the structure in order to adjust the desired height, but here the whole trick is in the chain drive. That is, they simply used bicycle sprockets with a chain. Well, of course, it’s not easy, you need welding and other serious tools, but you’ll get a very comfortable table in an industrial style. How to make it, look at the step-by-step photos.
Photo source kevinjantzer.com/diy-adjustable-standing-desk/
Simple DIY computer desk
You can make such a simple computer desk with your own hands, say, for a summer house. Of course, it’s not exactly computer-based, but rather universal. You can call it a written one, even a kitchen one; in my opinion, it’s quite a suitable option for a dacha. There is a drawer under the tabletop that can be used as a regular drawer or converted into a keyboard. It’s quite simple to make; all the steps are indicated in the diagrams with step-by-step photos.
Photo source www.thedesignconfidential.com/2012/08/free-diy-furniture-plans-build-pottery-barn-inspired-hendrix-large-desk
Preparing the walls
Before you hang your kitchen cabinets on the mounting rail, you need to prepare the walls on which they will hang. What is meant by preparation?
- The first step is to level the walls so that later there is no distortion and the cabinets do not “walk” in different directions. Also, if the walls are uneven, problems will arise in the future with the cabinet doors closing tightly.
- If the set has corner cabinets, then the wall joints (corners) must be carefully measured at 90 degrees.
- Next, you need to complete all electrical work related to the installation of sockets, lamps, switches, as well as the installation of internal wiring.
- Complete all cosmetic work on painting and wallpapering the walls on which the wall cabinets will be installed.
- Lay out the “backsplash”, if it is provided in the kitchen, before hanging the kitchen cabinets on the strip, so that after all work is completed, the top row of tiles goes under the cabinets.
Required materials and tools
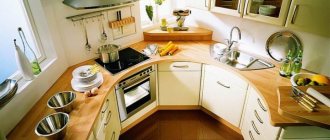
These pieces of furniture are of great importance. They save space in the kitchen and have sufficient capacity. They keep a lot of things there. Therefore, it is necessary to make high-quality and thorough fastenings to the wall. Before you start work, you need to prepare materials and tools:
- A base to secure objects.
- Hinges for the facade.
- Elements necessary for the construction of cabinets.
- Self-tapping screws, nails.
- Intersectional couplers.
- Tires.
- Hinges and screws to install them.
- Drill. If the wall is concrete, you need a drill with a hammer drill function.
- Tape measure, pencil, ruler.
- The level is preferably long.
- Screwdriver, screwdrivers.
- Drill attachments, screwdriver attachments.
- Hammer.
- Clamps, hacksaw.
- Open-end wrenches.
After you have purchased all the required materials, you need to prepare the walls for installation and make markings.
How to properly apply markings on walls?
90% of successful work on hanging cabinets depends on correct marking. So, how to hang a kitchen cabinet perfectly level on a rail? You just need to carry out the markings consistently and correctly.
- Install the base cabinet and measure the distance from it to the wall cabinet. According to GOST, it should not be less than 45 cm, in practice - 50-60 centimeters.
- Using these marks, draw a line or stretch a thread, always measuring everything according to the level.
- Already from this line, measure the height of your cabinets and also draw it or mark it with thread.
- Set aside the required distance from the top edge at which you have attached awnings or other fittings for hanging cabinets, and approximately mark the holes.
- Measure the width of the mounting strip and make sure it will not protrude over the top of the cabinets.
- Place the strip along the top line or slightly below (depending on your measurements) and mark the holes as shown above.
Useful drilling tools
A jack of all trades always needs certain tools to work in a private house, on a summer cottage, in an apartment, or when building his own house. Many of them are not even worth purchasing if they do not require constant use. For example, for drilling, there are many different attachments that will greatly increase the functions of your drill and significantly expand them.
Let's look at some devices for auxiliary potential.
To obtain precise holes of significant diameter in different workpieces, a device such as a drilling and milling attachment will help to carry out individual milling work.
Make a milling machine out of a drill.
The next device worth mentioning is very expensive, but has the highest versatility. You will sharpen all the tools that you have on the farm, be it knives, shovels, axes, hoes, various drills, effortlessly with the universal sharpening device.
When purchasing drill attachments, be sure to check their compatibility.
Holder with clamp. With its help, you can fix the drill anywhere, use it with various kinds of devices, use it as a mini-lathe, sharpening, milling or grinding and polishing machine.
The drill holder allows you to quickly secure the drill.
All kinds of attachments are also designed for drills. These can be stops that limit the depth of drilling, platforms with which you can drill at a certain angle or perpendicularly. There are nozzles that are adapters and extensions of different designs: offset, angled, flexible.
The angle drill adapter is designed for hand and electric drills.
Metal cutting attachments turn your drill into a one-of-a-kind tool. Some resemble sheet metal shears, while others have a different feature, such as roller shears. The nozzle, called the “Cricket,” seems to cut through the metal.
The main advantage is that they do not damage the polymer coating of the metal.
There are also other attachments designed for monotype work.
- For installing aluminum rivets. There are types for both the same size and those with interchangeable bushings for different calibers.
- Tape-shaped attachment for self-tapping screws. With its help, you will significantly save time when working with plasterboard partitions or when you need to secure other materials with self-tapping screws.
- A belt sanding attachment will completely replace a sanding machine, and it will be much cheaper in cost.
- An attachment with which you can turn your drill into a hammer drill will not be superfluous.
- Using the corner pruner attachment, you can cut various cables, as well as tree branches.
- Using a variety of attachments, the drill will replace your jigsaw, circular saw, pump, and you can polish surfaces and sharpen drills.
- There are unusual attachments.
Whatever attachments we use, the main thing is that the work is enjoyable.
Features of mounting cabinets on plasterboard walls
Unfortunately, in an attempt to reduce the cost of the construction process, plasterboard is often used for interior partitions. How to hang kitchen cabinets on a mounting strip fixed to a plasterboard wall should be discussed separately, as it has its own nuances.
In order for the material to withstand a sufficiently large weight of hanging cabinets, the first thing you need to do is choose the right fasteners. Gypsum board is filled with gypsum aggregate, which is very soft and crumbles easily. Self-tapping screws simply won’t stick in such a wall, as experts say, they will “crumble” out of there quite quickly.
The fastener used when working with plasterboard walls is a phosphated self-tapping screw with a large thread pitch. It must be phosphated because the filler inside the plasterboard sheets is a powerful oxidizing agent, and such a coating will protect the self-tapping screw from corrosion.
So how do you hang kitchen cabinets on a mounting rail when working with drywall?
What are the advantages
Buying such a product is not a problem. The price is low, and there are different types in size, color, etc. The design principle is approximately the same everywhere. Whether the canopy will be white, black or gray is up to the buyer to decide.
If we talk about the advantages, then we can highlight the following points:
There is no need to say that such a furniture canopy is expensive. Yes, the price is a little higher compared to regular metal plates. But with such advantages, this is a good reason to overpay slightly.
Method number 1: on a wooden beam
In cases where you install plasterboard partitions yourself, you can mark out your future kitchen in advance and lay a wooden beam at the location of the mounting rail before finishing work. Choose a beam of medium width, about 8-10 centimeters, so that later you can slightly adjust the height of the cabinets. The timber is laid in the spaces between the vertical guide profile to a width equal to the width of the kitchen unit, and is attached to the main wall of the room. Subsequently, choose the fasteners for your cabinet so that its length is enough to sew through the plasterboard sheet and secure it in a wooden block. This method is usually chosen in cases where main walls are leveled with sheets of plasterboard.
Method number 2: on drywall
If it is not possible to lay the timber in advance, then fastening the kitchen cabinets to the plank can be done directly on the drywall. In this case, be sure to use special screws and screw them into the bar in a checkerboard pattern at least every five to eight centimeters. It is advisable to screw the outermost screws not into the material itself, but into the joints of the plasterboard sheets, trying to get into the metal vertical guide. In this way, it is better to hang not single cabinets, but a series of cabinets, so that the rail is held in place by as many screws as possible.
Recommendations from the experts
When choosing fittings, you should remember that the kitchen, in addition to its external beauty, must also be durable and reliable. Well-chosen fittings ensure the absence of noise when using the set, allow for a tight fit of the doors, and safe fastening of the shelves.
When choosing, it is recommended to pay attention to the material from which the parts are made, the number of operating cycles specified by the manufacturer, and the presence of a warranty period. When adjusting hinges, follow the general recommendations:
- When debugging, first of all, you should align the vertical gaps along the entire length of the door leaf, and then adjust the seat height. This will speed up and simplify the process.
- Before you start adjusting the hinges, make sure that the module is evenly secured in all planes. This can be done using a building level.
- If the furniture is cluttered, first of all you should pay attention to the gaps on the front doors.
- Make sure that the façade addition under the cup is done correctly. If this is not the case, it will be almost impossible to make precise adjustments.
It is important to remember that there is no universal fastening. Each case is individual; fittings must be selected based on:
- wall material;
- size of cabinets, planned load on them;
- availability of special tools.
Also, during adjustment, try to simultaneously adjust all three parameters - horizontal, vertical and depth. This is necessary to prevent imbalance, which could lead to uneven load distribution between the cabinet hinges.
Adjusting kitchen cabinet hangers is a simple procedure that does not require special knowledge, skills or tools. It is extremely important to do it regularly. Timely debugging will significantly extend the life of the kitchen unit.
Method number 4: anchors
Another way to hang a cabinet on a mounting rail if you have a plasterboard wall involves using expandable anchor fasteners. This installation method is ideal for kitchen cabinets, as it can withstand quite a lot of weight (about 35 kilograms). The anchor fastener is suitable for both a canopy with and without a mounting rail. It is quite difficult to tear it out only if it is with a large piece of drywall. It should be said that it is better to use metal fasteners specifically for the kitchen, since commercially available plastic ones are still not as reliable and can withstand less weight.
Unconventional method of fastening to drywall
It should be immediately clarified that although such methods are quite rare, they also occur, since, unfortunately, it is not possible to secure the cabinets in the traditional way.
- A chrome-plated floor frame is pre-ordered, to which the cabinets are subsequently attached. It can be used quite interestingly in the kitchen; it will not take up much space and will look beautiful and modern. The main condition is that it must be quite heavy to withstand the weight of the cabinets.
- Hanging cabinets from the ceiling. The methods can be different - either using movable cables or chains, or using chrome-plated tubes with rigid fastening. Quite a modern and progressive way of installing kitchen units, especially in different planes.