A kitchen set, as a rule, includes all kinds of cabinets (including wall cabinets), various cabinets, a sink and other functional panels and pencil cases. And if there are usually no difficulties with the arrangement of floor cabinets and cabinets, then when it comes to hanging elements of the set, many “fall into a stupor” because they do not know where to start. Let's look at all the nuances of such fastening and the errors that arise during the work process before hanging kitchen cabinets on a mounting rail.
Tips for hanging cabinets
There are several rules for how to attach kitchen cabinets to the strip.
- The height of the wall cabinets should be such that adult family members can freely take the item on the top shelf from the floor.
- Cabinets must not block ventilation outlets.
- The fastenings must be as strong as possible so that the cabinets can withstand quite a lot of weight - their own, food and kitchen utensils.
Disadvantages of hinge mounting
- In order to hang the cabinets perfectly level, you need to carefully mark them.
- This fittings are quite unreliable and cannot always withstand a lot of weight.
- Even under the weight of its own weight, cabinets with this type of hanging very often break off the hinge attachment point on the back wall.
- It is almost impossible to hang wall cabinets this way alone.
But this type of mount has, perhaps, only one advantage – low cost.
Attaching the mounting rail
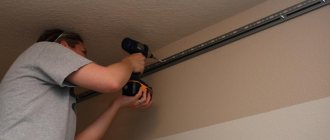
Before hanging cabinets on the mounting rail, you must install and secure it correctly.
The first thing you need to pay attention to is the mounting height. The standard height for attaching kitchen cabinets to the strip is considered to be within 50-60 cm from the countertop of the lower cabinet. A closer distance to the working surface of the tabletop will make it more difficult to work on it. Usually a woman spends more time in the kitchen and she is the mistress there, so the height should first of all be comfortable for her. In addition to the height of the shelves itself, take into account their depth, since in deep cabinets the height of the canopy will be slightly lower than in standard ones in depth. When all these values are taken into account, you can proceed directly to the installation of the rail.
On the wall, use a pencil or marker to mark the resulting mounting height. At this height, place the mounting rail for wall cabinets against the wall and mark all the holes that will need to be drilled.
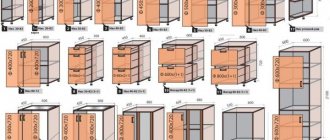
It should be said that the standard length of the mounting rail is two meters. If you will hang cabinets at a distance from each other, then the rail must be cut into lengths according to the dimensions of these cabinets. There is no need to cut the strip to hang a row of cabinets.
Start making holes for the mounting rail for kitchen cabinets from the outermost one. After this, having slightly secured the rail, place a level on it and strictly follow it, make a hole from the other edge. Next, you need to drill a hole in the middle to secure it, and then do all the rest. Then you need to insert plastic dowels into these holes and secure the mounting rail for wall kitchen cabinets with screws or self-tapping screws. At the end of the work, check the level of the rail fastening again.
Advantages and disadvantages of the plank
This simple design has a number of advantages, which is why it has gained its popularity:
- Even non-professionals - people with basic construction skills - can cope with the installation.
- When installing adjustable awnings, there is no need to measure and drill holes for each wall hanging cabinet separately. The general level is reflected.
- Using anchor bolts you can adjust the position of the cabinets. They can be placed on the same level, regardless of the flaws of the wall.
- Unlike fastenings for wall-mounted kitchen cabinets with dowels, a design with a strip is considered more “durable” and reliable. Even if a couple of screws loosen over time, the rest will hold well even when the cabinets are as full as possible.
The system has no global shortcomings. The only thing you should keep an eye on when purchasing a bar is the quality of the material. Low grade metal will bend a lot and may even break during furniture installation.
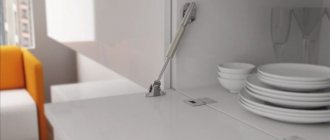
The locking mechanisms of kitchen cabinets have to endure heavy loads.
Fastening kitchen cabinets
Fastening kitchen cabinets to the mounting rail is done using awnings. In order to install them, you must first remove the back door of the cabinet and fit the canopies tightly into the far upper corners of the cabinet. It is necessary to try on the canopy in such a way that the hook, which will cling to the mounting rails for kitchen cabinets, protrudes slightly outward (about four millimeters).
After you are sure that everything is done correctly, use a thin drill to make a hole in the side wall of the cabinet to attach the canopy. To strengthen it, you can secure the canopy not with self-tapping screws, but with a through screw and nut. The disadvantage of this method is that the screw heads will be visible on the side walls. You can fix the canopy on the end cabinets with a screw, placing it not in a through hole, and make a screw fastening on the remaining cabinets. Do not overtighten the screws to avoid cracking the cabinet walls.
When installing, please note that the canopies are divided into “right” and “left”.
After the awnings are secured, it is necessary to nail the back wall of the cabinets with thin nails, first cutting out holes for the hooks using metal scissors or a jigsaw. All you have to do to hang the kitchen cabinets on the mounting strip is hook the awning hooks onto it.
It would seem that there are no particular difficulties with hanging kitchen cabinets, but this work has its own nuances. Let's look at them now.
Preparatory work to be done
Regardless of the type and dimensions of hanging furniture, there are a number of important points that must be taken into account before choosing and purchasing the set itself.
Preparing the walls
Furniture is often purchased after the renovation is completed. According to the rules, wall decoration must be completed. But not all craftsmen approach their work equally responsibly, so first you need to check how smooth your walls are.
To do this, take a long level, a plaster rule or any flat plank and apply it in several places to the wall. The gaps between the plank and the wall will immediately show the level of curvature. If possible, it is advisable to illuminate the wall at an angle, so you will see all the finishing defects.
The quality of finishing work on the walls is checked using a perfectly straight and long strip.
If smooth deviations along the plane of the walls do not exceed 2 - 3 mm, it means that you have encountered relatively normal craftsmen and you can safely proceed to further work. Otherwise you have 2 options:
- Level the wall with your own hands or call a professional to fix all the defects. In fact, you will have to do the repairs all over again, and this is time-consuming and expensive;
- Fasten a couple of wooden blocks 30-40 mm thick to the wall and attach a mounting rail to these bars for hanging kitchen cabinets. Of course, due to the slats, you will lose 30 - 40 mm of usable area, but you will save a lot of effort, time and money.
When hanging cabinets, two wooden blocks can compensate for slight curvature of the walls along the plane.
Nuances of choosing accessories for fastening
Remember - there is no universal fittings; when choosing, you should start from the material from which the walls are made.
| Illustrations | Recommendations |
| Tree. One of the simplest options. Here the mounting plate is screwed with wood screws. For kitchen cabinets, self-tapping screws 70–100 mm long are sufficient. They are driven in increments of 100–150 mm. | |
| Concrete or brick . For concrete and brick walls, steel anchor bolts with a cross section of 8 - 10 mm are used. They are driven in increments of up to half a meter. | |
| Drywall. Plasterboard walls are considered the most problematic when hanging cabinets on them. For fixation there are so-called “mollies”. But the hinge is heavily loaded, so the molly needs to be driven so that they cling not only to the sheet, but also to the internal metal profile.
| |
| Cellular concrete. Cellular concrete includes gas and foam concrete; special anchors are also produced for them. Standard technology:
|
Fastening with dowel-nails or self-tapping screws with plastic dowels is only possible on brick or concrete walls, and the fixing step of the mounting strip should not exceed 150 mm.
It is not advisable to use screws and self-tapping screws with plastic dowels for heavily loaded suspensions.
Preparing the walls
Before you hang your kitchen cabinets on the mounting rail, you need to prepare the walls on which they will hang. What is meant by preparation?
- The first step is to level the walls so that later there is no distortion and the cabinets do not “walk” in different directions. Also, if the walls are uneven, problems will arise in the future with the cabinet doors closing tightly.
- If the set has corner cabinets, then the wall joints (corners) must be carefully measured at 90 degrees.
- Next, you need to complete all electrical work related to the installation of sockets, lamps, switches, as well as the installation of internal wiring.
- Complete all cosmetic work on painting and wallpapering the walls on which the wall cabinets will be installed.
- Lay out the “backsplash”, if it is provided in the kitchen, before hanging the kitchen cabinets on the strip, so that after all work is completed, the top row of tiles goes under the cabinets.
Preparing walls for installation of wall cabinets
Before you begin installing wall cabinets, you must complete all electrical wiring and installation of all electrical equipment, such as sockets and switches. Then the surface of the walls is leveled and defects are removed. Some people neglect this procedure, believing that wall errors will not be visible behind the cabinets. But in order for the quality of installation to meet accepted standards, finishing work should not be neglected.
Construction beacons fixed to the wall with plaster will help level the surface of the wall. A solution is applied on top of them. After it hardens, the surface of the walls is leveled. Small differences in the level of plastered walls are equalized with a solution of finishing putty. After completing the preparatory work, you can begin installing the wall cabinets.
How to properly apply markings on walls?
90% of successful work on hanging cabinets depends on correct marking. So, how to hang a kitchen cabinet perfectly level on a rail? You just need to carry out the markings consistently and correctly.
- Install the base cabinet and measure the distance from it to the wall cabinet. According to GOST, it should not be less than 45 cm, in practice - 50-60 centimeters.
- Using these marks, draw a line or stretch a thread, always measuring everything according to the level.
- Already from this line, measure the height of your cabinets and also draw it or mark it with thread.
- Set aside the required distance from the top edge at which you have attached awnings or other fittings for hanging cabinets, and approximately mark the holes.
- Measure the width of the mounting strip and make sure it will not protrude over the top of the cabinets.
- Place the strip along the top line or slightly below (depending on your measurements) and mark the holes as shown above.
Installation of cabinets: stages of work
After completing the preparation of surfaces, it is necessary to proceed to the stages of installation of structures. First, we need to apply markings at the optimal height.
Choosing the height of the cabinets
According to the standard, many manufacturers recommend leaving a distance from the table to the beginning of the top cabinet of about 45 centimeters. At the same time, many repairmen and designers consider this arrangement to be incorrect, and call another, the most optimal distance - 50-60 centimeters.
In fact, there is no single rule - cabinets must be installed in such a way that a person can easily reach the highest shelf. Since the height of all people is significantly different, during installation you need to do the following: raise your hands up and mark on the wall the point where your fingers end - the top cabinet will begin from this point and this calculation will allow you to have free access to all other shelves.
Calculations must be carried out based on your height and the growth of other family members
There are also general principles for installing upper cabinets depending on the height of the residents. If the average height of household members is up to 160-165 centimeters, then the cabinet is installed at a distance of approximately 175 centimeters. If you are taller than 170 centimeters, the top shelf should be located at a height of about 185 centimeters. In some cases, cabinets are installed even at a distance of two meters from the floor.
When determining the exact height, it is necessary to calculate the distance from the floor to the highest shelf
Marking
The exact marking height will vary depending on the type of fittings chosen. However, the principle of performing the work will be identical in all cases:
- After you calculate the exact location of the cabinet, you will need to draw a transverse line along the entire surface.
- If the headset is located at a corner, you will have to start from the corner. If the cabinets are located in one line in the middle, then marks should be left from the beginning of the outer cabinet.
- During the process, you must use a measuring tape and a water level. First you will need to place one point, and then determine the location of the second using a level.
A water level is a convenient, but at the same time cheap, tool that allows you to make markings on the wall in the best way.
After determining the location of the points, they will need to be connected to each other to get a line. For such purposes, you can use a ruler or any flat bar.
Important point! The most technologically advanced and accurate tool is a laser level. Thanks to this device, you can quickly apply markings, which is why experienced furniture makers prefer to use it. The only drawback is that such a tool is too expensive compared to other analogues.
Tools
During the work you do not have to use a large number of tools. The main thing is to prepare an electric drill with an impact mechanism, or it is better to immediately purchase a hammer drill. In addition, we will need the following:
- measuring tape;
- water level;
- hammer;
- screwdriver;
- screwdriver;
- a simple pencil;
- square;
- knife;
- metal knife.
It is necessary to prepare all the tools in advance
Features of mounting cabinets on plasterboard walls
Unfortunately, in an attempt to reduce the cost of the construction process, plasterboard is often used for interior partitions. How to hang kitchen cabinets on a mounting strip fixed to a plasterboard wall should be discussed separately, as it has its own nuances.
In order for the material to withstand a sufficiently large weight of hanging cabinets, the first thing you need to do is choose the right fasteners. Gypsum board is filled with gypsum aggregate, which is very soft and crumbles easily. Self-tapping screws simply won’t stick in such a wall, as experts say, they will “crumble” out of there quite quickly.
The fastener used when working with plasterboard walls is a phosphated self-tapping screw with a large thread pitch. It must be phosphated because the filler inside the plasterboard sheets is a powerful oxidizing agent, and such a coating will protect the self-tapping screw from corrosion.
So how do you hang kitchen cabinets on a mounting rail when working with drywall?
Installation method
To properly secure kitchen wall cabinets, you need to select a tool in advance and strictly follow the installation technology. It’s easier to do the work with 4 hands, but 1 person can do it. Of course, this will take a little more time and will require extreme concentration, accuracy and caution.
An important factor is the reliability and quality of fastening of each part of the headset to the wall.
Preparatory stage
Before starting the process of drilling surfaces and direct installation, you need to perform the following steps:
- Cleaning and leveling walls. The easiest way to do this is with drywall. First, you need to secure a frame of profiles to the wall, on which the structure of the cabinets will be supported.
In order to begin the process of installing kitchen cabinets, you need to level the walls. - For corner kitchens, the angle between the two planes should be maintained at 90 degrees. If the curvature of the walls is insignificant, you can simply plaster them.
Please note that for a corner kitchen, the angle of the walls is provided at 90 degrees. - Applying basic markings. Using a perpendicular, a construction pencil and a level, you need to schematically arrange the attachment points and select the height of the structure.
This stage must be performed using a plumb line, pencil and level. - If the situation requires it, you must first install all sockets and lighting fixtures and attach all related elements.
Installation and connection of all sockets and lamps must be completed in advance. - Before starting work on the installation of kitchen cabinets, the walls must be painted or wallpapered - no repair work should be carried out after installation.
You can do all the work yourself, without any help.
Hanging height indicators
It should be convenient to use the set, so the height of the cabinets directly depends on the height of the owners and the anatomical features of their figure, and the features of the room.
Before you start assembling the set into a single “wall”, you need to decide on the height at which the furniture will be hung.
Main criteria and numbers:
- The drawers should be tactile and located at eye level. On average, the distance from the plane of the table top to the top cabinet is 55-65 cm. In this case, a person must reach the very top shelf without the risk of dropping the desired item and without the use of auxiliary objects (chairs, benches, etc.).
- If you do not plan to mount a table top or the lower part of the set, then the ratio of human height and fastener height should look like this:
- up to 165 cm – 175-180 cm;
- 165-157 cm – 185 cm;
- 175-190 cm – 200 cm.
To correctly carry out these manipulations, preliminary calculations must be made.
Required tools and materials
To carry out the work quickly and efficiently you will need:
- Drill or hammer drill with drills or augers. For brick and concrete, the impact mode should be used; for other surfaces, regular drilling will be sufficient. When working with tiles, you need to stock up on drill bits with pobedit tips.
- A screwdriver, which will be used to tighten the screws for attaching the holders to the cabinets.
- Construction pencil and tape measure.
- Level for marking the location of cabinets and adjusting awnings.
- Stable ladder.
Method number 1: on a wooden beam
In cases where you install plasterboard partitions yourself, you can mark out your future kitchen in advance and lay a wooden beam at the location of the mounting rail before finishing work. Choose a beam of medium width, about 8-10 centimeters, so that later you can slightly adjust the height of the cabinets. The timber is laid in the spaces between the vertical guide profile to a width equal to the width of the kitchen unit, and is attached to the main wall of the room. Subsequently, choose the fasteners for your cabinet so that its length is enough to sew through the plasterboard sheet and secure it in a wooden block. This method is usually chosen in cases where main walls are leveled with sheets of plasterboard.
Method number 2: on drywall
If it is not possible to lay the timber in advance, then fastening the kitchen cabinets to the plank can be done directly on the drywall. In this case, be sure to use special screws and screw them into the bar in a checkerboard pattern at least every five to eight centimeters. It is advisable to screw the outermost screws not into the material itself, but into the joints of the plasterboard sheets, trying to get into the metal vertical guide. In this way, it is better to hang not single cabinets, but a series of cabinets, so that the rail is held in place by as many screws as possible.
Method number 4: anchors
Another way to hang a cabinet on a mounting rail if you have a plasterboard wall involves using expandable anchor fasteners. This installation method is ideal for kitchen cabinets, as it can withstand quite a lot of weight (about 35 kilograms). The anchor fastener is suitable for both a canopy with and without a mounting rail. It is quite difficult to tear it out only if it is with a large piece of drywall. It should be said that it is better to use metal fasteners specifically for the kitchen, since commercially available plastic ones are still not as reliable and can withstand less weight.
Unconventional method of fastening to drywall
It should be immediately clarified that although such methods are quite rare, they also occur, since, unfortunately, it is not possible to secure the cabinets in the traditional way.
- A chrome-plated floor frame is pre-ordered, to which the cabinets are subsequently attached. It can be used quite interestingly in the kitchen; it will not take up much space and will look beautiful and modern. The main condition is that it must be quite heavy to withstand the weight of the cabinets.
- Hanging cabinets from the ceiling. The methods can be different - either using movable cables or chains, or using chrome-plated tubes with rigid fastening. Quite a modern and progressive way of installing kitchen units, especially in different planes.
Useful drilling tools
You can never have too many tools, but in a city apartment, a home craftsman has nowhere to put a full-fledged machine, but he needs to work, and here the problem will be solved by special attachments for an electric drill.
| Illustrations | Recommendations |
| A circular saw . A convenient device that allows you to unravel relatively small bars with a cross-section of up to 50 mm at home. | |
| Fraser . Attachment for milling small blind holes. With it you can easily cut out a bed for a door lock, handle or hidden canopy. | |
| Stand for corner and straight drilling . This stand makes it easy to create precise holes at the desired angle. Working depth is up to 150 mm. | |
| Lathe . The power of such a machine depends on the engine power and the maximum speed of the drill, but most models are suitable for working with soft wood. | |
| 90º collar . An indispensable thing for working with furniture, especially for repairing it, when it is not possible to drill a straight hole in some narrow compartment. | |
| Pump . Summer residents will appreciate a unique nozzle that replaces a garden pump. Its productivity is 2500 l/hour, which is quite enough for a country house of six acres. | |
| Engraver . For small engraving work there is a flexible “sleeve” with the ability to connect a set of special attachments. | |
| Grinding and sharpening machine . This is perhaps the simplest and most accessible device. The drill is attached to the table with a clamp with a special holder, after which the attachment with the desired circle is inserted into the chuck. | |
| Metal scissors . A whole series of such attachments is produced. The configuration of these devices is different, but the task is the same everywhere - to quickly and effortlessly unravel the sheet of metal. | |
| Cord brush . Such nozzles are available in 2 versions - with metal and synthetic bristles. | |
| Drilling machine . Here the drill is already used for its intended purpose, but the rigid frame with a feeding mechanism allows you to make precise holes with a fixed depth |