Convenience and comfort of cooking and being in the kitchen depends on many details. In this room, it is important to distribute everything so that what you need is at hand. The comfort of staying here depends on such a thing as a hood. Some people neglect it, believing that there is nothing terrible in kitchen smells: but so far it won’t burn anything. Others would be happy to install such equipment, but do not want to take up extra space in an already cramped room. For this, there is a solution such as hoods built into the cabinet, which do not take up much space and at the same time retain all the necessary functions.
Advantages and disadvantages
There are different types of kitchen hoods:
- dome;
- hanging;
- built-in (fume hood).
The most cumbersome of them is the domed one; this option is definitely suitable only for large rooms. The built-in one takes up the least amount of space, but fits organically into the interior, making it stylish and modern.
The advantages of a built-in cabinet design:
- versatility, allowing you to merge with the interior, become part of it, and also not be conspicuous;
- compactness, small size, not taking up useful space;
- low volume of electricity consumption;
- minimum noise produced;
- variety of variations and models;
- wide range of colors;
- ease of installation, including do-it-yourself;
- good performance.
The good thing about a built-in hood is that it can be matched to any interior and placed in any kitchen, even the smallest one. This design has disadvantages, especially in comparison with other types of hoods:
- less power than a dome structure;
- lower productivity;
- the need to regularly replace the adsorbent filter;
- the need to regularly clean the grease filter.
But it is logical that a small built-in one will be less powerful and productive than a dome one. Performance is the volume of air that the hood passes through itself over a certain period of time. Therefore, for a smaller area, an appliance with a lower value will be enough, which means that a built-in hood will be just right for a small kitchen. And the variety of designs implies hoods with both a minimum working area and the possibility of expanding it.
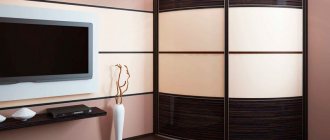
Built-in
Hanging
Dome
Mounting method
If you search on the Internet for photos of a built-in kitchen hood, you will come across hoods that are completely different in appearance. This is primarily due to the different method of fastening:
- Hidden. This method is suitable for small kitchens because... allows you to save space. The hood is mounted directly into the wall cabinet. Outside, only a thin strip with a control panel remains. If we are talking about a flow-through system, then the air duct pipe is also hidden in the closet. If a circulation model is used, most of the cabinet can be used for its intended purpose;
- Telescopic. The hood is also mounted in a cabinet, but before use it is pulled out so that the grease filter of the device becomes accessible;
- Flat. In this way, circulation hoods that do not need to be vented into the air duct are attached. The hood is attached to the wall immediately below the wall cabinet.
General characteristics
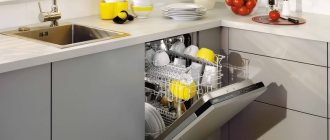
A fume hood is necessary not only to absorb unpleasant odors, but also pleasant ones that arise during cooking. After all, it’s one thing when the aroma of food hovers only in the kitchen, another thing if it permeates the space of the entire apartment. In addition, the hood prevents the smallest particles of fat and food splashes formed during cooking from scattering across the walls and cabinets. The hood draws them into itself, significantly facilitating the subsequent cleaning process.
Any hood has grease filters installed. They are removable and easy to remove and clean. This should be done regularly, because the performance of the device largely depends on the cleanliness of such a filter.
The peculiarity of a built-in hood is that its device is hidden in a cabinet suspended above the stove. It can be either flow-through or recirculation. The operating principle of the first type is that polluted air is discharged through an outlet into a ventilation shaft or, in the absence of one, directly to the street through an additional hole in the wall. Fume hood fans are used to move air.
Recirculation does not require a ventilation shaft. The principle of operation of this system is to purify polluted air and return it to the apartment. For this purpose, the hood is equipped with special filters, most often carbon filters. They purify the air, trap dirt particles, and neutralize odors. The quality of the hood’s operation depends on their parameters. In addition, filters must be changed periodically - once every six months. Air is drawn into the hood from below through a grease filter, on which the bulk of food particles, fats, and dust settle. Then it passes through a system of carbon filters and, cleaned, returns back.
According to the type of design, a built-in hood can be:
- fully built-in;
- with retractable panel;
- visor.
Fully built-in
With pull-out panel
Visor
The first type fits completely into a fume hood. Therefore, the working surface of the hood is equal to the area of its bottom, which, as a rule, is smaller than the area of the stove. For greater hood performance, it is necessary that these two indicators coincide. Therefore, visor models and those with a retractable panel have greater productivity. The visors include an internal device hidden in the cabinet under the hood and a surface hanging over the stove.
The most convenient is the retractable model. When turned off, it is compact and almost invisible to the eye. To turn it on, you need to pull out the panel located above the stove. It may be equal to the area of the slab, or it may be larger.
Depending on the type of control, there are push-button or touch models. The latter are more modern and easy to use. You can turn it on, off, and regulate its operation with the slightest touch, say, with the edge of your palm. This is important because hands are often dirty when preparing food. But such a system requires more careful maintenance. Even fingerprints are visible on the touch panel, and it is easier to disable it than a push-button panel. If we talk about standard characteristics, they can be seen in the table.
| Standard size chart | 50x60x90 centimeters. |
| Fan power (performance) | For a small apartment you will need at least 210 cubic meters per hour. |
| Type of filter used |
|
| Noise level | A noise level of up to 50 dB is considered comfortable. |
| Additional functions |
|
Components
There are some options that will also be useful to housewives: for example, an anti-return valve that prevents the penetration of street air (the air entering the apartment through the ventilation does not have pleasant refreshing properties and sometimes just has a disgusting smell).
The body is also an important element of the product. If it is not easily soiled, then the owner will no longer need to wipe the panel and adjacent elements daily.
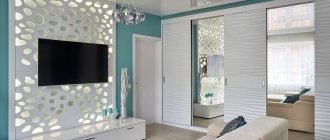
Backlight. For many cooks, light plays an important role (additional lights will help control the cooking process in a poorly lit room).
Hood with lighting
Exclusive design of the hood with lighting
Functional built-in hood with lighting
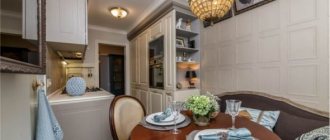
Deciding on the size
The larger the area of the fume hood, the higher its performance, and accordingly, the more air it can purify. When choosing the size of the hood, it is necessary to take into account the area of the kitchen; the larger it is, the more powerful it is, the larger the design should be.
In small rooms, as a rule, a hood that matches the size of the kitchen stove is sufficient. Usually this size is 60 cm. In general, the parameters of hoods vary from 45 cm to 90 cm.
The smallest ones, 45-50 cm, are the least productive. Powerful 90 cm, as a rule, are equipped with a retractable panel and cover the maximum working space of the kitchen. Such hoods require more space for location, but will provide maximum protection from food splashes, grease, dust, and kitchen odors.
However, usually the dimensions of the hood coincide with the dimensions of the stove. Kitchen cabinets are made in the same size. The kitchen cabinet, located above the stove, is 60 cm long and leaves free space for the subsequent arrangement of the hood. The choice of size also depends on whether the kitchen is already equipped or planned from scratch. When the stove and kitchen unit are installed, in any case you will have to adjust the hood to the existing dimensions. That is, install it in a 60 cm cabinet.
When planning a kitchen from scratch, you can calculate in advance all the dimensions of furniture, household appliances, including hoods. In this case, they can be absolutely anything - at least 80 cm, at least 50. The main principle that should be followed: the ideal size is one when the exhaust surface covers the area of the hob, and not vice versa.
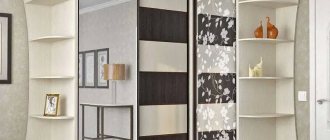
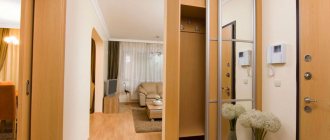
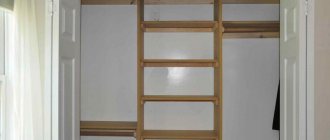
The importance of a cabinet for a built-in hood in a kitchen interior
A cabinet for a built-in hood is the top element of a kitchen unit, designed specifically for installing an exhaust system in it.
It allows you to perform several functions at once:
- disguise the hood, making it an aesthetic piece of furniture;
- complemented by a convenient storage system;
- save space in cramped kitchens.
As a rule, such a module is located above the hob and is designed to match the overall style of the kitchen unit. If necessary, it can be purchased separately.
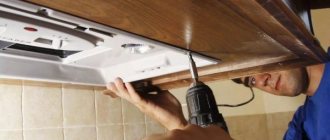
Installation rules
When ordering a ready-made kitchen that includes a hood, it is easier to order professional installation. When purchasing a hood separately, the company also offers installation. Installation can be done independently, after all, we are not talking about a laboratory fume cabinet with a sink, but about small household appliances. The structure is installed in a 60 cm wall hood cabinet without a bottom, located above the stove.
Safety requirements must be taken into account during installation. The exhaust surface must be located at a distance of at least 70 cm above the electric stove, and at least 80 cm above the gas stove. If you neglect this rule, then, firstly, the hood may interfere with cooking. Secondly, the equipment will overheat, it may fail and even fire.
Any hood is supplied with detailed installation instructions. But without any experience in such matters, it is better to entrust the installation to a specialist for the first time.
When installing a fume hood with your own hands, you need to follow these rules:
- nothing should interfere with the sliding panel. It should be visible, easy to slide out and slide back in;
- If the hood is flow-through, you need to make sure that there is a ventilation hole nearby. The equipment outlet is connected to it;
- the connection between the outlet and ventilation holes must be reliable and durable;
- the distance between the stove and the hood should be 70-80 cm;
- It is necessary to have an anti-return valve to prevent contaminated air from flowing out;
- the cabinet above the hood should hide the structure itself, leaving only the hood surface outside.
It is also important to ensure that there is an electrical outlet for connection near the location of the hood. It should be nearby, but so that the wires do not hang too close to the surface of the stove. Also, the outlet should not be near the sink.
Necessary materials Installation diagram for built-in hood
Recommendations for choosing an air duct
Price remains a significant selection criterion for homeowners; aesthetics and performance characteristics of ventilation ducts fade into the background. Flexible corrugation definitely wins here; it is much cheaper than other options, and fittings are not needed.
We will offer our recommendations on how to choose a ventilation duct for your hood:
- There are two types of channels suitable for external installation: plastic and metal. The former are cheaper, but look worse; they are better hidden above cabinets or behind decorative cladding.
- For hidden installation, you can use any air duct: corrugated, PVC, galvanized. If you don't care about the noise level, use a cheap aluminum hose.
- In a country house, summer kitchen or veranda with a stove, connect the hood with a corrugated pipe. Plastic in such rooms quickly becomes dirty, and it is quite difficult to remove the yellowness.
- If an apartment has undergone expensive renovations, you cannot save money and spoil the interior. Match the steel frame, fittings and grille to the color of the hood. Stainless steel is perfect for a nickel-plated surface, and copper for a golden surface.
Watch this video on YouTube
Features of operation
The operating rules for both fully built-in and canopy, retractable hoods are not much different from the use of any other household appliances. It is important to avoid overheating of the equipment (to do this, install it correctly), ingress of water, promptly wipe off dust and other contaminants, do not drop or hit, avoid twisting the wire or its contact with hot surfaces.
Regarding the hood, which is built into the cabinet, the following rules should also be observed:
- The grease filter protects the internal system of the structure, trapping droplets of fat and splashes of cooking food. The performance of the hood depends on its cleanliness. Therefore, it is necessary to regularly remove it when it becomes dirty and wash it with detergent. It can be easily removed and put back;
- The carbon filter of a recirculation hood is one of its most important elements. Over time, it loses its cleansing abilities. Therefore, it is necessary to replace it with a new one at least once every six months. There are different brands of carbon filters;
- It is necessary to ensure that the sliding panel slides out and slides back easily. To do this, it also needs to be regularly cleaned of dust, dirt and grease particles;
- If the hood has touch control, then in the kitchen it is especially susceptible to contamination. There are fingerprints on it, food splashes, and dust sticks to it all. The ease of operation of the device depends on its cleanliness, and a strong degree of contamination can lead to breakdown. Therefore, it is necessary to especially carefully monitor the cleanliness of the touch panel, wiping it with special wet wipes;
- The push-button control system can also be damaged by grease particles and kitchen fumes. When dirt gets stuck between the buttons, it can impair their performance. Therefore, the cleanliness of the control panel must be as carefully monitored as a grease filter.
If the equipment breaks down or its performance deteriorates, you must contact the service center. Timely handling can save equipment and extend its service life.
Step-by-step installation of a dome hood
Before installing the fireplace hood, you need to accurately orient the position of the stove relative to the outlet of the ventilation duct. Usually the stove is installed exactly along the axis of the ventilation hatch. After this, installation of the equipment begins.
- We draw an axial vertical line on the wall from the center of the hob up to the channel opening, using a pencil, level, tape measure or ruler.
- We mark the height of the lower edge of the dome and draw a horizontal line.
- On the dome, measure the distances from the mounting holes to the bottom edge of the hood. We transfer the markings of the fastening points to the wall.
- Using a hammer drill we drill holes for dowels. We insert polymer elements into them.
- To install the dome you will need a stepladder and additional workers. Leaning against the back of the hood, we align the mounting holes with the dowel sockets and drive the screws into them.
- On the wall we make a mark at the bottom edge of the air duct.
- We cut off the excess part of the pipe. Under no circumstances should you do this with a hacksaw. The saw teeth will leave jagged edges and damage the enamel. Cut with a miter saw, jigsaw or circular saw.
- The hood kit usually comes with a mounting frame. We either expand the channel opening with a perforator, or narrow it with cement mortar to fit the size of the frame.
- It is necessary to secure the frame in the channel with dowels, sealant or glue.
- We insert the air duct into the hood, and attach its upper end to the frame.
- We treat all connections with sealant.
- Before installing the air duct, you need to install a power supply point. We recommend that you do this in two ways:
- Along the axis of the pipe above the dome, we use a crown to drill out a seat for the box and install it on cement mortar. Using a hammer drill, we punch a groove into the box, into which we lay the electrical wire. With the electric meter turned off, we connect the power cord of the hood to the network cable through the block. We seal the groove with putty. Close the box with a lid. We restore the finishing coating of the wall;
- in the second case, we try to secretly route the wire behind the dome body into the adjacent wall cabinet. We attach a socket on the bottom shelf or on the side wall. We attach a plug to the end of the hood cable. We connect the socket to the power cord, which runs from the box behind the walls of the cabinets.
Manufacturers
Built-in hoods are produced by most manufacturers of household kitchen appliances, so that the entire room can be furnished entirely with equipment from one company. There are also companies specializing in hoods.
Popular manufacturers of similar designs:
- Bosch - this company has a good range of products from affordable models to premium ones. The latest models are equipped with a touch control panel and automatic selection of operating modes, filter indication, and an additional cleaning system. They are distinguished by their noiselessness;
- Krona - this company specializes in built-in kitchen appliances. Their hoods meet all modern requirements put forward by consumers. The sizes of hoods vary from 45 to 80 cm. There are both ultra-modern models and simpler ones;
- Elikor - products of a popular Russian manufacturer meet all international requirements and standards. Elikor hoods are produced not only in various colors, but also with decorative decorations in the form of gilding and carvings. A distinctive feature of this product is its unusual design (look at the photo);
- Hephaestus - hoods from this company are easy to operate and equipped with high-quality lighting. Their power and performance make the equipment suitable for both small and large spaces.
Whatever the brand is chosen, each of them has a product line full of a variety of models of hoods, from the most compact, allowing them to be built into a 50 cm cabinet, to 80 cm. And also in various colors and styles. A built-in kitchen hood is a universal solution for any room where culinary masterpieces are prepared. By installing it, you can forget about unpleasant odors, freshen the air and make cleaning much easier.
Additional features
A high-quality range hood of any type has several engine operating modes. The mode can be changed depending on the degree of smoke in the kitchen.
The hood should not turn off immediately after pressing the corresponding button. It must work for a few more seconds to expel the dirty air from the pipe. Otherwise, he will enter the kitchen again.
Some hoods have a turbo mode. Enhanced ventilation can be turned on in an emergency, for example, when something is badly burned on the stove and there is smoke in the kitchen.
Illuminated hob. Now almost every model has hoods.
Photo
Why does the check valve sometimes not work and close?
On the kitchen side, a check valve is mounted on the tee. In the factory version it will be quite long. In this case, it is better to shorten it so that this “gun” does not stick out too much.
The valve is inserted inside a section of a standard air duct d-125mm, and this air duct is put on and siliconized onto the tee.
If this whole structure seems too cumbersome to you, and the protruding pipe with the valve is not very aesthetically pleasing, you can do it a little differently. You make the air duct not with a round pipe, but with rectangular channels.
In this case, you install the above check valve on a straight section, as close as possible to the turn.
You can't achieve a factory connection here, so you'll have to farm collectively. Buy a rectangular tee with a round outlet on one side. Next, this round timber is cut off and a check valve is glued in its place.
The valve is placed strictly at an angle (2 degrees). Otherwise, it will open every once in a while or not open at all.
Many people have encountered this problem and easily solved it this way.
The damper itself is also mounted with a vertical deviation. The upper turning point, based on the hour dial, is at 13.00 (1 o'clock), and the lower one is at 17.00 (5 o'clock). This is if your flow direction is from right to left.
Otherwise, the circle is placed at the 11 o'clock - 7 o'clock position.
For more reliable operation and stable opening of the damper, you can stick some kind of weighting material (no more than 2 grams) on one side. Glue it close to the edge.
By the way, do not throw away the previously cut round pipe. It is tightly inserted onto the valve from above, after which a decorative grille diffuser is mounted on it.
What nuances might there be with this method? If your hood stands exactly above the entrance to the ventilation shaft, and the duct pipe goes straight, without any turns in the horizontal plane, then the valve installed on such a straight section does not work normally, at least at 1st speed.
You will simply have nowhere to get the increased pressure to close it. The air will fly through this “turn” in a straight line. You definitely need an angle.
The valve cover and its rotating mechanisms are easy to clean and do not be afraid of them becoming overgrown with grease. For this to happen, you will have to fry huge wild boars on the stove and stew them in your oven for several hours a day, no less.
If you don’t want to see a protruding “hollow” under the ceiling at all, then, as an option, you can install a tee so that the middle elbow rests against the wall, otherwise, where the valve is located, it would look to the side. In this case, also close the hole with a decorative cover.
Everything will look much nicer. However, due to the additional rotation, the performance of natural ventilation will deteriorate slightly. And the grill will reduce it by another twenty percent.
In addition, it will no longer be possible to clean the channel by hand or with a vacuum cleaner. But many do this deliberately and even hide the entire structure in a wooden or plastic box.
As they say, beauty requires sacrifice.