Making a picture frame with your own hands: three simple ways
Making a frame for a picture with your own hands, as well as for a poster, photograph or drawing is quite possible.
Moreover, the activity is interesting and even creative. You probably immediately have doubts that you will really be able to create something worthy that will not spoil your work of art, and that such a frame will not be embarrassing to hang on the wall. And it’s completely wrong to think so. If you are one of those whose hands are certainly not from the back, then everything will definitely work out. You just need a little effort, patience and knowledge, which I will gladly share with you. And the result will not disappoint you. And if it turns out well, it will even be a source of pride for you. It's always nice to look at something you've made with your own hands. So let's get down to business.
The procedure for making a wooden frame
- Estimate the dimensions of the frame and select transverse and longitudinal wooden planks. You can cut a wooden strip into four elements. All parts of the future frame should be as smooth as possible, so if necessary, they can be planed and then treated with sanding paper.
- Saw off the ends of the wooden planks at an angle of 45 degrees. To ensure that the corners are even and the product comes out neat, it is better to use a special device - a miter box with suitable connectors.
- The ends of the planks are greased with PVA glue and pressed tightly at an angle of 90 degrees. To fix the corners, the frame should be tied tightly with twine, making sure that the corners do not move. Can be used to secure the corners of half staples from a stapler. They are cut into two L-shaped halves. Next, these corners are inserted into the middle of the cuts at the ends of the wooden slats, and then the two sides of the frame are connected.
- The PVA glue hardens for 15-20 minutes, and after that the frame is again treated with sandpaper and coated with paint or varnish. You can use stain or potassium permanganate, which also gives wooden products a beautiful brown tint.
- The reverse side of the frame is cut out of thick cardboard or a piece of fiberboard. If the design is not intended to be collapsible, then you can glue the back side to the frame with glue, and for a collapsible frame, use special metal clips.
Selecting skirting boards based on material of manufacture
Based on the material used, ceiling moldings are divided into several types, each of which has its own advantages and disadvantages; not all of them are easy to use. Let's look at some of them:
- Foam baseboard. The most budget option, simple and easy to process, has minimal weight and a wide variety of shapes and reliefs; imitation of various natural materials, such as wood, granite, etc. is also found. Ideal for first experiments in working on frames. A serious disadvantage of such fillets is their fragility; they break too easily, crumple and crumble.
- The second most popular material is polystyrene foam. Visually it differs little from the previous one, but is much stiffer and stronger, which allows it to be bent at the desired angles. Such a plinth will cost more, but after acquiring some skill it will allow you to create frames of oval and round shapes.
Paper frame
These types of frames are the most common and are very popular among both children and adults. They are easy to make, but at the same time very beautiful and original.
By doing this work with your children, you will have fun, and the children will gradually learn something new and interesting.
Here is one way to make photo frames from paper. For the first job you need the following things:
- multi-colored paper;
- glue (hot glue may also work);
- scissors;
- old plain frame;
- toothpick.
Let's get down to business:
- cut sheets of multi-colored paper into strips (they should be about 1-1.5 centimeters long);
- the strips must be folded in half and twisted with a toothpick, but if you don’t have one on hand, you can do without it;
- After you have twisted the strips, glue their edges with glue. There should be a large number of such rolls so that it is enough for the entire frame;
- then randomly glue them all over the frame.
Popsicle stick photo frame
Popsicle stick frames are beautiful and easy to make. Even children can make such crafts and give them to friends, family members or teachers. With a little time, you can also create your own stick frame.
Simple option
Step 1: Find 4 Popsicle sticks. You will need one stick for each side of the frame. If you need a thicker frame, glue 2 sticks together to make one wide one.
Popsicle sticks
Step 2 . Glue the sticks together to form a square and wait for the glue to dry. To do this, use regular PVA glue.
Gluing sticks
Step 3 . Paint and decorate the frame. This can be done using markers or acrylic paint. Let the frame dry and then decorate it. You can write something on the surface of the product, such as “Daddy and Me” or “I love you, Mommy.” You can also glue items such as glitter, gems or buttons onto it.
The frame of the product is decorated
Step 4 . Place the finished frame on the photo and trace it from the inside using a pen. Photos can be valuable, so it's best to use a copy instead of the original.
Marking is being applied
Step 5 . Cut out the photo. Try to go a little beyond the line you drew. This way your photo won't stick out from the frame.
Photo cut out
Step 6 . Glue the photo to the back of the frame. This manipulation will make the frame and photograph a permanent structure.
Pasting photos
Step 7 . Add ribbon to the back of the frame if you want to hang it on a nail. Cut a piece of tape, flip the frame over, and apply some glue to the top left and right corners. Press the ends of the tape for a few seconds to secure the tape. Let the glue dry and then hang the frame.
The tape is fixed at the back
Step 8 . If you wish, you can glue magnets to the back of the frame so that it can be attached to the surface of the refrigerator instead of a wall. Turn the frame over and apply some glue to the top and bottom of the frame. Press the magnet and wait for the glue to dry. Place the frame on the refrigerator door.
Gluing the magnet
Step 9 . The popsicle stick photo frame is ready. If desired, it can be hung on the wall or attached to the metal surface of the refrigerator.
This is what the finished craft looks like
Different types of hoops: which ones to choose, how to use?
Round, oval, square, tapestry, armchair, frame hoops and machine hoops - choose what is best for you and your embroidery.
Why are hoops needed?
A hoop is a useful and even necessary tool for embroiderers. Whether you are cross-stitching on canvas or satin stitch on fabric, using a hoop will help prevent the thread from pulling on the base material. The hoop ensures accurate work execution and makes it much easier. The working surface is clearly visible, embroidery in a mobile hoop is comfortable to hold in your hands, and a stationary hoop like a machine completely frees your hands. However, some (usually experienced) embroiderers prefer to work without a hoop: this way, each stitch can be performed in one movement, rather than in two. In fact, this is the only bonus of working without a hoop; you must always be careful not to pull the fabric with embroidery. In short, most embroiderers choose to work with hoops - we’ll figure out how to choose the hoops themselves below.
Gold embroidery: the basics of “precious needlework” for beginners
What types of hoops are there?
Round, oval, square, tapestry, armchair, frame hoops and machine hoops - they are made from different materials and different sizes. Let's look at the main varieties.
1. Round hoop
The most common type. Round hoops may or may not have a fastening mechanism (the first option is more reliable and convenient). Sizes vary in diameter (up to 30−35 cm) and rim thickness (7−25 mm). The diameter should be chosen according to the size of your embroidery, the thickness of the rim - according to how comfortable it is for you to hold the hoop in your hand. Hoops are made of plastic, metal and wood - experienced embroiderers agree that wooden hoops are the most convenient and durable, and well-processed wooden hoops are the most gentle on the fabric.
2. Oval and square hoops
Such hoops are designed according to the round principle, the difference being that they have either the shape of an oval or a square with rounded corners. You can choose such a hoop if the shape matches the shape of your embroidery. Some embroiderers also find it more convenient to use square hoops - this is determined during the process and for each individual.
3. Hoop machines
This is a much more complex and space-consuming option than the previous ones. However, they have a lot of advantages. Such hoops, as a rule, are located on the table (there are also very large ones that are placed on the floor) and completely free the embroiderer’s hands for work. They can be used for large jobs. They allow you to reduce distortion when embroidering petit and half-cross stitches. They allow the use of fabric of different lengths and cause little deformation of the fabric. Often such hoops have several options for attaching fabric to them, this is convenient. You can find square or round frame hoops.
4. Tapestry frames
The tapestry frame is a wooden rectangle to which the canvas is attached only at the top and bottom. The canvas can be attached to the frame either with fabric (if the upper and lower parts of the frame are covered with it) or with special plastic clips. As you embroider, the canvas is scrolled using the upper or lower parts of the frame, which scroll in any direction.
5. Chair/sofa hoops
If you like to embroider not at the table, but in a chair or on the sofa, consider this option. A chair hoop is a regular embroidery frame attached to a holder on a leg and a stand. You can place this design next to you, for example, on a chair, and embroider while pressing the stand with your foot.
6. Frame hoop
This is a “symbiosis” of simple round, oval or rectangular hoops and a frame for finished embroidery. These hoops have a loop that allows you to hang your embroidery on the wall right in the frame when you're done.
7. Clamps for attaching the hoop to the table
A mobile and non-bulky replacement for the machine, freeing up the embroiderer’s hands and not taking up much space. Using a clamp, the hoop can be fixed at a convenient height for you and rotated around its axis.
How to make an organizer from a hoop
Machine or hoop - the reasoning of an embroiderer
What should you pay attention to when purchasing and using hoops?
— The hoops, no matter what material they are made of, must be highly polished and not have any irregularities (this can damage the fabric).
— If you choose a hoop with a fastening mechanism, check its operation when purchasing. The screw should not turn too tightly, but also not turn (the thread should be preserved).
How to make a photo frame
The process of creating a photo frame from wood with your own hands is quite creative. Therefore, different methods are used to obtain the final result.
First way
Least labor intensive and easy to use.
- First of all, you need to choose the right fittings from which the future photo frame will be made. To make a wooden frame, you will need wooden slats, glue, paints, sandpaper, and staples for a stapler.
- Of course, it’s also worth paying attention to what size the future frame will be. Next, the same length of all four sides of the future product is correctly measured. After which the edges of the slats are filed at an angle of 45 degrees.
- Then, using staples, the two sides of the frame are connected, so that the joint becomes barely perceptible. But this is not enough; the sides of the future frame should be coated with glue before connecting them with staples.
- After the glue has dried, you can start decorating the frame. In this regard, everything will depend on your own wishes and imagination.
- After decorating the frame and gluing the selected decorative elements to it, you can place a photograph in it. This can be done using a stapler, and the photo must first be laminated. This will allow you to maintain its appearance for as long as possible.
Second way
The next method is more labor-intensive, although the initial principle of operation is the same as in the first case. But this version of the frame requires the presence of a baguette. First of all, wooden blocks of the same size are glued together, then the same bars are glued together, but of smaller sizes, for the second frame. The result is an object that looks like a box.
The joint that connects the two frames is glued with a decorative baguette. It is coated with glue twice before use. After drying, the wooden frame can be painted at your discretion. The result is an unusual and original product.
An item made with your own hands always brings more joy and satisfaction than something bought in a store. For example, a picture frame assembled with your own hands will always evoke more positive impressions.
A frame with your own hands can also be made using a special woodworking machine, where you can cut out beautiful patterns and create an unusual ornament. But this is usually done by craftsmen who have experience in this type of work.
We decorate different rooms in the house with stylish decor
Most often, a mirror in a square frame is used in an apartment as a decorative item. At the same time, the frame is able to effectively highlight its content, attracting all attention to itself. So, what frames are suitable for a square mirror:
- Plastic,
- Wooden baguettes,
- Metal,
- Forged,
- Frames with imitation stone, marble, leather or wood and many others.
Dressing tables and trellises are usually installed in the bedroom. This is where the item will look most organic. The dressing table can be made of solid wood or MDF. A square mirror for a dressing table is suitable, but a trellis would rather boast a high mirror stand consisting of three parts. The middle part is usually static, and the sides are rotating. The frame is often designed simply, although variations are possible with wood carvings in the form of grapevines, flowers and even images of angels.
In order to highlight the design of the bedroom, you should take a closer look at the wall mirrors. The majority of bedrooms do not have a huge area, so installing a huge floor structure in this room is still not worth it. But a square mirror can successfully highlight a wall, especially if there is a niche for it.
The frame in this case must match the design and style of the room. For example, for a high-tech bedroom you can use an aluminum, plastic, perforated or metallic-painted frame. For bedroom interiors in Rococo and Baroque style, a good choice would be a baguette with elements of gilding or bronze.
If the mirror is selected for an African-style , the frame can be decorated with bamboo strips or imitation snake skin. But the Mediterranean style will be emphasized by a mirror in a frame made with shells, starfish and figures of turtles or fish.
For a bathroom, the best option would be a mirror in a plastic frame, because high-quality plastic does not deform in conditions of high humidity, can withstand multiple temperature changes and hot steam, and can last for quite a long time.
How to make a frame from wood
There is always the question of how best to glue a wooden picture frame. Frames with a figured profile are joined in a “mustache”, i.e. The ends of the parts are filed at an angle of 45*. Clamps for tightening frames when gluing have existed for a long time, but the strange thing is that they continue to be invented to this day.
Moreover, such clamps are designed by the craftsmen themselves, especially those who have to make a lot of such frames as part of their work. Apparently, one single universal clamp has not yet been invented.
I don't make picture frames every day, and I usually use two methods. The first option is to tighten the parts using a special corner clamp, photo above. But this method has some inconveniences; the corner clamps that I use do not allow me to assemble small frames.
Another option, not the most common, is to tighten the frame when gluing it with a rubber band tied in the form of a loop. But to apply this method you need some skills, and precise cutting of the ends at 45* is required. Although this particular method seems to me the most convenient, well, as they say, this is not an acquired taste. There is an article on how to make photo frames for more information on this.
There are other fairly simple gluing methods. Making such a device takes just a few minutes. To work, you will need a flat square platform made of chipboard or thick plywood. Support bars are screwed onto two edges with self-tapping screws. Please note that during assembly, the bars should be at an angle of 90* relative to each other. For precise installation, use a metal square.
Next, we coat the frame parts that have already been prepared and sawed at an angle with glue and tighten them using two long clamps. When compressing, be sure to check all corners of the frame with a square. The photo shows how else you can check the correct assembly. Graph paper is placed on the device platform, and during assembly you can see how the parts fit in relation to each other. And also, so that you can use your device for a long time, place paper under the corners so that the glue does not stick to the site.
Wooden frame with passe-partout
This frame is well suited for framing photographs, as it will highlight the expressiveness of both color and black and white photographs. Before you start making a frame, you need to carefully consider not only the size of the frame, but also its pattern, as well as the color of the mat.
This decorative frame is made of wooden planks and thick cardboard (for passe-partout). Profiles for a wooden frame can be very different - smooth, with carvings or patterns; the type of passe-partout also varies - thickness, color of cardboard, its pattern. In this regard, you can choose frame details that will be in harmony not only with the photograph or painting itself, but also with the entire interior of the room. This is especially true if you plan to hang several paintings - they must be combined with each other. For example, light wooden frames look good on dark walls or richly colored surfaces. Accordingly, on light walls you can hang paintings and photographs in dark frames.
Hand carved frames
Exquisite portraits, timeless landscapes or beautiful still lifes should occupy a prominent place in the home. The carved frame will draw the attention of guests to the most important accents of the surrounding interior. Friends and acquaintances will not be able to simply pass by the beautiful paintings. And thanks to the elegant addition of an exquisite hand-made baguette, everyone around you will be happy to look in the mirror to see their own image in a carved frame.
It is manual work that allows you to reveal all the visual effects of the paintings. There is not a single unnecessary touch in the baguettes of the great masters; they themselves are elegant masterpieces worthy of admiration.
Only real masters are familiar with the ancient technologies that were used for the originals of the Louvre or the Hermitage. Each carved frame is unique.
Tools and materials
In order to start making frames, you will have to prepare a simple set of tools and materials:
- the molding itself or its fragments (let's look at the example of foam or polystyrene ceiling plinths);
- thick cardboard (if the product being framed does not have a rigid base, for example embroidery or tapestry);
- universal glue or “liquid nails”;
- sharp knife (construction or stationery);
- miter box (you can take a protractor) for even cutting of corners;
- ruler and marker;
- acrylic paints and putty (better for wood).
Note! When choosing an adhesive, you should make sure that it is suitable for the selected material, as some types can corrode foam/polystyrene.
Decorating a photo frame
A ready-made photo frame with glass will help simplify the design of embroidery. It is enough to stretch the canvas onto a stretcher or add embroidery to the mat, and then assemble the product according to the instructions (tighten the threaded fasteners or insert the embroidery frame differently). In this case, the dimensions of the canvas will have to be adjusted to the parameters of the frame.
To decorate the finished frame, the same techniques are used as for finishing the mat. You can complement it with glued shells or other natural material. If the frame has a relief, the convex areas can be easily covered with glitter or metallic paint. You can use beads, rhinestones, etc. in the design. The main thing when decorating is to observe moderation and not overload the frame with additions.
Step-by-step creation algorithm
To create a spectacular edging, the easiest way is to use wood or polyurethane. A special original color will give the finished product a unique appearance. Here you can also show your imagination and create a one-of-a-kind mirror design.
Made of wood
The ease of processing results in a wide variety of wooden elements from which a frame can be made. Therefore, at the first stage, you need to clarify the concept of the product and select the appropriate raw materials, tools, and fasteners. When creating a frame made of wood without any frills, you can use screws and corners, glue or nails as fasteners. From the tools it will be enough to take a hammer, sandpaper, a hacksaw. A pencil and ruler will also come in handy. In other cases, if you plan to have a carved or complex-shaped frame, you will additionally need cutters, a file, a drill and, possibly, other devices.
The external design of mirrors can be made from any semi-finished wood products. Even elements of wooden door or window frames remaining after repair are suitable. They are convenient because they have a profile that is well suited for installing a mirror. The procedure for creating a wooden frame will be as follows:
- Disassemble the platband into individual elements.
- Cut them to the height and width of the mirror - you will need four parts in total. The size of the elements depends on the method of articulation. You can make it at an angle of 45˚ or straight. You will also need a glazing bead. Its size will be determined after assembling the base for the frame.
- When the layout is ready, all elements are cut to size, it is necessary to treat the wood with an antiseptic for its better preservation.
- After the wooden frame is assembled, the front surface should be sanded and then sanded. This will reveal the natural grain of the wood. Then you need to varnish the surface, or you can simply paint it with oil paint in a color that matches the interior. As an option, apply decorative elements by gluing them and covering them with colorless varnish. This composition will look great on the wall.
The frame for the mirror is ready. All that remains is to make a backing from dense sheet material and install the mirror itself. You can secure it using a bead.
Before decorating the mirror frame with paint, you should degrease the surface.
Using improvised means
It is also possible to make frames using scrap materials and items that are literally at your fingertips.
This way you can modify the appearance of a finished modular picture, breathe new life into an old Soviet frame, and also create something new, literally from scratch.
I suggest considering the following options.
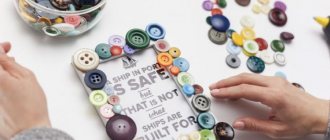
- Buttons
. Simple but interesting solutions. The point is this. We need a foundation. You can make it yourself, or take a ready-made old frame. And now glue the buttons to the surface. Moreover, they come in different shapes, sizes, and colors. Start with large buttons. Fill the rest of the space with smaller elements. They are easier to glue than to sew; - Newspapers
. Original and beautiful. You need to take newspapers and roll them into thin, dense tubes or rectangles. Then carefully glue the layers together. It is important that the density of each element is the same. It turns out incredibly impressive. You can apply a layer of paint on top, or cover it with clear varnish. This way the frame will last much longer; - Twigs
. Also an interesting solution. You need to collect branches of approximately the same thickness and length. Then form them into a rectangular or square structure with a void in the middle for a photo. You can glue them together, or connect them to a base made of plywood, thick cardboard, and other suitable materials. A composition of twigs and sticks mounted on glass or transparent plastic will look beautiful. And below them is the image itself. It is advisable to treat natural material with 1-2 layers of transparent varnish. This way the wood will be protected from external factors; - Decorative tape
. Everything is elementary. A good option for restoring old frames. You need multi-colored decorative tape. With its help, the entire structure is covered. You can glue at an angle, create some compositions, tricky weaves, etc. Use your imagination.