Since ancient times, the chest has been considered a symbol of prosperity and success. It was bound with iron and decorated with intricate handles, locks and precious woods.
Now, in addition to its decorative function, it can also be used as a piece of furniture. In the bedroom it can be useful for storing bedding, in the nursery - for toys.
Making it from wood is not easy, this work will require certain skills, but the result is worth it.
The most important thing is not to rush and strictly follow the drawings of the chests, of which there are plenty on the Internet, this will help us make a truly work of carpentry with our own hands.
Decorative chests: practical applications
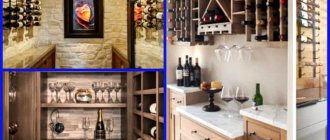
There are many options on how to make a trap chest, or a large chest for children's toys, a woodpile in the form of a chest and a jewelry chest.
Capacious and compact products are decorated in accordance with the chosen style and for this you can use modern decorative materials.
Presentable appearance and practical spaciousness, proper organization of internal space helps to use all the capabilities of such products.
For holiday greetings, you can make a small and attractive money chest, which will be perfectly complemented by a bouquet of flowers and a greeting card.
Option No3. Small antique chest
To make it you will need a furniture panel made of soft wood. The dimensions of the structure are as follows: 28x24x20 cm (although you can make the chest in other sizes). Having chosen the parameters, cut the shield into the bottom, walls and lid; You will also need 4 legs (in our example, their dimensions are 3x3x2 cm).
After sanding the future interior surfaces of the chest, assemble all the parts (except for the lid). For assembly, use wood screws, making holes of a slightly smaller diameter for them in advance. Select the correct length of screws to avoid the formation of through holes! Seal the screw heads with wood putty after priming.
Assembled wooden chest
Bottom view Chest with lid
Important! Instead of putty, you can use wooden plugs (the fact is that its color may change after painting) or cover these places with belts, as the author did in our example.
Next, brush all external parts with a metal brush, including the ends of the structure. Do this along the grain to remove the softer wood tissue.
Metal brushing
The more time you process and the harder you press the brush, the brighter the structure of the wood will be revealed.
After this, apply a deep penetration primer (no color). Because of this, the pile will rise, which will increase the adhesion of the surface to the layers that will be applied further. When the primer has dried, remove any raised lint with sandpaper.
Applying primer Sanding with sandpaper
When finished processing, remove the dust with a wet cloth. Then apply acrylic wood stain (in our example we used a walnut shade), and then go over again with a damp cloth to remove excess product. This will reveal the structure of the wood.
Acrylic impregnation is applied
Removing excess impregnation Result of work
Cover the structure with another layer of the same primer, and after it dries, look at the pile. If it has risen, remove it with sandpaper and wipe the surfaces with a wet cloth to remove dust.
To get the moss green effect, prepare acrylic paint in advance that has a chromium oxide color. It must be diluted with water and then applied to all surfaces of the structure. Do not wait for the paint to dry, but immediately remove the excess with the same wet cloth.
Chromium oxide (acrylic paint color)
Painting the chest Excess is removed immediately
Product after painting
Once you have achieved the desired effect, apply the primer again. Inspect the pile. Dry the structure, then apply matte parquet varnish (in one or several layers - decide for yourself). The advantage of parquet varnish is that it is very wear-resistant.
The chest is varnished
Install the fittings. Make a hole in the middle of the lid and install a carrying handle there.
A hole is drilled in the center of the lid. A handle is installed.
Screw on the loops (about 5 cm from the edges) that are about 2 cm wide.
The hinges are screwed on
Install the latch lock. It will be located in the center.
Installing a Latch Lock
On the sides, step back 6 cm from the top and drill holes there to install the side handles. It is important to drill with extreme caution, especially at the exit of the drill.
Holes are drilled in the side walls Holes are ready Side handle installed
Next, prepare eyelets with an internal diameter of 0.4 cm, a riveter for them, leather 50x50 cm, a punch (required diameter - 0.4 cm), nails, 2 plaques 3x3 cm.
Take the leather, cut strips 2 cm wide from it, make straps with a length corresponding to the height of the front wall of the structure + grip to the bottom (corresponding to the thickness of the wall). Next, nail the straps on the front part of the structure at a distance from the edges corresponding to that of the hinges. There shouldn't be any difficulties with all this.
Nails, cut leather straps, hammer
Leather strips are nailed, straps are nailed
Important! Use caution when using upholstery nails! Their length should not be greater than the thickness of the walls. Otherwise, the excess will have to be removed with pliers.
The excess length of the nail was bitten off with pliers.
Upholster the lid, focusing on the previously attached straps, go to the back wall, close the hinges and go down another 10 cm. Cut the ends of the straps so that they look like a triangle with rounded corners.
Upholstered product cover
Same, rear view
Upholster the structure along the edges, moving from one leg to the other. Do not touch the bottom and legs. Be careful not to hit the screw head and forget the upholstery nails!
Upholstery of the chest along the edges Do not touch the bottom and legs
Seal the screw heads at the bottom of the structure using the same straps with upholstery nails. Also try to act carefully.
Make lid opening limiters using the same straps. Secure them against the hinges.
Lid opening limiters
That’s it, the antique chest is ready, but if you wish, you can further decorate it. Good luck with your work!
This is what the finished chest looks like. Photo of the product before and after processing.
What can you use cardboard chests for?
Not complicated technologies and a step-by-step procedure on how to make a chest from a box, described in this article, will help you make a chest yourself.
Such universal and thematically designed crafts can be used for different purposes, it all depends on the functionality, decoration and purpose of the finished product:
- for storing jewelry and money, small souvenirs;
- as a storage system for children's toys and treasures;
- as gift packaging for different sets;
- as a decorative decoration and design addition.
An antique-style chest or small chest is highly decorative and perfectly decorates the room.
To preserve its presentable appearance for a long time, you should carefully follow the manufacturing technology of the craft and select the right materials for manufacturing and decoration.
Expanded polystyrene chest
Another option for making a spectacular and easy-to-assemble chest.
We will need:
- expanded polystyrene sheet;
- stationery knife;
- a simple pencil and ruler;
- silicone glue;
- screwdriver;
- paints and brushes.
We draw a drawing of all the parts with dimensions. The cover of the product will consist of five parts - 4 sides and a top. Using a screwdriver, we make stripes on the surface of the walls - imitating the texture of wood.
We paint the parts with black paint on the inside and brown on the outside.
- Do-it-yourself wardrobe for the balcony - 80 photos of how to make a balcony wardrobe from various materials with your own hands
- Do-it-yourself wardrobe - a detailed description of how to make and assemble a wardrobe with your own hands at home (110 photos + video)
- DIY flower stand - how to make a flowerpot for indoor flowers and plants (110 photos + video)
After the paint has dried, glue the parts together with silicone glue. A gluing diagram and photographs of such a handmade chest can easily be found on the Internet.
We decorate our chest to our liking. From the same polystyrene foam you can cut out a skull and bones, “precious” stones, and a castle. Let's color the details and glue them onto the craft.
As you can see, making a functional, original and beautiful chest is not very difficult.
And if you use your imagination and use applied parts, rhinestones, pieces of laminate, textured wallpaper in decorating your craft, then even a paper decorative element will be indistinguishable from a wooden one.
Jewelry chest manufacturing technology
To make an old-style chest yourself, you do not need special knowledge or a lot of time; the creative process is based on several stages.
To implement them and obtain the planned result, you must follow all recommendations from experienced craftsmen and designers:
- the choice of idea is based on one’s own taste and preferences, taking into account the intended purpose of the craft;
- depending on your own skills and abilities, you need to select the right materials and tools;
- special attention is paid to the selection of the method and method of fastening the individual elements of the future chest;
- correctly selected accessories and fittings make it possible to significantly increase the decorative value of the craft;
- technologies for interior and exterior design involve the use of different finishing materials.
Based on these tips, you can choose an idea, decide on the theme of the chest design and begin implementing your plans.
At each stage, you don’t have to limit your imagination, because the most daring experiments help you get an ideal and excellent result that can amaze even a master.
Step-by-step instruction
The process of making a wooden chest with your own hands:
- First you need to prepare the material - the board is cut to size and planed.
- A quarter is made in the workpieces using a milling cutter.
- A box is assembled from the prepared boards.
- Using a router, a quarter is prepared for the bottom.
- The bottom is assembled and attached to the box using self-tapping screws and glue.
- Semicircular ends are made for the lid. After them, the lid is “assembled”.
- Hinges for opening the lid and other accessories for decoration are attached.
- Wooden legs are prepared and attached.
- The surface of the manufactured chest is structured with a metal brush.
- The entire product is covered with paint, and after drying, with a primer.
- To reveal the texture of the wood, sand it.
- The remaining fittings are attached - brass corner plates, metal strips for the edge of the lid and on the corners, handles.
- The entire chest is varnished.
If working with wood seems overwhelming, you can replace it with plywood, which is easier to cut. Even professionals in their field, before starting to manufacture such original furniture, draw up a detailed drawing of the chest and try to adhere to it throughout the manufacturing process.
If it is difficult to make markings directly on plywood or wood, then you can use paper patterns of the future model of the chest, which are applied to the wood and traced according to the template. This method will help avoid disproportion in details.
Selection of materials
The technology of how to make a chest from cardboard or plywood can differ significantly in the way materials are processed.
For beginning craftsmen, the optimal solution would be to make a practical craft from a ready-made cardboard box, and after practice, you can begin to use more practical materials.
The lid must open
You can, of course, simply install it, but it is difficult and inconvenient. It is much more interesting to make a real chest with a hinged lid. You will need:
- 3-4 window hinges;
- mortise lock, latch or latch.
We attach window hinges to the back side. It is better to recess them by cutting out recesses of the appropriate size in the casing - only the axles should protrude. It's all screwed on with the same self-tapping screws.
Place a device in front that will close the chest. Pirate films usually show chests with mortise locks, but they are not as convenient as, say, a latch or latch. You can attach one latch in the center, or you can attach two in the corners, as you like.
Tools for work
Depending on the selected idea and materials, you will need to prepare tools to apply the technology for processing them yourself.
The standard set is a stationery knife and scissors, glue with good adhesive properties, additional accessories and paints and varnishes.
What you need
- cardboard for the base;
- paper - colored and white (for office);
- scissors;
- stationery cutter;
- a set of paints (preferably acrylic or gouache);
- brushes of different thicknesses;
- a simple pencil for marking;
- glue (stronger - PVA, Moment);
- ruler (preferably metal, plastic);
- double-sided tape;
- knitting needle, dull pencil or out of pen;
- brads in the shape of carnations;
- fabric (what kind and whether you will need it depends on your idea);
- small decorative elements (also selected according to the design).
Please note: beer cardboard is much easier to cut with a utility knife than with scissors!
Assembling the chest
The procedure for making a chest for wood begins with cutting the source material in accordance with the selected sketch into individual elements.
Working with packaging cardboard is simple and convenient; it bends perfectly and is suitable for forming any configuration; it is easy to glue and decorate.
Marking sockets and lugs
Do-it-yourself slatted wooden ceiling with lighting.
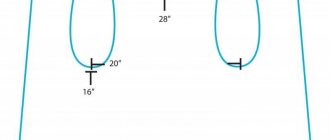
Chest size chart.
Before you start selecting the lugs, so that you can later make a connection (straight open tenon), all the sockets are carefully and accurately marked.
If you mark the tenons and lugs incorrectly, all the work on making the chest will be a waste of time. This operation must be performed slowly and very carefully. For marking, you will again need a triangle ruler and a simple pencil.
How to correctly calculate the size of a spike? It depends on the socket and is calculated so that the part is inserted tightly into the eyelet. The marking of tenon joints must be as accurate as possible.
There is one more nuance here: the spike should not be too thin, otherwise it will not be able to hold the walls of the chest. If the tenon is too thick, the wood part will be damaged and will become unsuitable for making a chest.
That is, in order to avoid mistakes in making spikes, you must adhere to the principle of the golden mean
It is very important to use high-quality stationery for marking. A simple pencil must be well sharpened
In order to knock down the frame of the chest, it is recommended to use sheets of plywood or chipboard.
As for the lines, they are not applied without markings.
If it is necessary to outline blanks for a number of similar elements, the parts are placed in a row. To perform this operation you will need clamps. If the chest is made of thin wood, you also need to worry about its safety in advance.
To mark parts of the same type, spacers will be required. The latter are placed between layers of wood to protect the material from mechanical damage and defects.
Once the spikes are marked, sawing begins.
There is another markup secret that will help avoid common mistakes for beginners. Not every craftsman knows how to make spikes correctly. Such a seemingly simple operation has its own secrets.
The workpiece must be carefully and firmly secured so that its end is at the top. With the tenon method of connection, markings are first made on the surface of the tenon on one part, then the operation is repeated on the other - with a socket. This operation is repeated in a checkerboard pattern.
Chest decoration
If we are making a chest for money or jewelry, then it is necessary to decorate it beautifully not only on the outside, but also on the inside.
To do this, you can select different materials and cover it entirely with paper or wallpaper with an appropriate print, use self-adhesive film or acrylic paint, and bronzing technologies.
Making a chest with your own hands: master class
Necessary:
- The bottom of the future chest is cut out of beer cardboard (size 18×12) - 2 pieces, walls (size 18×8) - 2 pieces, walls (size 11.7×8) - 2 pieces, lid (size 18×19.5) . To make the sides of the lid, you need to circle the CD, cut out the resulting circle and cut it in half.
- On the lid blank we draw parallel lines with a ruler at a distance of approximately 2 centimeters (the latter will be approximately 3 centimeters). Using a handle, the workpiece is slightly folded into a semicircle so that the cardboard is slightly bent and takes the desired semicircular format.
- 2 strips are cut from an A4 sheet, each 4 centimeters in width, and folded in the middle. Cut out half of each strip with teeth. These paper strips are used to glue all the lid blanks together in the future.
- We connect all the parts of the pirate chest with our own hands using three centimeter strips of office paper, bent lengthwise. The manufacturing process does not end there.
- We make boards for our chest with our own hands. To do this, we cut strips of beer cardboard 3 centimeters wide, trying to ensure that they are not the same. Strips of approximately 19 centimeters are cut in length, i.e. 1 centimeter more than the length of the chest itself as reserve for bevel.
- To achieve the effect of a “slightly rotten board”, lightly cut off the side edges of the strips and corners.
- The “boards” are glued into place. The second bottom is also glued to cover the unsightly places where the sides and bottom are fastened.
- The workpiece is painted brown. After drying, black paint is applied to the sections to imitate rot. The edges of the boards are also slightly tinted black.
- From silver cardboard we cut out strips 2 centimeters wide and in length corresponding to the length of the lid and all three sides of the base box. We use brown and black paint to imitate dirt and rust on iron, smearing the cardboard with paint. After the paint has completely dried, insert the brads at approximately the same distance from each other and glue the strips to the workpiece.
- Loops for the lid are cut out of the same silver cardboard. We make them dirty and rusty using the same method as the previous stripes, and glue “studs” for decoration. After the paint has dried, we connect the lid to the box with these fasteners using glue.
- Decorative handles are glued in place of the lock in the middle and on the sides of the chest.
Photos of chests
Thinking through the design
First of all, you need to decide on the sizes. If you make a chest for yourself, then the dimensions are determined based on the place where you plan to put it and what will be stored in it. For example, if it is too bulky, it will look bad in a small room and interfere with movement around the room, and a small one may be inconvenient for storage.
We make a drawing on a computer in any design program: Compass, AutoCad, Solidworks, etc. and print the parts in full size. If there is no experience in working with such programs, then we draw on paper, also in real size. Or take the drawing posted here.