Recently, in the interior design of apartments, special attention has been paid not only to beauty, but also to functionality, and the ability to properly use space. A corner shelf in a room is an excellent solution that will not allow a single centimeter of free space to go unused.
This detail can easily be used in every room. A wide selection of materials and various design variations allow everyone to choose a practical option for a modern interior.
Corner shelf in the room
The main purpose of the shelf
The design of rooms with functional, aesthetically pleasing shelves is actively gaining popularity. This piece of furniture allows you to use space as efficiently as possible. Many people use it to create a unique style in the interior.
On such shelves you can easily arrange various things so that they are always accessible, but the room remains in complete order. So, the following can be easily placed on the corner shelves:
- small household appliances;
- dishes;
- books;
- photos;
- souvenirs;
- personal hygiene items (if we are talking about the bathroom).
Corner shelves are often made from natural, environmentally friendly materials
Types of wooden shelves
As you can imagine, there are countless design solutions for the manufacture and decoration of shelves. All structures are divided into 4 groups according to the method of fastening:
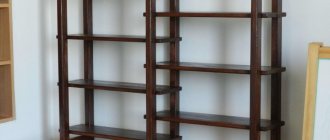
- Classic wall hangings installed on a free section of the wall. Most often they are intended for storing books, so they are made in a rectangular shape. But nothing prevents you from showing your imagination and giving the product an unusual look, making it square, round or consisting of several parts, as shown below.
- Corner shelves designed to effectively use the space where 2 walls form an internal or external corner. They are successfully used not only for arranging literature, but also for arranging flowers, various souvenirs and small household appliances (for example, a small TV or printer).
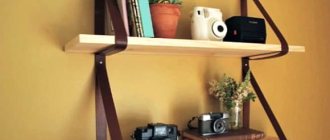
- Suspended, attached to a wall or ceiling with flexible braces made of ropes or strings. One of the interesting solutions is a flower shelf suspended on straps.
- Floor structures. These include open shoe cabinets and racks with a large number of cells for storing a variety of household items or tools.
Main varieties
If you decide to functionally use the corner area by choosing a corner shelf for it, you should carefully study the types of structures. There are a large number of them. The simplest ones consist of 2 supporting parts and a board screwed to them on top. Even a novice craftsman can create such furniture with a set of simple tools at hand.
Table 1. Types of corner shelves
| Variety | Description |
| It is distinguished by the presence of three supports on which horizontal parts are firmly fixed. Externally, the bookcase looks light and elegant. Can be complemented with openwork carving. |
| It is advisable to install it in internal corners. When designed correctly, it becomes a harmonious recess in the wall. Most often, plasterboard sheets are used to create niches. The material attracts:
|
| Many people choose this type of design because it is easy to install on the outer and inner corner of the wall. The shelf is distinguished by the absence of vertical posts; each tier is separately attached to the wall. This creates the effect of lightness and airiness. |
| It differs from other species by the presence of its own walls on the sides. They not only represent an attractive decor, but are also load-bearing elements. |
What tools and materials will be needed?
There is a list of tools and materials, without which the process of assembling a shelf will not only become more complicated, but will become an impossible task. Let's look at all the necessary parts and accessories:
Tool
- board;
- corners;
- screwdriver;
- self-tapping screws;
- building level;
- hacksaw.
To assemble the shelf, you can use boards or chipboard. The second option is more suitable as it is easy to process. A less popular material used is plywood.
Important! The thickness of the parts must be no less than 16 mm. The best option is to use boards and chipboards, the thickness of which is 18 mm
Another important geometric indicator is the width of the boards. It should be approximately 15-17, but not more than 18 cm.
Interesting: How to install a sink in a countertop
Characteristics of materials used
Furniture departments offer a wide range of shelves, which are made from a variety of materials. When choosing a specific name, it is worth starting from the three most important factors.
- Operating conditions for the presented design.
- Stylistics of the room.
- Future load on the shelf (the design may have a decorative or functional purpose).
Be sure to analyze these factors, and then make your final decision.
It is easy to place indoor plants and decorative items on a multi-level structure
Table 2. The most common materials from which corner shelves are made
| Material | Description |
| Natural wood | Instances made of wood always look expensive. The use of rare breeds is not widespread due to the high cost of the product produced. Such a shelf should completely match the style of the room. The designs look elegant:
|
| MDF and chipboard | The presented material has a number of advantages, which include:
|
| Plywood | An affordable sheet material consisting of layers of wood veneer that are glued together. Advantages of plywood:
|
| Plasterboard and gypsum fiber sheets | Many people prefer to make their own shelves from plasterboard. This allows you to create a design that matches the interior of your home. It should be remembered that the material used does not withstand high loads. Therefore, heavy objects cannot be placed on it. If the design is being developed for the kitchen, it is necessary to use a moisture-resistant gypsum fiber sheet. |
| Plastic | The presented material is in most cases used for bathroom shelves. It has undeniable advantages, including:
|
| Glass | Glass options are highly valued in interiors where there are no clutter. The material creates an airy effect. The proposed designs fit harmoniously into the interior:
|
| Metal | Few people use metal shelves for home design. Its main advantage is strength, but heavy weights are rarely stored on such structures in the house. They are more suitable for:
|
Location and purpose of the structure
When choosing the size of the shelf and its type, consider in which room it will be located in the future. It is important to create a complete interior with a functional detail.
The main purpose of the shelf is to optimize space in the house
Kitchen
For the kitchen, it is important that all the necessary items are always at hand, and not hidden in numerous drawers. It is best to use a compact, yet spacious wall design. Wooden models are most suitable for the kitchen, as they create a cozy atmosphere. A variety of designs allows you to choose an option that harmoniously complements the interior of the room.
Not the most practical solution for the kitchen would be models from:
- plastic;
- glass;
- metal
A good alternative to wood is decorated gypsum fiber sheet.
In a small kitchen, the shelf has a practical purpose, helping to keep necessary utensils in order.
Hallway
By using an original hanging shelf, you can easily decorate your hallway. Such furniture can easily perform several functions.
- A small shelf is suitable for storing keys and small items.
- The larger design allows you to easily accommodate all your bags.
- The tall design, complemented by figurines, will add sophistication to the hallway.
- The shelf with hooks is easy to use as a hanger.
For the hallway you should choose wooden furniture. Glass, metal and plastic cannot be called practical or universal. Take this into account when arranging the room.
A corner shoe stand will be a functional addition to the hallway
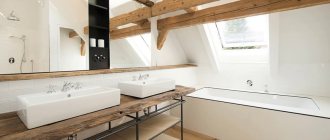
Bathroom
It's hard to imagine a bathroom without a convenient corner shelf on which all hygiene products are stored. Of course, numerous jars can be neatly stacked in a closet, but getting them out of it every time is not entirely convenient. It is better to have them at hand at all times.
For the bathroom they most often choose:
- glass structures with chrome stands;
- plastic shelves with metal racks.
It is important that such an interior detail is distinguished by its laconic execution. This makes it easy to care for, since high humidity in the bathroom causes rapid contamination of surfaces.
Manufacturers make the design as functional as possible by adding hooks, soap dishes
Living room
The living room is an ideal place where you can install a functional corner structure. Reading lovers will use shelving to store their home library. On the shelves you can easily place:
- family photos;
- decorative items.
During installation of the structure, you should definitely consider what load is planned on it. Fastenings must be as reliable as possible. Its size directly depends on the future purpose of the selected shelf. Decorative elements look good on compact models, and for a large library or collection, choose a spacious shelving unit.
Small corner shelves with carvings and shaped wooden details are often used as stands for icons
In many living rooms, wooden or metal corner shelves are used as flower stands. Glass specimens are much less common in living rooms. Designers advise not to clutter the shelves with numerous flowerpots and figurines. This eliminates the feeling of lightness that such a design is intended to add to the room.
In a spacious interior, options installed on external corners look harmonious. More often they are made of plasterboard or chipboard. You can design such an addition to the room yourself, taking into account the characteristics of the place chosen for the shelf.
For a small room it is better to purchase a compact design
Design and preparation
The material has been chosen, and now it’s time to carry out careful special preparation. It is equally important at this stage to decide on the design of the future shelf itself. Here are the tools that will come in handy when you decide to create a shelf out of wood:
- tape measure and ruler;
- file;
- screwdriver;
- a pencil with a string or a special compass with a large radius;
- marker;
- drill;
- hacksaw;
- electric jigsaw;
- fine-tooth saw;
- glue;
- building level.
When everything has been prepared, it’s worth thinking about the shape and, naturally, the design of the future creation. Because my product ranges from the simplest design to the most complex creation with an abundance of all kinds of elements. Will it be several shelves or will there also be some special fastening. Maybe this is a do-it-yourself corner shelf for icons, which will not be bright, but will become modest and extremely discreet. Or maybe a do-it-yourself corner bookshelf with creative design solutions from a master.
DIY shelf: advantages
A few years ago, no one would have thought of making home furniture themselves. It was believed that this was a sign of poverty and the inability to purchase a finished product in a store. Today, such a stereotype is completely destroyed. Everyone wants to emphasize their individuality in the interior by showing creativity.
Handmade furniture is a real home decoration
Of course, any project can be easily carried out by a qualified craftsman, but such services, as a rule, are quite expensive. When designing a shelf, you can refuse the help of a specialist and do everything yourself.
Drawing No. 1
Drawing No. 2
Drawing No. 3
Drawing No. 4
New design
The same shelves that were cut out of a circle can be designed in a slightly different design. For example, make the support not the wall itself in the apartment, but specifically purchase more material and create some kind of wall for such a corner shelf. Numerous do-it-yourself corner shelves and photo options simply overwhelm the Internet. Once you understand the manufacturing principle, you can create the most creative options.
It is possible to make furniture for your home yourself, and there is nothing unrealistic. The simplest and most sophisticated forms of corner shelves for one or two at home. You can create comfort and warmth within the walls of your home at affordable prices and simply do useful, pleasant things as a hobby. Try making simple options for your home yourself.
A simple method for making a corner shelf
When choosing material for a shelf, it is better to give preference to ordinary wooden boards or plywood, since they are not difficult to work with. If it is not possible to purchase a new wooden sheet, you can use the remnants of old furniture. When choosing raw materials, you need to take into account some features.
- Use only high-quality boards. If there are defects on it, such as rot, it is not suitable for creating shelves.
- Also, material with deep scratches and potholes would not be appropriate, since even after treatment it can quickly become unusable.
Boards with mold and rot are not suitable for creating furniture
Step 1. From the board you need to make blanks of the required size and shape. To do this it should:
- cut diagonally;
- rub it with sandpaper.
The result should be two triangular-shaped shelves. You will also need additional wood for the four posts. They must also be processed with sandpaper to eliminate chips, roughness and other irregularities.
Blanks
Step 2. Each design detail must have a high-quality appearance, so they should be:
- clean thoroughly;
- paint.
It is better to choose the color based on the design of the room.
It is better to paint with a roller - it does not leave streaks and ensures uniform coloring.
Step 3. Proper placement of the shelf affects its stability and aesthetic appearance. Therefore, it is important to carefully choose the location for its placement. After you determine the future location of the interior part being manufactured, measurements and markings are carried out using:
- regular pencil;
- building level.
Making markup is quite simple if you follow the following algorithm.
- Attach the stand to the wall.
- Level it using a level.
- Make a mark with a pencil.
A level will help you make the correct markings.
Step 4. The stand is attached to the wall using quick installation, for which holes are made with a drill. The racks must be installed according to the prepared markings. Then you need to double-check the correctness of the design using a level. Any deviations, even minimal ones, will negatively affect the quality.
Quick installation - dowel + nail
Don't know how to choose a drill for home use? Read in detail in a special article.
Step 5. You can use glue to fix the shelf to the racks. It must be applied in an even layer over the racks, having previously squashed any dust from them. Next, you just need to tightly fix the shelves on the prepared structure and wait a few hours for the glue to dry.
Apply glue
The shelf will be usable only after the glue has dried.
This shelf is suitable for storing:
- various household items;
- indoor plants.
Please note: in order for the structure to support heavy objects, it should be reinforced with metal fastening systems.
Additional fastenings will increase the stability of the shelf
The material is ready, the work process
For easier understanding, let's divide the process into several steps:
Step number one
You need to draw a perfectly even circle. For this, some skills from school will be useful. For this, you can use a special large compass, or just take a pencil and a rope and directly draw a circle with the help of such a homemade compass of the required diameter and find the center of such a slab. Be sure to mark the center later in your work using a contrast marker. From the center we accurately draw a circle with a diameter of 20 cm. Afterwards we divide the circle strictly into four equal sections. These are four sectors or 4 pieces of cake.
Step number two
We saw these blanks along the lines. In the process we use a jigsaw. Initially, you need to cut out the circle, and only then cut it into 4 parts. We cut out these blanks and then use them on the shelves for the product. Now you choose strictly yourself, whether it will be several shelves at once in one place or several at once, one shelf at a time.
Step number three
You need to carefully sand the shelves and create grooves on them, with which they will be fixed to the wall. The holes must be cut in the very edge of the slab on both sides at once. It is important to make a longitudinal type groove on the left that looks like a narrow groove, but on the right, a point groove only using a drill. Longitudinal sections can also be made with a drill, just make several circular drills and only then connect them. If you do everything correctly, the structure can be safely secured and it will be almost unnoticeable, which is why such fastenings are often called simply invisible.
Step number four
Securing the shelf itself. You just need to put the shelf on the screws. Strictly screw the screws into the wall into the grooves, only in this case the fastening will be invisible. On the left side, the screws go in as if from the bottom up, and thus fit the current structure more tightly to the wall. It’s a little more difficult to strengthen the shelf this way, but the shelf itself will look impressive, and the structure will sit more firmly in its place.
How to make a corner rounded shelf yourself
A shelf is not just a practical design. It can also become an indispensable part of the interior of any room.
To create a corner shelf, it is not necessary to purchase expensive materials, such as glass. You can use no less practical and at the same time stylish options from:
- wood;
- sheet of plywood;
- chipboard;
- plastic.
Depending on the selected material of the shelf, its purpose will differ. To carry out work on installing the shelf, you will need to prepare material and tools.
Preparation of material
Step 1. Chipboard will be the best solution for making a shelf with your own hands. The size of the sheet is selected individually, taking into account the purpose of the structure. Using a pencil, make a marking in the form of a quarter circle on the selected material, and cut it out using a jigsaw.
Cutting out the shelves
Step 2. From the remaining material you need to make racks (2-4 pieces), their number depends on the required design of the entire structure. Each part should be sanded, and then holes for self-tapping screws should be drilled in them.
We fasten the racks together
Making holes for shelves
Step 3. To make the structure as reliable as possible, before fastening it is necessary to make markings using a level. Then holes are drilled in the wall to secure the studs using:
- drill;
- hammer drill
Now you can install the racks according to the markings. To strengthen the structure, you can use PVA glue.
We make holes in the wall to secure the shelves
Step 4. First you need to attach the shelf to the wall and check the accuracy of the measurements. If everything fits, you can begin further work. The parts are fastened to each other using self-tapping screws.
Fastening the shelves
If desired, the shelves can be decorated using slats of a semicircular section, making handrails out of them. This decor will protect items on the shelves from falling off.
Unusual shelves made from scrap materials
If you have free time and a desire to experiment, you can create very unusual shelves for the wall from scrap materials. For example, a corner shelf made of plastic pipes looks original. To make it you will need sections of sewer pipes and corner bends. The shelf is attached to the wall with screws and dowels.
Unusual shelves made from scrap materials
Unusual shelves made from scrap materials
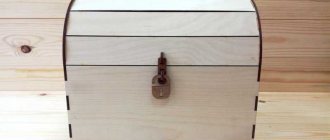
Old suitcases and briefcases also make great wall shelves. To do this, they are cut to half their height, covered with plywood at the back and secured to the wall with screws or on brackets.
Shelves made from old suitcases
Drawers from unnecessary bedside tables are quite suitable for making shelves. To give them an elegant look, the boxes should be carefully sanded, primed and painted in bright colors. Then they are leaned against the surface with the back wall, the attachment points are marked and holes are drilled for them. Even one such shelf looks very original, and a composition of 2-3 drawers will become a real decoration.
Bright shelf
Bright shelves