Nowadays, not a single kitchen space is complete without a set of cabinets for storing kitchen utensils, cereals, detergents and cleaning products. It’s not for nothing that when translated from German, Schaff sounds like putting things in order.
The first prototypes of modern cabinets were recesses hollowed out in the walls and floors of caves, which were the dwellings of ancient people. Food storage facilities were also built in tree hollows at a height inaccessible to wild animals.
Over time, people learned to make boxes for storing food and personal belongings. Later they began to attach lids to them. The products became more and more similar to the cabinets we are used to. The first mention of wooden boxes found in Egypt dates back to the 3rd century BC. Boxes with lids came to Europe thanks to the Greeks and Romans.
It took more than a hundred years until rough drawers turned into analogues of our usual wardrobes with shelves and drawers. If we compare modern kitchen furniture with that produced several decades earlier, the design, the list of materials used for their manufacture and cladding, finishing details, fittings, and fastening methods have changed.
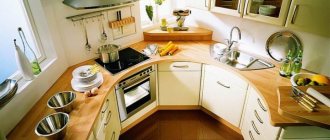
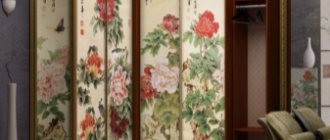
Types of modern wall kitchen cabinets
Along with the appearance, the filling of the cabinets has changed. They have acquired greater functionality and ease of use. There are cabinets equipped with a roll-out system, racks that rotate around a rigidly fixed center. This creates additional ease of access to kitchen utensils and food supplies.
All wall kitchen cabinets are attached to the back wall and have the same design, consisting of a frame, shelves and front. Chipboards are used to cover the back wall; solid wood, MDF, chipboard, and LMDF are used for the facade. The industry produces several types of wall cabinet designs:
- Open type, which are not much different from shelves and racks designed for storing various works of art, vases, photographs, and printed literature. On shelves that are not closed with doors, you can conveniently place spices in decorative boxes, vases with cookies and sweets, containers with coffee and tea.
- Closed type, which have standard shelves closed with hinged doors. The cabinets are designed for storing kitchen appliances, detergents, sponges, napkins, and for building in multi-tiered drying structures.
- Combined type, which combines all the characteristic features of closed and open wall cabinets.
There are not only simplified versions of wall-mounted kitchen cabinets, but also a variety of square and corner ones designed for drying dishes and installing exhaust hoods. They all have different shapes, sizes, color options, and filling capacity.
Cabinets with built-in drying racks for plates, cups, and glasses are usually hung above sinks with a kitchen faucet. Structures are installed above the kitchen stove where exhaust devices are placed.
Corner designs allow you to use all the free space of wall cabinets, including areas that can be difficult to reach. They can be shaped like the letter G; trapezoidal and straight wall cabinets with beveled corners are available. With wall-mounted vertical cabinets, the ceiling height visually increases and the interior takes on a complete look.
Lately, tall vertical kitchen wall cabinets that reach the ceiling surface have been gaining popularity. The design is especially relevant for small kitchens and families who have many different kitchen appliances for cooking. True, to get to the upper shelves, you will have to use small stairs.
Horizontal wall cabinets visually make the kitchen wider, expanding its boundaries. And the upper and lower niches of wall cabinets increase the space for storing necessary items and equipment in the kitchen.
Horizontal clearance
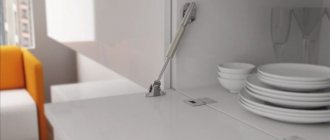
By tightening the two screws located on the ears of the strike plate, you can move the doors up and down. This eliminates sagging or upward displacement of the doors relative to the body.
By tightening the two screws located on the ears of the strike plate, you can move the doors up and down
- loosen the screws on all hinges;
- raise or lower the canvas (as appropriate);
- tighten the screws almost to the limit.
The best option is to select self-tapping screws with fine threads; they are tightly fixed in the door leaf and help to most accurately adjust the height of the facade.
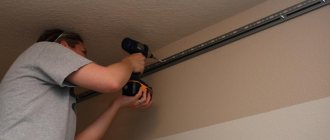
Fastening cabinets to rails
Rack fastening is one of the most popular modern fasteners. It can be recognized by the mounting plate, which looks like a strip cut out of metal, with a canopy. The canopy with a hook for the slats is hidden in a plastic case. Before installing the slats, mark the fastening points at an equal distance from the floor surface.
The mounting rail is attached to the kitchen wall using dowels or self-tapping screws. Each of the canopies, equipped with a hook, must protrude beyond the slats. This is necessary to adjust the hook mechanism. The design will allow you to install wall cabinets as close to the wall surface as possible.
The rack mounting greatly simplifies the installation of adjacent wall cabinets. Installed on hooks, they move freely along the rail, moving in any horizontal direction. Having decided on the rack type of fastenings, it is worth considering the weight of the kitchen cabinets. The slats may not hold heavy cabinets and become deformed, and then troubles cannot be avoided.
Adjusting furniture hinges with closers
After purchasing cabinets for my kitchen, I noticed that some doors come with closers. These doors turned out to be no more difficult to work with than ordinary ones. Adjustment of furniture hinges with simple type closers is carried out in a similar way.
It would be a different matter if these were elite and quite expensive awnings. I would have to tinker there, since such models have a built-in screw system with eccentrics and oil springs.
Source m-standart86.ru
I often get asked questions about how to adjust the hinges on kitchen cabinet doors. This procedure is performed in the same way as for all other types of headsets. The only difference may be the type of awning used.
Attaching kitchen cabinets to furniture sheds
Our grandfathers also used furniture canopies for wall cabinets, considering them not only the most common, but also the most reliable method of fastening. Furniture canopies are a metal plate with holes for inserting screws and self-tapping screws into them. The first step is to make precise markings on the wall, along which dowels or anchors are secured. Canopies are fixed to them, pre-attached to the rear wall of the modular structure. Oblong slots, 2 centimeters in size, allow you to slightly move the cabinets horizontally.
Useful tips
Installation of awnings is a fairly simple operation, but it requires some experience to perform it quickly and efficiently. In this case, you also need to follow a few simple recommendations:
Only high-quality hangers and certain experience will allow you to achieve the desired and correct location of all kitchen modules. In the absence of such indicators, it is advisable to entrust the solution of such problems to specialists.
Kitchen wall material for fasteners
When hanging cabinets on concrete walls, it is advisable to use anchor bolts. Installation of the planks is carried out using screws screwed into the mounting dowel. You can use corners to attach cabinets.
When hanging cabinets on walls made of foam blocks, you will need special mounting hardware. On a cellular material with air bubbles, a simple anchor, screw, or nail will not hold well. The first increased load will throw them up. A wall made of hollow material can only withstand a load with a chemical anchor, plastic or nylon dowel installed on it.
To install cabinets on drywall, use special self-tapping screws and anchor bolts to which the mounting strip is attached. But even such fastening to plasterboard walls cannot guarantee that a heavy wall cabinet with kitchen utensils will not break off and fall, breaking everything in its path. It is better to use decorative cables and tubes under heavy kitchen cabinets.
When choosing fastening options, be sure to pay attention to the material from which the kitchen walls are made.
Inventory I will use
So, I purchased a storage closet with two large doors. Of course, I started assembling it myself, since I had no desire to give the furniture into the wrong hands. But when it came to the hinges, I began to realize that I had placed them unevenly. And I began to correct the situation. What was useful to me:
- crosshead screwdriver;
- a wooden stationery ruler (since there was no tape measure at hand);
- building level, which has a bubble mechanism.
Since my furniture was located in a fairly dark room, I thought that I could not do without additional lighting, so I brought a portable lamp from the barn. Just in case, I took a caliper.
Source palitra21.ru
Preparing walls for installation of wall cabinets
Before you begin installing wall cabinets, you must complete all electrical wiring and installation of all electrical equipment, such as sockets and switches. Then the surface of the walls is leveled and defects are removed. Some people neglect this procedure, believing that wall errors will not be visible behind the cabinets. But in order for the quality of installation to meet accepted standards, finishing work should not be neglected.
Construction beacons fixed to the wall with plaster will help level the surface of the wall. A solution is applied on top of them. After it hardens, the surface of the walls is leveled. Small differences in the level of plastered walls are equalized with a solution of finishing putty. After completing the preparatory work, you can begin installing the wall cabinets.
Advantages
A modern suspension has many advantages over a conventional hinge.
The only disadvantage of this mount is the price. But its advantages do not allow you to regret the cost.
How to care for fittings
In order for the furniture to last a long time and not cause discomfort during use, you need to regularly care for the hinges.
4 simple rules will help with this:
- The first adjustment of the hinges is carried out immediately after installing the door on the cabinet.
- The interval between the following adjustments depends on the correctness and intensity of use of the cabinet door. If you use the cabinet daily, you need to adjust it 4-6 times, and if you use it irregularly, 2-3 times a year.
- The cabinet facade is regularly inspected for distortions, sagging and door deviations. If deviations appear, adjustments must be made.
- In order for the hinges to last longer, not make sounds, and open doors easily and smoothly, they need to be lubricated. For this purpose, motor and diesel oils and lubricants are used: “Ciatim”, “WD-40”. The hinges are lubricated 1-2 times a year.
In order for the hinges to last longer, not make sounds, and open doors easily and smoothly, they need to be lubricated
Height
Despite the generally accepted meanings, the main thing is the comfortable use of furniture, which is directly related to the growth of its owner. The hostess or owner should easily reach the middle shelves of wall cabinets without the help of a chair or stool.
You should know that the minimum distance from the tabletop to the bottom edge of the cabinet is 450 mm. This will allow you to comfortably use the work surface and place the necessary small household appliances there, such as a coffee maker, microwave, electric kettle, etc. But most kitchen furniture stores consider the optimal distance to be 600 mm.
To make it easier to determine the most convenient level for hanging cabinets, you should familiarize yourself with the calculations of the ratio of human height and the distance to the top shelf of the module:
- height from 1.55 to 1.6 meters – height to the top shelf 1.75 meters;
- from 1.6 to 1.7 m – distance to shelf 1.9 m;
- from 1.75 to 1.9 m – height 2 meters.
Taking into account your height, you can easily determine the optimal distance for yourself to the top shelf of the headset.
Operation of configured fittings
We figured out the installation and adjustment, but in order to maximize the service life, you need to learn how to independently adjust and lubricate the parts. It is these factors that make it possible to protect the fittings and increase their wear resistance.
As for general recommendations regarding the care of loops:
- The first adjustment of hinges and other fastening parts is carried out immediately, as soon as they have been screwed into the desired place.
- As for the number and frequency of subsequent adjustments, this completely depends on the frequency of use of the belays and their designs, namely on the frequency of opening and closing the doors.
- If the doors open several times a month, the parts will need to be adjusted no more than three times a year. If the furniture is used daily, the parts will be adjusted more than 7 times a year.
- Carry out a thorough inspection of the appearance of all façade parts. If you notice distortions or a low-set vestibule, you will need to fine-tune its hinges.
- To maintain the quality of furniture fittings, periodically lubricate the hinges. To do this, you can use motor oil that has a natural or artificial composition.
- To eliminate the noise and sensitivity of difficult use of furniture when opening or closing cabinet doors, use motor oil 1-2 times a year on all hinges.
By plane
The adjusting screw is responsible for changing the position of the facade along the plane; by turning it, you can move the sashes to the right or left. This eliminates distortions of the door relative to the body and the adjacent door.
To eliminate distortions to the right or left, you need to tighten or loosen the adjusting screw. Carry out opposite manipulations with hinges located at different heights until the door is perfectly aligned.
To eliminate distortions to the right or left, you need to tighten or loosen the adjusting screw
Adjust vertically
This is the very first and main element of setting up furniture fittings. This method is necessary if the front of the cabinets is positioned crookedly and incorrectly, which makes it stand out from the background of the entire structure, or if there are two cabinet doors and one is higher than the other.
Using this adjustment option, we do everything step by step, dividing the total into 4 actions:
- Open the doors and, if necessary, remove the caps on the hinges.
- We tighten the screws on two hinges; they are located along the edges of the side walls and doors. It is these parts of the overall system that position the sashes vertically. First, you need to place two bolts at the same level, which will allow for high-quality adjustment of wall or floor cabinets.
- After this, we close the doors and inspect the furniture to notice other irregularities. In the case when the slope goes to the right side, tighten the bolt of the upper hinge, and loosen the lower one a little. Well, accordingly, on the contrary. If there is a slope to the left side, twist the lower part.
- We repeat points 2 and 3 until the front part reaches its normal position. Only after completing this can you move on to the next steps.
Door height
To adjust the height of kitchen cabinet doors, look at the screws. They are installed on two so-called “ears” of an elongated shape. A loop passes through this addition, which provides the level of height of the facade. Adjusting the doors with this option is also done step by step:
- First, loosen the screws that hold the adjusting structure.
- If it is difficult, we raise or lower the doors and tighten them again.
You must tighten it carefully, until it stops, but so as not to strip the thread.
It is important, when starting to adjust the height, prepare self-tapping screws with fine threads in advance. It is the correctly selected elements that will help in setting up and securing the desired position.