When you start immersing yourself in making furniture with your own hands, there is a need to simplify your work with the same type of operations associated with the preliminary marking of parts for fasteners. Furniture drilling jigs are an excellent tool for the home craftsman. Many people prefer to make templates from blanks themselves. However, there are quite a few budget devices on sale on Aliexpress that are easier to buy than to reproduce. And they will last much longer, maintaining the original accurate calibration.
You can read about how to properly prepare sawn parts for further assembly in the article about adding and drilling chipboard with your own hands.
Furniture templates for installing handles
Any furniture handle has an installation base - the distance between the screws is subject to system 32. That is, it is a multiple of pitch 32, corresponds to the values 32, 64, 96, 128 mm, etc. When installing handles, it is important to maintain the same distance from the edges of the facade. Templates for drilling holes for handles can make marking easier. They can have different looks and shapes. The package may include drills.
Adjustment
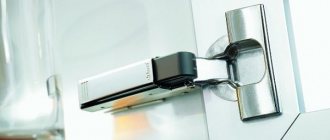
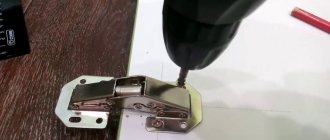
Adjustment (or adjustment) is the final stage of installation of furniture hinges. It must be performed in several planes at once - vertically, horizontally, and in relation to depth:
- Adjusting the depth will help press the door closer to the body, or ease the pressure. You need to tighten the oval hole.
- On the vertical side - it will help to move the facade. This is done by twisting oval-shaped holes.
- On the horizontal side - ensures free movement of the door back and forth and back. The purpose of this adjustment is to avoid gaps between the cabinet and the door. The method is great for rooms with uneven floors or walls.
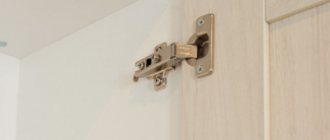
Now you know how to secure furniture hinges. As you can see, this is not so difficult to do. You don't need to have any special skills or abilities. Doing this kind of work with your own hands will be another reason for a little pride.
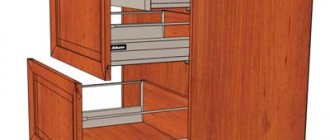
Furniture jigs for marking fasteners for guides for drawers
The fastening of any guides and pull-out systems also obeys the furniture “law”: the distance from the edge for fastening the first screw is 37 mm, and then the installation holes are located in increments of 32 mm at distances of 64, 128, etc.
Most manufacturers of components for drawers offer their own furniture jigs to facilitate marking for fasteners. However, you can also choose universal templates. Most often they consist of a set - left and right conductors.
Consumables and replacement attachments
For smooth operation of carpentry tools, you need to regularly replace their consumables. These include:
- Nozzles
- Cutting devices.
- Other accessories.
In order not to encounter a shortage of consumables during wood processing, it is better to take care of their supply in advance. Important consumables include:
- Jigsaw files. They are used when processing products made of chipboard and MDF and come in two types - cutting edges for fast and figured cutting. The first blades are equipped with a large tooth and are designated “T101B”. If you need to perform figured cutting, it is better to use models with the designation “T101AO”. Processing plexiglass, metal and other structures requires the selection of other types of hacksaw blades. However, their scope of application is limited.
- Sanding belts with different abrasiveness. Used to form edges and surfaces. In most cases, sanding materials with an abrasiveness of 80 (for rough grinding) and 120 (for finishing activities) are used for processing. Tapes with diagonal gluing demonstrate increased reliability.
Bits for fixing fasteners have different tip shapes. They are sold in sets or individually and are marked as follows:
- "PZ" or "PH". Used for Phillips head fasteners.
- "T". These bits are designed for screwing in confirms.
- With direct glitz. This type does not have a designation, but differs from others in appearance.
- Combined solutions. Provides two different ends. Suitable for devices with a cartridge.
Additional consumables that may be needed when making furniture at home include a magnetic holder. It is supplied with certain models of screwdrivers, while the element itself is sold in specialized retail outlets and is inexpensive. Using a magnetic holder, you can simplify the handling of electrical materials, which is especially useful when using bits.
For furniture production you will also need spiral drills and straight or edge cutters. When implementing specific tasks for processing and drilling holes, you need:
- Confirmed drills.
- Forstner drill.
- Bimetal core drills.
Initially, it seems that the carpentry equipment is quite extensive and requires several dozen devices and large financial costs. At the same time, for a novice furniture maker who is going to create primitive products, a basic set of tools is enough and only as the tasks become more complex, buy more professional tools.
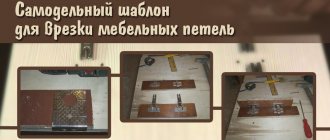
Template for marking and drilling for confirmation
It will be useful for those who assemble furniture from laminated chipboard of any type and do pre-addition manually. The furniture jig is a ruler with holes for a 5-8mm drill for marking the front part of the parts (sidewalls) for confirmation with a countersink. The pitch can be set to even values from the edge (50, 70, 100mm) or in compliance with system 32.
Features of self-production
When designing a conductor for confirmation, it is necessary to correctly calculate what functions it will have to perform in the future. It should be done for the most commonly used fasteners in the house. If such a device is required by furniture makers for constant work, then it is better to buy a factory model, which is distinguished by great precision. In addition, manufacturers often include additional fasteners, stops and templates in the kit.
Universal furniture jig for drilling
In terms of functionality, it combines the two previous devices, since it can adapt to marking with drills of different diameters, and the ruler allows you to set any desired distance from the edge and pitch. It is used both for drilling the front surface of parts and the end.
Well-known manufacturers of furniture jigs include Cheron, Kreg and Wolfcraft. Before choosing any model, we recommend comparing prices, quality and functionality with smaller manufacturers and suppliers of furniture components Blum, Hettich and others. Often the optimal price-quality ratio, and even with a guarantee, can be found where it seems that “everything is expensive.” Do not exclude this possibility for yourself and consider all possible options. After all, a furniture jig can serve faithfully for many years, helping to speed up production processes without losing the quality and accuracy of making furniture with your own hands.
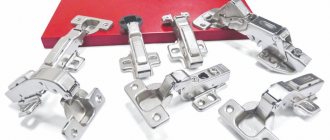
Other types of loops
So, all types of loops can be classified in different ways. Thus, there are different types according to design, purpose, method of fixation and application. In general, there are several dozen types of furniture hinges, some are more common, some are less common, but almost all find application in various types of furniture designs. In addition to four-hinged hinges, let's look at a few more variations of hinges that may be encountered by furniture assemblers or people who have bought new interior items and decided to assemble them themselves.
Card loop
Card loops are considered the oldest. Their ancestor is a forged hinged hinge with a long overlay. Outwardly, they resemble an ordinary door hinge, only slightly smaller in size. The design consists of two metal strips connected in parallel using a thin rod that acts as a hinge. Nowadays they are rarely used, but are indispensable in the manufacture of retro-style furniture.
Butterfly door hinges
Pendulum type hinges or bar hinges make it possible to open the door 180 degrees. What happens is something similar to how the doors open at the entrance to a saloon in old westerns.
Bar loop
Mezzanine hinge structures are designed to attach horizontally oriented doors that will open upward. The hinges have a spring mechanism and also allow you to fix the door when open. They resemble ordinary overhead variations of loops.
Mezzanine hinge MK01
Ombre structures are used for so-called hinged doors. They will be mounted on both ends of the cabinet and do not require insertion, but may require minor milling (up to 2 mm). Then the sash can be opened 180 degrees. This is an ideal hinge for a folding table.
Hinge for folding elements
Secretory structures are similar to the card ones described above; they have an axial hinge and plates. They make it possible to open the façade downwards and keep it in a horizontal position. They can be accompanied by a special bracket that provides a supporting function. Usually installed in those cabinets where a bar is provided.
Secretory loops
Blind hinges, otherwise called adit hinges, are used for doors on the side of the cabinet that is adjacent to the wall. They can be used to attach the door to the false panel.
Gallery hinges
Heel products are extremely rarely used because they are designed only for lightweight doors. But they can be installed on facades with any type of opening. Installation is carried out in the lower and upper parts of the sash.
Heel loops for furniture
There are special hinges for glass sashes. They also come in different types, but their advantage is that they can withstand significant loads, and they look very beautiful.
Glass hinge
And relatively recently, hinges with 8 hinges, eight-hinged, appeared on sale. To install them, you do not need to resort to milling or cutting. This is an improved variation of the usual four-joint hinge. True, they are more difficult to install, and therefore, despite the absence of the need to carry out any preparation, such loops are rarely used.
8-joint hinge
Manufacturing stages
Let's consider the process of creating a metal conductor device for confirmations. This fastener is most often used when assembling furniture:
- A piece of the required length is cut from a square metal block (10x10 mm) using a grinder. The ends of the resulting segment are leveled and cleared of burrs using a file. Corners and edges can be rounded for ease and safety of use;
- The hole locations are marked on the workpiece. Their centers should be located at a distance of 8 mm from the side edge (the thickness of the chipboard sheet is 16 mm). There should be 32 mm from the end and between the holes, in accordance with the generally accepted system of furniture fastenings. For marking, you can use a carpenter's angle or caliper. It is better to make marks on the part using a sharp metal object - an awl or a large needle. You can use a core and a hammer to make holes for the initial installation of the drill. When drilling holes, it is important to prevent the drill from moving and make them strictly perpendicular to the surface of the workpiece;
- use a drill with a diameter of 5 mm to make holes;
- to create a stop, you need to cut a piece of the required length from a metal plate (1x25 mm);
- sand the edges with sandpaper;
- bend the workpiece at a right angle, holding it in a vice. Fold the parts, aligning them coaxially;
- fasten the parts in this position using a clamp;
- From the side of the plate along the length of the device and at the end, drill holes corresponding to the size of the screw. Cut threads and fasten parts;
- Cut off the excess thrust plate and process the edges.