Wooden products have been valued at all times, which is why many craftsmen love this material. Making small models requires care and precision. Fasteners are not used in such cases, because they often spoil the appearance. How to glue wood to wood? Modern manufacturers offer a wide range of products that will qualitatively connect these parts.
When creating wooden structures, gluing is the most critical stage. Even the most experienced craftsmen sometimes make mistakes that cause great disappointment. Because of this, the workpieces become damaged, and all the work must be redone.
What is better to use for gluing?
Today there are many adhesive materials that are used for carpentry needs:
- polyurethane compounds;
- contact glue;
- various types of PVA glues;
- epoxy resin.
Each master always has several of the presented substances in stock. So, how do you glue wood to wood? The appropriate option is chosen, paying attention to certain features of the future project:
- wood features;
- the conditions under which the product will be used;
- the degree of load that will fall on the seam.
Main types of wood adhesive joints
There are many different types of adhesive joints, which are almost impossible to make at home. This requires special woodworking equipment. But some of them, such as gluing into a smooth fugue along the edges or along the faces, can be done with your own hands. The tabletop for the table in the bathhouse is just one of these connections.
All adhesive joints are divided into two main types. This:
All of them are characterized by increased strength, and the gluing points, if the manufacturing technology is followed, as a rule, have greater strength than the wood itself. For this reason, strength calculations are carried out as for monolithic wooden elements.
The undoubted advantage of adhesive joints is that from small and often unnecessary wooden boards you can get a durable and fairly dimensional wooden product both in length and width. Moreover, their configuration can take on various geometric shapes and sections, ranging from a flat part to a curved workpiece of variable cross-section.
Transverse adhesive joints
This type of connection includes products that are glued together in one of the following ways:
- By layers.
- Along the edge.
- By face and edge.
The method of gluing across layers is used to produce prefabricated parts with a height equal to the sum of all the heights of the glued boards. This method can produce both straight and curved products. For example, for making a wooden beam for a ceiling in a bathhouse.
Glued parts along the edges are blanks that are obtained by gluing together several elements located in the same plane. An example of such a connection would be a tabletop or a wide board for a bench.
The connection of one board along the face and the other along the edge is called an adhesive connection along the edge and face. For example, a T-beam, an I-beam or a channel represent just such a joint.
Longitudinal adhesive joints
Adhesive joints with longitudinal joints are used for longitudinal splicing of parts in order to obtain a glued workpiece of the required length. Such joints include both simple connections (end-on, stepped) and more complex ones (groove-ridge, tongue-and-groove and toothed.
The joining of parts on the “mustache” has several subtypes, which are shown in the figure above. The miter joints have a slope of 1:10 in relation to the thickness of the boards being glued. Due to this, the beveled end has a significant length, which limits the use of this joint, for example, for short gluing boards. More complex miter joints are used when it is necessary to eliminate the possibility of boards moving along the longitudinal side and to increase the strength of the adhesive joint.
Glue Features
When choosing glue, you should also pay attention to its composition. It must be resistant to temperature changes, water and light. The most popular today include the following:
- "BF";
- PVA for wood;
- industrial adhesive for working with wooden surfaces.
BF glue is used by many woodworkers due to its minimal drying time. The composition is not afraid of corrosion and rotting. It is resistant to oil, gasoline, and water.
PVA for wood is a non-toxic, cheap and practical substance that can reliably glue wooden parts. Their final adhesion occurs after 24 hours.
Industrial adhesives are waterproof and can hold together different types of wood. At the final stage of work, this composition does not damage working tools.
But how do you glue wood to wood firmly?
Bonding quality
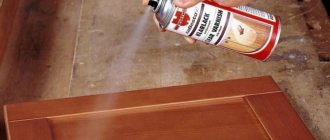
If you use regular glue, it takes a long time to dry, and then doesn’t hold well. Then TURBO FIX 805, it glues in seconds, and really tightly.
I tried to tear off part of the “balcony” that I had glued, first with half strength, then with all my strength, but the quality of the gluing is such that it holds very tightly. I would like to note that this is a really good product for gluing wood to wood, not many compounds work like that
Moreover, as the manufacturer assures, it can glue not only wood, but also plastic, rubber, ceramics, stone, leather, etc. That is, this is a universal composition
Now let's watch the video version
I’ll finish this, it was important for me to fasten the tree, and in seconds. I looked through a bunch of different means, and now I found what I was looking for. If you liked it and helped someone, write comments, subscribe to my YOUTUBE channel. That's all for now, everyone.
PVA glue
This is an ideal substance for joining wood parts. It is environmentally friendly, not harmful to human health, and non-toxic. It is easy to apply to any surface configuration. The connection can withstand a maximum load of up to 60 kg/cm². Moreover, the substance has a long shelf life. PVA glue is actively used in the manufacture of furniture.
Which PVA is best for gluing wood is the choice of every craftsman. Its only drawback is its low moisture resistance.
The type of wood you glue also matters
Wood can be divided into two types: coniferous and deciduous. Coniferous wood (such as pine boards) grows quickly and has a porous structure. This means that they absorb glue more easily and stick together faster. Often the clamps can be removed sooner. Hardwood grows slower and is much denser as a result, so the glue takes longer to penetrate and dry. Wood glues are equally effective on both types of wood, but it is especially important to ensure full cure for hardwoods.
Wood glue "BF"
Many people are interested in what is the best way to glue wood to wood. The BF series adhesive allows you to reliably connect different types of surfaces. Today, the following modifications of the adhesive are popular: BF-2 and BF-4. The first is used for interior work, the second for exterior work.
A high-quality connection can be achieved by applying two layers:
- the first - primer - must dry for 1 hour;
- the second - final - dries within a short period of time.
Other publications
How to save money on auto bonding
Many manufacturers of flexible packaging, when purchasing printing equipment, quite consciously complete it with a unit for automatic gluing of the printed material. All of them plan to reduce their costs due to downtime and material losses when stopping and accelerating the printing machine.
Self-adhesive fasteners 3M™ Dual Lock™ – scope of application, characteristics
It turns out that you can hang a clock and a picture on the wall, fix a communication box or an advertising sign without drilling the surface. All you need to do is buy 3M™ Dual Lock™ self-adhesive fasteners.
Source: mona.ru
How to glue wood to wood
Before you start gluing wooden parts, you need to prepare the surface:
- The areas of wood to be fastened should be cleaned of dust and dirt. To do this, go over the surface with a file or sandpaper. It must be sanded until smooth.
- Wood glue should be applied in a thin layer to both surfaces. In this case, it should be rubbed in a little. An exception is the connection of wooden surfaces with polyurethane glue. It is applied to only one surface, and the second is slightly moistened with water.
- The adhesive layer must be uniform, in the required quantity, since an excess of the substance does not improve the quality of the connection, but only contributes to the waste of material. In addition, the surfaces are smeared with excess, and this adds work to the craftsman at the stage of finishing the wooden product.
- The parts are connected and placed under a press for a certain time, which is indicated by the manufacturer on the packaging.
The most reliable gluing of wooden parts when connecting tongue and groove. In this case, only the walls of the groove and the cheeks of the tenon are lubricated. This connection is very reliable and durable.
The adhesive should be applied as described above. After all, if you miss the coat hanger, you will not improve the quality of gluing. In this case, excess will only appear, which will have to be removed in the future.
DIY wooden doors
Wood ranks at the top of all opinion polls about the popularity of finishing materials. They are used to make doors, windows, furniture, and other interior details. The wood is easy to process. A wooden door can be made quickly with your own hands if you have the tools and a minimum amount of knowledge about the technology of work. All that remains is to choose the type of door and quality lumber.
How to select lumber
It is impossible to get a good door from low-quality wood. When choosing a material, we focus on the following factors:
- location in the house: internal (home doors) are less susceptible to moisture, and street (entrance) doors take on all the climate aggression;
- building type. In bathhouses and technical buildings, the door plays less of an aesthetic role and more of a functional one, and the material needed is simple, but moisture-resistant, resistant to mechanical loads.
Tree species differ from each other in hardness, wear resistance, strength, and resistance to deformation. Making doors with your own hands from hardwood is more difficult than from softwood. Hard wood is difficult to work with hand tools, but is less susceptible to moisture compared to soft wood.
Low quality lumber if it has:
- fallen and ashy knots, resin pockets, cores, cracks, blue, red;
- humidity indicator from 15%;
- wavy, deformed shape.
- thickness less than 2.5 cm for interior door structures and 5 cm for entrance ones.
What are the features of deciduous trees?
Hard hardwoods - birch, beech, elm, maple, ash, oak, walnut, soft - poplar, linden, aspen, alder. Walnut, birch, and ash are difficult to process, but their wood is in demand due to its interesting texture. Oak and beech are considered the leaders in use for entrance doors: expensive, difficult to process, but reliable and beautiful. Soft woods are susceptible to rotting, but when impregnated with bactericidal compounds, they are suitable for indoor use.
Why are conifers popular?
Pine is a leader in use in construction. The wood is soft and has a fairly pronounced structure, it can be processed well with hand and mechanized tools, on machines. The main disadvantage: low moisture resistance. It is recommended to make internal doors from pine. Solid larch wood has a beautiful, intense texture, suitable for processing with semi-mechanized tools. Strong resin content allows you to protect the finished product from moisture, which means that larch entrance doors will last 5-10 years. The main advantage of spruce lumber is its lightness in weight and level of processing. But the boards will have a significant number of knots, and finished spruce doors may not withstand strong mechanical loads.
Required tools for making a door
- a router (a set of shaped cutters), with which grooves are selected, holes are made, the surface is ground and rounded;
- chisels of a full range of sizes;
- two types of hammers: heavy metal and lighter rubber;
- screwdriver or set of screwdrivers;
- drill;
- hacksaw, saw for cutting wood;
- grinding machine (can be replaced with sandpaper);
- plane;
- level and drawing and measuring tools.
Required materials:
• boards, humidity up to 15%. The length and thickness depends on the purpose of the doors and the intended design; • self-tapping screws; • glue. PVA or special for wood is suitable.
Important! You cannot make a door from undried boards. Lumber with high humidity is additionally dried for 1-2 months. If you make a door with your own hands from raw wood, then there is a high probability of it warping as the wood dries.
- accessories – locks, handles, latches, awnings;
- closers in places where rooms with different temperatures are separated;
- slopes and seals if necessary;
- protective compounds;
- finishing material, decor.
Types of doors
Based on the type of assembly of the door leaf, there are:
- carpentry or solid wood . A continuous sheet of planed boards is assembled and reinforced with lintels. High-strength doors are made from tongue-and-groove cedar, oak, and larch boards. A tongue and groove board is a board with milled grooves along the edges. Using these grooves, the boards are tightly connected to each other.
For the doors of outbuildings, simple boards made of linden and spruce are suitable;
- panel They consist of an internal wooden frame and two external skins made of MDF or thin sheets of plywood. The internal cavity is filled with cardboard or MDF.
- paneled. They consist of a wooden frame and insert panels of different configurations made of wood, MDF or fiberboard. Basically, such panels are made to refine and decorate the door. Sometimes frosted glass is used as panels.
The design of the doors is limited by the width and height of the doorway, the required functionality, general requirements, design, price limits and the level of knowledge on how to properly make a wooden door with your own hands.
Ways to decorate and protect boards.
There are several ways to make a door look beautiful. These methods are aimed at emphasizing the natural beauty of the tree.
- Antiseptic treatment with color. This treatment protects the wood from rotting and at the same time imparts a color tint while preserving the structure of the wood.
- Coating with stain - this method of decoration is similar to the previous one. But stain imparts color to wood without protecting it from rot.
- Firing wood. During firing, the softer material between the growth rings of the tree is burned, thereby making the structure of the tree more visible.
- Varnished. The varnish protects the board from moisture and gives it shine. As a rule, varnish is applied after preliminary decorating the board with stain, antiseptic, or firing.
- To give wood fire protection, there are special compounds called fire retardants.
As a rule, all compositions are applied in several layers with preliminary drying of each layer. In the case of giving wood a tint, each subsequent layer of stain applied changes the color of the board to a more saturated one.
Step-by-step instructions for making a wooden door from solid wood.
Making a door yourself is not difficult. It is necessary to think through the stages of work and follow all points of the instructions. Then the new door, made by yourself, will become a decoration of the house.
The door will be structurally made of two frames glued together - outer and inner. The internal filling of the door will be made of horizontally arranged boards.
First, we will process the planes of the boards on a jointer to make the boards even.
Now you need to cut the boards on a circular saw. This way you get boards with smooth parallel edges and the required width.
We take four boards from which we will make the outer frame. They only need to be cut on one side. Leave the other side uneven. This uneven side will be a decorative element on the door.
The four boards of the internal frame of the door and the boards from which the door filling will be made must be cut on both sides.
Let's take the boards of the outer frame of the door.
We mark on the board the junction of the vertical and horizontal boards of the door frame.
We cut out the excess board material.
Apply wood glue or PVA to the boards and glue the boards of the outer and inner door frame together. For an outdoor door, it is necessary to use moisture-resistant wood glue.
For good gluing, we tighten the boards with clamps.
We do the same for the remaining boards of the door frame.
Apply glue to the side where the door interior boards will be installed and glue the boards in place.
After gluing, the boards must be nailed to the door frame with small nails. Here, the best solution would be not to use nails, but to secure the boards using furniture dowels with preliminary drilling of the necessary holes.
After gluing all the boards, you should get a door like this.
Almost finished wooden door
Now you need to sand the two surfaces of the door to remove small differences between the boards.
We burn the door to reveal the natural grain of the wood and give it the necessary decor.
This is what the door should look like after firing.
Wooden door after firing.
Now all that remains is to coat the door with clear varnish and it will be ready.
Tip: to give the door additional rigidity, you can install a jib diagonally across the door.
Do clamps guarantee high-quality grip?
The strength of the connection directly depends on the accuracy of the fit of the parts and the quality of their processing with glue. The amount of clamping force is practically unimportant here, so it is not necessary to tighten the clamps too much. A sign of good clamping pressure is a small amount of glue showing through.
Experts rarely use clamps. Woodworkers who make small items use tape or masking tape to secure them together. With well-fitted joints this is enough.
Repair of wooden doors - don’t rush to throw away the old door
Old wooden doors are sometimes easier to replace than to repair, which is what many designers suggest doing. But very often it is possible to repair wooden doors, so do not rush to replace them - try restoring them first.
The reason for repairing an old wooden door can be either the loss of its original appearance or problems that have arisen with its functioning. Many of the reasons that lead to problems with the door are quite easy to fix with your own hands. Therefore, do not rush to save money to buy a new product; first make sure that repairing a wooden door is impossible.