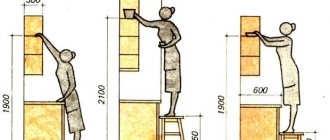
Very often, when repairing furniture or assembling it, you need to accurately drill holes for the firmmat, dowel and other fasteners. If you drill a sheet of chipboard, it is almost impossible to do this with a simple drill, since the hole breaks and it is not always possible to make a right angle. Therefore, for such work you must have a tool called a conductor.
Design Features
The jigs are represented by devices that serve to center the drill and ensure the straightness of its movement. Thus, they are self-centering templates for making holes.
Design features are determined by the type of device. Thus, the body of the multi-position version with clamp fastening is represented by a thick-walled corner made of aluminum of great length with an intermediate fastening in the middle. The wall of the corner is placed on the surface during operation. The location of the guide bushings is determined by the distance for the dowels.
A two-slide rotary jig for furniture is represented by two guide rulers connected by fasteners to a bar. To secure it, there is a connecting bar and a travel limiter, pressed with a wing screw.
There are conductors made of various materials: plastic, plexiglass, steel. The latter are considered the most successful, since these devices, due to their high strength, provide the best support for the straight movement of the drill and are least susceptible to deformation, and also do not heat up during operation. Models made of plastic and plexiglass are easier to handle due to their lighter weight.
Finally, design features are determined by the purpose of the devices in question. This article covers models for dowels.
Do it yourself
Now let's talk about how you can make a homemade conductor. Let’s focus on a simple model, since it’s not worth doing something complicated with your own hands. It is better to immediately buy a quality tool from a trusted manufacturer.
Conductors are made from pieces of reinforcement, plastic and metal bars. You can take wood, but it is less durable.
Of the tools you will need to prepare a set consisting of:
Classification
According to the characteristics of their use, conductors are classified into the following types:
- Invoices. These are simple and mobile devices that do not require fixation, but are held by hand. In view of this, drilling using these jigs has to be done with one hand. They are used mainly when processing chipboard and MDF boards. The devices in question are easy to create yourself.
- Rotary. These conductors are equipped with brackets. Designed to perform drilling in two adjacent planes in one pass.
- Sliding. These devices are designed to create multiple holes without changing settings. They belong to professional equipment requiring appropriate skills.
- Angular (at an angle). They are presented in highly specialized versions, designed for making holes at different angles. Often made according to an overhead scheme.
Blum furniture fittings: price, reviews, where to buy, how to set up
If you look at the assortment, then all factory or factory conductors can be divided into 2 categories. These are universal and highly specialized devices. The first type of template is suitable for performing various tasks, working with standard furniture elements. They can be used when drilling different materials and performing all kinds of operations. It is the universal models that have become widespread in everyday life and among those who assemble tables with their own hands and make original designs.
In particular, I recently had to deal with the creation of a manicure table. I also have plans to try to assemble a table with a hiding place myself. Everything is still at the design stage, but there are interesting ideas. In many ways, I reflected my observations in the material at the link.
Conductors can be classified depending on their design features and functionality.
There are actually 3 main varieties here. These are the ones home craftsmen should pay attention to.
- Invoices. When working with a conductor, you need to attach it to the material at the desired point, fix it with a clamp, if there is one, or hold it with your hand. Suitable for drilling flat parts;
- Rotary. Here the working part can move in a vertical and horizontal plane. An indispensable jig if you need to drill elements with a complex geometric shape, as well as for holes at an angle;
- Tiltable. This is an option for situations where you have to drill in a perpendicular plane.
There is a category of conductors that are designed for specific tasks and work with certain fastenings. This includes tools for dowels, for confirmations, corners, screws, etc. There are also solutions that are used for installing fittings for cabinet furniture and more.
Application
These products have been used for a long time and are widely used in metalworking. Thus, many machines are equipped with conductors. The need for templates for dowels in the woodworking industry is due to the prevalence of closed furniture joints. In this industry, the devices in question are used both in mass production and during assembly. In the latter case, furniture jigs are used to drill holes for dowels.
In addition to the above-mentioned areas, such devices are in demand in construction, mechanical engineering, and household work.
The scope of application is determined by the type of conductor. Thus, overhead devices are used for processing flat parts, chipboard and MDF boards. Corner ones are applicable both for furniture and for chipboard and MDF boards. Rotary products are designed for making holes in cylindrical parts. Universal models are suitable for small-scale furniture production. Tilting options are designed for simultaneous processing in several planes. Clip-on and sliding jigs are most suitable for home use. In addition, the latter are incompatible with single-spindle machines.
Rigid models are designed for making holes in objects with an uneven surface, such as pipes. In this case, they are secured using a clamp, but this method is not suitable for furniture, since deformation of the surface is possible.
The use of conductors simplifies and speeds up the work due to the fact that it eliminates the need for manual measurements and calculations.
Washing machine in the kitchen: installation options, reviews, pros and cons
Furniture jigs are fairly simple mechanical devices. They are needed in order to simplify and speed up the process of drilling various holes. Using such an object, you can make a hole according to the markings and with optimal accuracy and the required angle of inclination. It is actively used in the process of assembling furniture and when performing various carpentry tasks. The conductor is perfect for household use, since you can always do it yourself or purchase a small tool for personal use.
In essence, we are talking about a template for holes with different diameters. The main part of the tool is presented in the form of a rectangular block made of durable material. There are holes on the block.
To simplify work with the conductor, many models are equipped with additional adjustment and fixation mechanisms. If desired or necessary, you can make the tool yourself. And sometimes the result turns out to be no worse than Cheron.
With the help of a jig, the drill moves in a given direction and creates a hole of the required size. In this case, the material is drilled strictly at a right angle of 90 degrees. Some models allow you to adjust the angle or they initially have a certain inclination. It is extremely important to eliminate deviations when processing thin materials, the end parts of doors and walls. It is difficult to maintain the correct angle manually. Often there is a lot of waste, and you have to waste extra material.
The jig is designed for drilling all materials used in furniture production, including wood. Chipboard and MDF.
If you need to make many identical holes on different parts, or make them perfectly straight along one line, the jig will become simply an indispensable device.
Homemade conductors
First of all, it should be noted that the simplest models of jigs are very inexpensive, so making a template for dowels with your own hands is not always advisable. In addition, you need to take into account that models for confirmations are the easiest to make. Options for dowels have a more complex design.
To independently create such a device, you need drawings that are easy to find in open sources. There are also instructions in different forms. They describe the creation of various types and variants of templates for dowels: with one and several holes, from different materials, etc. The starting materials can be represented by improvised raw materials such as wooden blocks, fragments of reinforcement and plates, etc. So, a square one will do reinforcement 10x10 mm. In addition, you will need plumbing tools and equipment such as a drill and grinder. To create more complex jigs, a welding machine is required.
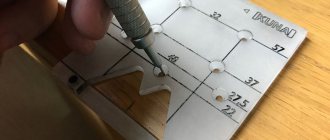
Creating a template for dowels yourself involves several stages. At the first stage, the reinforcement is cut into fragments, the length of which is determined by the dimensions of the product. Next, holes are made for drilling, for which you need to know their parameters. They have a diameter of 5 mm and are 8 mm from the edge of the jig and 32 mm from each other. To increase ease of use, it is possible to equip it with a stop. It can be a plate bent at a right angle and fixed to the product. The parts are fixed using a clamp and fastened with threaded connections. In addition, sometimes homemade conductors are equipped with trays for chips in the form of fragments of plastic bottles.
If you find an error, please select a piece of text and press Ctrl+Enter.
Source: stankiexpert.ru
What is it and its purpose
In essence, a furniture jig is an ordinary template with holes of the required diameter. The working part of the device is a rectangular block of solid material with holes located according to the required markings. For convenience, it can be equipped with adjusting and locking mechanisms. Based on the simplicity of the design, you can quickly make stencils for furniture with your own hands using available materials.
The jig ensures the desired direction of the drill at an angle of 90 degrees to the surface, eliminating the possibility of deviation. This is especially important when working with narrow parts of furniture, such as the ends of walls or doors. Without this device, it is quite difficult to maintain the required angle, which can lead to defects, because even a slight deviation in the direction of the mounting hole can make it impossible to assemble individual elements into a single structure.
For the perfect fit of furniture elements to each other, the accuracy of the location of the holes for fasteners is also of great importance. Those who make furniture with their own hands are often faced with the need to create a number of identical holes at a certain distance from each other. To make the work easier, make it faster, it’s easier not to mark up every time, but to use a template.
Using the jig you can work with different furniture materials: wood, chipboard, MDF.
Jig for drilling holes
Precision drilling, used to connect wooden, metal and other elements with each other, is the key to the fact that the product will be of high quality, without backlash, durable and will be used effectively for a long time. When processing chipboard, OSB, MDF and other materials, it is recommended to use a drilling jig to achieve successful results.
Materials and tools
To manufacture a device, you must first decide on the tasks that it will perform. Accordingly, the necessary material is selected from which the furniture template will be made with your own hands. The most durable, reliable and “long-lasting” is considered to be a metal conductor. To create a furniture jig for drilling with your own hands, it is permissible to use wood, plywood, textolite, and plexiglass. This is due to lower labor costs and cheaper materials. All this is important, especially if you are going to make several different templates yourself.
To make a conductor, a piece of reinforcement, a block or a plate is suitable - something that can probably be found in any garage or home workshop. To make a simple marking device, you can take a regular school ruler - wooden, plastic or metal.
Of decisive importance in the manufacture of the jig is the accurate calculation of the location of the holes on the workpiece. You can take a ready-made diagram or make it yourself. The latter option is preferable, since the dimensions in the drawings must correspond to the tasks being solved.
Tools you will need:
- drill;
- grinder or jigsaw;
- a set of locksmith tools;
- clamps;
- vice.
Need for an assistive device
A do-it-yourself drilling jig helps both in domestic conditions and during industrial processing. This product is a thick metal strip. It has several holes, inside of which there are special bushings - sleeves.
Template makers can be manufactured in different versions, but the task for all is the same - marking for drilling
A step-by-step algorithm that involves using a jig to drill holes in workpieces consists of the following steps:
- determine the drilling location;
- apply a conductor to it;
- fix the device in a convenient way;
- We put sleeves in the holes;
- drill in the indicated places.
Classification of markers
A jig for drilling holes with your own hands is used in various areas of production activity. Based on similar characteristics, similar auxiliary devices are usually divided into several groups:
Jig for drilling holes
An overhead jig with a turret head is suitable for drilling standard holes for dowels of any size
The group is called this way because of the way it is operated. The product is usually installed on top of the intended workpiece and fixed using screw clamps. Less often, at home, it is based on an emphasis on any plane. This way you can mark holes for furniture screws.
Rotary jig for drilling holes
Rotary adapted for working with corner surfaces
This jig is used for drilling at an angle. Comfortable processing is achieved due to guide bushings.
Tilting jig for drilling holes
Tiltable for use on multiple surfaces
The group is involved in drilling on several surfaces located at an angle to each other.
Sliding jig for drilling holes
Universal slider type marker for drilling holes for confirmat and dowels
They are in demand in areas where it is not possible to fix the marker. The guide bushings are mounted on folding bars.
Not only jigs are widely used for drilling holes for confirmation, but templates are also used in mechanical engineering, when it is necessary to make many of the same type of drills in workpieces.
This device has many advantages:
- it is possible to achieve maximum accuracy in finished products;
- ease of operation;
- the ability to repeat the center distance on any surface at a convenient time;
- affordable cost of the finished product;
- You can make a homemade jig for any workpieces and different center distances.
VIDEO: How to make a self-centering jig for drilling holes for furniture dowels
Scope of application
During the furniture assembly process, some drawings indicate where to drill holes where the pins will be located inside. In such a situation, you cannot do without an accurate tool. It will not be possible to align the mates on the parts being connected as clearly as possible with simple markings, so a furniture jig will be useful for drilling holes.
Even a simple device in the form of a strip with a stop greatly facilitates and speeds up the process of making holes of the same type
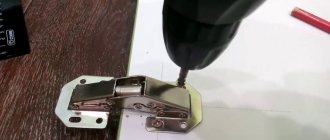
In addition, the templating engine facilitates quick detection of the required points after the marker is located. In addition to holes for dowels, cavities are also needed for mounting door hinges. They can also be made using a rigid stencil.
Marking and drilling multiple holes at an angle or perpendicularly, at the end or on the main surface in a pipe without help is always problematic. This is due to the special geometry of the workpiece. You can also save time and get the desired result thanks to the conductor. The set of auxiliary devices can be supplemented with an installation that ensures perpendicularity of the drill entry.
The difference between store-bought and homemade
The importance of this equipment, which performs an auxiliary function, cannot be overestimated. Some people prefer to make it themselves so that the product has the necessary functionality and is suitable for a specific job. Other experts strive to choose the most comfortable product from the products offered in online stores.
What is it used for?
When manufacturing and assembling elements of furniture structures, specialists have to carry out many similar actions related to both marking locations and drilling future holes. The furniture jig allows you to optimize both of these processes.
According to their functional purpose, furniture jigs can be marking and drilling. The first, as their name implies, are intended to simplify the marking of the locations of future holes. Drilling jigs used in the production of furniture structures exclude the use of marking devices.
Drilling jig for confirmations
Many people purchase a furniture template, designed for preliminary marking of the locations of future holes, in a factory-made version. However, you can make a jig for assembling furniture with your own hands. The easiest way is to make a furniture jig from a metal ruler, to which the crossbar is screwed strictly perpendicularly. This furniture template is a multi-purpose marking device that is easy to make and use. The holes through which the drilling sites will be marked are made in a metal ruler at a certain distance. So, if holes are drilled for a minifix, then the distance between them will correspond to 32 mm, and for shelf holders - 100, 200 or 300 mm.
You can make a simple furniture marking template using a regular carpenter's square as a base, in which holes are also drilled at the required distance. Such a marking device, although more functional, is less stable on the surface of the workpiece. This is its most significant drawback.
The simplest furniture template for handles is a plate with calibrated holes, on the reverse side of which a stop strip is fixed
Using a similar principle, using available materials, you can make highly specialized marking devices (for example, a jig for furniture hinges or for marking holes intended for fixing furniture handles or any other furniture fittings).
Of course, if you have your own serious furniture production and the volume of assembly operations performed is quite large, you should pay attention to professional equipment for furniture assembly. However, the cost of such furniture jigs and templates, especially if they are produced under well-known brands, is quite high.
Homemade conductor for dowels
When manufacturing cabinet furniture, there is a need to be able to accurately and quickly drill into the end of parts. As a rule, this need is due to the use of euroscrews (confirmations), in which holes with diameters of 4.5-5.0 mm (depending on the density of the plate) are drilled into the end of the parts to a depth of 35-55 mm (depending on the length of the euroscrews).
Of course, there are special drilling and attachment machines for such purposes, but they are not readily available to private furniture makers or small organizations due to their high price, plus, the machines are not convenient due to exclusively stationary use. To simplify the work of a furniture maker, jigs were invented - small devices for precise drilling with a conventional hand-held electric drill. Today there are several manufacturers on the market; by paying quite a price, you can buy a ready-made conductor. This article will discuss how you can make a good homemade conductor from available and easily accessible material in a couple of hours. We use ball bearings to guide the drill bushings. The bearings are made of durable steel and will last a long time. In order for the drill to be well oriented in the jig, two bearings are used for each working distance (the bearings are located coaxially one under the other).
To make a conductor (for three working fixed distances) we will need:
- A piece of MDF board 16mm thick.
- A piece of MDF board 10mm thick.
- Six pieces (a pair for each working distance) of any ball bearings with an internal diameter of 5.0 mm, an external diameter of no more than 16 mm. The height of the bearing should be as small as possible and no more than 8mm.
- A dozen self-tapping screws 4×25 mm.
- PVA glue, “Superglue”.
- Furniture foot with internal thread M6 (see photo).
- Screw M6x50. Nut M6. Grover washer 6mm.
Manufacturing of the conductor body.
First, you need to make the case itself. There is no need to explain anything specifically about the body, everything is elementary. The cross-section of the body is the letter “P” with one end (closed) wall. This wall will be used as a stop and will set the zero point, the starting point for drilling. When drilling, the stop is pressed against the end of the part. Main dimensions:
- The external size of the conductor is arbitrary.
- The upper part, in which the bearings will be seated, is made of 16mm MDF, the remaining parts are made of 10mm MDF.
- The distance between the two sidewalls (where the workpiece will be placed) is 16.5 mm, which corresponds to the actual thickness of the plate plus a small gap for ease of installation and removal of the jig.
- The distances between the centers of the bearings and the stop: 50, 70, 100 mm are the most common in furniture practice.
Communities › DIY › Blog › Tools for assembling furniture (personal experience).
In yesterday's topic about building cabinets, a lot of people asked to tell us what tools my friend and I used to assemble the furniture.
I believe that professionals will not be interested in this, and many will even say that they could have made the templates themselves and not spent money. It is possible, but without experience, it is difficult and time-consuming. We took the fast, but costly, route - we bought ready-made ones. However, I am very grateful to everyone who sent me drawings of their templates - it really helped me understand the topic and understand what's what.
In general, as I understand it, two approaches are used to connect chipboard using confirmations: 1) Templates for drilling end and front holes. They can be in the form of rulers (like Cheron) and in the form of drums. They can also consist of entire systems that are attached to a sheet of chipboard. But the general idea is that each sheet is drilled out one at a time. Perhaps you can save time and use another method. 2) Clamps for fixing chipboard sheets at the desired angle (usually 90 degrees) and a confirmatory drill. The advantage of this option is that in one pass we get both holes at once and can immediately tighten the confirmation. It would seem that everything is easy and simple, but now try to combine panels with a length of 2600 and 1200 mm at an angle in an apartment. Hard? running away? yes, and not alone at all (not like in the first option).
Areas of use
Furniture jigs and templates are devices that are practically indispensable when assembling furniture structures. The use of jigs allows you to avoid the main problem that arises when drilling holes - the drill entering the workpiece at the wrong angle. Correcting this error takes a lot of time and effort, and it is not always possible to fix it at all. The jig used for drilling holes not only allows the drill to be correctly oriented at the processing site, but also prevents the tool from straying from the specified trajectory.