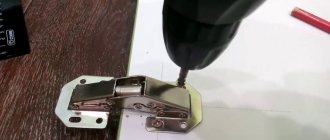
How to drill a hole in plywood without chipping?
It depends on the holes. If the diameter is from 10 to 50 mm, then it is preferable to use Forstner drills - they give a clean cut.
If the hole is through, then it is necessary to drill on a hard, flat substrate, pressing the workpiece tightly against it, for example, chipboard or the same plywood, so that the drill does not tear the material at the exit.
If the hole requires a large diameter, then it is better to use a milling compass. (by the way, there are models of compasses that allow you to cut holes from 15 mm in diameter) one of them is presented on the channel of V. Zhilenko (grandfather Volodya)
There are, of course, simpler devices
Other devices such as crowns, ballerinas, feather drills, etc. do not produce such clean cuts as the above.
First you need to decide on the following:
The hole is through or not through.
Type and thickness of plywood.
Next, we select a drill, for example, we need to drill a through hole up to 10 mm in diameter.
I usually use these spiral wood drill bits for this purpose (it’s more convenient to buy a set right away)
To avoid chipping on the back side of the plywood, precise markings are needed, on both sides.
First we drill with a drill of a smaller diameter, then a larger one.
Marking, we work with a tape measure, pencil, ruler.
Then, so that the drill does not “blink” at the entrance, we make a recess in the center of the hole, for example with an awl.
We set the drill to medium or even low speed.
Hold the drill evenly relative to the surface.
We drill through the plywood to half its thickness.
The same thing on the reverse side (drilling to meet).
That's it, then a drill of the required diameter and there will definitely not be any chips at the exit of the drill.
For large diameter holes, you can use wood crowns, wood ballerinas, etc.
The answer to the question directly depends on the size of the required hole and the instrumentation. As a rule (judging by yourself), only a drill is available.
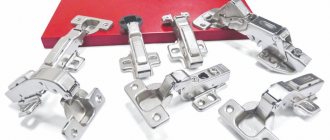
In this case, you need to decide on the choice of drill, and there are quite a lot of types.
- twist drill;
- screw drill;
- feather drill;
- Forstner drill;
- ring drill (crown).
Each type of tool is designed to make different holes in wood. The first three are used if you need to drill through. The “neatest” one in this trio will be a screw drill, also known as an auger drill. Although it is unlikely that it will be possible to completely avoid chips on the back side of the hole.
The last two are intended for making blind holes and the problem described should not arise there.
What to drill with?
Often home craftsmen have had to deal with a situation where they have to use what is available.
Use of 3 drills of different diameters
This method is suitable for small-sized jobs, as it involves huge time costs. The hole is prepared in 3 steps.
- Drilling the entire length of the confirmat through 2 parts. The diameter of the cutting tool must correspond to a similar parameter of the Euroscrew body, but without taking into account the thread (we have already talked about this). This is done so that the helical surface of the thread creates a counter thread in the material.
- Drilling out an existing hole for an even part of the fastener, which must fit tightly, but not too tightly, so as not to tear the material. The expansion is carried out with a drill similar in thickness to the neck, while the depth must correspond to its length.
- Processing the hole for recessing the cap into the material. This is done using a cutting tool of larger diameter. Experts recommend doing this with a countersink to avoid chipping.
Special drill for Euro screed – 3 in 1
Working with a special drill for Euro screed is much easier, because it has a special stepped design, and the entire procedure is completed in one pass.
Another advantage of its implementation is that it simultaneously chamfers the countersunk head of the fastener. In practice, it connects two different diameter drills and a countersink.
In addition, the confirmation drill has a lead with a pointed end, which ensures clear entry of the cutting equipment and does not allow it to move away from the center at the beginning of drilling.
Rules for ordering furniture additives
Drilling is the process of drilling holes in furniture parts. Among the main production operations - cutting, edge application and additives - the latter is the most labor-intensive, and the complexity of drilling parts for the same product can differ several times depending on the qualifications of the designer.
In order to order an additive in the production of Chipboard Kit, you must send us by e-mail a correctly completed order form for chipboard parts (see the section “Price lists, forms”) and drawings of the parts - see detailed information below.
Video: how the additive is made
How to choose and what to pay attention to
Choosing a high-quality circular drill is quite easy. The main thing is to know the main points that you should pay attention to first, but also not to lose sight of the little things.
The design is a very important point: a wood ballerina comes with one chisel or two or more. For frequent use, it is better to purchase an option with two or three cutting elements. It is easier to work with such devices and the quality of the processing performed will be at an acceptable level.
It would not be superfluous to be able to replace individual parts. Inexpensive circle drills can have a solid shank with a permanent center drill and rod.
Metal, its quality determines its strength and ability to withstand workloads. High-quality tools are made from high-strength steel or alloys. The shank and cutter holders are shaped using a machine tool. The rod is usually stamped and made of the same metal.
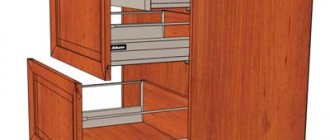
Preparing for furniture assembly: marking and adding chipboard with your own hands
After the furniture parts have been cut to size and all visible ends have been glued with edges, you can proceed to the stage of preparing the furniture assembly. It consists of two parts - marking the holes and adding laminated chipboard with your own hands. This is a rather important stage, the accuracy of which determines the appearance of the furniture and the quality of the assembly.
Strictly speaking, many craftsmen neglect marking and adding chipboard, preferring to use clamps and drill straight away. But this requires having several corner clamps in your arsenal and skill in handling them. Constantly pulling parts together at right angles in order to accurately drill and tighten them onto confirms, and then unscrewing them is quite labor-intensive and time-consuming. It is much more efficient to first mark the parts for fasteners, drill holes, and then assemble the furniture.
Societies › DIY › Blog › device for drilling holes in furniture
I'm not a furniture maker, but I had to redesign the cabinet, dismantled the old one, ordered the newest sides and assembled it at home for confirmation. So that the holes were even and accurate, I came up with such a device from waste. At first I made only a vertical hole, but later I made a horizontal one strictly in size. It’s comfortable to drill on the sides - you don’t need to create a marking, just move it close to the edge with a strobing pin and clamp it, and mark the middle hole. Because the holes were precise and I made three times less markings for them, the cabinet became faster and lighter. I think maybe someone will need my idea. More photos in the blog.
Crown with a hardened tooth
A crown with a hardened tooth at first seems like a good idea: the cutting part is thin, which suggests the idea of precise holes in thin material such as plastic or fiberboard. But we’ll see how to drill a hole in the chipboard in a minute.
As in the previous case, this tool is not intended for blind holes, unless for lack of a better one and unwillingness to purchase the same Forstner cutter. The photo shows that you can knock off the inside with a chisel, but the bottom may remain uneven.
Drilling holes in wood with such a tool showed its complete inability to produce the exact specified diameter in the material. When measuring, the size of the hole was as much as 34.6 mm (.), although we used a 32 mm nozzle, as required by the experiment. Add here the uneven and torn edges of the hole - the tool does not deserve attention among professionals. At the moment, after using four tools, this one is the most inaccurate. It is noticeable in the photo that the cutting part near the teeth is much wider than near the base of the crown. Why this happened is a mystery.
Mistakes when working with a jigsaw
If the technological subtleties are taken into account, but the cut line turns out to be crooked and with many chips, there may be several reasons.
The master has little experience working with a jigsaw. You need to practice more and as a result you will be able to cut as it should.
The material is not secured securely enough and moves out of place when cutting, or is fixed inconveniently for the person doing the work.
If the process is performed by a worker without experience, it is necessary to use guides, and when making complex shapes, a special pattern. If this is not possible, the quality of the cut can be improved by reducing the speed.
The main reason why a crooked cut is obtained is a malfunction of the tool or blade. In this case, there is a high probability of chipping, the file moving to the side and becoming dull. An incorrectly selected blade for a specific material will lead to it breaking repeatedly during work and the result will be of poor quality. It is worth carefully inspecting the jigsaw and eliminating the damage.
Too much emphasis on the jigsaw leads to excess pressure, which also negatively affects the final cut.
To cut material with a jigsaw, it is not necessary to have many years of carpentry experience; it is important to listen to the advice of professionals and follow the technology for working with the tool
Preparation and completion of work
Before cutting a circle in plywood with your own hands, you need to drill holes for the tool. It is important to choose the drilling location, because... in one case you need the cut out circle itself, and in the other - the outer side. A careful hole is made 5-8 mm away from the edge in the part that will go to waste, then the tool is adjusted, and work can begin. In the case of a milling machine, the hole is made along the path of the tool in a circle, because It will be difficult to expose it later.
After the cutout is ready, you need to sand it with coarse sandpaper.
At this stage, the quality of the working tool is checked, because With good sharpening and successful work there will be no chips.
But you shouldn’t be upset if you have them, because... everything can be compensated for with subsequent finishing.
Hole in chipboard
Hole in chipboard.
When making furniture with your own hands, the operation of drilling holes in the parts is perhaps the next most important place after sawing them. Technologically, drilling holes in chipboard is not much different from drilling other materials used in furniture production, therefore all the methods for making holes described in this article are also applicable to fiberboard, wood and other materials. A well-made hole is characterized by three main indicators: the absence of chips at the drill’s entry into the workpiece, a clean cut inside the hole, and the absence of chips at the drill’s exit from the workpiece.
The first question that arises when it is necessary to make a hole in a chipboard is what? and the next question will be - how? To get the correct answer to these questions, let’s divide the holes by diameter into three types, select a tool for each of them and consider the features of their manufacture.
- Small diameter holes from 2 to 12 millimeters are best drilled with ordinary wood drills.
- Holes of average diameter from 10 to 50 millimeters are made with special drills, such as a feather drill or a Forstner drill.
- Large diameter holes from 40 to 200 millimeters are drilled with special cutters or an adjustable drill (ballerina).
For holes of larger diameter in furniture parts, the term drilling should no longer be used and, accordingly, a tool should be selected like an electric jigsaw or a hand router.
Choosing the right drill
Regular twist drills are inexpensive. They are considered universal and are designed for drilling wood, metal and plastic. Typically, their tips sharpen the floor at a 118° angle for most applications.
But due to such an obtuse angle, the drill can deviate to the side at the beginning and tear out wood fibers at the exit, so reserve these drills for plastic and metal, as well as for holes with a diameter of less than 3 mm in wood (thin drills have less pronounced drawbacks). For holes with a diameter of 3 to 13 mm, choose drills with a central point designed specifically for wood. The tip of such a drill prevents it from moving to the side at the beginning of drilling, and the side cutting projections (the so-called trimmers) help reduce chipping.
Marking drilling locations
In order to perfectly fasten two parts, it is necessary to mark the places of their fastenings as accurately as possible.
On the part that will be applied to the end (the one on which there will be a through hole), you need to make two measurements - along the length (usually 5-10 cm) and from the edge - exactly 8 mm (this is if the thickness of the plate is 16 mm).
On a part that lies perpendicular, mark the drilling point at the end. Here you need to maintain the same distance in length (5-10 cm from the beginning), and in width - strictly in the center (8 mm from the edge).
Markings must be done as accurately as possible, especially along the length, because If the markings are incorrect, your parts may have extra gaps or protrusions when joined.
It is better to make a through hole in the first part, attach it to the second - and immediately use a drill to mark the drilling location at the end of the second part. And then, separately, calmly drill the hole.
Cutting Tips
Jigsaw
As we noted above, a jigsaw will come in handy if we are looking for how to cut a word out of plywood or make other parts of complex shapes:
We transfer pre-printed drawings or templates onto the workpiece using carbon paper.
Figured carving with a jigsaw: photo of the finished product
- If the structure has through sections, we make starting holes with a thin drill.
- Insert a file or jigsaw blade into the hole. Secure the free end of the file with a fastening screw or clamp.
- We make a cut along the intended mowing line, pressing the workpiece to the workbench. The saw moves either automatically (for electric jigsaws) or manually.
After all the arc elements have been sawn, we remove unnecessary areas and process the finished part with a file or sandpaper. Finished hole
Re: Round holes in chipboard?
I'm making an attachment for a jigsaw. Some jigsaws include this in the kit, but often there is an inaccuracy there. The bottom line is this: a rigid metal strip is attached perpendicular to the jigsaw frame, in which a hole is drilled at the required distance from the saw (the radius of the future hole), this hole is the center of rotation. I screw a screw of a suitable diameter through this hole into the center of the circle being cut out. It is important that the perpendicular drawn through the ends of the saw teeth passes strictly through this center, otherwise the saw will lead away. You need to take a saw that is not so narrow as it is thin, with a significant set of teeth. And measures must be taken to ensure that the saw does not dangle in the swing plane; this is the main drawback of almost all jigsaws. This way I can cut circles with a diameter of 75 mm (limited by the distance from the saw to the edge of the bed) to several meters. The result is almost perfect. There is one more trick. As I cut out the circle, I hammer wooden wedges into the already cut slot, thereby fixing what is being cut out relative to what remains. Otherwise, at the end of the cut, the center of rotation may shift quite far from the initial position, and the smaller the diameter of the circle, the relatively greater the displacement. The result is an unpleasant “step” at the exit. Wedges allow you to reduce this effect to a minimum.
Big hole
When drilling into a polished slab, place a felt washer on the drill, which will protect the surface of the slab from damage by the drill chuck, even if the drill goes through. By drilling a small hole at the end of a crack that has formed in a piece of plexiglass or other material, further development of the crack can be stopped. There are many devices for cutting large diameter holes in sheet material: plastic, plexiglass - plastic, plywood, chipboard, etc. A bracket is bent from a strip of steel 2 - 3 mm thick, its ends are sharpened, a hole is drilled in the center, then the bracket is put on a bolt with pre-sawed head. To operate, the device is clamped in the chuck of an electric drill. We suggest using a roller from a glass cutter for engraving on metal, glass, and plastic.
Wood ballerina: adjustable drill bit or how to make a large hole for drilling large diameter round holes. various: wood, fiberboard, chipboard, MDF, plasterboard, plastic. General.
Drill saw
Neither a hand saw nor an electric hacksaw will help if you need to cut a small hole in the workpiece - less than 10 cm in diameter. A jigsaw may also be useless if the workpiece is large. In this case, the most suitable tool is a drill saw. With its tip it bites into the wood like a drill and thus makes a “starting” hole for further cutting. Externally, the saw is similar to a round file with the difference that its shaft is surrounded by a spiral around the cutting edge.
Drill saws are available with interchangeable attachments of various diameters, designed for processing both soft and hard wood, as well as a variety of materials made from it.
The working body of a drill saw is a metal rod with a cutting tip, like a gimlet, and a cutting edge that goes around the rod in a spiral.
This is what the narrowest of hand saws looks like. Thanks to the fastening unit, the blades in the hacksaw can be changed depending on the nature of the material being processed.
Drill attachment
One of the most popular and convenient options for cutting a hole is a special attachment for a drill. It is made in the form of a crown comb and has a rounded shape. With this attachment, cutting holes occurs quickly, and they turn out quite smooth.
drill bit for holes
Nozzles come in different diameters, which allows you to cut a hole of the required diameter. If you have already prepared a hole, we can advise you to try your hand at options trading.
Drill
You can also cut a large hole using a drill. To do this, it is necessary to pre-mark the outline of the hole to be drilled. Next, use a small drill to drill through holes along the contour prepared in advance. Next, using a jigsaw or a very sharp knife, we cut off the holes, thereby connecting the holes. After which you can smooth the circle using sandpaper of various grain sizes.
Read also: What is laser cutting on wood
Chisel
You can also cut the required hole using a chisel. It is enough to remove the wood layer by layer along the contour. This option is the least suitable for interior decoration. The hole must be smooth, which cannot be achieved by using improvised and unsuitable materials for the job. The best option would be to use a drill bit. The hole is even and has smooth edges.
Thus, to summarize, it becomes clear that you need to choose a tool for cutting a hole based on your goals. If you need a high-quality cut, then you cannot do without a special tool.
As it turns out, not many people know that you can easily cut a perfectly round hole of any diameter in plywood.
And I decided to share this method with you.
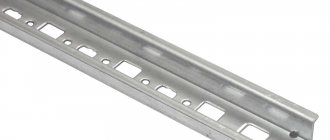
To do this we need a piece of rail and two self-tapping screws.
Divide the diameter of the future hole in half and put two marks on a piece of wood.
Then we drill according to the marks.
And screw both self-tapping screws into the drilled holes so that their ends protrude by 5-8 mm.
Now we align the first tip of the self-tapping screw to the center, and with the second, applying a little force, rotate it around the axis
Having reached the middle of the thickness of the plywood, we turn it over and perform the same operation. Don't worry about the center getting lost. Scrolling in place, the central self-tapping screw drilled a hole.
Using the example of a piece of krages, you were convinced that it is not so difficult to cut out a perfect circle without special tools.
In this way I cut holes in 10 mm thick plywood.
And of course, in the video you can watch the whole process in detail.
BEING THE AUTHOR OF THIS ARTICLE, I PROHIBIT COPYING TEXT, PHOTO AND VIDEO MATERIAL FROM THIS SITE TO OTHERS.
Hole in chipboard
You should not put pressure on the saw. Take your time - be patient. As an additional insurance, you can use wide adhesive tape, in the middle of which you should cut. This is especially important for slabs with a coating, such as varnish. In this case, it is better to even cut through the coating with a sharp knife. Of course, if you don’t care about the quality of the edge processing, you can cut the chipboard however you like.
Another action is drilling.
The advice is this: first make a hole in the chipboard with a drill with a diameter three mm smaller than required without special precautions. Then do the same with the desired drill, which will follow the path of the first. Since the material easily crumbles when drilling, it is necessary to strictly monitor the correct position of the drill so as not to get a funnel. If chipping on any side is undesirable, then you need to first drill one side to a small depth, then make a through hole on the other. Another option to avoid chipping is to place another chipboard under the drilled chipboard. The drill should have a sharp edge and should preferably be drilled at a fairly high speed. For through holes, a metal drill is preferable to a wood drill. Do not put pressure on the drill at the end. There are special confirmed drills for Euroscrews. They simultaneously form a cone for deepening the screw head. Drilling blind holes requires special skill.
Final touches
Finishing the edges of chipboard is done using a plane, rasp and file. It is necessary to guide the tool from the outer edge of the slab to the inner edge so as not to add creases. Very minor roughness can be improved with sandpaper.
When working with different types of wood, you always need to know the detailed variations in its processing. Before you cut a circle in plywood, you need to know all the options, because you often have to adapt to the situation. There are many options for carrying out such an undertaking, and they differ radically.
In order to cut a circle from plywood, you can use both professional tools and improvised means.
Main dimensions
There are no GOST standards for Euroscrews - they are manufactured following European standards such as 3E122 and 3E120. They have a very wide list of sizes: 5x40, 5x50, 6.2x50, 6.4x50, 7x40, 7x48, 7x50, 7x60, 7x70 mm.
The most common of all those named is 6.4x50 mm. The hole for the threaded part is created with a 4.5 mm drill, and for the straight part with a 7 mm drill.
When working with other confirmations, the following principle is observed: proportionality between the diameter of the hole for the area with protrusions and the diameter of the rod, while the height of the thread is not taken into account. In other words:
- Euroscrew 5 mm – drill 3.5 mm;
- Euroscrew 7 mm – drill 5.0 mm.
The assortment of Euroscrews is not limited to the presented list. There are even such unusual sizes as 4x13, 6.3x13 mm.
Using confirmations without taking into account their traits will definitely lead to trouble. Without much effort, you can damage a large part by choosing the wrong fastener. The choice of thread diameter is of particular importance. Thick fastener components tear soft materials, this often happens when working with chipboard. The length should ensure that the end is firmly attached.
Re: Drilling ends for confirmations (with a router?)
No conductor can save you from crooked hands. The end-to-end additive is rehearsed on a piece of material if necessary. 5 holes is enough to understand whether this is your activity or not. Conductors, countersinks, typesetting drills for confirmations are complete nonsense for the pros. For confirmations there are 3 diameters of drills: 4.5-5mm (in the end), 6.8-7mm (in the plane), 10mm (countersink the hole for installing the screw head “sunk” if necessary). This applies to chipboard. If you have a furniture panel, then a plug is needed to cover the screw head. That's all.
Threat, conductors use small vehicles without a machine park to speed up work. The whole thrill of the conductor is not that it does not allow the drill to swerve, but that with its help you do not need to make markings.
Rules for smooth cutting with a jigsaw
To obtain a straight cut:
- Prepare all necessary auxiliary devices.
- Select a suitable saw blade.
- Fix the workpiece well.
In some cases, the material being processed is sawed with its face down. You can familiarize yourself with the cutting and tool management techniques by watching the training video. During work, be sure to follow safety rules.
When a jigsaw cuts crookedly, how to fix it is the first thing the craftsman thinks about. Perhaps the problem is with the file: chipped teeth have appeared or the blade has become dull. The reason may also lie in the breakdown of the tool itself. It is difficult to fix problems on site; diagnostics and repairs are required.
When sawing you need to follow simple rules
Fastening material
Thanks to reliable fastening to a strong, stable surface of plexiglass, wood, laminate, metal and other materials, you can achieve a more even cut. The workpiece being processed is secured between the clamps in such a way that it does not touch them when sawing.
Marking the cut line
The applied markings will help you cut the board accurately and cleanly. Before starting work, draw all the necessary lines with a pencil and a ruler, taking into account the required dimensions. If you have to do figured cutting, then first apply the pattern on paper, and then copy it onto the material. Be sure to use an even strip that will act as a guide, otherwise the file will move to the side. Some electric jigsaws have a laser beam. It is possible to use it to guide the tool more evenly, but it is not advisable to abandon the rack.
Guide rail for jigsaw
This is a metal ruler with a groove. The latter is needed in order to install a special soleplate for an electric jigsaw. The sole of the tool will move along it as if on rails, and the work will become much easier.
Almost all guides have rubberized strips that prevent the tool from sliding over the surface of the material being processed. Small clamps are additionally used for fastening. When using a guide rail, markings are first made and then fixed. Then the jigsaw moves around the device and cuts smoothly.
Most modern construction tool manufacturers produce special guide bars that are tailored to their products. The main disadvantage is low versatility, which is limited to working with jigsaws from this particular company. But there is a multifunctional Line Master guide that has an adjustable sole.
Guide rail for jigsaw
Wood cutter (“ballerina”)
The third experiment started unsuccessfully with an attempt to establish the required diameter of 32 mm. The fact is that this tool has an extremely inconvenient scale for setting the required diameter. We warn you in advance: before drilling a hole in chipboard or other material, you will have to suffer in the literal sense of the word. Perhaps there are more successful models, but we purchased this one - we will fool ourselves.
So, with grief the diameter has been set in half, we begin drilling. As with a feather drill, you will not be able to make a blind hole.
1/2 pass
This will be prevented by a guide drill, which will not leave a through hole in too thick material. Also, the inside of the material is not drilled out; the best you can hope for is further work with a chisel. Conclusion: the tool is absolutely not suitable for a blind hole, unless there is no other tool, accuracy is not important to you and you have free time to fool your head.
Entrance
Towards the end of the drilling, the characteristic smell of burnt wood became noticeable. What it was became clear after measurements. So, the inlet had a diameter of 32.7 mm, and the outlet had a diameter of 31.7 mm. It turns out that it was precisely because of such a big difference that the material began to burn, since the cutting part was already standing on its base.
Exit
It was possible to drill a hole with a “ballerina” in the chipboard, as can be seen from the photo, with a bitter result: the edges are torn, the diameter of the hole is much different, and even different on the reverse sides. The only thing that turned out to be more or less satisfactory was the inner surface of the hole wall. When compared with previous tools, the wood cutter gets a rating of 3 with a minus.
It is noticeable that the surface is slightly burnt
An interesting point: we decided that setting the required diameter would be more accurate if we set it to whole numbers. We set it to 60 mm, drilled it, measured it - we got 58 mm. Conclusion: for imprecise work, a “ballerina” will do for lack of a better tool.
Confirmation drill – three in one
Working with a special confirmat drill (cutter) is much easier, since it has a special stepped geometry, and the entire operation is performed in one pass. An additional advantage of using it is that it simultaneously chamfers the countersunk head of the hardware. In fact, it replaces two drills and a countersink of different diameters. In addition, the confirmatory cutter has an insertion part with a sharp tip, which ensures precise insertion of the tool and eliminates the risk of it being pulled to the side at the beginning of drilling.
Using three drills of different diameters
This method is suitable for small volumes of work, as it requires more time.
Hole preparation is performed in three approaches: First step
– drilling through two parts for the entire length of the Euroscrew. The diameter of the drill must be equal to the diameter of the screw body without taking into account the thread. This is done so that the threads can cut a counter thread in the material.
Second step
– expansion of the already obtained hole for the smooth part of the hardware, which should have a tight fit, but not too tight, so as not to split the material. Reaming is performed with a drill equal to the thickness of the neck and to a depth equal to its length.
Third step
– countersinking a hole to deepen the head into the material. This can be done with a drill of a larger diameter, but to obtain a high-quality result without chipping, it is better to perform this operation with a countersink.
How to cut a round hole in chipboard?
However, if you choose the wrong tool for a particular surface material, the drill may become dull or even break, and scratches and cracks may appear on the surface. To prevent this from happening, you need to know certain nuances of doing the work. How to drill, how to properly prepare the surface and select a drill, we will consider further. The tool must be held correctly in your hands. The drill should be positioned straight and enter the surface in a vertical direction. To make drilling easier and more accurate, you can use an additional handle, which usually comes with the drill. Based on what type of surface you are working with, you need to select the material and size of the drill and determine the operating mode of the tool.
Support the workpiece from the reverse side
Regardless of the type of drill bit, when metal penetrates wood, the unsupported wood fibers on the back of the workpiece are torn, resulting in chips. Therefore, you should not forget to support the back side of the material with a trim
boards. The backing scrap supports the fibers where the drill exits and prevents a sharp increase in feed at the end. When making holes on a drilling machine, simply place the scrap under the workpiece, and when using an electric drill, secure it with clamps. If at the beginning of drilling the fibers around the hole rise or small chips form, apply masking tape to the surface, and then mark the center and start drilling.
Hole depth and width
Usually a confirmat size of 6.4*50 is used. Because the thread diameter is 6.4 mm, and the diameter of the confirmation body is 4.4 mm, then for high-quality fastening of parts, the hole diameter must be in the range of 4.5-5 mm and a depth of at least 50 mm.
If the thickness of the hole is greater than the specified one, the confirmat will not hold the parts well; if it is less, its thickness can tear the chipboard.
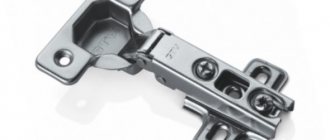
For drilling, use a confirmat drill with a diameter of 4.5 mm, which is equipped with an additional head for drilling an enlarged hole for the neck of the confirmat, which also makes a countersink for its head.
Of course, you can use a regular drill with a diameter of 5 mm, but for high-quality fastening in the hole you will additionally need to make space for the neck of the confirmat and its head.
In order to perfectly fasten two parts, it is necessary to mark the places of their fastenings as accurately as possible.
On the part that will be applied to the end (the one on which there will be a through hole), you need to make two measurements - along the length (usually 5-10 cm) and from the edge - exactly 8 mm (this is if the thickness of the plate is 16 mm).
On a part that lies perpendicular, mark the drilling point at the end. Here you need to maintain the same distance in length (5-10 cm from the beginning), and in width - strictly in the center (8 mm from the edge).
Markings must be done as accurately as possible, especially along the length, because If the markings are incorrect, your parts may have extra gaps or protrusions when joined.
It is better to make a through hole in the first part, attach it to the second - and immediately use a drill to mark the drilling location at the end of the second part. And then, separately, calmly drill the hole.
We make a hole at a distance of 8 mm from the edge.
The drill should ALWAYS be held strictly perpendicular to the surface.
Before making a through hole, place a piece of unnecessary chipboard under the part. This will prevent chips from appearing on the reverse side.
When the through hole is made, the part can be drilled on the fly to drill holes for the neck and head of the confirmat.
The main rule is that when drilling at the end, the drill must be strictly perpendicular to the end of the part. If you don't hold the drill straight, the drill bit may go sideways and come out, ruining the part.
When drilling, you need to pull the drill out several times so that chips do not clog in the hole.
This option is considered the most accurate and, moreover, the fastest. But in order to make a hole in two parts at the same time, you will need to fix them before drilling. To do this, you may need special clamps, clamps and other devices.
Hole Drilling Tools
In order not to mark 8 mm from the edge each time both into the layer and at the end, you can use a special device, which, by the way, is easy to make yourself.
It is a kind of wooden template with a metal sleeve for a drill inside.
It looks like this, see photo:
And this is a more professional thing:
Watch a short video on how to accurately drill holes in chipboard for confirmations and assemble furniture parts:
When drilling, the chipboard breaks out the bottom layer of the laminate
All comments and moralizing are of an exclusively humorous nature. They do not in any way affect the honor and dignity of the interlocutor of the shabby Cat from the window.
Those who help people are wasting their time.
You cannot become famous for good deeds.
#3 OFFLINE DEDAlex
- Gender: Man
- City: Severodonetsk/Moscow
- Interests: Curious generalist amateur
- From:Ukraine/Muscovy
It is necessary to make through holes from 3mm to 6mm in millimeter increments.
Exactly with 1mm STEP? Well, with such diameters it almost turns out to be a groove. Well, even if there is a gap of 1 mm - what kind of need is this, won’t you devote it? The standard pitch in furniture is 32mm. A millimeter. Well, that's not the point.
There are drills specifically for through and blind drilling of chipboards; they are used in drilling and additive machines and in drilling groups of machining centers. In order not to give preference to any manufacturer/seller: https://www.google.r. iw=1067&bih=733 Starting from a diameter of 4mm, they come with a 10mm shank with a flat, so it is not recommended to clamp directly into a 10mm collet; it is better to use an adapter.
#4 OFFLINE yaso73
- Gender: Man
- City Novosibirsk
- Interests: I really like to live. I really don’t like it when people stop me from doing this.
- From:Novosibirsk
All comments and moralizing are of an exclusively humorous nature. They do not in any way affect the honor and dignity of the interlocutor of the shabby Cat from the window.
Those who help people are wasting their time.
You cannot become famous for good deeds.
#5 OFFLINE CeRuR4
- From:Moscow
Yes, I wrote something ambiguous. The step in millimeter is for diameters, i.e. diameters 3, 4, 5 and 6mm.
#6 OFFLINE DEDAlex
- Gender: Man
- City: Severodonetsk/Moscow
- Interests: Curious generalist amateur
- From:Ukraine/Muscovy
Well, what's the step? What kind of machine (what kind of spindle)? What will this actually result in?
The more information from you, the more advice from us. Something like this.
#7 OFFLINE vv92
- Gender: Man
- City: N. Novgorod
- From: N. Novgorod
#8 OFFLINE CeRuR4
- From:Moscow
I wanted to take a picture of the table to vent my pain)))
In general, the story is this machine - a domestic BigZee craft with a 4.5 kW HSD spindle without a quick release, now I’m amazed at how much time is spent on changing tools, the table is like this:
They threw 25mm MDF on it with a bunch of holes. We tried using these clamps https://www.festool. 030&name=mft-sp for fastening ready-made workpieces into which screws cannot be screwed. But the clamps lift the part a little, the idea didn’t work out very well.
Although the table itself is prepared for vacuum. But. when I wanted to purchase an additional vacuum pump, the sellers said that this was an “advertising” table and would not be suitable for fixing laminated chipboard and MDF.
So the first question is, is this true?
In principle, there are no problems with processing MDF. The screws hold the sheet with a bang + the removal of chips down prevents the parts from dangling.
But we need to beat the machine quickly. And they decided to cut and attach chipboard. It didn't work out. There is no vacuum, the sheet bends and vibrates. As a result, chips, even jointing does not help. We cut it with a 12mm diamond like this
Although nothing depends on the cutter. Banana leaf, what is the bottom edge.
Then we decided to try seating blanks that had already been sawn on the format. But again the bottom laminate breaks out.
#9 OFFLINE DEDAlex
- Gender: Man
- City: Severodonetsk/Moscow
- Interests: Curious generalist amateur
- From:Ukraine/Muscovy
It's clear. Well, as I already advised, use drills from an additive. To quickly change tools, you don’t need to invent anything. There are several standard quick release chuck systems available on drilling and attachment machines. https://www.google.r. iw=1067&bih=733 We have Vitap, there are no complaints about the system. But the choice is yours. Each tool is clamped into its own individual quick-change chuck. At the end of each drill there is a reclining screw, which is unscrewed from the shank and rests against a pin in the chuck. Thanks to it, you can adjust the protrusion of the drill from the chuck (for example, after re-sharpening). All you have to do is make an adapter that copies the additive spindle of the selected system. The time to change the drill is 2 seconds, if you work with two hands - we remove it with one, and put it in with the other. It would be useful to make an annular spring-loaded clamp on the spindle, pressing the workpiece at the drilling site, to prevent vibrations - the workpiece is not pressed by a vacuum. And in this case, for fastening the workpieces, basing stops on both sides and eccentric or lever (type Clamp) will be sufficient. on the opposite side of the part, pressing it against these base stops. Sharpening through drills allows you to drill without chips and extend “into the void” on the reverse side. Well, what about the backing?
#10 OFFLINE CeRuR4
- From:Moscow
I recently bought a Vitap Alfa 35, but it didn’t take root. Everything is drilled in the old fashioned way with a drill on the knee. In the morning I looked at what kind of system it was. Ours has pneumatics. Convenient, but again a bummer for the router.
But what if you grind off the threads on something like this?
There M10, without thread it will be almost 8mm.
#11 OFFLINE DEDAlex
- Gender: Man
- City: Severodonetsk/Moscow
- Interests: Curious generalist amateur
- From:Ukraine/Muscovy
This is the kind of adapter you need to make, clamped into the collet of your spindle. And you can change cartridges with drills by hand in two seconds. And the pneumatics there are at working feed - it has nothing to do with changing cartridges. Chucks with tools are changed manually - you go to the machine and figure it out
The chuck in your photo is still an ancient Scheer standard (not quick-change) - I don’t see the point of turning it and clamping it into a collet - it won’t add any speed to changing drills.
Topics with similar tags Chipboard processing, Drilling, Drill
Drilling holes in aluminum profile
- 40 Replies
- 1
- ShadowVoice
- 20 Jul 2021
Drilling solid wood
- 3 Replies
- Engineer
- 19 Feb 2020
Milling a kitchen countertop
- 15 Replies
- 2
- kolokop
- 26 Jan 2019
Program for creating NC drilling of 50,000+ holes
- 16 Replies
- 2
- Pato
- 16 May 2018
Ncstudio 5.5.60 with support for hole center search and drilling cycles
- 4 Replies
- 2
- PashaCNC
- 03 Nov 2020
Number of users reading this topic: 0
0 users, 0 guests, 0 anonymous
- CNC World is a forum for lovers of CNC machines and everything connected with them...
- → Milling and engraving equipment
- → Production issues
- → Working with wood (MDF, chipboard, Cardboard/Paper)
- Privacy Policy
- Ignorance of the forum rules does not exempt you from responsibility! ·
- You are using the theme that best suits your browser Click here to select a theme
- Help
Power tools or hand tools?
Tools and materials:
- drill;
- jigsaw;
- hand jigsaw;
- milling machine;
- nails;
- rope;
- chisel;
- hammer;
- stationery knife;
- sandpaper;
- compass.
When determining the diameter of the future circle, it is necessary to take into account the dimensions of the working cutter.
The most popular option among all is a jigsaw. This tool allows you to cut not only circles, but also any other geometric shapes. Its only disadvantage is the need to form additional grooves at turning points (corners), but this is not noticeable when creating a circle. It is very important to choose the right nail file, because... they come in 3 types: vomiting on the left, vomiting on the right, vomiting on both sides. After the canvas is selected, cut out a circle of any size.
An ordinary hand jigsaw.
Before cutting a circle from plywood using this tool, you need to make sure that the workflow is accessible. The main difficulty is the limitation (usually up to 30 cm) due to the physical structure, i.e. It will not work in deep places. When starting work, not from the edge, but directly from the center, the nail file is threaded last.
Milling machine. A very convenient option, but it requires rigid adhesion to the surface, for which a self-tapping screw is screwed into the center of the circle. A circle can be made of any diameter, and very quickly. Sometimes there is not enough working handle, which is why you have to make all sorts of improvised brackets, which can be a channel, a profile, a block, a board or even a rope, but with a rigid hitch it is much more convenient. This tool makes a fairly wide hole, so before starting work you need to carefully measure the future structure.
It is necessary to select only sharp nails, and sand the edges of the resulting workpiece with coarse sandpaper.
Nails. A very popular method in cases where the work must be done “yesterday”, but the tools will not be available soon. It is worth noting right away that the work ends up being quite rough, so it is used as a last resort. All you need is a hammer, 2 nails and a rope. One nail is driven into the center of the hole, and the other is pulled on a rope to the required length (radius), after which a circle is drawn with a firm movement. Such circles with pressure continue until the circle is finally cut out. At the very end, the nail is removed from the hole, turned over and carefully beaten with a hammer to achieve a more accurate seam.
Chisel and stationery knife. Here everything is much simpler, because first you need to draw a circle with a compass (pencil), after which this circle is circled several times with a stationery knife under pressure.