Many people are in no hurry to part with old furniture and resort to do-it-yourself cabinet restoration. Let's talk about how to do this at home, without financial or physical costs.
Many people are in no hurry to part with old furniture and resort to do-it-yourself cabinet restoration.
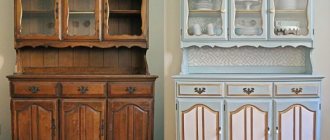
Restoring an old cabinet is a painstaking task, but you can do it yourself. Many houses have old furniture, creating a nice and comfortable nest for families. This is why people came up with the idea of restoring old things so that they could take on a new look and bring joy for several more years.
Restoring furniture with your own hands is not only exciting.
Basic cabinet makeover tools can be found in every home. If for some reason you don’t have tools at home to work with old furniture, you can easily purchase them at the store.
The decor of the cabinet can be fixed with patterns or pasted over with various fragments from old albums and books.
When starting work, inspect the location of your furniture, what colors and tones should be chosen.
Restoring an old cabinet is a painstaking task, but you can do it yourself.
The main advantage of restoration at home is that the bulky cabinet does not have to be taken outside its abode. The second plus is that you watch the whole process yourself and it’s easy to make any changes. About the third, as mentioned above, all tools are easily accessible.
Each master puts a piece of his soul into his products - this is not a metaphor.
When restoring a cabinet without the help of specialists, you estimate the cost of the work, which also has a positive effect on your budget.
This is why people came up with the idea of restoring old things so that they could take on a new look and bring joy for several more years.
In general, only creative people can cope with such work, since they need to choose the right tones, shapes, and more. But if you approach your work more responsibly, then, perhaps, even without much talent, you can transform your old wardrobe, which has remained necessary for many years.
Basic cabinet makeover tools can be found in every home.
What you need
The components that will be used during the restoration of the product depend on the chosen work method. If you don’t have specific decorating skills, don’t despair – we recommend paying attention to the following types of work:
- painting the cabinet;
- use of craquelure varnish;
- Decoupage technique.
Decoupage
Painting
Craquelure
The indicated methods of repairing a product can be carried out even by a teenager. Restoring a cabinet with your own hands requires having an idea or choosing the style of the future masterpiece. To do this, you should turn to the existing interior: if it is made in a vintage style, the craquelure varnishing technique will do. If the interior is made in a classic style, choose painting followed by applying an image. When the design of a room requires elements of romance, decoupage is a good solution.
Restoring a chipboard cabinet begins with repairing visible defects. To move on to decorating the facades and ends, you should carefully inspect the hinges of the product and check the integrity of the fittings. Open the cabinet and inspect the drawer mechanisms and check the interior for chips and holes. All noticed defects must be eliminated. This can be easily done with a hammer and nails, as well as by replacing faulty mechanisms with new analogues.
A universal list of tools for restoring an old cabinet with your own hands looks like this:
- sandpaper or sanding machine - to give the plane a flat and smooth surface;
- a screwdriver or screwdrivers along the diameter of all bolts - for possible adjustment of the product and removal of fittings before cleaning;
- spatula - for covering holes and chips;
- a paint roller and a narrow brush - in order to renew the coating;
- wood glue or PVA;
- set of screws for replacement.
Directly for the decoupage technique you will need napkins with a pattern or ornament, acrylic varnish, and a special thin synthetic brush with fan-shaped bristles. Also, restoration of an old cabinet requires the presence of a primer, wood putty, paint for painting, and masking tape. To use craquelure you will need a varnish of the same name.
It is necessary to immediately decide on the idea of restoration, because without an idea it will not be possible to make a beautiful product. Consult with your household and find out about their wishes.
Tools and materials for decoupage
Expert advice
Restoring furniture yourself is not easy, but it is possible. Don't be afraid, even if something goes wrong, you can always fix it.
- It is best to carry out restoration work in a special room. A garage, loggia or balcony are suitable. If this is not possible, you need to prepare the room. Cover the rest of the furniture with film, take out carpets and textiles. Cover the floor.
- Prepare tools and materials in advance. Don’t rush to buy a power tool; you need it if you have a lot of furniture to restore. In another situation, you can rent it.
- Restoration can take a long time, so don't expect quick results. Quick-drying materials can speed up the work.
Stages of restoration using painting
Before studying a master class on painting clothes storage products, it is recommended to carry out preparatory work on wood. These include cleaning and sanding the old coating. It is important to achieve a smooth surface so that when painting the brush applies the composition evenly.
For small areas, use sandpaper; for larger areas, use a sander. The final stage of preparation always involves using the finest grain sandpaper.
As soon as work with defects is completed, decorators advise moving on to primer. This stage is no less important than the painting itself. It is necessary to restore an old cabinet with your own hands with high quality, so primer will be an excellent solution: it will hide all the cracks and fill the pores. In addition, the coating treated with primer will absorb less of the coloring composition.
After waiting for the product to dry completely, we restore the cabinet using paint:
- unscrew all the fittings that will prevent the brush from penetrating into narrow places;
- those elements that cannot be removed are sealed with masking tape to preserve their original appearance;
- When painting wood, it is better to use special acrylic compounds - they adhere better to the surface and create a protective layer of film. Pour the paint into the roller container and get to work;
- First we process all the internal elements: shelves, compartments, mezzanines. After this, we proceed to painting the facades, as shown in the photo;
- After the first layer has dried, apply a second, and if necessary, a third layer of paint. This is necessary to achieve color brightness and complete coverage of all gaps;
- The dried cabinet must be opened with varnish in several stages.
Restoration experts advise you to use your imagination and make the cabinet not in a single color, but add several colors to the facades. The simplest option is geometric shapes. To do this, use masking tape to cover some part of the facade and paint the remaining area a different color. For originality, you can decorate the cabinet in a contrasting design.
Removing old coating
Sanding parts
Chips are repaired with putty
Surface primer
Painting parts
Varnish coating
Pasting with paper or fabric
A budget option that will require the performer to be careful and attentive. Decoration can be done using paper or fabric. Also, many people prefer to radically update old furniture by ordering special photo wallpapers for pasting; they can also be bought in hardware stores.
In order to decorate an old cabinet and cover it with paper, you need to additionally prepare it - level the surface and improve the abrasiveness so that the paper sticks well to the surface. For work you will need the following materials:
- Spatula, long ruler, felt-tip pen, scissors or stationery knife;
- Sandpaper;
- Materials for surface treatment – primer and putty;
- Glue suitable for the selected type of paper and a soft roller for application.
How to cover an old cabinet:
- Take it apart and get rid of the fittings. The greater the number of parts into which the cabinet can be disassembled, the better;
- Remove the old varnish from the surface and sand it well with sandpaper;
- Remove varnish dust from furniture using a damp cloth or sponge;
- Fill uneven areas, cracks and chips, if any;
- Coat each element with primer on both sides;
- You can start gluing. Take measurements of each part and prepare pieces of paper suitable in size;
- Apply glue to both the surface and the paper. Carefully place the paper layer on the part to be glued and smooth it using a dry soft cloth. Repeat these steps with each element;
- Let the glue dry and then proceed with the final assembly.
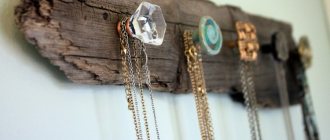
Don't neglect replacing accessories. New handles and hangers will play a significant role in transforming old furniture and will become its highlight.
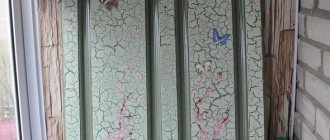
Using craquelure
The technique of coating wooden products with a special varnish consisting of 2 components will transform an out-of-fashion cabinet. With its help, it is possible to create an old wardrobe that grandmothers used. To complete the work you will need PVA glue, craquelure, acrylic paint and varnish, and a wide brush.
The technique also does not require specialized talent; all manipulations are similar to conventional coloring. The algorithm of actions looks like this:
- preparation - the old product is sanded, if necessary, putty is used to seal large holes. The final stage of preparation will be a primer in several layers;
- coloring - for work you will need compositions of 2 colors: dark and light. They do not have to be in harmony - the dark version is used to decorate cracks, and the light version is used for the main coloring. Using a brush, apply a dark color, evenly distributing it over the surface of the product;
- craquelure - once the paint layer has dried, you can apply craquelure. This must be done quickly and preferably in several layers - the thicker the varnish, the more visible the cracks will be. Dry the product until your fingers stick slightly;
- second color - the master class on craquelure at this stage suggests applying a light color and waiting for it to dry gradually. As soon as the coating dries, a characteristic mesh will become visible;
- applying varnish - a completely dry restored cabinet is coated with acrylic varnish to consolidate the effect.
When choosing craquelure, it is worth considering that if there is an image on the cabinet, you should not touch it. For this, a two-phase composition is used, the work with which is characterized by application in 2 stages.
This technique is suitable for restoring cabinet facades, but similar manipulations can be performed inside the product. This beautiful antique wardrobe will appeal to all lovers of vintage interiors.
Roomy swing
If you live in a house with a garden, an item like a swing is a must! A swing is rest, relaxation, an opportunity to serenely enjoy the beauty of the surrounding views and a lot of positive emotions. Maybe you shouldn't throw out the old door? Better spend a little time and build a swing out of it!
Don’t forget, it’s not only old doors that deserve to be transformed by caring hands. This collection of ideas will teach you how to transform unnecessary junk into wonderful, creative things that you will love!
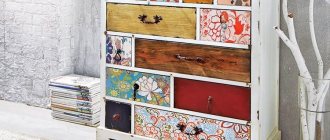
Decoupage
Modern art stores will surprise any novice craftsman or amateur with an abundance of assortment of napkins and paper for decoupage. Napkins have a small format and are often used to decorate small items. In the case of a cabinet, they can be considered as elements for the design of drawers or mezzanines. Decoupage paper is available in large sizes, so it will be optimal for this type of work.
Before restoring the cabinet, select a theme for the product. These can be floral motifs, historical ornaments, images of people, heroes, or just vintage pictures. Decoupage consists of several stages:
- The surface prepared for repair is sanded and primed in several layers. After this, light acrylic paint is applied to create a background;
- at this stage, paper materials are applied to the surface of the cabinet, mentally coming up with the plot and location of each detail;
- Transferring a picture to a surface is considered one of the most difficult tasks. You can use the "file method" to do this. Prepare a regular office file, remove the top 2 layers from the napkin and place it face down on the file. Next, take a spray bottle of water and gradually wet the entire napkin. As soon as it gets wet, gently use your fingers to try to push out all the bubbles. If this is not done, wrinkles will be visible on the product. As soon as the napkin has become even and smooth, we apply it along with the file to the surface of the cabinet. Carefully delete the file and move on to the next step;
- using a thin synthetic brush and special glue, treat the surface of a napkin or paper in 1 layer;
- As soon as the napkin sticks and dries, you need to treat the surface with acrylic varnish. The photo shows options for decoupage of old cabinets.
Restored furniture gives the room a fresh look - it looks original, non-standard. Such products will delight all guests, positioning the owner as a budding master of decor.
Elements that do not require restoration are covered with masking tape
Painting furniture elements
Glue the napkin
Applying clear varnish
Disassembling the cabinet
If you are satisfied with the appearance of the furniture, but you are not satisfied with its contents or fittings, then think about the fact that you can simply disassemble the old cabinet. Free it from the internal shelves and drawers so that only the box remains. Repair the doors, replace the filling. Many companies are ready to make new shelves and hangers to order. To update the look a little, just buy new handles that will be easy to use. Such a transformation can increase the functionality of the cabinet, it will again become convenient and pleasant to use. And the new fittings will please the eye.
The last option is to get rid of the old cabinet. A radical method for those who are sure that nothing will help their elderly furniture. Disassemble the cabinet into its components and take it outside, or try to sell it on a specialized site, for example, Avito or Yule.