Repair of frame frame
The frame frame consists of front and rear backs and side elements, or crossbars. Its task is to provide an aesthetic component, that is, to add a beautiful appearance to the rich functionality of the bed.
Most often, over time, the bolts that hold the backrests and crossbars together become loose, the fastening becomes loose, and the wood wears out.
As a result, the side components pop out and the backs fall off. Due to wear and tear, in most cases it is not possible to connect the sidewalls and backrests in the old place, and more thorough repairs have to be carried out. This is done very simply. We drill three holes at the end of the cross member, one above the other. We insert connecting tenons (plastic or wooden) into the outermost ones, leaving the middle one for the coupling bolt. The diameter of the bolt should be slightly smaller than the hole for it. Now we turn to the side of the cross member. At a distance of approximately 40 mm from the end, we make a hole about 30 mm in diameter, exactly above the place where the tightening bolt will pass. A clamping boss or eccentric is inserted into this hole, through which the bolt is inserted.
On the wrong side of the sidewall, we drill two holes for the guide pins and one for a metal fitting, which we screw or press into this hole. We screw the coupling bolt into the footing. The back and crossbar are connected.
In some cases, it is enough to insert the fallen foot into its original place. For this you will need:
- or a small wooden barrel, which is inserted into the loose hole from under the foot and in which a new hole is drilled;
- or thread and wood glue, which will help to securely glue the futurka to the old place.
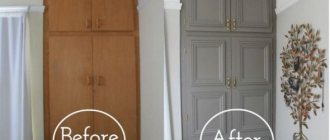
Chips
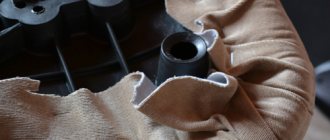
For kitchen facades, it is advisable to use wax to repair furniture. The substance will help fix chips and cracks on the surface. Wax pencils are used for easy application. Repair instructions using wax:
- Selecting the required color. To repair chipboard furniture, purchase a wax pencil of a suitable shade in specialized stores. If the store doesn't have the color you want, mix adjacent shades. To do this, you will have to take shavings from two pencils, mix and melt in a metal bowl. By choosing proportions, achieve the desired shade. After this, minor furniture repairs will not be difficult;
- To repair chipboard furniture with your own hands, you need to clean the surface. This is done by using sandpaper and a blade to carefully cut off the loose parts;
- When applying pencil to furniture, you will have to melt it, but not with an open flame. It's all because of the beeswax included in the composition; the pencil will simply catch fire. A heated metal object is used for melting. A knife is perfect for this. It is heated over a flame and melts the pencil, after which they continue to repair the veneer on the furniture;
- A chip or crack is filled with a slight excess of molten wax;
- After the composition has dried, its excess is removed with a blade;
- Wait for the mixture to dry completely and polish the surface;
- Polished surfaces are varnished to consolidate repairs and extend the life of furniture.
Repairs are fairly easy, but repaired chipboard furniture still needs to be protected from further damage. To prevent them, you should cover the furniture during repairs with film and secure it with tape. This will prevent dyes and dust from penetrating onto the surface of the furniture.
Apply wax
Removing excess wax
Polishing the coating
If the bed slats are broken, can it be replaced with something?
Even the highest quality bed has its own service life. Most often, breakdowns occur with connecting parts, legs, fastenings deteriorate, or it simply begins to creak heavily. Most modern beds have orthopedic mattresses, and they are placed not on a mesh, as was the case before, but on slats.
Lamels can also become unusable for a number of reasons, but they can also be repaired or replaced, and with your own hands.
Restoring light abrasions and scratches
If furniture products have partially retained their original appearance, but scratches have formed on a small surface area, you should not throw the item away. In this situation, restoring the structure of the coating will not be difficult. You can do the necessary work yourself by using household tools and purchasing the necessary supplies at a hardware store. Below are several options for how to restore scuffed furniture coverings made from different materials:
- Wood coated with varnish - a special putty pencil is used to restore the surface. It is sold in construction stores and is very easy to use. You need to apply the product to the problem area, and then carefully remove the excess buildup. To ensure that the product adheres well to the wood, use a sanding pad: smoothly rub the substance in with circular, soft movements;
- Light-colored wood treated with oil - when restoring old furniture with your own hands, you should use similar oil compositions. To begin with, the surface is lightly sanded, after which the product is applied using linen or other natural material. Lightly rub the oil with a cloth, distributing it evenly over the coating;
- Other materials – it is unlikely that it will be possible to visually remove scratches from metal parts of furniture: the solution will be to paint the surface. It is also better to paint over plastic elements.
For wood, substances such as putty are often used - it is produced in liquid form and is applied to the cleaned surface with a spatula. In addition, folk remedies used at home are widely used: walnuts, honey, colored pencils. In order not to additionally damage old furniture with products, check the effectiveness of the method in advance on an inconspicuous area of the product.
Walnut for removing scratches
Oil
Using a special pencil
The main reasons for squeaking on parquet floors
Wood is considered a fairly durable material, but is extremely sensitive to changes in the external environment. After a certain time, the parquet begins to emit an unpleasant squeak. This can be due to many reasons:
- improper installation of the coating;
- floor subfloor defect;
- using too thin a shock-absorbing substrate;
- defect of parquet beams.
Mistakes when laying parquet
Failure to adhere to parquet laying technology is considered the most common cause of parquet squeaking. This is usually caused by the absence of expansion joints, namely, a small gap, a distance between the wall and the parquet. Among the most common mistakes when laying parquet are:
Uneven base. Most often, a cement screed is used for the base of the floor.
Before laying it, it is important to ensure that the floor is thoroughly leveled and all debris must be removed from the surface.
Defects of transverse beams and their location. This is the frame of the future floor, so the logs must be strong
They require careful installation.
No vapor barrier. It protects wood from the harmful effects of condensation. It is laid between the screed and the substrate.
No underlay or incorrect underlay material used. Intermediate material is used to prevent the coating from coming into contact with the floor. Otherwise, you will be bothered by an unpleasant crunch, constant creaking or other extraneous sounds. Using a thick underlay can lead to play; parquet board locks are not designed to withstand such a load.
Drying or swelling of the parquet board due to high humidity. Damp or dry boards become deformed on their own. Therefore, when purchasing flooring material, it is important to monitor the quality of packaging.
Failure to comply with the required humidity conditions in the room. Wood tends to change shape over time under the influence of changes in temperature and moisture. Because of this, parquet planks may increase or decrease in size. If, when laying the flooring, you do not leave gaps or make them too small, then the parquet, swollen from moisture, will begin to rest against the wall. This will cause an unpleasant squeak to appear when any pressure is applied to the floor covering.
Laying in violation of the basic requirements for the formation of the structure. Often this includes too large a distance between elements, sparse fasteners, poor-quality support, and lack of waterproofing. To correct this error, you need to completely dismantle the floor and look for the causes of the squeak.
In addition, parquet with end latches can cause squeaking. During the installation process, the rows of such parquet are shifted due to the snapping of the locks. As a result, the planks begin to rest against the wall and make an unpleasant sound.
Properties of wood
Parquet is not suitable for every room. Often it starts to creak due to the wrong type of wood. So, for example, if you plan to lay the material in a room with high humidity, it is recommended to choose larch or ash.
If you plan to install a heating system under the covering, it is highly undesirable to use beech or maple for these purposes, since such wood is most actively deformed. According to the manufacturers themselves, this is the most common reason why parquet creaks in an apartment. You should also monitor the humidity level. In winter, when the heating is on, the moisture level in the room decreases, the slats dry out and begin to creak. In this case, you should use special humidifiers.
Parquet wear
Over time, any coating ages and requires replacement or restoration. As a result of long-term use of parquet:
- wooden planks dry out and twist, supporting joists and plywood are destroyed;
- lining material sags;
- elements of the old parquet come off;
- fasteners of nails, pins, and self-tapping screws become loose and fall out.
Manufacturing process
After purchasing the required materials and preparing the tools, you should begin marking and further cutting them. It is recommended to adhere to the following rules in this process.
The ideal method for attaching slats is with metal fasteners.
- Make a detailed drawing of the future bed, indicating all the exact parameters.
- Write a list of all the parts needed for the product. Indicate how much material is needed for each of them.
- It is recommended to make markings in places for future cuts using a cutter or pencil and always a ruler.
- When making parts with identical parameters in several copies, you should make one and leave it as a template. This will make the process easier and faster.
- The cut areas must be cleaned with sandpaper.
Ortho frame for baby crib
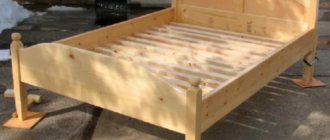
After making the marks, you can begin building the frame.
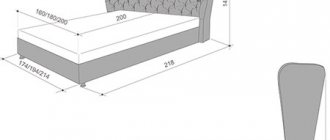
It is recommended to begin assembly by measuring the parameters of the mattress that will be used on this bed. It fits freely into the frame frame.
Slats are increasingly being used to provide an ideal and durable base for beds.
Using the taken parameters, saw off 2 end and long boards, which will become the sidewalls.
Reinforced block of slats for a high-quality bed base with a high degree of load.
Gather the resulting pieces into a rectangle. To fasten them together, you can use wooden spikes or eyes. Cut holes with a jigsaw. Can be hollowed out with a chisel.
Orthopedic base with adjustable positions
The resulting eyes are lubricated with glue and connected. Align everything at a 90 degree angle and, using clamps, secure until completely dry.
Choose the type of lamella fastening that will be the most durable and reliable.
The frame is ready. It is quite reliable and strong. To make assembling the base of a wooden bed an easy process, you should connect the parts using self-tapping screws that have additional fastenings and metal corners.
Orthopedic double bed frame made of slats.
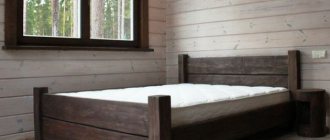
After the frame, they begin to install the legs. Cut several bars of identical length. They are mounted in the corners of the product. They can be inserted into the frame or secured from the outside, from the inside.
Lifting bed base
To insert the legs directly into the base, use tenons to secure them. This is the most reliable option. If the width of the bed exceeds 220 cm, the 5th leg should be installed in the middle of the product. To do this, a longitudinal board is mounted, to which it is attached.
Bed base mounted on five legs
What is a lamella
Before you begin, you need to familiarize yourself with the description of the features of the lamellas in more detail. Lamels are wooden structures that have a curved shape. Their characteristic features include a high level of elasticity and elasticity. It is thanks to these features that the mattress can be securely fixed.
The slats are made from high quality wood. The most commonly used wood is birch, maple, ash or beech. They are cut from solid wood, after which they are processed and given a curved shape.
Such wood products are laid out at a distance of 2-5 centimeters. This allows slatted beds to be used by both thin and overweight people. The thickness of one plank reaches ten millimeters, and the width does not exceed thirty. However, cheap beds can use boards 4-5 millimeters thick.
How to replace a corner with your own hands
You can independently fix not only the new canvas, screw on the handle, but also repair the mosquito net, even if the corners of its frame have burst. Plastic elements break under uneven load resulting from improper installation of the structure. The store sells both standard and reinforced corners, which are characterized by high strength and long service life. To replace a broken part:
- Using a sharp object, pry up the cord intended for sealing and remove it from the groove located in the upper part of the frame.
- By tapping the board with a hammer, they take out the broken plank.
- Holding with pliers and pushing with a screwdriver, the broken parts of the corner are pulled out of the grooves and the new part is fixed to the top bar.
- The edges of the mesh are straightened, tightened, the sealing cord is placed in the frame, pressing tightly with scissors or a screwdriver.
You cannot hit the plastic with a hammer, but it is better to place a block of wood, then the paint will not peel off and cracks will not appear on the surface. To extend the service life of the aluminum profile, it is recommended to attach a corner made of galvanized steel sheet. It does not need to be inserted into the grooves of the frame, but should be installed on plastic elements, drilling holes on both sides, and connected with rivets. The metal corner is treated with sandpaper, primed, and painted white.
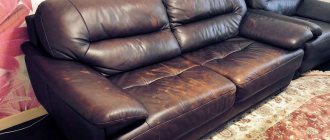
The nuances of repairing a bed at home, step-by-step recommendations
New furniture means comfort, coziness and aesthetic pleasure. But some 7-10 years will pass and your favorite bed or sofa begins to age: the wooden frame cracks in places, the upholstery tears, the foam base sags. Many owners are beginning to look at the bed differently and are thinking about replacing it. Of course, you can buy new furniture, but you can also try to repair it. Repairing beds and sofas helps extend the life of once-loved furniture, as well as save money in the family budget. If you have the desire and a little knowledge, you can easily restore your furniture. First you need to understand what is the cause of the breakdown.
Final stage
Now you can proceed to assembling the slatted base. These are cross bars that support the mattress and prevent it from deforming.
Slats at the base of the sofa
- Tap the fastening locking strip along the base, side and end parts.
- Mark at a height of at least 100 mm of the edge from above.
- The rail is attached around the entire perimeter using a solid line and a dotted line. You can use a metal corner instead.
- You will need a block with a section of 30x30. Use it to make a frame for the crossbar. They fasten it according to the internal parameters of the base.
- Then a rail measuring 150x4x2 cm is placed on the frame. Fasten it across the length. The distance is at least 5 cm.
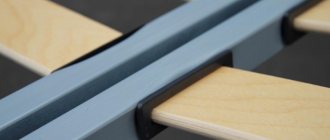
The lamellas must be attached to the metal frame using metal fasteners.
If you carry out all the steps strictly following the drawings, you will not have any problems with installation. At the final stage, the base should be treated with sandpaper and coated with varnish.
The chalk holder can be completely invisible, but at the same time as durable as possible.
You should carefully consider the choice of covering for the finished bed. After all, it must completely fit into the interior of the room. Before coating the product with varnish, it is recommended to first tone it. Stain is suitable for this.
Reinforced metal fastening for wooden slats
It should be applied evenly using a brush. The surface should be varnished only after the stain has dried. It is necessary to make 2 layers of varnish.
How to choose the right lamellas?
If you are wondering how to choose the right lamellas, we recommend paying attention to certain characteristics and properties
The type of fastening for the slats should also be selected based on the base of the bed.
The more slats there are at the base, the longer the bed will last you.
A variant of the single bed model, the base of which has wooden slats installed.
A double room should have more than 30, and a single room should have more than 15 pieces.
Standard placement of slats in the base of a double bed.
The distance between the plates should be minimal.
Choose for yourself the bed with the minimum distance between the slats at the base.
For an orthopedic bed with slats, you need to choose appropriate mattresses to distribute the load evenly and avoid deformation.
An orthopedic bed base made of slats should be complemented by a high-quality mattress, then your sleep will be perfect.
Don’t forget to pay attention to the cost of the products, the material from which they are made, and most importantly, the name of the manufacturer
The fastening of wooden slats is carried out using various methods, none of which is inferior in reliability and quality.
Are “magic plates” worth buying?
Definitely worth it, because they have more pros than cons.
The slats should only be attached to the metal bed frame using metal fasteners.
Moreover, at the moment there are many profitable options for purchasing and replacing them. If you have any doubts, you can always consult with specialists.
A few tips for a novice master
If you are not renovating, but making a bed yourself, you need to remember the following basic rules on how to make slats for a bed with your own hands:
- The minimum number of slats in a single bed is 15 pieces. In a double design, respectively, - 30.
- The distance between the slats should not exceed the width of the slats.
- The lamellas can be secured using special tips or frame stands.
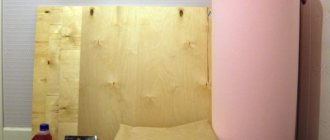
Important! With all the advantages, flexible bed slats are the weak link. If you don't want to constantly repair the bed, you can replace them with two 12 mm thick plywood sheets. The sheets must first be connected to each other and then to the frame to form a rigid structure. To provide ventilation, make several holes in the plywood sheets. In addition to the fact that the structure is durable, such a bed will not creak.
Repairing bed slats
If the bed slat (slat) is broken so that it is not possible to seal it, you will need to buy a new element. Bed slats can be found in furniture stores, or you can order them online. Slats are made in single copies in carpentry workshops. Take dimensions from the element and contact a specialist. In just a few minutes they will make you a new slate for your bed. In workshops and stores you can order and buy not only lamellas, but also lath holders. Although these elements are made of durable plastic, they can also break under constant load.
If the entire base fails, you can make a new one using boards or thick plywood.
Features of leg repair
Replacing the legs usually does not pose any problems. A broken leg can be replaced with a new one, and if it is loose, replace and tighten the fasteners.
When replacing the legs, be careful when dismantling the element - it is important not to damage the bed base during the work, replacing which will be a difficult and expensive process. How to eliminate a squeaking bed?
How to eliminate a squeaking bed?
It is impossible to sleep and get a full night's sleep on a creaky bed. A loud and unpleasant sound can disturb sleep and prevent you from falling asleep quickly. When planning to fix a defect, the first thing you should do is find out exactly what material your furniture is made of. If the structure is made of MDF or chipboard, then the cause of the squeak may be both the fittings and the base boards. Metal beds most often begin to creak at the places where the screws are installed.
To identify the cause of the creaking, the bed structure will have to be completely dismantled and then completely reassembled. During the assembly process, all fasteners are carefully screwed and tightened. If you are not sure that you can disassemble and then correctly assemble the bed, you can try to solve the squeaking problem by treating all joints with different substances: special furniture lubricant, wax-based or silicone-based compounds.
Let's write down the instructions for eliminating bed squeaks step by step:
First, you should check the tightness of all fixing elements, tighten and strengthen all nuts, bolts, screws and bolts
It is also recommended to treat all fittings with a special furniture lubricant. Check the mattress: its springs may be squeaking. You should also coat all joints in the structure with wax, soap or silicone. Pay attention to the slats too. If they are the ones making the creaking noise, you can replace them or change the distance at which they are installed. Her legs can also creak in the bed.
The creaking of the legs is eliminated by replacing this structural element. It is worth checking the evenness of the boards on the base. They should not lie flush against the sides of the structure. If one of the boards creaks, try swapping it with other elements or simply turning the base over.
The cause of the squeak may also be in the fastenings. The easiest way to solve the problem is to replace the old fasteners with new fixing elements. If you do not want to face the problem of squeaking, when buying furniture you should give preference to metal and forged bed models.
Choosing high-quality fasteners for bed repairs
Do you want your bed to serve you flawlessly for many years, and to have to repair it as rarely as possible? Pay careful attention to the correct selection of fasteners. Professionals categorically do not recommend using conventional fasteners - bolts, screws, angles, ties
These types of fixation elements quickly fail. It would be best to choose special types of bed fasteners for repairs in specialized stores. The classic combination of a bolt and a foot can provide excellent fixation of all structural elements.
In what cases is specialist help needed?
Installing gas lifts has many nuances. If you have little understanding of the mechanisms and the reason for the failure is unclear to you, you are not confident that you can perform the installation efficiently, you should entrust it to an experienced specialist. The best option is to order furniture assembly or repair to specialists. They will select the style, size and design of the piece of furniture. The optimal characteristics of the lifting mechanism will also be determined.
The optimal fittings are considered to be products from German companies. However, many domestically produced products also have good user reviews.
Door restoration step by step
Most often, wooden doors are treated with paint or varnish after repair. Let's consider how repairs and restoration should be carried out in this case.
Preparatory stage
Before repairing a wooden door, it must be removed from its hinges and placed on the floor or table so that it is convenient to work with. Now you should remove the upholstery, if any.
Removing the fabric from the hinges is done using a screwdriver and a hammer. Look at the hinges attached to the door frame; they may need to be strengthened with longer screws or replaced altogether.
Removing paintwork
Before you repair a wooden door, you should get rid of the old coating. The easiest way to do this is with a hair dryer and a spatula. Use a spatula to pry up the paint, and use a hairdryer to heat it up until it comes off quickly. Remember that the device heats surfaces quickly and very well, so do not get too close.
The hairdryer needs to rest every 15 minutes, otherwise the tool will quickly become unusable. In hard-to-reach places of the door leaf, for example, in corners, you need to remove the paint layer very carefully so as not to damage the base of the door.
Grinding
After removing the paint with a spatula, you need to sand it. This process will help get rid of all remnants of finishing material. You can do this manually using sandpaper, or use a grinder.
Elimination of defects
At this stage of repairing the wooden entrance door, we begin to use putty
Apply the composition in an even layer to the canvas, paying special attention to depressions and irregularities. After the surface has completely dried, go over it again with medium-grain sandpaper.
It is convenient to do this by attaching the emery to a wooden block. Perform the action in the direction of the wood fibers so that in the end there are no sanding marks left.
If you plan to varnish the door, sand it very carefully and efficiently. Because when treating the surface with a transparent composition, all defects will be visible.
Once you've finished sanding, wipe the door with a fairly damp cloth, then go over the surface again with fine-grained sandpaper.
Painting
The final stage of restoration of the wooden entrance door. Painting must be done in several layers. Apply the first ball with a brush or roller, moving along the line of wood fibers. It is enough to apply the paint in two layers if it is thick and rich. We begin to apply the second layer only after the first has completely dried.
If the color is not sufficiently saturated, the wood should be treated with white enamel before painting. The color composition will fit well on it and will not look transparent.
It is better to apply both layers of paint in the same directional movements. For example, if you placed the first ball from left to right, then the second should be done in exactly the same way.
Toning
This step can be performed if you want to make the door especially original and beautiful. Tinting is done with very liquid paint, so all work must be done very carefully. We apply the composition with a brush, the number of layers will depend on individual preferences.
Tinting paint dries in about 8-12 hours. You can find out more details from the manufacturer's instructions. After the surface is completely dry, you need to go over the door with zero-grade sandpaper.
Finish
When the repair and restoration of wooden doors is completed, you need to put all the fittings in place - handles, locks, latches, and so on. After this, we return the canvas to its place, securing the loops.
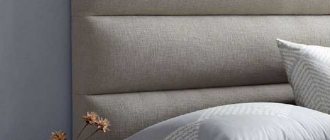
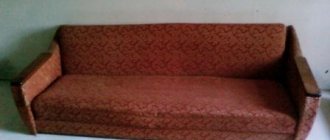
Upholstery of the head of the bed
The old upholstery is removed from the backrest ; it can be cut for ease of dismantling.
If the layer is nailed on top with nails with decorative heads, they are removed carefully, prying them off with a chisel or screwdriver, but do not use a nail puller so as not to break the head. When changing these hardware, they are removed without saving. They also get rid of the foam padding or a layer of old padding polyester. If these soft materials are still in good condition, they are reused.
The procedure for repairing the head of the bed (making new upholstery):
- the old material is laid out and the creases are smoothed out with an iron;
- using it, they make a pattern out of cardboard , use leftovers from a roll of wallpaper, or glue together old newspapers;
- the new fabric is spread and smoothed on a large table or on the floor;
- The pattern is placed on the material, the contours are outlined with chalk, and cut out with scissors.
If everything fits on one piece of material, it is placed entirely. Sometimes it is necessary to connect parts of the fabric, while the joining seam is placed symmetrically relative to the sides of the back, and sewn together on a sewing machine before cutting.
A pad made of soft material is fixed on the back , glued and nailed. The size of the middle layer is chosen according to the contour of the headboard. Upholstery material is placed on top , its ends are brought behind the back, and fixed there with staples (stapler). The step between the fasteners along the perimeter does not exceed 15 - 20 cm.
On the front side, check that there is no tugging, folds, or creases. Decorative nails are nailed.