What is lining? Wikipedia says it is “a thin cladding board, a product of wood processing. Has a tongue-and-groove connection. Used for interior and exterior decoration of premises: country houses, baths, saunas, loggias, balconies, attics, technical and utility rooms.”
Initially, lining was used for interior decoration of passenger railroad cars. Actually, that's where the name comes from. Later, builders became interested in the convenient and affordable finishing material, but for some reason they turned it into a material for finishing the interiors of utility rooms, sheds, temporary cabins or rooms in country houses.
We don't agree with this. Cladding board (as lining is also called) is an amazing material: lightweight, environmentally friendly, plastic. And it fits perfectly into modern interiors. Now we will demonstrate this.
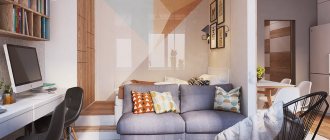
Lining in the interior of the apartment
Just 10 years ago, in an ordinary apartment, lining could only be found on the balcony. It was used both as a finishing material and as insulation.
Today, lining is already leaving the space of technical rooms and is winning the right to the title of a fashionable finishing material.
6 main groups of wood protection compounds
If impregnation is necessary for the panels on the balcony, and it faces the south or east, then you will need a solution for exterior work.
It is important to note that some compositions may give the surface a greenish or pink tint due to chemical reactions.
For this reason, carefully read the description, since it will be possible to disguise this color only with opaque paints or a very dark tint.
Stain and other tinting compounds do not hide the texture of the wood, and also do not apply any film, for this reason the wood retains its properties and the vapor permeability remains the same. If you want to express the wood pattern more clearly, it is better to choose a slightly pigmented solution. In this case, several layers may be required, but then you can achieve the required level of “painting”.
Varnishes nowadays are used both water-based and scuba-based. The latter, in turn, are divided into glossy, semi-matte and matte. It is easy to add various colors to varnish coatings, as well as UV filters and bactericidal solutions.
red kut rent an apartment for a long time
Wood oils. There are pigmented ones, and there are also transparent ones. They are perfectly absorbed deep into the fibers without leaving a dense film on the surface. The best solutions are as good as varnish, protecting the surface from dirt and abrasion. But oils do not have a glossy shine; the surface is slightly shiny or, rather, matte. This is a great way to protect your panels. It is possible to highlight the grain of wood using the correct coating technique.
Wax compounds. There are three types of wax: water, liquid, solid. Aqueous and liquid compositions are initially ready for use, while solid ones, before use, will have to be melted to a liquid state. Waxing panels is very effective and traditional, but with new technologies the processing process has become much easier. And although applying wax still remains a difficult task, it will lie much more evenly on a primed surface.
Interior decoration with clapboard
Both walls and ceilings can be finished with lining. In country houses, the walls on the first floor are most often painted or covered with wallpaper, and the upper floors are often completely finished with clapboard.
Lining is a textured, living material that perfectly retains heat indoors, provides excellent sound insulation, and excellent air permeability. The walls “breathe”, which means that moisture does not accumulate behind the lining of the lining, and bacteria and mold do not multiply.
Clapboard finishing has another advantage: even if the building is built of stone, it is very easy to create the feeling of a wooden house in one or all rooms.
Look at the photo and tell me: are these walls made of timber or an interior decorated with clapboard? It’s difficult to tell the difference at first glance, but take my word for it: it’s the lining in the photo.
What to cover
The choice of coating for the lining is determined by the brand and type:
- Acrylate paint has a long service life. Ideal for exterior finishing, as well as for interior use. This paint leaves behind a vapor-proof layer;
- Acrylate aqualac. This coating is rightfully considered the most optimal and popular option when choosing indoor paints and varnishes;
- Oil paint. This type of panel treatment is remarkably absorbed into the wood and effectively protects against moisture. Oil paint is often used specifically for the exterior walls of a building. The light colors of this paint are much more resistant to sunlight. Bright colors, in turn, will quickly lose their color and become more faded;
- Oils and waxes perfectly preserve the individual texture of wood, and this coating allows the wood to breathe. The main disadvantages are the regularity and required frequency of application.
There are a lot of means for application, there are both ready-made solutions and folk remedies. Wonderful bleaching solutions are: “Iney Prof”, “Neomid 500”, as well as the well-known “Snowball”. “Iney Prof” is available for both gentle whitening and for deeper treatment, it’s up to you to choose. However, nowadays there are no problems with wood bleaches.
Folk remedies include: oxalic acid, hydrogen peroxide and bleach. If you have chosen bleach, it should be diluted in a ratio of one to ten (ten parts of water). But it is better, of course, to purchase a ready-made solution so as not to bother with folk remedies.
Instructions for using the solution are usually written directly on the container, but often the usage scheme looks like this: apply the solution with a brush or sponge to the wood, then it all depends on the coating you choose - some need to be washed off after 10 minutes, there are those that after 15. Always wash off with lukewarm water. The surface will lighten almost immediately, and after 20 minutes you will not recognize your panels.
It is important to remember that bleaching is only the first step, followed by priming, painting or varnishing. It is best to perform bleaching in a ventilated area with rubber gloves on your hands.
Any tree, no matter what it was covered with before, loses its external and color qualities over time. Especially when there is a factor such as increased evaporation. There are a couple of options on how to “revive” your lining.
Sanding and subsequent painting is considered the most reliable.
Most people use oil paint for freshening up. But its use is strongly not recommended for updating your coverage. The paint takes a long time to dry, and the color often does not justify the expected result, and such repairs have a very limited shelf life and soon you will have to repeat the procedure again. Acrylic paints in this case are much more practical, and the profile with this coating will look like new.
Another method is to coat the panels with a special bleaching solution. Construction stores offer a wide range of products, which will allow you to make the right choice that will meet your requirements. Chlorine-based products are most often used, but in addition to this, there are many other active substances, a lot depends on the manufacturer and quality. The main thing is to understand that after bleaching you will have to varnish your profile.
There are also owners who apply a light-colored varnish to the panels (this is the easiest way). Using this method, the color of the wood will indeed become lighter, but you will not return the original shade. As they say, it will be an easy repair for lazy people.
Lining in different interior styles
Country, Provence - these are the styles in which the lining feels absolutely in its place. Wooden accents in the interior add warmth and comfort and blend harmoniously with aged wooden furniture. But the lining easily fits into more formal interiors. Here are some examples of how you can neatly fit lining into the space of a modern home.
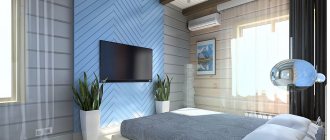
The outer wall in the photo above, covered with clapboard, also serves as a wooden accent and has a purely utilitarian function of additional thermal insulation for the bedroom.
The clapboard ceiling looks organically in the space of a modern loft. This technique visually lowers the ceiling a little, which is what the designer of this project actually wanted to achieve.
A wall panel assembled from artificially aged cladding boards looks great.
Let's figure out the color
The widespread use of clapboard interior decoration is understandable; for Russia this material is quite inexpensive, an important factor is environmental protection, and the easy availability of the material. Under the profile, uneven walls and communications are easily hidden. But this type of decoration has one huge drawback - the impression that the room looks like a huge, red, wooden box.
Wood paneling initially implies variety. The decoration can be romantic, light and airy, or it can be elaborate and sophisticated. But before finishing it is worth getting rid of the vague yellow color. Alternatively, the board can be painted, but it would be more appropriate to whiten it, preserving the texture of the wood. The most important thing is to choose a shade that will look natural, but at the same time unobtrusive.
Do not rush to coat the panels with varnish to fix the color. Because it is precisely because of the varnish that the lining acquires the feeling of being in a dressing room.
In order to avoid a red tint in the decoration of their home, many consumers bleach the paneling completely. It's not very practical, and it also makes you feel like you're in a hospital room. In order to avoid this effect, you should breathe a little more life into the interior with the help of bright inserts. This could be: paintings, furniture, pillows, curtains and even decorative stained beams.
what year was the berlin wall built
And vice versa, the same technique: an ash profile creates a contrasting effect in the smooth, bright white decoration of the bath. The use of wooden panels in finishing bathtubs is quite acceptable. If the ventilation functions well and the wood does not come into direct contact with water, then such a coating is acceptable.
Painted lining
An interesting way to use wainscoting in your interior is to paint it.
Paint the clapboard walls white and soft blue for a great nursery in a Mediterranean or Provençal style...
...paint it a soft yellow for a great backdrop for a country style room.
A white wall made of painted and artificially aged lining fits well into the interior of a Scandinavian-style bathroom (although, in our opinion, it is not entirely comfortable in the bathroom)…
... and into the space of the large kitchen-dining room, echoing the same textured furniture facades and wooden ceiling.
How to properly paint the inside of the lining: technology
To paint lining in “dry” rooms inside the house, you can use any type of paint. Here you simply decide on the requirements for the decorative appearance of the surface. If the lining is dry, it can not be impregnated with protective compounds, or you can choose paint/varnish/wax with appropriate additives. You can paint it only on one side, leaving the back side untreated.
Paint each panel of the lining separately
If the lining will be used in damp or unheated rooms, on a balcony, it must first be thoroughly impregnated with protective compounds on all sides, maybe twice. Only after the impregnation has dried can it be painted, varnished, or, in general, given decorative properties. Another point: when installing the lining on a wall or ceiling, it has to be cut into pieces. Places of cuts in damp rooms must also be coated with the composition. It is not necessary to wait until it dries, but it is necessary to process it.
There is one very important nuance that many amateur decorators overlook. If you want to get a professional-level painting of the lining, you need to process each board separately: sand, paint, dry, and only then assemble the surface from the already painted lining. That is, mount already fully processed boards on the wall or ceiling. Only with this approach will the surface of the lining have the same color from any point.
It’s difficult to paint the entire surface of a clapboard wall well
If you paint an already assembled surface, unpainted areas remain in the grooves and recesses, making it difficult to sand large areas. You definitely won't get a perfectly flat surface. The quality of finishing in this option is not above average. It is permissible to paint a finished surface if you are renewing the paint job. This must be done at different intervals, depending on the operating conditions and the properties of the paintwork material.
Correctly, the painting technology looks like this.
- The lining is checked and sorted. All bent, bent or cracked boards are rejected. They can be used to test color, select color, number of layers, practice technique and painting sequence.
- Boards that have been sorted are sanded until completely smooth. It is most effective to work with a sanding machine, but you can also use a block with sandpaper attached to the surface. Sandpaper grit - 250-280. When grinding, circular movements pass through the face, tenon and groove. The back part of the lining can be left without treatment. It is more convenient to work with a grinding machine
- Apply the composition with a roller or brush. Each type of coating has its own points and features - they are written on the can or in the accompanying instructions. In general, the rules are simple: take a little paint and apply it in single strokes along the entire length of the lining. Then rub thoroughly and shade until a uniform color is obtained.
- Having achieved uniform coloring, leave to dry.
- After drying, sand again if necessary. This step is often necessary when working with opaque paints and varnishes. The first layer of paintwork raises the pile of the wood, which is why it becomes rough in places. This pile is removed by repeated sanding.
- The second layer of paintwork is applied. Drying.
There can be many layers: it depends on the hiding power of the paint and on what effect you want to get. But in any case, one rule remains: there should be little composition on the brush. The exception is impregnation or primer. They are applied with a well-moistened brush, but only those without pigment. When applying pigmented protective compositions, the rules for paints apply - the minimum required amount of the composition is well shaded.
Sometimes, even with careful rubbing of the paint, stains are clearly visible. This is not a bad paint, but the properties of wood: in some places the pores absorb better, in others worse. In order to achieve an even color in this case, the surface is first primed. You can use any wood primer or colorless matte varnish (can be water-based). After drying, the surface is sanded (yep, again) and then the required number of layers of paint are applied. Only in this case, after the first layer of paintwork, grinding is rarely required, and if necessary, then in some places, more often on a tenon or groove.
Watch the video to see how to evenly apply glaze, oil or wax.
If furniture quality painting is required, there are even more layers: first a stain is applied, then two layers of primer. After drying, the surface is sanded until the surface is completely matte, first with grain 280, then 320, after removing the dust, a finishing layer is applied - varnish. An example of such work is in the video.
Lining in the kitchen interior
In the kitchen interior, you can clapboard all the walls or focus only on the dining area. The lining also looks beautiful on a kitchen apron. Don't want problems with cleaning? Treat it with an antiseptic and cover it with moisture-resistant paint.
In a country-style kitchen, unpainted lining looks harmonious; in other cases, it is better to paint it. White, gray and beige colors are suitable for the Scandinavian direction, and delicate pastel colors for Provence. For an eco-friendly style, choose brighter shades, such as green or brown.
Choosing paint for painting
In most cases, we are talking about painting internal surfaces, and the type of paint is selected accordingly - acrylic, water-based or oil-based (white).
The advantage of acrylic paints is their environmental friendliness and comparative cheapness. Oil paints dry faster, but at the same time they emit a specific odor that is not always acceptable to others. Water-based paint, for all its non-toxicity, is still inferior to the other two types in terms of coating durability. Therefore, the use of a certain type of paint is determined by the specific conditions of its use.
Recently, scuba paints have been actively used for painting linings, previously used mainly for painting ceilings. The advantage of scuba tanks is that, while forming the color of the surface, they also form a dirt-repellent layer. Therefore, caring for the white panels, which were decided to be painted with aqualac, will be much less labor-intensive. The downside of scuba gear is its high cost.
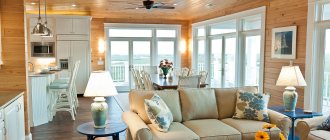
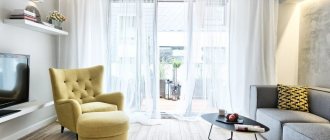
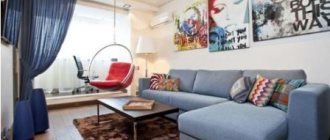
Lining in the living room interior
The lining goes well with wallpaper. If you make panels out of it at the bottom of the wall, the room will turn out to be especially homely and cozy.
Everyone is already a little tired of boring monochrome living rooms. Let's use lining to add a little color to the interior and play with contrasts? For example, you can trim the walls with clapboard and paint them in an unusual color (complex dusty shades look most interesting, as in the photo above), and leave the floor or ceiling white. Fresh and unconventional. The reverse scheme also works: bright wallpaper - snow-white wooden paneling.
Processing material
Most are inclined to believe that the lining inside the room should not be covered with anything at all, leaving natural wood, due to which the panels can breathe, and the owner can enjoy the beautiful appearance of his finish. This, of course, has its own meaning and aesthetic value, but not in every climate and not in every room the material will retain its textural qualities. With low levels of ventilation, the wood may take on a bluish tint, and when exposed to direct sunlight it will turn dark gray.
Blue staining can only be dealt with using biological agents - active oxygen or chlorine will best help with this, after which it should be soaked in a protective solution. It is much easier with a grayed panel - it is enough to treat the surface with sandpaper in order to return the original whiteness to your profile, but without a protective coating such treatment is also short-lived. You can see what white lining will look like in the interior in the photo on our website.
It is also worth considering the fact that not everyone likes it when their interior has a wood-textured surface. This happens because some people simply get tired of such a coating and want a simple, even color, including white. In this case, it is worth finding opaque paint. Choose the effects and characteristics yourself according to your wishes.
Opaque paint is also applied because the texture of wood is not always combined with other styles, for example, when you want to use a high-tech style in a wooden interior.
Pros and cons of lining
Like any other finishing material, lining has its pros and cons. A sign will help you understand whether or not it should be in your interior.
With the help of lining you can create a truly stylish and at the same time unique design. We have already talked in the blog about how you can use wood in the interior. Why not try to do the same with clapboard and be surprised at the result?
How is coloring done?
How to paint lining so that the effect is long and impressive? For such an event you will need a set of tools:
- Set of brushes and roller. If possible, then a spray gun.
- Tray. To make it easier to pick up paint.
- Protective and decorative compounds.
- Sandpaper, stiff brush.
- It is better to have a stable stepladder and glasses to protect your eyes.
Using a spray gun allows you to quickly complete the work of painting the lining.
Painting consists of several stages. It is much more difficult when work is carried out on an old coating. Then it becomes necessary to remove the old decorative layer and clean the surface well.
Stage one - preparation
Purchased products are checked for possible damage and deformation. It often happens that materials are purchased that belong to a lower class. They require a long preparation - they are processed with sandpaper, and the cracks are covered with wood putty. If there are dark spots on the surface, then bleaching is performed.
If the material has defects in the form of cracks, they are eliminated using putty
Stage two - primer
It is necessary to cover the front side of the lining with priming compounds. This will reduce the consumption of other solutions, increase adhesion, and will also prevent the elements from being subject to deformation
In this case, special attention is paid to the knots; they are literally impregnated to eliminate the possibility of falling out if drying occurs
The primer improves adhesion when painting lining
Stage three - impregnation
Now protective impregnations are applied. These are fire retardants and antiseptics. Impregnation is carried out over the entire surface. Do not allow unpainted areas to remain
It is important to consider that such products should not have any foreign (pungent) odors or change the color of the wood.
When applying protective impregnation, it is necessary to ensure that no untreated areas are left.
Stage four - coloring
How to paint lining inside a house? This procedure begins only after the material has dried well from previous manipulations. The process is:
- The paint is prepared in advance. The solution must be well placed, because at the bottom there may be sediment, which includes the main components.
- A small part of the composition is poured into the tray if a roller is used. It is better to provide a container for the brush that is easy to carry. Using a spray gun makes the work better, and the paint is poured into a special container.
- It should be taken into account that movements are performed along the fibers of the material. You can’t stay in one place, the coating should be uniform.
- Several layers are applied, this will provide an excellent decorative effect.
To obtain a good decorative effect, the paint should be applied in several layers.
Still, how to cover the lining? This question is quite complex, the answer to it depends on many factors that are calculated purely individually. But it must be taken into account that if the composition is used over large areas, then it must ensure the “breathing” of the material.
Pencil drawing
Beautiful options for wall painting can be applied without having the talent of an artist. One such method is pencil drawing.
To realize your plan, you need to create or print a life-size sketch of the image.
Note!
- DIY pillows - 165 photos of decorative ideas for pillows of various models
- Paintings for the interior: 110 photos and video description of how to decorate the interior with paintings correctly
- DIY decoupage - TOP-150 photos of decoupage ideas. Basic techniques and methods of making it yourself. Selection of materials and tools. Room decor
To work you will need to stock up:
- pencils,
- soft cloth,
- grout.
First of all, you should conditionally define for yourself the boundaries of the pattern on the surface of the wall. Then you can get to work.
One of the easiest and most accessible ways for non-professionals to paint a wall with a pencil is to transfer a finished image, printed using life-size templates, to the wall.
Samples of works done using the pencil drawing technique can be viewed on thematic websites.
Factors on which the decor of the living room depends
The use of different materials is allowed. Among them:
- Decorative plaster. It will help hide noticeable unevenness of the walls. The material is expensive, but is considered durable and can be renewed annually by painting. When used correctly, it does not turn yellow or fade (if the color version is used).
- Liquid wallpaper. They contain acrylic and lie flat on the surface. This option is affordable and environmentally friendly, and does not require professional finishing skills. The disadvantage of this material is the lack of assortment. In total, there are five to seven types of mixture for application.
- Paper wallpaper. An excellent budget option that is suitable for those living rooms in which the walls are perfectly straight. The canvases are easily soiled and cannot be cleaned and are subject to mechanical stress. Gluing is not easy, as the paper often tears and wrinkles.
- Vinyl or non-woven wallpaper. This option has a wide range of colors, but the base is considered not environmentally friendly. It may take a long time for the smell from the wallpaper to dissipate and not harm a person’s lungs. Among the advantages are that it fits perfectly on the surface, dries quickly and has a lot of colors. With the help of such finishing you can even create a basis for decoration.
- Painting. Quite a good option, especially if wallpaper for painting is already pasted. It applies well with a roller and leaves no drips or streaks. These properties are guaranteed if the instructions for dilution and use of the liquid composition are followed.
- Wall panels are options of different shapes and textures. They also differ in color. They are expensive and not widely available. Suitable for all types of walls, they hide sound insulation and other intermediate materials well. The panels do not tolerate temperature changes and mechanical damage. Due to the high cost, they try to mount it on one wall to create an accent or depth of the room.
- Textile wallpaper. These are pure and natural canvases. They will create a unique atmosphere in a classic interior style. Not practical as they get dirty easily. They are expensive, but when completed, the rooms look rich, luxurious and perfect.
Space is an important factor when choosing decor. The smaller the living room space, the less visible accessories and decorations should be.
Using coffee textile wallpaper with textureSource oooalfa-pro.ru
Decorating the walls in the living room with bright textile wallpaperSource mirpola-dekora.com.ua
Painting lining at the dacha: types of coatings, interesting ideas, technologies
Materials for a country house must be environmentally friendly, durable and safe for humans. In addition, the house does not have heating in winter, so increased moisture resistance is required, since condensation can form on the walls. Lining for a country house can be a completely acceptable option if it is first subjected to special treatment and installed correctly.
Various paints, varnishes and impregnations are used to:
Each type of processing is designed to solve one or more of these problems, so it is usually necessary to carry out complex processing using several tools:
When choosing products for coloring lining, you need to remember that some of them are designed to emphasize the natural structure of the wood; all patterns and annual rings become pronounced and acquire a unique tone.
Other paints, on the contrary, cover the surface with a massive layer and hide the texture of the wood. Opaque paints include acrylic, oil, and water-based paints.
Transparent are varnishes, stains, and some other paints. They are used when the lining is new, just installed, to preserve its beauty and texture.
Old wooden panels need to be treated with opaque compounds. To make such a surface look beautiful, first remove the top layer of old wood and sand it. This is a rather time-consuming and labor-intensive method. It is advisable to paint cheap spruce and pine with thick paint, as they do not look beautiful enough.
Colors are selected based on the design of the house or a separate room. Using different coatings you can zone a room, place accents, and make the design more attractive:
The color of the lining should match the interior. If the decoration of the house is new, then it is better to use transparent varnishes and azures. The old surface is painted.
The lining is also used for exterior decoration of the walls of a country house; it is used to line the roof of the terrace and roof overhangs. Different types of opaque paints prevent wood from darkening in the light and create a kind of ultraviolet filter.
Many impregnations contain fire retardants and antiseptics. Or they need to be applied before the main painting. This is done with a brush; you can immerse the boards in the prepared composition. Wood that has darkened over time can be bleached.