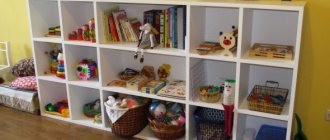
Shelves in a children's room are additional storage space for books, toys, photo frames, souvenirs and other small items. They are good because they allow you not to hide all the most necessary and beautiful things, but, on the contrary, to display them for easy access and interior decoration.
- You can also make shelves easily and on a low budget with your own hands in literally 1 evening. In this case, you will have the opportunity to come up with an “exclusive design” that the baby will like and fit perfectly into the interior of the nursery.
For creative parents, we have prepared a large selection of ideas and inspiring photos, as well as a master class on making a homemade shelf in 7 steps.
Design Features
Children's shelf houses are products that imitate the walls and triangular roof of buildings. The design is open, there are no doors, and the number of shelves is arbitrary. In some models, the inter-ceiling space is additionally divided into sections.
This design will appeal to any child aged 3 to 10 years.
Such houses, also called dollhouses, have a number of advantages:
- Versatility. Perfect for placing books, toys, children's sets and other children's “needs”.
- Affordable price.
- If you wish, you can make such a design yourself.
- Compactness. With a minimum of occupied space, maximum capacity and functionality are guaranteed.
Its purpose is to store toys and other entertainment accessories.
This design can be made in a floor or wall version. If the house is installed on the floor, then in addition to the storage function, it also serves as a favorite toy. The child has the opportunity to arrange such a “home” and come up with his own stories for games.
Types of children's houses
Now let's take a closer look at the types of children's houses. First make markings on the site, determine the location and dimensions. The dimensions are chosen arbitrarily, taking into account the age of the children and their number.
A comfortable little house is one and a half meters high and a little more wide.
House-tent
Such a house has more advantages than disadvantages: it is easy to transport, disassemble and assemble, cheap, compact, the material for manufacturing is available. You can place the tent house anywhere on the site.
A tent requires a frame and fabric. It is possible to make a frame from wooden blocks, metal pipes and PVC pipes.
Take 4 bars, 120-150 cm high, make corners and connect them together by drilling a hole for the crossbar.
To cover, use any fabric the size of a sheet, stretch it, sewing elastic around the edges to secure the fabric. At the tent house, secure the ends by digging or securing with pegs. The tent is ready.
It’s even easier to use PVC pipes for the tent frame. They are easily connected to each other using fittings for fastening plastic pipes. The building is stable, the frame will not move apart.
By showing your imagination, you can make any child’s dream come true by creating a house of any complexity, a gazebo or a wigwam.
Wooden houses
Wooden playhouses for children are a simple, environmentally friendly design. But if you want to build a children's house for several years, then it needs a basic foundation.
To do this, you can use pillars for support, burying them to a depth of 50-60 cm in the soil. Place a layer of crushed stone at the bottom of the pit and treat the lower part of the pillars against corrosion.
It’s even easier to base the house by filling the area with a layer of crushed stone or compacting it. Be sure to use waterproofing: the cheapest type is roofing felt and special mastics.
Logs or beams are placed on the prepared base. Then they make a rectangular box for the floor and cover it with floorboards.
It is better to insulate the floors with foam plastic or other insulation that you have.
To add strength to the structure, use metal corners and additional cross bars.
The frame of the house is finished with sheets of chipboard, MDF or boards, sheathed with clapboard or wooden siding. For the roof, use soft roofing, slats, plywood, slate.
Windows and doors should be provided in the house; they are located at a height of half a meter from the floor. The doors are made 30 cm taller than the child’s height.
Other types of playhouses
Using this design, you can build a playhouse on a tree. A tree house will require support posts, a strong wooden platform and a strong tree.
Cheaper designs are frame houses and plywood houses. Many summer residents use the technology for manufacturing frame houses to build their country houses and cottages.
To save money, you can use wooden pallets (pallets). They are durable, you can assemble a house from them or disassemble them into boards to use in construction.
Do not use painted pallets or pallets marked IPPC as they have been treated with formaldehyde and other chemicals.
And the simplest design of a playhouse for summer cottages is a hut. For construction, any thick rods are taken. Long poles are placed in a circle, secured at the top, and tied with twine. It turns out to be a wigwam.
A classic hut is built differently: two thick spears are driven into the ground, a support pole is placed on them, and secured with a rope. Vertical branches are laid on top, a lathing is made, and covered with spruce branches or hay.
The bottom of the hut is covered with earth. The floor is covered with hay. A hut in the form of a tent can be woven from willow branches and secured with twine.
How to choose?
Since the range of designs is large, you will have to choose a model that is ideal for your child and harmoniously complements the interior.
Shelves in the children's room provide additional storage space for toys.
To ensure safety, plywood shelves are most often chosen. Eco-friendly and lightweight material is ideal for creating accessories for a child's room. The main thing is that the plywood is well processed, has no “burrs”, and is “densely” covered with paint.
The shelf house can be made in any color.
If you purchase such a shelf in a store, remember that this product, like all others, must undergo mandatory certification, and this is an advantage. However, purchased models, as a rule, do not have much variety. Therefore, if you want to purchase a special design, unique in its kind, you will have to either order it from a workshop or make it yourself.
You can arrange the shelves inside the house yourself.
Hand-crafted houses often have an unusual design, asymmetrical shelves, can be semi-closed, with a unique finish.
Materials for making playhouses
The materials used to make such toys are different: depending on the preferences of the parents and the child, you can choose a children's house for an apartment made of fabric, wood, cardboard, plastic, and so on. Below is a more detailed description of the materials used.
Tree
Wooden structures are among the most expensive. They are used more on the street or in the country, and not in a city apartment. Wood is an environmentally friendly, breathable material. Products made from it are obtained as exact copies of a real fairytale mansion or even a castle. They are often equipped with additional elements, such as ropes, rope ladders, slides, rings, and swings. You can play them even in the rain, because the buildings have a reliable roof that will protect you from bad weather. In addition, they are very durable and can be used for many years.
Here he will be able to spend his leisure time usefully, dream about a wonderful future, “fly in the clouds” and prepare for adulthood.
Plastic
The plastic house can be used both indoors and outdoors. Typically, such models are easy to assemble and disassemble. Children's folding houses made of plastic are easy to clean: if it is an outdoor option, you can spray it with water from a hose, if it is an indoor option, wipe it with a damp cloth and detergent. In addition, they are bright, attractive and do not have sharp corners or hard elements, which means they are not dangerous.
It is easier for parents to do important household chores without worrying about their child.
Attention! If the houses are used outdoors, then it is better to disassemble them for the winter and put them indoors, since the plastic can crack from low temperatures. And in bright sun and high temperatures, it is better to put it in the shade to avoid overheating of the structure
Textile
Children's playhouses made of fabric are the most popular models for apartments. They are made on a metal or plastic frame made of hypoallergenic fabrics. This is a fairly budget option and, moreover, very compact, which when folded takes up minimal space. You can also use a fabric tent outdoors, because if it gets dirty, the fabric can easily be washed.
The recently fashionable “wigwams” also look very stylish in the interior and can serve as decoration for a child’s room.
Important! Before playing outside, the structure must be securely secured with pegs.
PVC materials
Often there is a children's soft house made of PVC. It is absolutely safe even for the little ones, as it does not contain hard parts or sharp corners. And the springy, swaying floor, like a trampoline, will not leave children indifferent, because you can jump and frolic on it. The bright design with cartoon characters or cute animals will appeal to little fidgets.
This is an inflatable model, quite inexpensive and very compact.
Cardboard
Recently, children's folding houses made of cardboard have been gaining popularity. They can often be colored like a coloring book, which is sure to keep kids interested. This design is very inexpensive, easy to assemble, but not as strong and durable as the previous ones.
It is easy to accidentally deform during play.
How to make a shelf with your own hands
Any interior detail made with your own hands looks special and brings a unique atmosphere of coziness and comfort. And the shelf house is no exception.
Not only do you have the opportunity to make a model that will fit perfectly into the scale of the room and will personally meet your needs. You have a wonderful opportunity to put a little bit of your soul into the interior.
Prepare all tools and materials.
Moreover, to make such a structure you do not have to be a professional carpenter. So, you will need:
- Several boards (their number depends on the model you choose), you may need plywood, thick cardboard (this also depends on your idea and capabilities);
- Screws (or nails);
- Screwdriver (hammer);
- Hacksaw;
- Quick-drying paint for treating wood surfaces.
Wooden rulers and corners are quite suitable as additional consumables. Wood putty will help hide imperfect joints.
After puttying, the furniture is sanded.
Before you start working, make a sketch of your future masterpiece.
It is important to choose high-quality putty and other materials.
Children's shelf-houses, in addition to their pleasant “appearance,” must be distinguished by good processing - no burrs or roughness are allowed. Therefore, before starting to create a structure, carefully process all the boards.
First, the frame is made, and then they begin to create the roof.
If it is planned that your house will have a complex structure, and the shelves will be divided into sections, then the partitions are also installed before the roof is “put on.” Alternatively, the structure can be made of different materials: the base - walls and partitions - made of wood, and the roof - made of plywood, or even thick cardboard.
Houses can be made in different shapes.
Every parent wants their beloved child to have a special house, a model that is not similar to those of other children. As for the finishing, it’s all at your discretion; make your wildest fantasies and your children’s come true.
Use quality materials for the house.
Some people complement the basic design with balconies, staircases with railings, and attics. Others additionally make windows and decorate them as full-fledged window openings - window sills, curtains, and even flower pots. Others create a main entrance and an emergency exit... Garlands and an openwork roof are used as decoration for the structure. In general, go for it!
Use your imagination when creating a shelf.
But remember, the more additional elements, the more difficult it will be to use the house as a storage system. It becomes a spectacular toy, part of children's fun and entertainment. And for the most practical model, you only need walls, partitions and a roof.
You can quickly make a house with your own hands.
Building a house with your own hands will allow you not only to spend several hours doing an interesting, and perhaps unusual, activity for you, but also to save money. The models presented in the store are not cheap.
Natural wood has been used to create furniture for many centuries.
Materials can be purchased either in specialized construction stores or on numerous Internet sites that sell a similar range.
Homemade children's shelves - ideas and master classes
Shelves in a children's room are additional storage space for books, toys, photo frames, souvenirs and other small items. They are good because they allow you not to hide all the most necessary and beautiful things, but, on the contrary, to display them for easy access and interior decoration.
- You can also make shelves easily and on a low budget with your own hands in literally 1 evening. In this case, you will have the opportunity to come up with an “exclusive design” that the baby will like and fit perfectly into the interior of the nursery.
For creative parents, we have prepared a large selection of ideas and inspiring photos, as well as a master class on making a homemade shelf in 7 steps.
6 DIY Shelf Design Ideas
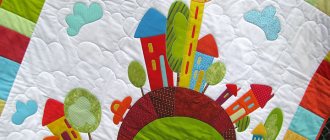
Idea 1. Curly shelves
Curly shelves may not be the most practical and functional, but they are definitely the most beautiful and fun. They are made easily and quickly. The main thing here is to show your imagination and... have a jigsaw.
- We will tell you more about making such a shelf in step-by-step instructions at the end of the article.
- You can search for ready-made figured shelves on Etsy.com or the Crafts Fair.
Here are original and easy to implement ideas for a homemade floor shelf for books and toys.
A video tutorial from the Do It Sam channel will help you make a similar floor or wall-mounted children's book shelf, where a master makes a shelf in the shape of a sheep with several sections out of plywood.
Idea 2. Hanging houses for toys
Wooden toy houses have long been a hit in modern children's interiors. You can make them from thin plywood yourself or order them from crafts moms on Instagram or Etsy.com.
However, toys can live not only in houses, but also in such sections and cells as in the photo below.
Idea 3. Hanging shelves for toys and decor
Another fashion trend is planks or boxes suspended on ropes or ropes from hooks. As you can see, the design of hanging shelves is simple and can be done very quickly.
Idea 4. Use available materials
Shelves can be made not only from plywood, chipboard, MDF or wood, but also from pallets, boxes, cardboard boxes, old chests, skateboards and other scrap materials. We present examples of such shelves in the following photo selection.
You can watch how to make a shelf from a pallet with your own hands in this video master class:
Idea 4. Shelves with hooks
Shelves with hooks for hanging clothes are a more functional and practical solution. Such a shelf would be especially relevant in a newborn baby’s room, because it can be installed above/near the changing table, then all the most necessary things will always be at hand for the mother. You can make a hanger shelf with your own hands by simply screwing the hooks on the back of the board to the board.
Idea 5. Involve angles
To make the most of a small space, you should choose corner shelves for storing books and toys. You can make them with your own hands from a triangle or a quarter of a circle (from the selected material) and a pair of brackets, or form a corner from two adjacent shelves.
Idea 6. Narrow slats for a children's library
Do you want to instill in your child an interest in reading? Narrow slats will help you with this, on which you can display books not with their ends, but with their covers forward. Then the bright library will always attract the attention of the young reader and at the same time decorate the walls of the children's room.
- It’s not difficult to make such a ledge for books with your own hands; to do this, you need to construct it from three narrow boards - a support, the shelf itself and the side. To make the plank more beautiful, you can decorate it with ceiling molding. By the way, some types of moldings themselves may well become shelves after a simple alteration.
However, the slats are intended not only for books, but also for storing icons, decor, paintings or photo frames.
Master class - how to make and hang a children's shelf
To work you will need:
- Plywood with a thickness of at least 15 mm or wooden boards made of soft wood, such as pine.
- Brackets, for example, are made of untreated wood, which are sold at Ikea or any hardware store. When purchasing brackets, be sure to check the permissible load weight for them.
- Also prepare screws with dowels, a drill or hammer drill with a drill (the tool must match the wall), a building level, clamps, a pencil, and paintwork with a brush.
Step 1. Draw a silhouette of the mountains on one board, and make markings for cutting on the other.
Step 2. Secure the boards to the table with clamps. To avoid leaving traces of clamps on the wood between the board and the clamp, you can lay fabric. Then we cut out our “mountains” with a jigsaw exactly along the marked lines, and also cut out the shelf itself.
Step 3. Carefully process the material with sandpaper along the ends and, if necessary, over the entire surface.
Step 4. The next stage is assembling the structure. We attach the “mountains” to the shelf (on the reverse side) with nails, self-tapping screws or self-tapping screws. It is advisable to do this in such a way that the fastening points can later be hidden by brackets.
Step 5. Now you need to paint it with two layers of paint or cover it with matte acrylic varnish.
Step 6. While the workpiece is drying, you can begin attaching the brackets. To do this, you first need to make sure that there is no electrical wiring in the desired location, then you need to draw markings on the wall using a building level and mark the fastening points.
- Before work, do not forget to lay a rag or newspaper on the floor so as not to get the floor too dirty. It’s even better to use a special dust collector for a rotary hammer or simply stick the bag on masking tape under the drilling site.
Then we take the following steps:
- We use a center punch to punch a hole at the attachment point as shown in the photo below. This is necessary so that when you start drilling, the drill stays exactly in the center and does not move.
- Using a hammer drill, we drill holes in the wall to a depth slightly greater than the length of the dowel (taking into account the dust that will remain in the hole). Keep in mind that the thickness of the drill should be slightly larger than the diameter of the dowel, and the dowel itself should be selected based on the expected load on the future shelf (a consultant in the store will definitely help you choose the appropriate option). You need to drill the wall strictly horizontally or slightly from top to bottom.
- Insert dowels into the resulting holes. Next, holding the brackets in place, fasten the screws.
Step 7. Hooray, almost done! All that remains is to secure our workpiece (with the paint/varnish already completely dried) to the bracket. To do this, simply place it on the corners and screw it onto the screws from below. Of course, they should be of such length as not to extend onto the front side of the product. Well, that’s all, we check our shelf for reliability and evenness and hurry to put something on it.
(Rate the material! Already voted: 21 average rating: 4.81 out of 5)
Where else can a shelf house come in handy?
To be fair, it is worth noting that shelves as such appeared a very long time ago. Almost from the time when people learned to build their own homes and began to make do with simple household utensils. Initially, the shelves were attached almost to the ceiling (and the ceilings, of course, were much lower than today). This was considered a characteristic feature of peasant houses.
The shelves inside this cabinet can be arranged however you want.
And over time, the shelf began to perform not only a practical function, but also to decorate the home, making it different from the others, the neighbors. Today we can no longer imagine life without shelves. Their sizes and configurations are so varied that they simply defy description. However, the functionality of this interior detail cannot be overestimated.
Only environmentally friendly and child-safe materials are used in their production.
Therefore, we can safely say: there were, are and will be shelves in any style and design. If you think that a shelf-house is an attribute exclusively for children's space, then you are mistaken. Wall “houses” are a full-fledged component of the design concept, capable of supporting any style or direction.
A house in the hallway is an opportunity to organize numerous keys and other little things that must be at hand. In the kitchen there is a shelf for spices or kitchen utensils. A shelf in the living room will adequately present your collections to visitors, just gifts from people dear to your heart or souvenirs from interesting travels.
You can also choose any color for the house according to the child’s wishes.
Shelf houses for a children's room, living room or kitchen differ in their design and size. But they are united by the following: a simpler, and at the same time, functional interior detail has not yet been invented, and it is unlikely that they will ever be invented. Regardless of what you prefer: hand-made or a stylish designer model, rest assured that the house shelf is a convenient system for storing a wide variety of things.
The positive aspects of creating a house for a child
If you are one of those parents to whom a house for a child seems just a whim, then we will now try to assure you of the usefulness of this structure. The fact is that by creating a house, you do not just give it a new space for games, protected to one degree or another from the outside world. But you will also give him his first personal property, which will subsequently have a huge impact on his development and teach him responsibility.
The house can be located both on the ground and on a hill
So, let’s look further at the table, in which we will analyze in detail all the positive educational effects of transferring the house into the possession of one’s own offspring.
Table 1. Advantages of purchasing or making a house for a child yourself
Advantage Description
Forming a caring attitude towards things
It doesn’t matter whether you make a house yourself or buy it for a child, in any case, in its appearance you will invest some valuable resources, which are realized, one way or another, by your offspring. Next, you will need to transfer the house into the possession of the child, emphasizing that it was purchased by you, but now completely passes into the possession of your son or daughter, and he or she will now take care of it. Such a ceremonial handover and use of the house will help develop in the child a caring attitude towards things, no matter whose property it is.
Instilling love for home
It’s natural to love the home you live in, since it reflects your inner state and gives you a sense of protection.
By teaching your child to love and care for the place in which he lives, even if he subsequently travels and does not stay long in one place, you will provide him with inner harmony and the ability to feel at home at any time.
Creating a feeling of safety
A playhouse with its thin walls can create and strengthen a child’s sense of security and calm. When he grows up, he will be able to better cope with various troubles, even when he is far from his parents.
Development of responsibility
Owning a house will teach your child responsibility. So, if he is careless, the house will break, and it is not you, but the child who will have to make an effort to fix it. In this way, he will learn not only to take care of things, but also to approach everything material and tangible that he owns exclusively responsibly.
Organization of useful leisure
Everything that happens inside the house, even the most trivial games with dolls and soldiers, will develop in the child a sense of inner freedom and other positive qualities we mentioned above.
In addition to all of the above, the child can also be involved in the construction of the house. As a consequence, he also:
- will gain construction skills;
- learn patience;
- will be able to carry out any work carefully.
Children's house - a refuge for a child
Shelves-houses in the interior in the photo
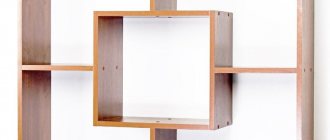
Basic models of shelving
Thanks to the creative approach of designers, today you can find unique models of shelving and ready-made plans for independent work. Furniture differs in shape, size, design and type of construction:
- In terms of size, there are large floor racks that reach ceiling level and miniature half-height shelves. Choose the appropriate size based on the area of the room, the location of other furniture in the room, the height of the ceilings and the placement of window openings.
- In the direction of the main body, linear models, corner and more non-standard types are distinguished, for example, T-shaped, U-shaped structures. The use of one or another type of rack is determined by the practical characteristics of the room. For example, for small apartments, it is more optimal to use corner models that fit well into any interior style, are quite compact, and are mobile due to modular assembly.
A separate, but no less important criterion for choosing a rack is the material of manufacture. According to safety requirements and current sanitary regulations, the material for furniture must be sufficiently durable, resistant to moisture and detergents, and have good environmental performance. Such bases today include solid wood, chipboards (pressed wood chips), and plywood sheets.
A wooden rack made by yourself is the best option for work. Plastic inserts and facades, metal frames, and shelves made of tempered glass are widely used as successful combinations.
Step-by-step production of a rack
When starting work on an independent project, you should draw up a thorough plan for further actions. A well-drafted action plan is the key to success and successful operation of the finished product.
Preparation of materials and tools
The most optimal material for independent work is wood, which is sufficiently durable, acts as an environmentally friendly basis and has an advantageous design. To work on creating a wooden shelf with your own hands, you should prepare the following set:
- Jigsaw and plane for cutting wooden blanks.
- Construction pencil and tape measure.
- Sandpaper for sanding surfaces.
- Compositions for impregnation: antiseptic, antipyretic, moisture-resistant and antifungal solution.
- Decorating compositions: acrylic varnish, stain, acrylic paints for stencil painting.
- Fasteners, which are most often used, are metal corners and self-tapping screws.
If the project plans to manufacture a combined rack, for example, from wooden plates on a metal frame, you should additionally prepare an angle grinder, welding and anti-corrosion compounds. You will also need instructions on how to make a rack with your own hands, video tutorials and detailed descriptions of the work.
Preparation of the drawing
Drawings for independent work can be found on various construction web portals. Many experienced craftsmen share their original schemes for assembling structures of a wide variety of shapes and sizes. The homemade drawing should display the following parameters:
- Overall dimensions of the structure.
- The depth of the shelves.
- Scheme of the structure of the frame, shelves and auxiliary compartments (if any).
The paper also shows the placement points of fasteners and their characteristics.
Processing parts before assembly
Based on the prepared drawing, sketches of future parts are displayed on the wood: frame racks, shelves. The parts are cut out with a jigsaw and subjected to pre-processing:
- Grinding of sharp cuts and nicks.
- Impregnation with antiseptic and moisture-resistant solutions, which significantly extend the service life of the finished structure.
After drying, the parts are opened with stain and acrylic varnish. The further operation of the rack directly depends on the quality of the processing performed.
Assembly of the structure
There are several main ways to assemble a finished structure:
- Using self-tapping screws along the outer contour and metal corners (for additional strength) along the outer surface.
- Using dowels.
An original assembly method is also known, in which joints on the corresponding surfaces are prepared in advance. The first to assemble the frame is wooden (in one of the following ways) or profile pipes are welded. Next, the sides are welded or mounted under the future shelves. The shelves are laid, carefully leveling all horizontal surfaces (using a building level).