What is a door jamb
A door jamb is a frame secured to a doorway. This structure is stationary and serves as a platform for rigidly fixing the door leaf on its hinges.
Read also: The meaning of the word NUGA. What is NUGA?
The door jamb is needed to attach the door to it
A door block without a special frame is a rarity. However, this is quite possible if it is necessary to insert a sliding structure or a door into the opening, which folds like an accordion when opened. In a frameless doorway, the leaf is secured with awnings.
In any case, doors without frames are only suitable for rooms decorated in a certain style. Still, the lack of a frame structure forces you to look at the doors as an object almost floating in the air. Thanks to their unusual appearance, such products look especially impressive.
Doors that move to the side when opened do not require a special frame
When you want to do without a door jamb, you can fix decorative panels in the opening. These structures are almost identical in appearance to the beams of a special box and are fixed in the passage in the wall in almost the same way. Another alternative to a door jamb is slats on a slatted frame.
Some recommendations
Tools required for work: tape measure, level, spatulas, screwdriver, metal scissors, grinder.
Immediately before starting work, you need to prepare your tools. This:
- spatulas;
- level;
- roulette;
- metal scissors;
- screwdriver;
- empty containers;
- Bulgarian;
- marker, etc. (depending on option).
Before you start finishing the slopes, it is important to make them smooth using plaster or drywall. Despite the fact that plastering is a rather labor-intensive task, it has excellent results, since the plaster is more durable
Compared to plasterboard, the wall and slope do not form voids, which will subsequently affect the thermal characteristics. In order for plastering to be done properly, it is necessary to use beacons along which the plaster is leveled.
When the question arises of how to finish the slopes of the front door, you should take into account the factors that are taken into account when choosing materials for finishing. Finishing the door jambs
Finishing the door jambs.
You should select a material for decorative finishing of entrance door slopes not only for its aesthetic qualities, but also take into account its properties. For example:
- Such parts of entrance doors are exposed to dust and dirt from the inside, so the material should be easily and quickly washed.
- Due to sudden temperature changes, elements are exposed to moisture, which is certainly expressed in the form of condensation on their surface. Certain building materials deteriorate from moisture, which further leads to deterioration. Therefore, it is better to plaster the products rather than cover them with plasterboard. This especially applies to private houses, where the entrance doors naturally come into contact with the street.
- The slopes of the front door are easily damaged under the mechanical influence of objects that are brought into the house. Therefore, the material must withstand mechanical damage.
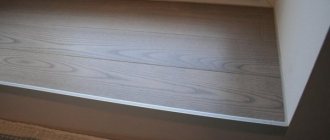
So, the most suitable materials include wood, laminated panels and natural or artificial stone.
Methods for making jambs and finishing materials
Depending on the amount of damage and unevenness remaining after installation of the structure, the slopes are designed in one of the following ways:
- filling the voids with mortar and plastering;
- fixing the facing material with an adhesive or solution;
- by installing the finishing panels on the frame.
Slopes made of decorative panels Which option is more suitable for your home depends on the features of the door, the general style of the interior, as well as personal preferences and needs.
If reliable sound insulation is important to you, then you should opt for completely filling the slopes with mortar. This will eliminate all voids and give the structure additional strength. In some cases, when the consumption of solution for filling irregularities is too high, it is more advisable to mount the materials on a frame made of metal or wood. Thus, making the jambs perfectly even will not be difficult. Another advantage of this method is the ability to hide communication wires inside the slope and install a lamp or switch in it.
Read also: what to do if you oversalt your dumplings?)))
As for finishing materials, the most commonly used are plasterboard, plastic and MDF panels, artificial stone, laminate, wood or decorative plaster. They all have their own characteristics that should be taken into account. For example, plastic is quite fragile and is easily damaged by mechanical stress, and applying smooth, high-quality plaster will require a lot of effort. Based on this, we can say that drywall and MDF are the most versatile materials, but the final decision on how to decorate the doorway of the front door is up to you.
MDF is a universal material with a wide color palette
Painting
Painting slopes is highly complex and involves a large number of wet processes. At the same time, this finish goes well with the main covering of the hallway walls, giving the room harmony and eliminating contrasts. Performed according to the following algorithm:
- Before installing the door, the slope is prepared for finishing.
- A layer of plaster is applied to the surface of the end of the opening in the wall until the plane is completely leveled.
- The installation team carries out the necessary production operations to install the front door.
Plastering the slope
- Upon completion of the installation of the structural element, the door leaf and frame are protected with film or masking tape from splashes of paint on the door.
- The master applies finishing putty to ensure a smooth surface of the slope.
- Before painting, the end of the wall is treated with a penetrating primer, which significantly improves adhesion.
- At the final stage, paint is applied, which is evenly distributed over the slope area with a roller.
Painting the slope with a roller
- If it is necessary to refine an element in hard-to-reach places, brushes with different working widths are used.
After applying the paint, you should wait for the standard period indicated on the packaging with the finishing material, and then check the quality of the application of the composition. Considering the risk of frequent mechanical contact of clothing or parts of the human body with the painted slope. When choosing a material, increased attention is paid to its wear resistance.
How to install door jambs
Door jambs are quite often called decks. The installation of door jambs usually has serious requirements. To make a door frame, you need to prepare thick logs in advance. You also need to have some skills in processing wood materials.
Door jambs are quite often called decks. The installation of door jambs usually has serious requirements. To make a door frame, you need to prepare thick logs in advance. You also need to have some skills in processing wood materials.
Door jambs are often called decks
Lay the logs with wedges on two or four blocks. From the resulting blocks it will be possible to cut four-rope beams. Make a groove in them on one side, which is needed for attaching to the wall studs. On the other side, select the quarter in which the door leaf will be installed. Installation of old casings Cut out tenons at the ends of the logs.
Also, adjust them exactly to the size of the grooves in the door jambs. Please note that the box is attached to the wall only with spikes. There is no other fastening. Quite often wooden doors are installed indoors. They are very heavy. When fully opened, they will try to turn the decks inside out. When closed tightly, they become loose. If the fit is poorly done, the defect will immediately begin to appear. The decks will become loose, moss will begin to fall out, and strong air will begin to blow into the resulting cracks.
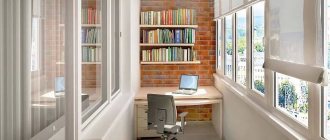
Common materials for finishing doorways
High-quality finishing of doorways guarantees an aesthetic appearance, as well as sound insulation and tightness
High-quality finishing of doorways guarantees an aesthetic appearance, as well as sound insulation and tightness. Materials that are in demand for finishing doors:
- MDF panels or laminated fiberboard. These materials are durable, environmentally friendly and hygienic. They have excellent noise and heat insulation qualities.
- Drywall. Before making a jamb, you can look at photos of various modifications in advance, and you may choose the appropriate option for finishing the doorway. Drywall is an excellent alternative to plaster. This type of finishing is a simple, fast and aesthetic way to decorate a surface.
- Sandwich panels. This material has excellent noise and sound insulation properties. The most modern finishing method.
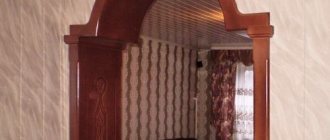
- Decorative stone finishing. Basically, this material is used to decorate door jambs without using doors, for example, arches.
- The classic option is plaster. This type of finish, in addition to its aesthetic properties, retains heat well and is highly durable.
As you can see from this article, there are many options for designing doorways. The main thing is to choose the most suitable one according to your tastes and preferences. In addition, the finishing method must meet all technical requirements and criteria, then it will delight the eye with its appearance for a very long time.
Sources:
- https://www.supersadovnik.ru/video/dvernaya-korobka-svoimi-rukami-10181
- https://goodlinez.ru/installation/613
- https://monateka.com/article/35211/
- https://jprosto.ru/kak-sdelat-dvernoy-kosyak/
Some nuances when installing platbands
It is necessary to install platbands or a finishing frame on the doorway, the finishing of which will give a finished and aesthetic appearance to the structure. You can select the necessary platband from a large number of standard ones presented in a hardware store. They are fastened using finishing and liquid nails and self-tapping screws. Some tips that will make the process of installing trim on doorways easier:
- Heads of screws/nails or small cracks can be hidden using a wax corrector or acrylic-based sealant.
- Gaps where the planks meet each other can be eliminated with a single finishing nail.
- Large defects in the door frame can be hidden with wider trims.
Sandwich panels
Sandwich panels made of a veneered surface with a porous filler are an almost ideal barrier against the spread of extraneous sounds. In addition, finishing structures have a low thermal conductivity coefficient and retain the heat of the room. Fastening of such materials is carried out similarly to PVC products, using liquid nails.
Installation of sandwich panels on slopes
Considering that the thickness of the element is 15 mm or more, their ends will be noticeable on the wall during operation. In such cases, experts recommend using additional platbands made of the same material as for interior paintings.
Finishing slopes near the front door
The most expensive and luxurious door will lose its beauty if the slopes are not carefully finished. And the task is to make them look beautiful, fit into the overall style of the hallway and corridor, and be practical.
Read also: Gray-green living room interior, photo
Before decorating, slopes must be leveled with plaster or covered with plasterboard. However, if you chose decorative stone or brick to decorate the slopes of the front door inside the apartment, plasterboard sheets may not withstand the weight of the finish.
Therefore, plaster, and with the addition of alabaster, is attached to the wall securely and quickly.
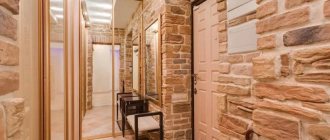
The pattern on the door is repeated on the walls.
The finishing of the slopes continued in the hallway
The principle of gluing slopes is practically no different from finishing work in an apartment.
- Laminate and MDF panels require a flat surface if the width of the slope is very large. If it is narrow, then some errors will not be a hindrance. They are attached to a thin layer of mounting foam, which fills the space between the material and the wall.
- It is not recommended to use plastic for slopes due to its fragility and cheap appearance.
- Clinker tiles in the form of bricks will be appropriate in both houses and apartments.
- Finishing stone is not cheap, but it also looks presentable and expensive. It is attached with liquid nails or special resin.
Not only the slopes, but also the walls are finished with stone
The slopes are not wide, so their finishing is minimal
Tip: using clinker bricks or stone, use these materials to decorate not only the slopes, but also the outer corners, the part of the wall in which the front door is located. Then the doorway will not stand out too much.
We have already talked about options for decorating the hallway with decorative stone. The same tips for choosing a design apply to the design of slopes.
And I would like to add that in a private house it is undesirable to use MDF panels, veneer, vinyl artificial leather, or plasterboard in the doorway.
Behind the outer wall there is already a street, and this is fraught with the formation of condensation, mold and subsequent damage to finishing materials. Stone or brick is preferable.
Installation and design options
There are two main options for installing slopes:
- frameless;
- framed.
Before moving on to finishing, you need to make sure that the structure is installed correctly, that there is an exact parallel between the opposite boundaries of the door frame and that all seams are tight. First of all, you need to check the structure for cracks. To do this, you need to light a match or candle and run it along the entire doorway. Where the flame begins to deviate or even go out, it is necessary to additionally insulate the slopes and add sealant.
When all the insulation work has been completed, you need to cut off the excess dried layer of polyurethane foam and additionally close the door frame with masking tape
After this, it is important to get rid of old plaster and loose concrete and brick wall elements
After this, you need to move on to plastering. First you need to completely clean the wall of construction dust and level it. Then you need to use a deep penetration primer. It will make the base of the frame stronger and more even.
If the surface does not absorb moisture well, then it is also necessary to use a special primer. After the soil layer has dried, you will need to install the profiles. But before doing this, it is better to wait about 8 hours until it dries completely. Profiles are necessary to level the layers of plaster on all slopes.
To do this, you need to use a laser or the simplest level to mark the position of a vertical line on the side of the door, approximately 3-4 cm. There you need to drill several holes with a diameter of 6 mm in increments of 30 cm. Dowels are inserted into the holes, and then the level of their caps is leveled using twine. After installing all these elements, you need to check that they are correct and vertical. Using the same principle, it is necessary to install the profile on top and on the opposite side of the doorway.
After completing the installation process, it is necessary to make a cement mixture. It is best to use sand and cement grade M150 for this. All these finishing materials must be sifted through a fine-mesh sieve. To create a high-quality solution, you need to mix sand with cement in a ratio of 3: 1. You need to gradually add clean water to the dry mixture and at the same time stir the resulting solution with a special drill attachment.
When the mixture becomes homogeneous and thick, like dough, the solution can be used to finish the slopes. Using a spatula, you need to sharply and quickly throw it onto the wall and iron it, closing the profiles. This way you can create a perfectly flat surface without unnecessary deformation.
The panel version without a frame is simpler. In this case, laminate, plasterboard, sandwich panels, MDF, laminated chipboard and other options are often used. Moreover, you don’t have to smooth the surface of the slopes at all. Finishing is carried out using glue installation
It is important that the surface is straight. There should be no defects or irregularities on the surface
Even if the door frame itself has some defects, they can be corrected using this design of the slopes. In this case, it is necessary to additionally plaster the door exactly in the places missing for a smooth surface. If the original surface is flat and smooth, then finishing with the frame method will be very simple. Initially, you need to apply primer to the base where the panels will be fixed.
Then you need to measure all the slopes and select the required amount of finishing materials. All notes and dots must be made on the panels. Then you need to connect all the lines and check them using a tape measure and a special square. This must be done very carefully. A sheet of such a panel must be cut into the required number of individual elements and prepared for installation.
As for laminate or parquet, they can be installed either vertically, one for each wide slope, or horizontally, using several short panels. Then it is necessary to apply glue to the finishing material using the nesting method in increments of approximately 15 cm in the shape of a square. All glue stains must be dried a little so that a film begins to form on their surface.
Only after this can slope elements be applied, but it is important to be very precise, since it will be possible to align the finishing panels only a couple of centimeters, no more
Then, starting from the top and moving down, you need to gently press the panels against the wall, but do not press them hard so as not to push them through. This is especially true for plastic panels.
Methods for making slopes
Finishing the doorway of the front door allows you to hide the fastenings of the frame, level the surface and give the space an aesthetic appearance. At the same time, the structure’s burglary resistance, heat and noise insulation increases.
The formation of slopes is possible in several ways:
- plastering with cement mortar and building mixtures;
- gluing finishing material;
- frame paneling.
Sealing with mortar mixtures is the simplest option. Allows you to obtain a monolithic and durable layer, without voids. However, such a surface is not decorative and requires a finishing coat of paint or textured plaster. Plasterboards also need finishing. To implement other methods, materials with external decor and original design are used, which already during installation form the final appearance of the doorway. They are mounted on a frame made of wooden beams or metal profiles. It is recommended to fill the resulting space with insulation - mineral wool or polyurethane foam.
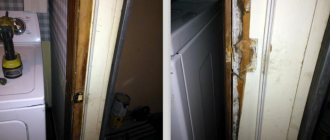
Rules and nuances of forming door slopes
So, let’s move on directly to analyzing how to make door slopes for the front door from different materials. Let's start with traditional plaster. Let’s immediately make a reservation that if a new door structure has been installed, then first of all it is necessary to remove the smudges of polyurethane foam sticking out in all directions, which are simply cut off with a knife at the level of the door frame. If the old door is replaced with a new one, then the same thing is done, only the old slopes are additionally knocked down to the brickwork.
Then the surfaces are primed. After which the plaster solution is applied. Typically, a plaster slope is finished with paint, so its surface should be as smooth as possible. How to do it:
- dried plaster is treated with a primer;
- after drying, apply finishing fine putty;
- after it dries, sand with zero-grade sandpaper;
- Next they paint or wallpaper.
As for other types of finishing, plastering must also be carried out under them. You just don’t need to achieve maximum smoothness and evenness of the plastered surface, because the slope will be covered with another material that will give the door element not only decorative, but also evenness.
For example, drywall on slopes is “set” on putty, which is applied to the finishing material in slides or, as the masters do, with slaps. It is thanks to them that you can level the drywall by pressing it on the skewed side.
How to make a door jamb
Door jambs are often called decks
Door jambs are quite often called decks. There are usually serious requirements for cutting decks. To make a door frame, you need to prepare thick logs in advance. You also need to have some skills in processing wood materials.
Lay the logs with wedges on two or four blocks. From the resulting blocks it will be possible to cut four-rope beams. Make a groove in them on one side, which is needed for attaching to the wall studs. On the other side, select the quarter into which the door leaf will be installed.
Cut out spikes at the ends of the logs. Also, adjust them exactly to the size of the grooves in the door jambs. Please note that the box is attached to the wall only with spikes. There is no other fastening. Quite often wooden doors are installed indoors. They are very heavy. When fully opened, they will try to turn the decks inside out. When closed tightly, they become loose. If the fit is poorly done, the defect will immediately begin to appear. The decks will become loose, moss will begin to fall out, and strong air will begin to blow into the resulting cracks.
Next, proceed to installing the box in the required location. Make the opening width on both sides of the door frame to the depth of the tenon. The depth of the tenon completely depends on the thickness of the decks.
Then choose one of two options: first, the door frame is made and an opening in the wall is cut along it, or the opening is cut first, and the frame is already cut to it. If you already have some experience in these matters, then feel free to cut the door “by eye.” Using a plumb line, make markings on the wall of the log house in the form of vertical lines. They will show the border of the opening for the door frame. Using a level, break through the upper and lower boundaries. Draw all the lines on the wall. Then cut out the doorway according to this marking.
If your doorway is wide, then use freshly cut short logs from the opening to make logs. Then place the selected logs with wedges on the blocks. The profile of the resulting decks may not be rectangular. It can be in the shape of a trapezoid.
Box assembly instructions
Manufacturers of interior doors offer two options for their products: assembled and in the form of a set of elements. Many people prefer to buy a ready-made door block. However, assembling a door frame yourself is not such a difficult task.
You can assemble the box using 3 technologies:
- into a tenon - the manufacturer has cut out the tenons and groove in advance. Only carpenters with experience can independently prepare the racks and crossbars for assembly into a tenon;
- at an angle of 90o - the simplest option;
- at an angle of 45o - a more complex method. But the difficulties are compensated by the beautiful appearance of the joint between the rack and the crossbar.
Tenon assembly
Assembling the frame on a tenon is rare - door manufacturers do not want to do unnecessary technological operations that increase the cost of the product. But, nevertheless, you can find them on sale. Assembling such a box is simple: on the floor, the crossbar is inserted with a tenon into a groove in the racks, after which the entire structure in each corner is fastened with a long wood screw, tightening and strengthening the box. It is better to drill a hole for the hardware, but of a smaller diameter.
At an angle of 90o
Assembling the frame at a right angle is the easiest and fastest way to install the load-bearing part of the door block. There are only three operations:
- the posts and crossbar are cut at an angle of 90o to the required size;
Attention: when measuring the racks and crossbar, it is necessary to take into account an important point: the crossbar will be attached to the racks or between the racks and will make allowance for the thickness of the box elements.
- using a chisel and saw, a part of the vestibule is selected (see photo);
- the box is assembled on the floor into one whole. The posts and crossbar are fastened together with self-tapping screws - 2 (in wide ones 3) at each end (see photo).
At an angle of 45o
The connection of the racks with the cross member at an angle of 45o, provided that the ends are cut correctly, looks very beautiful. The technology of work is simple:
- the elements of the box are laid out on the floor;
- the racks and crossbar are measured - no correction is made here for the thickness of the elements, as when assembling at right angles;
- the ends at the top of the box are cut at an angle of 45o. For work, be sure to use a miter box or a circular saw with a rotating mechanism;
- the structure is assembled into one whole;
- the ends are attached with self-tapping screws - two for each.
Plastering slopes
First of all, it is necessary to complete the preparatory stage. To begin with, the entire surface and objects must be covered with film so that they do not get dirty. Remove debris and dust and prime. This will eliminate the possibility of fungus appearing in the future.
Now you need to set the guide beacons, which are placed on the plaster or mortar. All potholes should be filled with cement mortar. After drying, you can begin applying the starting plaster. After the walls have dried, a reinforcing mesh should be applied and a second layer of putty should be applied, leveling the surface along the beacons.
After the second layer has dried, you can begin applying the finishing putty. Next, the surface is cleaned with sandpaper and painted or covered with wallpaper.
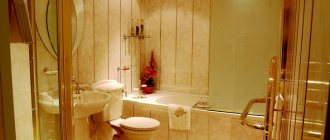
Tile
Porcelain tiles are used for finishing floors and walls in areas with high humidity or sanitary requirements. When installing this material along the entire plane of the walls of the space being used, the door slopes are formed automatically to create the overall style of the interior.
The tiles on the frame of the doorway are arranged in the same way as for the main part of the wall. For fixation, tile adhesive is used, which is applied to the surface with a notched trowel.
Installation of porcelain tiles on slopes
The seams between individual tiles are secured using spacer plastic elements - crosses. After the solution has dried, the gaps between the ceramic elements are filled with grout. Matched to the interior color.
In the corners, the tiles are cut at 45 degrees with a tile cutter, or the craftsman uses a plastic corner.
Dimensions
The dimensions of the doorway can be either standard or non-standard. Most often, the parameters of the entrance door are 800 x 2000 mm. Thus, the size of the box is 870 x 2022 mm. These are the parameters that are encountered most often.
If you decide to replace an old door, you need to take your time with the purchase. After all, entrance openings in houses with old and new layouts may differ. Often, non-standard dimensions of the door frame are found in buildings with an old layout.
The dimensions of doorways are regulated by GOST, as well as building codes and regulations (SNiP). In accordance with GOST 6629-88, the width of the doorway can be 670-1872 mm, height - 2071-2371 mm.
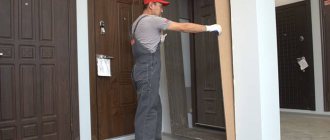
What is needed to install a door frame
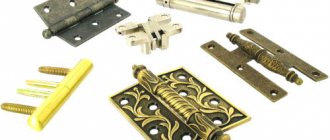
Typically, the jambs cover door frames, which are sold assembled, but can be purchased individually in the form of cut lumber. The technology for their installation requires certain tools and materials. Their exact set may vary, but approximately it is as follows:
- door frame set (frames, extensions, trim);
- polyurethane foam;
- decorative nails;
- putty;
- serpyanka;
- hammer;
- set of self-tapping screws;
- level;
- drill (screwdriver);
- putty knife;
- screws;
- hacksaw;
- wedges
Required Tools
You can install a door frame with your own hands using various tools; many owners have some of them, but what is missing will have to be rented or purchased.
- Miter box. A device that allows you to cut timber at different angles.
- Pencil, tape measure, construction tape.
- Acrylic paint on wood.
- Polyurethane foam for sealing the box.
- Chisel for making cuts for hinges.
- Hammer, drill, screwdriver.
- Nail puller, crowbar, hammer. For dismantling work.
- Miter saw, hacksaw and utility knife.
- Building level.
DIY door frame
Preparing door frame parts
For the door frame, it is important to choose wood that does not warp. In this case, the master chooses pine, but other types of wood that are resistant to external influences, in particular teak and oak, can be used to make door frames.
To ensure that the door frame fits perfectly with the door panels, the craftsman lays it in folds on both side panels of the future door frame.
To ensure the correct position of the door, the master places 3 mm spacers between the frame elements and the door leaf - in the upper part, exactly in the middle and in the lower part.
This distance ensures that the door opens and closes freely.
Fixing door frame parts
To maintain the correct position of the door relative to the door frame, the master fastens them with long clamps.
Now the main thing is to keep all the elements in place; for this, the master uses three screw clamps. They are placed in the upper, middle and lower parts, exactly where the spacers are located.
Preparing the top panel
For the door frame, it is important to choose wood that does not warp.
Now the master takes measurements for the top of the door frame, which will adjoin both side panels of the frame on top.
The size is taken from the outer edge of one side panel of the door frame to the outer edge of the other panel and in our case is 86.2 cm.
Saw off the top panel of the door frame.
Now we still need to cut it so that it rests on top of both side elements of the door frame.
The parts to be removed must have a width equal to the thickness of the jamb, that is, 2.8 cm. The master places this size on the top panel.
When marking, it is important to use a square so that the cuts are absolutely accurate. It is also very important to adjust the saw as precisely as possible so that the width of the rebate is exactly 2.8 cm.
The cutting depth should be 1.4 cm (this is the distance to the bottom surface of the rebate). Then the top panel of the door frame will ideally fit the upper ends of the side panels of the frame.
So, all that remains is to simply cut out the marked pieces of the top panel on both sides. If you don't have a miter saw, you can use a fine-toothed hacksaw.
Before attaching the top panel, you need to double-check that it fits neatly between the side panels.
Securing the top panel
Everything is in order, and now it can be secured. We do this using wood glue, applying it along the edges where the top panel will come into contact with the side panels. We press the top panel, but not all the way yet. First you need to squeeze the glue a little between the outer edges of the panels on both sides. And then we press the panel properly.
The door frame needs to be assembled and fastened, and the master takes a 3.5 mm drill. He drills three holes: one at the top, one at the bottom and one in the middle. Then he screws in the 4.5 x 70 mm screws. The same must be done on the other side. Now the door is almost ready.
Adjusting the height of the door frame
Before the door frame leaves the workshop, the craftsman will reduce the height of the frame. Since the height of the threshold under the door frame is 1.8 cm, the master puts this measurement on the frame below. He draws lines using a square and saws off the excess with a hacksaw. Finish cuts carefully to avoid splitting the wood.
Once both frame side panels have been cut to the correct length, a support board should be installed to ensure the door frame remains stable during transport.
The long clamps can now be removed. The new door frame is ready for installation. It took the craftsman about 45 minutes to make a new door frame for an old door.
Features of various types of MDF overlays
In order to make a choice of MDF overlay for a metal door, you first need to understand what it can be. In production, MDF board is used, and its finishing is carried out using painting, veneering, lamination or coating with anti-vandal plastic.
Painted MDF overlays
Here, a special paint is used to protect the panel, which is resistant to chemicals, does not fade in the sun and resists mechanical damage quite well. This is the most budget option, suitable for indoor entrance doors.
Painted MDF overlays are the cheapest
Veneered MDF panels
This coating allows you to completely imitate natural wood in color and structure. Doors finished with it acquire a solid and beautiful appearance; in appearance they are almost impossible to distinguish from products made from solid wood. Both natural and eco-veneer can be used.
The advantages of such panels:
- in appearance they completely resemble natural wood;
- You can combine several types of wood on the canvas, which makes the panel even more beautiful and unique;
- after special treatment, they normally tolerate temperature changes, moderate humidity and are not damaged by insects or microorganisms.
The disadvantage of this solution is that the panels are not resistant to severe mechanical and chemical damage, and this coating is also susceptible to abrasive. With constant high humidity, the panel may swell; prolonged exposure to sunlight can cause it to deteriorate. To restore the original characteristics, you will have to periodically open it with varnish.
Veneered MDF panels allow you to completely imitate solid wood
Veneered MDF panels are best used on the entrance doors of apartments located in multi-storey buildings.
Laminated MDF panels
In this case, the MDF panel is covered with a special film. There is a large selection of films that can imitate a variety of materials. Most often they order wood-look lamination; it is cheaper than veneering, but this solution looks no less attractive.
- the ability to implement various solutions;
- high wear resistance;
- creating inserts of different colors;
- ease of care;
- affordable price.
The disadvantages of this option are that with constant high humidity, the panels can swell and crack; in addition, they do not tolerate large temperature changes. Such panels are also not recommended for installation on doors facing the street, but for structures located in entrances, offices, and entertainment centers, they are an excellent solution.
Laminated MDF panels allow you to imitate any materials
MDF panels with anti-vandal plastic
In this case, MDF panels are covered with durable plastic, so this option can be used for metal doors facing both indoors and outdoors.
The main advantages of such panels:
- the coating is highly resistant to mechanical damage;
- the panels are not afraid of direct sunlight, have high resistance to fire, various chemicals and abrasives;
- can be used in combination with other finishing materials;
- large selection of colors;
- are not afraid of high humidity and temperature changes;
- affordable price.
Since MDF panels coated with anti-vandal plastic resist damage well, they are usually used in shops, schools and other frequently visited premises. If you install them in your home, you won’t have to worry about damage from pets.
Usually MDF overlays are made for doors of standard sizes, but if you have a non-standard entrance door, you can always order individual production.
MDF panels with anti-vandal plastic are best suited for outdoor use
Installation of accessories
In most cases, ready-made MDF boards covered with decorative film are used as additional elements in the manufacture of a door jamb. In the standard version, their size is 80x550 mm.
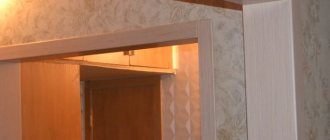
Additions allow you to make the door frame more aesthetically pleasing and stronger.
According to traditional technology, additional elements are installed “in a quarter”, that is, they are inserted into a special groove on the inside of the door frame. Therefore, such a device visually enlarges the door frame.
When additional elements need to be mounted on a door already fixed in the opening, add-on (adjacent to the frame) and underlay (substituted under the door frame) extensions are used.
To attach extensions to the door frame, proceed as follows:
1. Place the door frame with the inside facing up on 4 chairs. We align the corners to rectangularity, checking with the diagonals: they must be the same length. To do this, we temporarily nail to the bottom with small nails a wooden strip with a length equal to the length of the top strip of the door.
2. If the jamb does not have a quarter for the extensions, then we cut out the quarter with a milling machine. The depth of the quarter should be equal to the thickness of the additional board, and its width should be equal to the depth. For example, we have an additional board with a thickness of 16 mm (standard MDF thickness). Then you need to choose a quarter 16x16 mm.
3. Along the perimeter of the door frame, we attach strips of plywood or drywall to the outside so that they protrude upward to the width of the additional board. A continuous frame is not needed; two scraps are enough for the top bar and 3-4 for the sides. We nail the plywood with nails, and the drywall with self-tapping screws.
Drywall is attached to the outside of the door frame
4.Cut the extensions to size. The top trim strip should lie between the side ones, so we cut it to the size of the top quarter, and the side strips to the size of the sides of the box. Apply liquid nails or any wood mounting adhesive to both edges of the quarter.
5. We insert the additional boards into place and wait for the glue to set. We remove the temporary bottom strip that kept the extensions from falling out of the plywood, and put the door frame in place. We align it in width using wooden spacers, and check the verticality of the sidewalls with a plumb line.
6. Under the sidewalls of the wedges, we ensure that the top door strip is horizontal. We fill the cracks with foam and plaster them flush with the wall surface. We nail the baseboards, cut them to size and glue the platbands with liquid nails - the door with extensions is ready.
Since the box can be called a door lock on hinges, its manufacture must be done with all diligence. Even minor deviations from the rules will result in the door frame being too small for the opening.
How to beautifully make slopes outside and inside the apartment
To design openings, installation is required:
- slopes;
- platbands;
- thresholds.
Sometimes, before facing, the surface is plastered or covered with plasterboard. The decoration is made up of trims and tiles.
Plaster
The entrance door slopes are plastered before finishing. Alabaster, gypsum, perlite or decorative compositions are recommended. Even with labor-intensive installation, they are heat-resistant and aesthetically pleasing. Treatment with antiseptics is required to prevent the formation of fungus. Features of plaster finishing:
- the surface is moistened, primed in 2 layers;
- a rule is hung along the edge of the slopes according to the level;
- plaster mortar is poured on, leveled with the rule;
- external corners are rubbed or leveled with a perforated corner;
- the plaster is applied in 2–3 layers with a break for drying;
- to form even corners, metal beacons can be installed, which are supported by a rule;
- after drying, the rule moves to the left, the aligned corners are rubbed over.
Important Before facing, plastered slopes are puttied. An angle spatula can be used to form corners
Then the installation of beacons will not be required. To prevent the mixture from falling from a vertical slope, a reinforcing mesh is installed.
Video about how door slopes are plastered:
Installation of accessories
The extensions form an integral structure in the door niche, which does not require separate installation of slopes and trims. Allows you to hide significant distortions and unevenness of the opening. Single-color and telescopic elements are produced, connected by a tongue and groove. The accessories are made from:
- MDF;
- wood;
- plastic.
Installation process on a door frame without grooves:
- vertical and horizontal planks are assembled into a structure in the shape of the letter “U”, fixed with self-tapping screws;
- the prepared box is installed in a niche;
- in the opening (between the wall and the structure), the box is compacted with spacer bars, which are driven in with a hammer;
- expansion joints are filled with polyurethane foam;
- the structure is framed with platbands installed in a tongue and groove.
Additional platbands are often solid structures in the shape of the letter “P”. Collapsible elements must be sharpened by 45 degrees at corner joints. To do this you will need a miter box and a wood saw.
Video about installing door panels:
Plasterboard structures
Drywall is used to prepare the base for finishing slopes. It is fire resistant, low weight, easy to install and affordable, but cannot withstand impact loads. The problem is solved by panel or tile cladding. Stages of work:
- measure the height, length and width of the niche;
- make blanks by cutting out slopes with a wood saw;
- Drill holes for self-tapping screws on concrete and workpieces;
- fix the vertical bar with self-tapping screws, checking with a building level;
- install the longitudinal strips in the same way;
- Fill the gaps between the slopes and the door with foam.
Attention When marking workpieces, reduce the width by 2–3 cm from one edge to leave room for the mounting foam. Then the seams are plastered and masked under the cladding.
Tiling
The tiles are used both for decorating slopes and for arranging thresholds. Entrance doors are often decorated with concrete thresholds that require cladding. The tiles are fixed with tile adhesive. The gaps between the floor and the door are first filled with polyurethane foam. The seams between the slopes and the frame are sealed in the same way. Process:
- the surface is primed in 2–3 layers;
- tiles are laid on a dry surface, taking into account the seams, the pattern is marked with a construction pencil;
- apply the adhesive composition with a thickness of 5–10 mm using a notched trowel;
- the tiles are laid on the mortar and moved until they fit tightly;
- after 48 hours, the seams are filled with grouting solution;
- after 30 minutes, the remnants of the grout are removed;
- the seams are sealed with acrylic or silicone sealant.
Tip To maintain the distance between elements, you can use spacer crosses. They are removed before grouting after the glue has dried.
Entrance groups are designed in conjunction with door trim and opening decoration. Doors are paneled, covered with films or painted. Entrance niches are sealed with plasterboard or plaster and then decorated. Extensions are installed as a universal option.