Finishing door slopes is no less important stage in repair work than the actual installation of the door itself. The final result of the entire process depends on the quality of the work and the selected materials, which will directly affect the overall picture of the interior.
There are internal and external slopes. The last type refers to entrance doors and has many subtleties and nuances. Their types should also be distinguished depending on the cladding method. So, let's look at how you can finish the slopes of the front door:
- plastering followed by painting or wallpapering;
- overhead panels made of wood or MDF;
- plastic.
A modern option for finishing slopes is cladding with the same material as the platbands
Overlay panels can be attached in several ways. When installing on a perfectly flat surface, it is sufficient to use liquid nails. If profile guides are used, a distinction is made between vertical and horizontal installation. In the first case, a sheet of the required size is cut out and screwed to the profile. In total you will need 3 parts: 2 side and 1 top. When laying horizontally, the lamella parts are joined one by one in the direction from bottom to top, every 3-4th element is secured with screws or liquid nails.
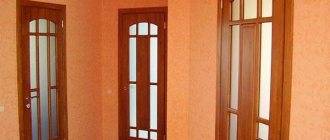
Doors
The slopes on the doors are not only an insulating element of the door decoration, but also perform an aesthetic function. The process of installing slopes on doors requires special attention, because there are different finishing methods and technologies. In this article we will consider issues related to installing slopes in various ways.
Table of contents:
- Methods for designing slopes
- Drywall door slopes
- Finishing door slopes with plaster
- Finishing slopes with plastic panels
- Finishing slopes with wood
- Detailed instructions for installing slopes for entrance doors
Methods for designing slopes
There are different options for installing door slopes, which are determined by the type of material, work technology, etc. When installing it yourself, it is important to follow the recommendations of specialists and detailed installation instructions. It is important to ensure that the materials used are practical and durable, and they must also perform insulating functions, especially when finishing the slopes of the front door.
The installation of door slopes must meet certain tasks, which include reliable fixation of fasteners, as well as performing a decorative function. When determining variations in the finishing of slopes, experts identify surface cladding with different materials, which are attached to the base with the assistance of mortar and plaster. Some elements can be attached to the frame base using a drill or other devices.
As finishing objects, you can veneer door slopes from laminate, plasterboard, plastic or wooden panels, MDF and the like. All materials are perfect for finishing, both for interior doors and entrance doors. In the latter option, it is necessary to ensure reliable sound insulation and complete sealing, which requires careful sealing of the slopes.
The slopes for the front door should not have any voids, which increases the strength and reliability of the cladding. You can use different finishing materials on top of the putty or mortar. The main thing is that they are combined with the interior design of the apartment or house. If a huge amount of mortar is needed for finishing, for example, to level corners, then a frame can be installed on the slopes. Its base can be wooden slats or a metal profile on which facing materials are installed.
It is worth noting that finishing the slopes under the frame will create a smoother surface than plastering. Moreover, finishing with wooden or plastic panels looks more attractive than painting the surface and so on. In particular, it is much easier to carry out telephone, electrical and other communications through frame slopes.
It is important that the doorway has a maximum service life, is durable and practically resistant to mechanical and other damage. To do this, you need to know the rules and technologies for installing slopes on doors yourself. No less importance is given to the choice of facing material, which includes:
1. Finishing with drywall. Such material will hide all the unevenness of the slopes. Using this option, you will get rid of unnecessary waste on purchasing putty and other solutions intended for leveling a certain area. In this case, there will be no possibility of installing a frame base.
2. Plastering the slopes on the door. This method is considered the most economical and practical, and all the work can be done independently. To do this, it is important to cover the working surface with plaster, after which you can begin finishing.
3. Plastic panels. Very often used for finishing window openings. They are rarely used in door openings, because plastic materials will stand out against the background of a wooden product. Moreover, this option is not reliable and durable.
4. Wooden slopes. This finishing option is the most popular. Wood is a durable and reliable material that will last for a long time. This finish will suit different room interiors.
Drywall door slopes
Drywall is not used for finishing, but is the basis for slopes. This option is used to save money on purchasing different mixtures for leveling walls. Installation work should begin with preliminary surface preparation, which includes cleaning the walls, as well as priming:
1. After the surface has dried, you need to take all measurements and prepare materials for finishing the slopes on the front door with your own hands. When cutting the material, make sure that some parts are cut at an angle. This is necessary for attaching parts to a tilted surface.
2. After cutting the sheets, check that all elements fit under the doorway.
3. Next, you should wait for the primer layer to dry completely, after which you can install the panels. Special glue or dowels can be used as fasteners. It is recommended to use the first option, which will allow you to fasten the sheets of drywall more evenly.
4. The installation process should begin with the installation of the side parts of the opening, and finally, the upper area can be finished.
5. Glue can be applied in a continuous strip or in separate dots, for example, every 15 centimeters.
6. After securely fixing the drywall sheets, it is necessary to finish the surface by attaching perforated corners using putty.
Finishing door slopes with plaster
This type of work does not present any particular difficulties and requires minimal costs. The process of finishing slopes with plaster has the following sequence:
1. First, the working surface must be cleaned and primed.
2. After the primer layer has dried, it is recommended to begin applying the solution to the surface of the slopes. It is recommended to use a spatula for this work.
3. To ensure that the corners of the opening are even, it is important to use perforated metal corners. They are attached to the surface using a layer of plaster and carefully covered.
4. After the plaster has dried, the surface of the slopes should be cleaned using sandpaper.
5. The last step is to treat the walls using paints and varnishes that will add aesthetics.
Finishing slopes with plastic panels
You can make door slopes with your own hands from plastic panels. The work is carried out in the following sequence:
1. First, you need to take measurements of the door slopes and cut plastic panels that would correspond to these parameters.
2. You should use an electric jigsaw, not a regular knife. This is necessary so that all parts in the cut areas are even.
3. After cutting, all panels must be checked against the doorway.
4. First, install slopes on the sides. For this purpose, a special profile is fixed to the opening using self-tapping screws.
5. Wooden slats must be attached to the edge of the wall. It is important to check the evenness of the installation elements with the assistance of the building level. Plastic panels will be attached to such slats using staples.
6. In the lower area, a plug is installed on the plastic panels, and the finishing item is inserted into the slopes on the sides and into the initial profile. The same procedure applies to finishing the slopes above the doors.
Modern bathroom interior with a window: design, layout, photo
A bathroom with a window in an apartment is very rare and lucky. Even modern developers, especially in economy versions, prefer not to fool themselves with arranging window openings in bathrooms. But, you must admit, it’s so nice to wake up in the morning and wash your face without looking at the mirror, but to watch the rays of the rising sun and feel them on yourself...
CONTENTS 1. What are the advantages of a window in the bathroom 2. View of the window opening in the bathroom 2.1. Window from the bathroom to the kitchen or toilet 2.2. Window to the street 2.3. Falshokno 3. Layout 3.1. Bath under the window 3.2. Sink under the window 3.3. Toilet under the window 3.4. Window as an architectural element 4. Materials for finishing the opening 5. Curtains or blinds 6. Photos of bathroom interiors with a window
But a window in the bathroom is found not only in luxury apartments, but also in cramped Khrushchev and Stalin buildings - at that time it was customary to make a window opening into the toilet or kitchen, which was intended to improve the lighting of the sanitary room. In the 90s, when renovations were done in such apartments, the windows were sewn up, but not everywhere. If you are lucky enough to become the owner of such an apartment, do not rush to mortgage it. Try to play with this architectural element, it’s not difficult, but the result is worth it.
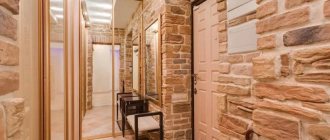
Decorative finishing of entrance door slopes with stone
A door portal made of stone or tiles can be with or without platbands. Naturally, the first option is better. Judge for yourself.
In the apartment at 59 on Marshala Zhukova - renovation in 2010 - the remains of floor tiles went to the door portal. This is an example of an impractical solution with good material. After all, platbands made of the same tiles really suggest themselves here. The designer apparently forgot about them. As a result, there are two big disadvantages:
• beauty – the entrance group turned out to be a bit scanty. Please note that on the right, the door to the dressing room decorated with platbands looks much more aesthetically pleasing;
• practicality - striped wallpaper adjacent to the tiles will peel up over time.
Repair of a house on Rublyovka near the station. Discord in 2015-2016. The decoration of the entrance door portal, together with the slopes of decorative stone, looks very beautiful, emphasizing the special status of the surrounding interior.
The footage is slightly distorted as it was taken with an action camera. However, this does not prevent one from seeing the quality and effectiveness of the entrance group.
However, let's reveal one secret. What looks like natural stone is actually gypsum moldings covered with decorative stone-like plaster, which was applied by individual specialists. However, elements of similar finishing can be found in stone.
On the one hand, caring for stone and tiles is quite simple. It is also the hardest finish available. It does not become frayed, it is difficult to scratch it or leave a dent on it. And, if the stone or ceramics are not laid with hands, and if you do not hit them with a hammer, then they will last almost forever.
On the other hand, if chips do appear on the door slopes, then the damaged tiles will have to be replaced entirely. The stone can be restored on site, but in both the first and second cases it is impossible to do without the help of specialists.
Installation of slopes made of stone or tiles, as well as plaster ones, is multi-stage, but more complex. This is especially true for doorways with platbands. To get a beautiful outer corner, the edges of the tiles have to be filed at 45°. The result, as in the photo below, is a perfect joint without the use of metal or plastic edging. And although the bathroom door is shown here, the entire wall is lined with porcelain stoneware, not just the trim, such finishing looks no less stylish in the corresponding design when decorating the entrance areas.
In such work, the master requires maximum professionalism and attention, because we are talking about adjusting a hard but fragile material with an accuracy of a fraction of a millimeter. One careless movement and the purity of the corner will be ruined! Naturally, this painstaking work cannot be done quickly and for nothing, so a portal with platbands made of the same porcelain stoneware is estimated at about 30-40 thousand rubles (cost for 2022) and is manufactured within a working week.
This method of finishing slopes has already gone out of fashion. What was good about it was the durability and high wear resistance of the material, ease of installation. The downside is that the process of “applying” the stone is lengthy. Another drawback is that adjacent walls can only be painted or covered with decorative plaster. Other finishing options (wallpapering, installation of MDF or other panels) will require the involvement of virtuoso repairmen.
Content
- Moisture resistant bathroom door
- Dry bath doors
- Bathroom doors. Choice of color and decor
The degree of influence of high temperatures and moisture on bathroom doors depends on several factors: firstly, on the volume of the room, and secondly, on the layout of the room. For example, some bathrooms have stationary showers without separating partitions. In such cases, water will most likely constantly damage the surface of the bathroom door. A similar situation will occur if the bathroom is too close to the product. If the bathroom door gets wet regularly, you need to choose a moisture-resistant design.
If the bathroom is small, there is poor ventilation, and more than one person uses such a bathroom, then the door can naturally suffer from exposure to high humidity. If this is exactly the problem in your apartment, then it is better to choose a moisture-resistant door.
In other cases, the moisture resistance of the door
doesn't play a big role. In other words, if the bathroom area is not too small, and a good hood is installed in it, and the place for taking a shower and other hygiene procedures is closed so that splashes of water do not leave the shower area, then you can not pay special attention to the moisture-resistant properties of the product, but install it , which is more suitable for the intended interior style.
Slopes on the front door
Of all the above materials for finishing the entrance door slopes, we can only recommend plastering and finishing with MDF or laminated chipboard. These materials have a sufficient margin of safety to withstand repeated impacts that are simply inevitable at the entrance.
If we talk about finishing the front door from the outside, then there is essentially only one option - just sealing the slopes with plaster. Another thing is that you can attach ceramic tiles, finishing stone, and other similar materials to it. The sequence of actions in this case is as follows:
- The slopes are prepared: loose and protruding parts, stains and dust are removed.
- The surface is primed.
- Beacons are being installed.
- The primary layer of plaster is applied and leveled.
- After the mortar has set, the slope is plastered a second time - completely. If you plan to use finishing stone or tiles in the finishing, they are installed at this stage with the appropriate adhesive.
The external slope of the entrance door can be finished with stone or tiles.
The internal slopes on the entrance door can also be made of MDF and laminated chipboard. They can be installed on foam and liquid nails, or you can use guide strips. The installation of MDF door slopes is described in detail in the article “We make door slopes from MDF, laminated chipboard, laminate.” It is better not to use other materials for the front door: they are fragile and brittle.
Brick
In a brick house, it is not necessary to finish the internal slopes if you decide to decorate the interior in an industrial style. Devoted fans of the loft, in the absence of brickwork, are forced to imitate it.
To enhance the feeling of negligence and roughness, “stain” the brickwork with plaster, and if you want to soften the effect, cover it with paint of a calm shade: white, brown, gray.
Applying putty to the surface
After making sure that the primer layer is even and without protruding defects, you can begin to putty the surface. To do this you need:
- To apply the putty evenly, beacons should be installed on the surface of the slope, which will indicate the required layer thickness.
- Then, using a level, check the evenness of the placement of the beacons.
- After making sure that everything is done correctly, you can apply a rough layer of putty.
- First, use a wide spatula to apply the first layer of putty to the recess. This layer should completely cover large cracks and surface imperfections.
- When this layer dries, you need to sand all the bumps and protruding parts with sandpaper. This must be done carefully, without missing a single centimeter.
- Then the finishing layer of putty is applied. It should be applied with a narrow spatula, making sure that the mixture lies evenly.
- After the second layer has dried, you also need to wipe down the surface. Grouting should be especially thorough if finishing methods such as painting the surface or covering it with special decorative fabrics are chosen. Because in this case, even the slightest flaws will be noticeable on the surface.
Each method of finishing slopes has its own advantages and disadvantages. Of course, the choice remains with the owner of the plot. Finishing the slopes of a doorway is a labor-intensive process. But if you approach it optimistically and act step by step, then no difficulties will arise.
Types of bath borders and their installation
All bathroom borders can be divided into two large categories, each of which has several subtypes:
- polymer and PVC: plastic (PVC) curbs for bathtubs;
- plastic corners;
- self-adhesive tape;
- foam or polyurethane (ceiling) borders.
Several profiles of plastic bath borders
- ceramic:
Products from the first group are more affordable in price, and they are also easier to install. Ceramic, marble or granite borders are more expensive and difficult to install, but they also look much more colorful. True, the design of the bathroom should also be appropriate.
These can be ceramic or marble
Plastering a doorway
Sometimes doors are not placed in the opening, but even in this case the doorway requires finishing. And the easiest way to do this is with plaster. The technology of the plaster itself is similar, but the guides and methods of their installation are different.
Plastering the doorway begins only after both adjacent walls have already been plastered. The opening itself is covered with a primer (the selection principle is the same).
The guides are installed from the sides. These can be boards, metal profiles, two rules, pieces of plastic, fiberboard, etc. One is installed on the right, the second on the left, they are fixed. The most convenient way to secure them is with clamps. If there are no clamps, you can use nails or screws - the remaining holes will then need to be carefully repaired.
To plaster a doorway, you need two guides, which are installed on both sides
The leading edges of the guides will serve as the basis along which the rule or wide spatula will move. The sequence of actions is the same: the first layer is rough, the second is finishing, if it is necessary to bring it to perfect condition, grout is done. For more information on how to putty a doorway, watch the video.
Plasterboard finishing
Holes are drilled along the perimeter of the door bevel at a distance of 20 cm from each other. Then insert the dowels and screw in the screws (not all the way).
Cut slats of the required sizes according to the dimensions of the opening. A guide strip is screwed along the width of the doorway with self-tapping screws.
Apply glue to the back side of the drywall strips, apply it to the wall, and press down. Excess glue is immediately wiped off.
The gaps between the wall and the bevel are sealed with excess glue. After complete drying, you should proceed to finishing work.
Slopes made of ceramic tiles under stone
You can make slopes made of tiles that imitate masonry made of natural or artificial stone for windows and doors with your own hands.
You can trim the slopes with tiles yourself
Before starting work with this material, you do not need to level the surface . This material is convenient because in addition to flat elements, you can purchase corner parts to make the opening look neat.
- To achieve high-quality adhesion between the product and the surface of the slope, notches are made on the latter.
Notches on the slope improve adhesion. Slopes are primed.
Primer of the slope surface The adhesive solution is applied not to the wall, but directly to the product.
The solution is applied to the tiles. Lay the tiles starting from the corner. When laying, the masonry elements are pressed tightly against each other, leaving no seams. If there is a desire to have seams, then plastic pegs are inserted between the parts.
To form a seam, pegs are inserted between the tiles. The seams are filled with grout mixture using a construction syringe.
The seam is filled with grout
- The grout is distributed along the seam using a brush.
To trim some of the fragments connecting to the window frame, you can use a regular hacksaw. At the ends, the tiles can be laid freely.
Stucco molding
Internal slopes can be so self-sufficient and attractive that there is no need for a curtain. Decorate them with an unusual pattern or stucco frame to turn them into the main design accent of the interior.
Additionally, play with the rich stucco pattern in ceiling skirting boards, window cornices or door frames.
How and with what you can decorate the slopes of the main door of your home
If you are faced with the task of how to finish the slopes of the front door, you can find step-by-step instructions in this material and in the video in this article, and we will try to analyze to the smallest detail all the pros and cons, which are often forgotten to be mentioned in advertising brochures.
Option number 1. Good old plaster
Finishing doorways with cement plaster is deservedly considered the patriarch of the trend. This decoration of door slopes appeared along with the doors themselves.
A well-plastered and finished slope will last for decades; it is not afraid of temperature changes, humidity, or cold. The plaster will fill all voids and uneven areas. To ruin such a slope, you need to hit it with a hammer. If you are not going to influence your doors so radically, then you can rest assured about the rest. To refresh the surroundings, the plastered slope can be repainted, wallpapered, or covered with the now fashionable reflective film with a 3D effect: a smooth and durable surface will withstand everything.
But plaster also has a downside. Of all the finishing methods, plastering slopes is the most labor-intensive and dirty process.
Of course, if you install the beacons correctly, buy good plaster mixtures and quality tools, then things will go much faster. Although believe me, if you have never plastered doorways with your own hands, this kind of design is not for you. In addition, plaster is, in fact, stone, only artificial, and you should not expect any serious insulation from such a finish.
There is one more professional nuance. Even on a well-leveled slope, you can only glue wallpaper, and then after two layers of primer. For high-quality painting, plaster alone is not enough: the surface will still have to be additionally puttyed and sanded, and puttying and sanding will take no less time, effort and money than plaster.
By the way, if you plan to finish the slope with natural or artificial stone, then plaster will be the best and most reliable base; you do not need to putty it.
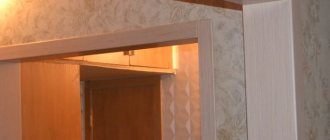
Option No. 2. Drywall slopes
The next most reliable option is finishing the doorway of the front door with sheets of plasterboard. This type of cladding is also called dry plaster.
Drywall attracts with its speed and relative ease of installation, plus, if necessary, door jambs can be closed almost completely. If we roughly break down all the work, then briefly finishing the front door opening with sheets of moisture-resistant plasterboard consists of 5 stages:
- According to the rules, before finishing the front door opening, the surface must be cleared of debris and covered with soil. But if the base is strong, for example, a brick wall, then just wipe off the dust and go over it with a solution of copper sulfate to prevent fungus from forming.
- Next we install the frame from metal profiles. There are wall and ceiling profiles, but for slopes it is better to take ceiling ones (UD/CD). If a large space is covered, then a solid frame is mounted, and when there is little space, only the outer vertical guides are installed.
- It is better to take wall gypsum board (12.5 mm), and the sheets must be moisture resistant. If an arch is formed, then there is arched plasterboard for it (7.5 mm). The sheets are attached to the frame with self-tapping screws, and glued to the wall with tile adhesive or a similar building mixture.
- When the structure is assembled, it needs to be puttied. Remember - nothing is glued, painted or attached to “bare” sheets.
- The last stage is decorating the doorway. It all depends on taste, dexterity and financial capabilities. The easiest way is to cover the slopes with wallpaper. They do not require extensive sanding. Next comes painting, but before that you will have to sand the slope well. Tiles or stone are more expensive, but they are installed quickly and easily.
A hollow plasterboard slope has another undeniable advantage: it can be filled with insulation, thereby increasing heat and sound insulation. In this case, it is better to use foam plastic as insulation. There is an option to blow foam inside, but you need to act carefully: it can squeeze out the sheet when it expands. It is advisable not to use mineral wool or any other type of wool to insulate entrance door passages: condensation will cause it to become damp and useless.
Many people blame drywall for allegedly breaking easily, but believe me, if you install a good frame with a gap between the profiles of no more than 200 mm, and when installing it with glue, you don’t have to worry about the strength of the slope.
Option number 3. MDF
Finishing entrance door jambs with MDF boards is currently considered perhaps the most common. This is a fairly tough and at the same time beautiful material; such panels behave well under temperature changes and in conditions of high humidity.
When choosing MDF panels, there is a small nuance: to decorate the inside of the front door, you can take any sheets, but for external slopes, especially if the doors go directly to the street, you should buy only moisture-resistant ones (the back of them has a greenish tint), otherwise within a year all the beauty will bubble up.
In this case, we are only interested in laminated panels; there is no point in taking regular ones and then painting them separately. The line also includes panels covered with natural wood veneer. The price for them is about half as high as for laminated ones, but such slopes are practically indistinguishable from expensive wood.
As for self-installation, it’s not a problem to buy and install extensions, trims, mounting angles and other things. Essentially, you are dealing with a constructor. First, a frame of wooden blocks is constructed around the perimeter of the opening, and panels are already attached to it.
A relatively expensive tool will require a miter saw or at least a jigsaw, as well as a drill and a screwdriver. A hammer, tape measure, etc. are usually in the arsenal of any home craftsman.
The only disadvantage of MDF slopes is the price of the material itself. The only thing more expensive than such cladding is natural wood of elite species; by the way, it is installed in the same way, but it is better not to undertake it yourself: the risk of spoiling it is too great.
Option No. 4. Lining
The price of a good wooden lining is approximately equal to the cost of MDF, but in this case you get slopes made of natural wood. This design of the doorway looks quite solid, but there are nuances.
Any lining is mounted on a wooden sheathing, which means you must have enough space for such sheathing. Accordingly, it is problematic to make small slopes from lining.
Natural wood is a good material, but rather capricious. In extreme conditions of entrance doors, wood must be covered with antiseptics, fire retardants and other protective compounds.
Previously, all linings were varnished, but now design experts do not recommend varnish. The fact is that most people associate varnished lining with balconies and garages, and the front door is still the face of the home. It is best to buy an oil-wax impregnation and apply it. The result is pleasing: fast, beautiful and inexpensive.
Option No. 5. PVC
Slopes made from finishing PVC panels can be installed within 1 day, plus the price of this material is affordable for almost everyone, but decorating a doorway with plastic has a number of negative aspects.
You can break through a hollow thin panel by simply leaning on it. As practice has shown, even the highest quality plastic panels on good sheathing in the area of entrance doors last no more than two to three years.
Under the plastic you need a wooden or metal sheathing. Theoretically, such a panel can be glued to a plastered slope with liquid nails, but if you have a good plastered slope, then why do you need plastic?
In addition, according to fire regulations, it is extremely undesirable to install plastic in the entrance area. In the event of a fire, it will actively melt and emit choking, acrid smoke, thereby blocking the exit.
Although, on the other hand, plastic is ideal as a temporary solution to the problem. And when you have enough funds, you can quickly dismantle it and install solid slopes made of high-quality MDF on the same sheathing.
Option No. 6. Decorative polyurethane linings
If you dream of seeing your doors decorated with luxurious stucco, we recommend paying attention to decorative polyurethane overlays. Visually, such a finish cannot be distinguished from good stucco, and the performance qualities of such slopes are an order of magnitude higher. The only problem is that the price for such jewelry is quite serious, plus you can’t glue an overlay to a crooked base. In other words, you will first need to level the slope with plaster or drywall, and then glue the polyurethane beauty onto it.
Layout
The role of the window in the sanitary room will directly depend on the layout you choose: either the entire design will be built around it, or it will be just one of the decorative elements. Considering that the windows in ordinary city apartments are quite narrow or located near the ceiling, we can offer different options for placing the necessary plumbing equipment and furniture.
Bath under the window
Most often, this placement of the bathing bowl has to be resorted to in the case of a very narrow room, on one side of which there is a window opening. By placing a bathtub here, we will give the room a more regular shape. But this layout is not without its drawbacks.
Firstly, the wall, slopes and the window itself will have to be insulated so that you don’t inadvertently catch a cold while taking a bath or shower. And any, even the highest quality double-glazed windows, are still cold in the winter season. But you don’t need to worry about drafts if the window “looks” into the kitchen.
Secondly, the glass in such windows will have to be frosted or corrugated in order to get rid of prying glances from the street. Conventional glazing can only be used if you live on the top floors of a high-rise building.
Thirdly, you need to provide convenient access to the window frame for ventilation. Otherwise, the window can only be opened by climbing into the bowl itself. A high window opening will complicate the situation. In this case, you might consider installing a shower instead of a bathtub.
Perhaps a corner bath model will help you get out of this situation - it does not take up much space and will provide proper access to the opening. And water procedures will become much more pleasant, since there will be less wind from the window.
Sink under the window
Installing a washbasin under the window may seem like a rational solution. If the window is not located high under the ceiling, in this case it is important to think through some nuances:
- Where will the mirror be located, after all, many are accustomed to looking at their reflection while washing their hands or basic shaving. You may have to limit yourself to a small rotating mirror mounted somewhere on the side.
- The main task is to choose the right faucet that will not limit access to opening the window.
It will help to move the sink slightly away from the opening by inserting it into the window sill-tabletop, if the height of the lower part of the window allows. Another modern solution will be an overhead bowl, and the tabletop will be one with the window sill. In this case, you can place all the necessary little things around: soap dishes, glasses, containers with toothbrushes.
If you can’t do without a mirror in front of the sink, try moving the washbasin a little away from the window: to the right if you’re right-handed, to the left if you’re left-handed (this way you don’t have to block the light from the window with your hands while shaving or applying makeup. And you can put it under the opening a regular laundry box or storage cabinet.
If there is free wall space on both sides of the window, then it is advisable to place pencil cases or storage shelves in these places.
Toilet under the window
If your bathroom is combined with a toilet, you might consider placing the toilet under the window. Modern designs of toilets with installation allow them to be placed even under windows. However, this option is eliminated if central heating radiators are located directly under the opening, and it is not possible to move them to another wall.
The only condition is to supply the necessary communications to this place; you will have to think especially carefully about the installation of the sewer pipe.
You can get a completely different interior by moving the toilet a little to the side, or turning it towards the wall adjacent to the opening. But in this case, there should be at least 70 cm of free space in front of the white friend to make it convenient to use.
Window as an architectural element
It is not always convenient to place any plumbing equipment under the window opening. In this case, the window serves as a decoration, an inevitable element that needs to be properly decorated. It is not at all necessary to put something under it, especially if the bathroom is spacious enough. Free access for ventilation and maintenance is maintained, and drafts do not interfere.
To further expand the space, a washbasin with a mirror is placed on the wall perpendicular to the window so that daylight is reflected in the mirror.
There is another room layout, when the window opening is located opposite the door. Then the plumbing fixtures and furniture are placed on both sides of the window, or along one wall if the room is elongated.
Please note: you should not place a mirror with a washbasin opposite a window, as the light from it will disturb you.
A cheap and common method is finishing with PVC panels
In advance, the installation of a wooden frame is required, which is made from beams with a cross-section of 2x4 cm. Four side planks are attached to the wall slope perpendicular to each other. Nails are used as fastening. Three planks are reinforced at the top.
Prepare plastic panels, cut them slightly wider than the bevel, because the edges are bent inward. To give shape, the plastic edges are cut from the inside out with a sharp knife. The prepared profiles are applied to the bevels and secured with screws.
Mounting is simple, but requires the following sequence:
- outline the proposed finishing boundary;
- make 5 holes in the wall;
- insert wood plugs;
- Attach the panel with screws to the plugs.
Slopes in a plastic bathroom near the door are easy to install. They have a lightweight, luxurious design. The only drawback is the insignificant service life.
News
Door slopes: which finishing of the interior opening is better
There are several types of slopes for interior doors. The method of finishing a doorway depends on the operating conditions, preferences and financial capabilities of the customer. In this article, read about the advantages and features of different types of door slopes.
Types of slopes for interior doors
Door slopes are the walls of the opening next to the door frame. To ensure that the door has a complete, attractive appearance, the slopes are finished with different materials, depending on the situation:
- plastering
- install overhead panels
- lined with wood or MFD panels
- laid out with tiles, ceramic tiles, decorative bricks
- covered with self-adhesive film.
The material for finishing the interior opening is selected depending on the degree of mechanical loads and humidity. For example, the slopes of a kitchen or sanitary door are lined with ceramics, which protects the walls from high humidity, is not afraid of steam, temperature changes and is easy to clean.
Door slopes are installed in two ways. If the walls are smooth, the cladding is glued with special solutions or glue. If the opening needs to be leveled, use a wooden or metal frame to which finishing panels are attached.
Advantages and features of different types of door slopes
Plastering is a classic finish for a doorway. If the work is done correctly, the slopes will last for decades without problems. The peculiarity of this method is that construction skills are required, since it is a whole range of work: from preparing the opening to finishing.
Plastering the opening can be an independent method of finishing or preparation for adhesive installation of slopes.
Overlay panels can be attached with adhesives or mounted on a frame. For gluing, a perfectly flat wall is required so that the contact area between the surfaces is maximum. Otherwise, the entire lining will fall off after some time.
The frame method does not require smooth walls, but it has advantages in installation:
- frame can be quickly installed and dismantled
- additional heat and sound insulation can be done
- allows you to hide electrical wiring if it is on top of the walls.
Wooden slopes will decorate any door. They are mounted on a frame and must be primed with antibacterial compounds, and covered with a protective layer of varnish on top.
Like any wood, such slopes do not like high humidity. Therefore, it is better not to use them for the kitchen and bathroom.
Decorative brick slopes are a modern way of finishing. There is no need to level the walls to match it - the uneven texture of the tiles will help mask surface defects.
When decorating a doorway with any tile, you should remember: doors do not combine with bright or glossy cladding. For these purposes, matte tiles in neutral colors are used.
Self-adhesive film is the most cost-effective way to finish an interior opening. Its advantage is a wide selection of shades: you can match it to any interior. However, the film must be glued to a perfectly flat surface. Otherwise, air bubbles will form underneath, which is not always possible to get rid of. And the appearance of the door will be ruined.
conclusions
As you can see, each method of finishing a doorway has its own characteristics that should be taken into account. And most importantly, this work should be done by professionals. It’s only in words that it’s not difficult to do it yourself. In fact, in order for door slopes to serve for a long time and look presentable, you need to have construction skills. If you don’t have them, contact . Our experienced craftsmen are always ready to help you. By the way, you can also order doors from us at competitive prices. Call!
Wood models
These are popular due to their appearance and good performance. Installing them is not difficult. Wood panels should be similar in structure and thickness. The surface is previously cleaned, primed, and plastered. Then the base is prepared. Glue is applied to the planks, applied to the wall, and secured with screws. Excess glue is immediately removed.
You have made sure that the slopes are quite easy to do with your own hands. Which material to choose depends on your taste and financial abilities. With little expense you can arrange everything perfectly. You can show your imagination by using combined materials. Don’t forget about sealing, why use polyurethane foam or mineral wool.