On trading floors, plastic corners for slopes are presented in a wide range. Let's consider the basic characteristics of the fittings, variety of types, and methods of application. Let's get acquainted with fastening methods and installation rules. After reading the article, it will not be difficult to make the right choice of materials and monitor the quality of installation work.
Variety of PVC corners Source akcedemir.com.tr
Description of finishing material
Plastic corners belong to construction fittings, which are often used for decorating external protrusions. These can be slopes, niches, boxes, columns and other architectural elements with 90-degree turns. The material is used to solve the following problems:
- masking installation seams;
- transition between different finishes;
- protection of corners from mechanical damage, penetration of moisture, dust, dirt.
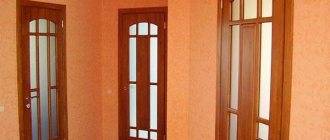
In most cases, a plastic corner is installed on slopes. This gives the opening a finished look. The polymer product is not afraid of moisture, lasts 20-25 years, and is easy to wipe clean. The advantages also include light weight, a wide range of colors and sizes, simple installation, and low cost. But scratches become a place where dirt accumulates, and if excessive pressure is applied to the workpiece, irreparable deformation of the soft strip occurs. It is worth noting the release of toxins when the polymer burns and gradual fading under ultraviolet rays.
Variety in color Source sense-life.com
Main characteristics
Among other characteristics, such as fastening method, material of manufacture, manufacturer, color and weight, special attention should be paid to the dimensions of the fittings. Corners for slopes come in the following sizes :
- 10x10;
- 20x20;
- 25x25;
- 30x30;
- 40x40;
- 50x50.
All dimensions are indicated in mm, so it’s easy to figure out which length is best to choose for your window. The smallest ones are suitable in those places where you just need to strengthen a corner, and those that have dimensions of 50x50 mm will already allow you to hide serious imperfections in the finishing.
Manufacturers also produce corners with dimensions of 60x60 mm. The entire size range is available in both plastic, aluminum and wooden models. Wider elements are often used for exterior decoration.
Important! The Russian market has corners of local production and foreign production. They are supplied in 2700mm lengths and can also be sold to order.
Kinds
The determining criteria for choosing plastic corners are color, size and types of fittings. The main classification is based on the cross-sectional shape of the products. The classic equal-flange option is most in demand. The width ranges from 10 to 50 mm in increments of 5 or 10 mm. There are three more versions:
- L – 5*17, 10*20, 15*25 mm;
- F or P - used as a profile to protect the end edges of sheet or cladding trim;
- T – connecting element of dissimilar materials in one plane (12-22*10 mm).
There are also 90/105 degree turns, straight/rounded/curly shelves. Separately, monochromatic (solid) corners or with a pattern (for example, imitation wood) are considered; products with a textured surface are less common. For those who like to change their interior frequently, manufacturers offer detachable fittings. The front part is fixed in the stationary part using a snap lock.
Split corner profile Source rewik.ru
For convenience, you can find samples with an applied adhesive composition, which is protected with a waterproof protective film. This option is sold in the form of rolls of 50 meters, which allows you to purchase tape of any length while minimizing excess after installation.
Pros and cons of use
The main advantages of using such fittings:
- Lightweight - the material is light in weight.
- Possibility to choose color and material.
- Availability.
- Easy cutting and processing - everything is done with metal scissors or a file.
- Convenient fastening with adhesive compounds.
- Ensuring slope rigidity.
- Hiding joints between planes.
- Possibility of independent installation work.
Among the disadvantages, we can highlight the features of the materials : for example, plastic and wood will be flammable, and low-quality fittings can be fragile when cutting.
Glue selection
Before gluing corners to slopes or other architectural elements, it is necessary to select the correct installation composition. Today there are 4 solutions to the problem. Let's look at each of them in more detail.
See also: Catalog of companies that specialize in decorative forms.
Liquid nails and sealant
In modern construction markets, sealants with liquid nails are presented in gun tubes or tubes. Moreover, they have the same volume. Buyers often get confused in this variety.
For installing lightweight plastic, only 2 options are suitable: liquid nails or adhesive-sealant. Here it is necessary to pay attention to the fact that the composition also exhibits good adhesion to the base. So, for absorbent surfaces you can use acrylic-based or neutral adhesives. They practically do not emit odor, can be wet cleaned before drying, and dry quickly. If work is carried out on concrete, plastic, metal or glass, you will have to make a choice in favor of universal compounds.
Universal composition Source stpulscen.ru
Sealants are often used to install corner profiles. This is justified by additional waterproofing. However, this approach is incorrect due to the weak adhesive ability of the material, and the dry residue can only fill the voids. A corner fixed with sealant does not always last for a year.
Liquid plastic
Liquid plastic is sold in the same containers as liquid nails. But the cost of the composition differs significantly from them in a larger direction. This is justified by high performance and technical characteristics. So, among the advantages the following are highlighted:
quality indicators and shape remain unchanged 10 years after installation of the fittings;
color change under the influence of ultraviolet rays, oxidation does not occur over time;
Due to minimal shrinkage during the drying process and good adhesion, a monolithic structure is formed, which additionally protects the base from moisture penetration.
Liquid plastic Source pvcwindow.ru
Liquid plastic belongs to the group of universal building materials. They can be used for gluing corners on slopes and filling/sealing joints between the window frame and adjacent planes. In addition, the composition is characterized by high mechanical stability, which allows it to be used for fastening window sills and sheet finishing of the opening. The only drawback against the background of numerous advantages is that the use is limited to PVC bases.
Polyurethane glue
Before gluing the plastic corner to the plastic panel, you should find out in advance about the color of the synthetic glue from light beige to dark brown. If the work surfaces are white, then the excess will be visible here. It can only be removed using organic or special solvents until it dries. Before using the material, you also need to find out about the working time of the glue in the open state.
Classic version of polyurethane glue Source sdelais.ru
The main advantages of polyurethane adhesive are as follows:
- resistance to biological damage and corrosion, which is important for areas with variable humidity;
- low thermal expansion allows the glue to be used in conditions from -60 to +150℃, which is not typical for the listed analogues;
- resistance to oils and organic solvents allows the composition to be used for finishing in laboratories and industrial enterprises;
- plasticity helps maintain the characteristics of the dry residue under vibration load;
- high adhesive ability determines the versatility of the glue to work with any substrate.
They also note the uniqueness of the polyurethane composition regarding the drying process. The higher the relative humidity, the more active it is. This allows you to install decorative corners for slopes in the bathroom without prior ventilation.
Correct cutting
Regardless of where you need to glue the corner - on a door or window, inside or on the outside, you need to take measurements and correctly cut the raw material along its length.
It is optimal to carry out the work of cutting plastic with a hacksaw with fine teeth.
First, the length of the opening is measured, then marks are applied to the corner so that the piece is consistent with this value. Then the plot that will be adjacent to the slope is cut clearly according to the marks, and the one that sticks to the wall at an angle of 45 degrees.
Installation technology
Before gluing the plastic corner to the corner of the wall, the base must be freed from dust, dirt, and debris. If old fittings are replaced, then any remaining adhesive must be removed.
Elimination of excess before installing corners Source myremontnow.ru
The profile is sold in its pure form, but it is better to wipe it with a damp cloth or degreaser (recommended) and dry it.
After trimming wallpaper, drywall with panels, and polyurethane foam, protrusions often form. It is important to inspect the corner for their presence, since depressions and chips can be hidden, but not obstacles to the tight fit of the fittings to the slope. In the case of wallpaper, it is worth noting the need to remove it by half the width of the corner shelf. Then gluing will occur to the canvas and the base, which gives a better and more durable result.
Next, the workpieces are cut. To form an internal joint, the planks are cut with the thickness of the corner subtracted. External ones are done in three ways:
- overlap;
- joined at right angles;
- cut the planks at an angle of 45 degrees.
Apply glue to the shelf in dots or in a continuous stripe. The first option allows you to save on adhesive composition and speed up installation. This approach is relevant in places with the lowest possible mechanical load. The second method gives better results in terms of strength and durability. The main thing here is not to apply a lot of glue and try to place it closer to the center.
Glue in a tube for a gun Source www.severdol.ru
Press the corner for slopes from the center with gradual pressure on the shelves. This reduces the risk of bending flexible fittings. Until it dries completely, it is recommended to additionally secure the plank in several places, especially at the ends, with strips of paper (painting) tape. It is better to use an inexpensive narrow strip, as it can be peeled off more easily without damaging the finish.
Often, in the case of a trimmed joint, the edges are not perfectly even. Because of this, dust accumulates in the gaps, and over time the seams begin to stand out due to darkening. To avoid this, you can sharpen the edges with a knife in advance or sand them with fine sandpaper after installation. The void is filled with sealant or liquid plastic in the color of the fittings.
How to attach corners to the ceiling
Since the place for manipulation is considered quite complex, before fixing the element, due attention is paid to preparing the base. You will need to remove dirt and prime the surface, and then prepare a comfortable and serviceable ladder, reducing the risk of injury when working at height.
A lot depends on the choice of glue; if the mixture has extra-strong fixation, then there will be no problems with installation; liquid nails have proven themselves well.
To ensure that the product lies flat under the ceiling and fits perfectly to the surface, the surface can first be thoroughly cleaned with sandpaper. And until the composition is completely polymerized, secure the section with adhesive tape; masking tape has come to the rescue of professional tilers more than once in such situations.
Briefly about the main thing
Plastic corners come in different colors, sizes and cross-sectional shapes. They are intended for decorating external and internal corners, end edges of sheet finishing, and installation joints in one plane.
To glue the fittings, liquid nails, adhesive-sealant, polyurethane glue or liquid plastic are used. The compositions differ in technical characteristics and color.
According to the technology, installation is carried out in 3 steps: preparing the base and corners (cleaning, cutting), applying glue, fixing the planks.
Preparatory work
Before you start finishing the walls with plastic corners, you should clean the working surface from dirt, dust and other construction debris. To apply glue, purchase a glue gun, and for installation, additionally the following tools:
- scissors or hacksaw for metal;
- square (preferably metal);
- stationery knife;
- roulette;
- masking tape.
You may also need a miter box, which can be used to make blanks with an angle of 45°. But if a tool is missing, you can cope without it using certain skills and our recommendations.
Tools
Degrease the place where the corner is attached and the part itself using a weak solvent or white spirit. The workpiece must be clean. Avoid exposure to moisture.