To decorate fabric (prevent fraying), eyelets are used, which are considered one of the most reliable methods of fastening. To install eyelets, special devices have been developed, which in the factory version cost quite a lot. Because of this, it will be better and cheaper to seek help from a specialist or try to do this procedure yourself.
Goals and purpose
Eyelets are used for decorative finishing of both fabric and paper. They allow you to make multifunctional holes on various notepads, postcards, labels and album sheets. If it is necessary to fasten several sheets together, it is often advisable to use a sleeve, since it solves two problems at once - it fastens the sheets together and securely fixes them .
After installing the eyelet, the product will look much better and neater than the usual glue or stapler. One of the biggest problems that someone who wants to install such a device on their own may encounter is the presence of many types of eyelets and a variety of diameters.
When installing bushings, certain difficulties may arise, since the diameter of the tool (press) must be different. The complete set is not cheap. Because of such reasons, people are interested in the question of how to install eyelets without tools on fabric and paper using only improvised means.
Types of grommet rings
The materials from which this type of fastening is made are varied - from metal to plastic of various shapes and colors.
Installation methods also directly depend on this. A plastic eyelet is much easier to install, but a large load on it is unacceptable! If desired, you can remove it and use it again, but the fixation of the edges of the fabric will be very poor - they crumble and become deformed, and the product looks sloppy.
Colored metal eyelets are much more reliable than plastic ones - they hold the fabric perfectly, preventing it from tearing.
Steel fasteners are considered the most reliable for fastening fabrics, leather parts, and cardboard. But before you install eyelets without tools on clothes or shoes, you will need to practice on unnecessary pieces of material. This is necessary to understand how the work is going and not to spoil the thing.
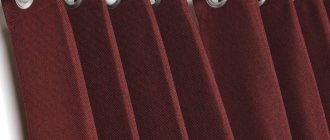
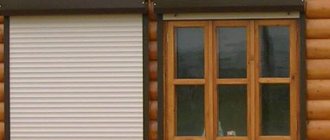
The most popular way to use eyelets is to attach them to curtains. To do this, you additionally need grommet tape, which is sold in specialized stores. It is used to glue the edge of the fabric, creating rigidity.
The mount itself can have a completely different shape - from circles to animals. The color palette is also huge.
Curtain eyelets will help to form smooth, interesting and neat folds. In order to move such a curtain on the eaves, you do not need to apply any force. The fabric does not wear out on the cornice, and, accordingly, its service life is longer.
Using available tools
If there is no special press, then installing the eyelets yourself can be done using ordinary pliers. Of course, such a tool doesn’t have many options; the diameter of the eyelets themselves will be limited, but for small diameters, pliers are suitable.
When it is necessary to install bushings with a large diameter, you can purchase a set of punches at a hardware store, but this will not fundamentally solve the problem. If you need to mount large products on heavy curtains, then such a tool cannot be used here.
The diameter and dimensions of the eyelets are specially marked for convenience. The marks determine the length and thickness of the product. It consists of a cap and a stem. The thickness of the fabric or paper being processed will directly depend on the length of the leg. The length is designated by the letter L, and the diameter of the leg by the letter D.
What are grommets? Purpose of the fittings
Eyelets are a pair of metal flat rings that are attached to both sides of the fabric to give a neat look to the round holes. This type of fittings is most often used for processing holes in the fabric of clothing, intended both to facilitate threading of laces and for decorative purposes.
At the same time, it is the eyelets that perform a protective function against shedding of the edges of holes in the material.
Install eyelets using special devices and tools. But it is quite possible to do a similar procedure at home.
The article describes in detail the process of installing eyelets with your own hands on various types of fabric. Using the advice of experienced craftsmen, you can easily give new life to your favorite dress or suit yourself, without additional costs for the services of workshops and sewing studios, and also create an exclusive model from an ordinary item.
Necessary materials
Installing eyelets on clothes with your own hands is not difficult, the main thing is to prepare thoroughly before starting work. You need to prepare a set of necessary tools and materials.
The main ones include:
- marker or pencil;
- eyelets of the selected diameter and model;
- hammer;
- a piece of flat iron;
- knife, ruler;
- a piece of rubber or linoleum for work.
If you need to install eyelets of the smallest diameter, then it is good to use steel rods for installation. The edges at the end should be rounded. You can also use balls from bearings. If you use steel rods with a conical end, then their diameter should be larger than the diameter of the eyelets themselves.
Important! If there are no such tools on the farm , then you can turn to a turner for help. It can easily make the edges of the rods rounded or in the form of a cone.
Press: homemade for metal work and household needs - options, drawings, manufacturing
Production is unthinkable without pressing operations, and modern production even more so: the processing of metals and materials in general by cutting produces waste, which ultimately has a significant impact on the environment and economy. In a home workshop, in a garage, it is also difficult for an individual entrepreneur working in metal to do without stamping, forging, straightening, bending, molding (flattening), pressing and pressing out blanks and parts, but the choice of presses for individual use is not wide, but the prices are scary. A press is no less necessary just on the farm - for squeezing juice, oil, baling hay. Virgin juice/oil can only be obtained from a special press (see below); You need to press the grapes into the wine especially carefully and with skill. And with the choice of ready-made presses and their prices, the situation is similar to the previous one. Finally, rising energy prices are forcing many homeowners to think about switching their autonomous heating to waste (alternative) fuel, or at least how to make fuel pellets or briquettes from existing household waste (straw, husks, husks, sawdust, shavings); This also requires a special press. This publication is devoted to how to make a press with your own hands for these and some other purposes (also see below).
Homemade presses for various purposes
Installing grommets yourself
In addition to preparing all the necessary tools, you need to prepare for the process. Installing such devices is not difficult. The main thing is to strictly follow certain instructions:
- The first thing to do is markup. You must first mark the installation locations on paper or fabric. To obtain a more accurate result, it is recommended to use a ruler.
- For precise work, it is better to use a hole punch. This is especially true if the hole needs to be made very close to the edge or if you need to work with very thick fabric or paper.
- There is no need to rush to make holes right away. First, you need to carefully check whether the hole diameter of the hole punch and the grommet match. It is advisable that the width of the hole punch be slightly smaller than the width of the eyelets.
- Small diameter holes can be made using a stationery knife or awl. If you work with fabric in this way, the puncture site must first be treated with glue.
- You need to carefully insert the product into the hole made so that the cap is on the front side and the leg comes out on the other.
- All work must be done on a metal sheet or ruler. This will prevent surface damage.
- You need to install the grommet on the backing so that the leg points upward.
- At the final stage, you need to place the device on the leg and hit it very hard with a hammer in order to flatten the grommet. If necessary, you need to hit several times.
Curtain sewing technology
Making a curtain begins with processing the top and gluing the tape. A master class with step-by-step instructions given below will tell you how to sew curtains with eyelets:
- Fold it over to the wrong side and carefully iron 2 cm of the top edge of the future product. If the craftswoman does not have much experience, it is best to first draw a straight line along which the fold will go.
- Measure the height of the comb from the smoothed rib. Draw a straight line and iron it inside out again. The cut of the top will be inside, between the layers of fabric.
- Unfold the ironed edge and insert tape with an adhesive layer (grommet) inside. As mentioned above, its width should coincide with the height of the comb - the width of the pressed hem. On thin fabrics, it is advisable to shorten it in relation to the fabric by the amount of allowances for processing the side edges.
- Heat the iron high and iron the folded part of the panel so that the tape inside sticks well. Be sure to perform this step through gauze or a clean white cotton cloth. When ironing thin tulle, you can pre-moisten the gauze.
- On the wrong side, stitch the hem 2-3 mm from the edge, securing it. At the same time, you can sew on decorative braid if the design solution requires it.
- Fold and stitch the side seams.
You may also be interested in: How to choose a mosquito net with magnets - types and design
After the panel is ready, sewing curtains on eyelets involves installing rings. But how to make the eyelets neat, like in the pictures? To do this, you will need the results of calculating the distance between the centers of the rings, a ruler and chalk.
Installation of eyelets
Set aside 1.2-1.5 cm from the side edge. If the calculations were made correctly, the mark will have to be placed a little further than the line. From this mark, set aside ½ of the outer dimension of the ring and mark the center of the outer insert. Do the same on the other side of the tape.
Set aside from the center mark an amount equal to the distance between the eyelets. Place a dot to mark the center of the next ring. Set aside the same segment again, mark and continue until the end of the tape. If everything was calculated without errors, the last mark should match exactly the next time you measure the distance between the eyelets.
If the error and discrepancy are too large, an error in the calculations is likely. You need to measure the distance between the extreme center marks and recalculate the size of the fold, dividing the distance by the number of eyelets. After this, repeat the markings.
Place the outer ring on the comb so that the mark is in the center of the inner hole. Trace a circle inside. Do this for each mark.
Use nail scissors to carefully cut holes for the rings. The eyelets themselves are installed very simply: the lower half is placed under the fabric (from the inside out). The edges of the hole should fit around the bushing. The upper, decorative part is placed on top and pressed until it clicks.
How to hem the bottom of a product?
To make your new curtains look beautiful, you need to know how to properly sew and trim the bottom edge. The almost finished product needs to be hung on the cornice rod. Determine at what distance from the floor the bottom of the curtain should be. This value must be measured from its surface several times, along the entire fabric, placing marks on the fabric.
Remove the curtain and lay it flat. Connect the marks using a ruler. The straight line will be the bottom line. Fold the material inside out along it and iron the fold. From the fold, set aside the desired width of the hem, draw a line, bend the cut along it inward and iron. Stitch 2-3 mm from this last fold.
If you carefully carry out all the operations one by one, then neither inserting eyelets for curtains nor processing the edges of a large product will seem difficult. In this case, the accuracy of measurements for the uniform arrangement of the rings and the accuracy of processing the cuts are important.
Installation of metal products
When using metal products, you must first flare the sleeve, and then proceed directly to installation. For these purposes, metal or wooden bases are used. If flaring tools are not available, round or cone-shaped objects can be used. The diameter should match the eyelets themselves. You can use a bolt with a rounded head.
It must be placed on the product and flared using a hammer with flair, that is, the impact force must be comparable to the malleability of the metal. When the process is halfway done, the bolt can be put aside and strikes directly on the sleeve. The product fixed in this way should not only hold the ring, but also securely hold the fabric with its edges.
When to buy
Tabletop manual mechanical mini press
But when you under no circumstances need to make a press yourself, it is when you are engaged in precision mechanics, optics, or jewelry work. All homemade presses are not particularly accurate: you can’t make them better at home and/or homemade conditions. And an inaccurate mini-press can break or irreparably damage a tiny irreplaceable part, crack a lens, a gemstone, etc. In these cases, it is still better to purchase a desktop mini-press; Of these, manual mechanical rack and pinion (see figure on the right) are widely available and their prices are reasonable.
Some advice from experts
From the above it can be understood that the process of installing such a device is not difficult and even a novice needlewoman can do it. But if you look into it, many difficulties may arise in the process that need to be resolved somehow. If you listen to a number of recommendations, you can prevent their occurrence.
Before you get started, it is advisable to read the advice from experts:
- If we compare products by installation complexity, the smaller the diameter, the easier it will be to install.
- The question may arise as to which bushings are best to use. Here the answer is obvious - products made of non-ferrous metals, preferably stainless steel. You can identify them using a magnet. Steel ones will be attracted to it instantly.
- It must be remembered that it is more difficult to work with steel; you have to put in more effort when working.
- It is not recommended to install eyelets on a rubber surface. If you do this, then if you miss during a strike, they may simply break.
- Alternatively, you can use a lead plate for work. But she can bend quickly. You will have to level it, and only then continue working.
Thus, with the help of instructions and step-by-step actions, as well as special recommendations from specialists, you can quickly install eyelets yourself. In this case, you do not need to buy expensive factory-made devices. You can use available materials. It would be enough. You need to be able to choose the right diameter of the device and the metal from which it is made.
Our master class will tell you how to install grommets with your own hands using various tools and help you choose the right materials! We'll show you how to install simple eyelets with a manual clamp, as well as how to use special pliers and a press.
How to choose a mounting option
Much depends on the material from which the fasteners are made:
- Plastic eyelets are easier to install, but can only withstand light loads. If necessary, the inserted plastic fastener can be removed and reused in the future, but it does not secure the material being fastened well and does not prevent the fabric from fraying or deforming.
- Fastenings made of non-ferrous metals are more reliable.
- Fabric, leather or other material made of steel will fix it even better. However, installing steel eyelets with your own hands is the most difficult thing.
Installation of fastenings in the form of eyelets on curtains and curtains is very popular. In this case, a special eyelet tape is used, which is glued to the fabric of the product, making it more rigid. The mounts themselves come in different colors and shapes. These can be stars, hearts, animals, which is especially important when decorating a children's room. A curtain with such decorations can divide a room, for example, into a play area and a work area.
The universal nature of such curtains allows you to attach them either to rings or by threading the curtain rod pipe directly through the eyelets. Curtain eyelets in this online store help create attractive and uniform curtain folds. Moving such curtains along the eaves will not require significant effort even from a child. Moving the curtain gently will increase the lifespan of the fabric: the easier it is to move the curtain, the longer it will last.
When choosing fasteners, pay attention to their sizes. In product markings, the designation L corresponds to the length of the leg, and D to the diameter of the sleeve and ring
The length should be chosen 1-2 mm greater than the thickness of the folded and tightly compressed layers of material that need to be fastened. In addition, you need to take into account the height of the ring.
The shorter the bushing and the smaller its diameter, the easier the installation. If you are choosing eyelets for curtains, except for very heavy ones, opt for plastic. Plastic eyelets are also convenient because they glide well over both metal and rope. They can be installed without the use of special tools.
Metal eyelets are widely used as fastening elements or as decoration on various items of clothing and shoes, on belts, bags and many other products. There are special tools and devices that can be used to secure eyelets, but for the most part these are quite expensive devices for factory conditions. For manual installation of eyelets at home, special kits are sold. However, this kit is only suitable for one ring diameter.
Nevertheless, you can install eyelets at home, you just need to be patient and perform the operations carefully. If you are starting to work for the first time, do not rush and be sure to practice on unnecessary pieces of fabric or paper before making the first fastening.
How to install eyelets: tools and materials
Eyelets are made of metal and plastic. Metal eyelets are most often used for working with fabrics and leather, while plastic ones are used when working with paper and cardboard.
Each eyelet consists of two parts: the bushing itself and a washer around which the edges of the bushing are clamped during installation.
The grommet size is usually calculated by the internal diameter, i.e. hole diameter. The holes in the material should correspond to this size (or 1-2 mm less for elastic fabrics) and the size of the matrix for installation. The height of the eyelet (height of the leg) is also important. For strong fixation, the height of the legs should be 1-2 mm greater than the thickness of the material.
Large eyelets (above in the photo), fixed with clips, are usually used when sewing light curtains and textile accessories. They consist of two parts: one part has “antennae” - clamps that can be straightened with simple pliers and a hammer.
How to install grommets using a tool?
To install most eyelets, you will definitely need a tool, which can be either manual or semi-automatic. If you rarely use eyelets and small round eyelets are enough for you, then a hand tool will be quite sufficient. You will need a punch to make a hole in the material and a matrix, which is inserted into the eyelet hole and using a hammer to flare (bend and press) the edge of the eyelet around the flat washer.
You can also purchase special pliers for installing eyelets in sewing accessories stores. The kit usually also includes punches of several sizes.
If you often sew bags or shoes, or constantly use eyelets of different sizes or shapes for decoration, we recommend purchasing a small press for installing them.
In such a press you can insert dies for eyelets, as well as various punches, as well as dies for installing buttons.
Be sure to strengthen the product before installing eyelets or installing them on material folded in several layers.
Punch for eyelets: description, scope of application
To install eyelets, round holes of a certain diameter are required, which are very difficult to make at home with improvised tools. Experience from industries where accessories are used in the production of footwear, printing, textile products and leather goods came to the rescue.
The main purpose of the grommet is to protect the edges of the hole from destruction.
Large companies use the grommet stapler as a tool for filing documents, and the rivets are often decorated with corporate symbols. Industrial enterprises use punches for grommets. Today, many companies offer for sale variants of punches for home use. This hole punch allows you to solve several problems at once: it perforates the material, bends its edges, so no additional processing of the edges is required.
Compatibility with instruments is checked individually each time.
There are the following types of punches for eyelets:
- manual;
- semi-automatic;
- automatic.
The choice of tool for installing grommets depends on what products you want to install.
Let's try to figure out which option you should choose.
It is important to understand the material, how strong the work will be, what the grommet itself will be made of, its shape and range of sizes. The choice of ring size will depend on the functional load of the product
Products come in different colors, shapes and materials.
The variability of the grommet itself will also affect the choice; you can use a metal version made of brass or steel, wood, plastic, coated or uncoated, of various shapes and sizes. Regardless of the type and shape, the fittings consist of two components: a bushing and a washer, so the principle of operation of the punch is approximately the same everywhere.
A hole is made with a punch, a sleeve and washer are applied and secured with a tool.
At the same time, the manual version of the hole punch is in great demand due to its low cost and ease of use in the original version. Usually it includes a punch, with the help of which the hole itself is made directly, a matrix into which the sleeve and washer are inserted, and embossing, by pressing which they are fixed components of the eyelet on the material.
Experts recommend purchasing devices in whole sets, but using universal, multifunctional ones is no less convenient.
Disadvantages of the manual option:
- for different grommet options you will need appropriate attachments for the embossing;
- with a high density of the material used, the process of piercing the material is labor-intensive;
- Not suitable for leather goods.
For “small things”, a hand tool with capabilities limited in terms of the size of the installed products is suitable.
Pros:
- availability;
- use at home.
In order for any eyelet installer to last as long as possible, it must be kept clean, visually inspected periodically, and lubricated with machine oil.
A semi-automatic hole punch is suitable for working with materials of increased strength, since the hole itself is punched automatically by the sharp edge of the sleeve itself
If we choose this option, then the choice of the eyelets themselves is especially important.
Hole punch eyelets must have a sharp edge.
Minuses:
Purchasing specialized eyelets.
Pros:
- versatility (suitable even for working with tarpaulins);
- availability;
- minimum effort;
- performance.
Installation pliers are not universal - the clamp for eyelets and blocks of different sizes is selected individually.
In industrial production, automatic punches are used.
Pros:
versatility in materials and eyelet sizes.
High performance.
- minuses:
- high price;
- weight and dimensions of the punch.
For large eyelets you will need more serious equipment.
Installing eyelets with clips
Press the eyelet half against the skin in the desired location.
Using pressure marks as a guide, cut a hole. Also cut out an additional piece of leather for reinforcement.
Glue the additional piece, aligning the holes.
Insert the main part of the eyelet from the front side.
Place the second part of the eyelet on the wrong side and release the clamps. Tap gently with a hammer.
Reinforce the grommet location with adhesive material (or fold the fabric in several layers or reinforce several layers for additional thickness). Press down on the grommet to create a hole impression.
Carefully cut out all holes following pressure marks.
Fold all layers of fabric, pin around the hole and insert the main part of the eyelet from the right side.
Place the second part of the eyelet on the wrong side.
Release the clamps. Tap gently with a hammer.
Installing eyelets using pliers
Strengthen the grommet installation site with adhesive material (fold fabric or leather in several layers). Place a punch of the required size in the pliers and make a hole.
Insert the main part of the eyelet from the front side.
Install the grommet dies into the pliers. Place the second part of the grommet (washer) on the wrong side.
Place the grommet on the die in the pliers and gently press it down, spreading the sleeve around the flat washer.
Press installation
Strengthen the grommet installation site with adhesive material (fold fabric or leather in several layers). Place a punch of the required size in the press and make a hole.
Insert the main part of the eyelet from the front side.
Install the grommet dies into the press. Place the second part of the eyelet on the wrong side. Place the grommet on the die in the press and press the lever smoothly but firmly, releasing the sleeve around the flat washer.
Eyelets are fastening accessories that are used everywhere. For example, in the manufacture of banners, awnings, tents, shoes, bags, clothing.
Initially, this part was used in shipbuilding, namely in fastening sails. Eyelets are widely used due to their functionality and ease of installation. They add strength to the fastenings of various holes and also serve as decorative elements.
Types of eyelets:
- metal;
- plastic;
- wooden.
Plastic and wooden ones are widely used when sewing curtains and curtains. Made in wood, metal or colored, they perfectly complement any interior.
Iron ones are used in fastening materials such as vinyl, leather, tarpaulin, banner fabric, paper and cardboard. Steel eyelets are inexpensive, but can corrode. Their material can be determined using a magnet. More expensive are steel eyelets coated with copper, nickel, and zinc. Copper and nickel-plated ones look beautiful, while zinc ones, although they look simpler, are more durable.
Brass eyelets are softer and easy to install, but their price is high. Stainless steel eyelets are not subject to corrosion, but they are also quite expensive.
The eyelet consists of two parts: a block and a ring.
There are eyelets without a ring and they are called block eyelets or shoe eyelets. These are the ones that are installed in shoes at the holes for the laces.
The size of the eyelet is determined by three main parameters:
- Bore Inner Diameter
The inner part of the sleeve (block) is measured. This value determines the size of the eyelet itself.
The size of the outer part of the eyelet is measured. May be approximate if the grommet is of an unusual shape.
The height of the eyelet leg is measured. This is of great importance when using dense or folded materials several times.
Advantages and disadvantages of application
Why eyelets are considered a good invention:
- Curtains with eyelets glide well on a special round curtain. They open silently and easily. The same can be said about paper with eyelets. Such sheets are easy to turn over in a folder.
- Reliable fastening. If curtains on hooks can be accidentally touched and the loops broken, then the eyelets will withstand such a load.
- Aesthetic appearance. Thanks to the fittings, the holes look neat. You can choose eyelets by color, to match the tone of the product, and also choose an unusual shape.
- Clothes and curtains can be washed in a machine without removing the accessories.
The only drawback is that the material on which the eyelets will be installed must be chosen correctly. Many fabrics shrink after washing, as a result of which the hole is deformed, and threads or the edge of the cut material come out from under the fastening of the fittings.
How to install iron eyelets at home?
Required materials:
- grommet;
- punch (scissors);
- bearing ball (bolt or screw with a rounded head);
- hammer.
At home, a lot of patience and perseverance is required if you want to achieve an ideal result. Installation work is carried out on a wooden surface. If the surface is too hard, the part may become deformed upon impact. To accurately and accurately punch holes, use a punch. If it is smaller than necessary, make several holes to obtain the desired hole. If you don’t have a punch, you can sharpen a metal tube of a suitable diameter yourself. As a last resort, cut the holes with scissors.
Having made the necessary holes, we install the eyelets. To do this, you need to take a bearing whose diameter will be slightly larger than the tubular part of the part. If there is none, look at a bolt or screw with a round head. After inserting the block and closing it with a ring, we place the bearing on top. To ensure that the part does not change shape upon impact, hold the hammer at 90º and apply a little force. We make a couple of small blows and see the result.
Adviсe:
- metal eyelets with a low leg are easier to install than with a high one;
- eyelets made of stainless non-ferrous metals are more convenient to install; they are softer;
- when installed on an iron surface, there is a risk of deformation of the grommet surface;
- can be installed on a lead plate; if it becomes deformed, treat the surface with a gas torch, and it will again become perfectly flat.
Crop-a-dile installer: description, principle of operation
Eyelet pliers “Micron” NT-2 are equipped with a ruler for measuring the diameter of fittings and a hole punch - the nozzle is located on the side of the working tool, used for elements with a diameter of less than 4 mm.
Micron NT-2 pliers are often purchased by people who are passionate about scrapbooking
The set includes eyelets of different colors
This hand-held device is good because:
- capable of punching holes of several sizes;
- weighs little;
- safe;
- easy to use;
- almost silent;
- takes up minimal storage space;
- performs assigned tasks efficiently.
On the tool's jaw there is a ruler with a regulator for setting the desired distance from the edge
Installation pliers are not universal - the clamp for eyelets and blocks of different sizes is selected individually. Some models are equipped with removable flaring attachments, allowing the installation of elements of two different diameters.
We suggest you familiarize yourself with How and at what height to hang a TV on the wall
Hand pliers belong to the cheapest category of tools, but provide quite good quality for installing eyelets
Impact-type grommet hammers require a hammer to operate, and the process itself will be noisy. The core installer is reliable, convenient, easily punches holes, and installs fittings of the appropriate size. Manual presses are also used to punch the fabric - the fabric is placed on a special platform, secured, and by pressing the lever at the back, a hole is cut corresponding to the diameter of the nozzle used.
Multifunctional punching pliers allow you to make holes of various diameters and secure blocks and shirt buttons
One of the tools suitable for installing grommet fittings is “Fiscars”. It is used for elements with dimensions of 1.6, 3.2, 4.8 mm, excellent for dense, thick materials. Punching and installation is done using parts with springs that are pulled up to a distance of 5 cm.
Using the tool, you can punch a hole and install a grommet, sold in sets of two or three sizes
The “Kangaro” tool is a pliers with a punch and a ruler. Their handle is anatomically shaped to ensure comfortable holding in the hand. The work process is standard: punching a hole, fixing the rivet by lightly pressing the handles of the pliers. The disadvantage is the inability to install parts with a diameter greater than 4 mm.
Kangaro pliers are useful for installing small eyelets in thin material
The hole is punched using a hole punch placed on the side of the tool
A special eyelet hammer is a heavy but compact tool made of steel, all the attachments of which are inserted into each other, like nesting dolls. The minimum size of installed fittings is 6 mm.
The hammer has easily replaceable nylon heads
Working with a hammer is a rather noisy process; it is necessary to place a metal anvil under the workpiece, since the puncture site is not fixed (which in different situations can be both a plus and a minus), there is a risk of the fabric slipping - this will lead to its damage. You first need to mark the installation point for the rivet; the punch is installed perpendicular to the edge of the blade. A couple of blows with a hammer and the leg is flattened and the part is firmly fixed.
Cropodile is the most commonly used manual eyelet installer, having a rotating head and cubes for changing positions, and a switch.
The tool has small feet for vertical storage
The device has almost no restrictions on the diameter of the fittings. He is capable of:
- carefully make holes of several sizes;
- securely mount buttons and eyelets;
- replaces three different tools;
- switch from one mode to another;
- cut through fabric, leather, plastic, paper, thin metal, chipboard, CD and other dense materials;
- can secure the part at any distance from the edge.
Crop-a-dile is capable of installing grommets more than 15 cm from the edge of the material
This eyelet tool is available in a variety of colors. Using the device, it is easy to secure parts with dimensions of 3.2 mm, 4.8 mm, buttons, elements with 8.3 mm pins. To do this, first a suitable hole is punched, then the part is inserted into it and pressed tightly.
“Cropodile” is not cheap, but it is of good quality and reliability
The tool has three positions:
- The first hole is punched with a diameter of 3/16 inches.
Switching from one operating mode to another is accomplished using a convenient switch - In the second - 1/8 inch.
- In the third, the parts are installed.
The photo shows an example of installing a grommet using the Crop-a-dile tool.
There is also a compact version of the Crop-a-dile device for installing eyelets, which differs in that it is not capable of making holes far from the edge of the surface being treated - only within 2.5 cm.
We suggest you familiarize yourself with How to iron a leatherette jacket at home? How to smooth out wrinkled outerwear made of artificial leather, eco-leather and leatherette?
The compact model is made in the form of pliers with short jaws, the length of which limits the capabilities of the tool
How to install shoe eyelets (blocks) at home?
Shoe eyelets (blocks) without a ring, on the tubular part there are notches in the form of a crown. When flaring, the notches fit tightly directly into the leather (or other material) in the form of a daisy.
Tools:
- block;
- special nozzle;
- press;
- hammer;
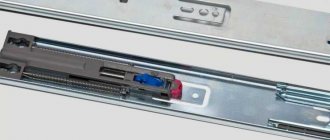
Installation requires a press and a special matrix attachment. The nozzle consists of two parts: upper and lower. The lower part should be equal in diameter to the size of the shoe block. If the flaring is not perfect, use a hammer to correct the errors. When installing without a press, use a hammer.
Advice: uneven flaring can occur if the size of the matrix is a couple of hundredths of a millimeter larger/smaller than the block. Dimensions may vary between different hardware manufacturers. It is recommended to replace the upper part of the nozzle with a larger or smaller size.
If you don’t have the necessary press and attachment at home, you can use two identical bearings and a nut of the same size. Install the nut and the bearing on top and you get a kind of stand. Then we install the block, previously inserted into the desired hole, with the front side on the bearing. On the reverse side we install the second bearing and give it several short blows with a hammer. All is ready.
Adviсe:
- the bearing should be slightly larger in diameter than the block;
- Before installing the blocks, you can slightly open the notch petals with pliers to avoid incorrect flaring inwards during installation.
How to install plastic eyelets on curtains at home?
Eyelets on curtains will make a stylish accent and transform even the most modest home. Moreover, they are easy to install and durable.
Advantages of using eyelets on curtains:
- uniform distribution of fabric along the cornice, creating a beautiful wave. Even after washing it remains the same.
- the fabric at the joints will not stretch or tear, as when fastening with hooks;
- affordable price and variety of shapes and decor, making it possible to choose the necessary options for various types of design and for every taste.
Plastic eyelets consist of two halves, but come in different thicknesses and sizes. For curtains, choose large grommets and small ones. Small ones are attached to the cornice using S-shaped hooks. Large eyelet sizes are most often used. When choosing, it is worth considering that the eyelets must be 1.5-2 times larger than the diameter of the cornice for free movement along the entire length.
Tip : when purchasing eyelets, consult with the seller what thickness and size of eyelets are needed for the selected fabric.
Which one should I do?
Pressure pressing allows you to perform almost all pressing operations necessary in everyday life. Homemade presses are most often made energy-autonomous, i.e. without a separate drive, working fluid reservoirs, pumping stations, etc. The choice of one or another design of the press is ultimately determined by its purpose and working force.
It is easiest to use a car jack as a power unit built into the press - it develops a force of up to 100 tf, and jacks for 10 tf are commonly used. The only operation that a jack press cannot handle is molding (flattening) the ends of rods during artistic cold forging.
The most commonly used jack is a hydraulic bottle jack (but see also below). In this case, a hydraulic press can be made according to one of the traces. frame design diagrams (see figure):
Basic design diagrams of homemade presses
- Pos. A – the jack is turned upside down, tightly fixed to the fixed upper cross-beam, and a punch is attached to the head of the working rod of the jack. This is the simplest and at the same time reliable and vibration-resistant design (see below for the role of vibrations in the operation of the press). Disadvantages - if the jack is needed for its intended purpose, dismantling it is quite difficult and time consuming, and swinging the lever of a jack hanging upside down is not very handy.
- Pos. B – diagram with a movable table. Structurally more difficult, because a movable traverse is added - a table. They pump the jack as always, it’s easy to remove it, because... it may not be secured at all. Disadvantages – worst vibration resistance; in addition, the technology of most pressing operations is designed for the punch to press on the workpiece or part from above, but if it’s the other way around, it’s difficult and may not work out at all. But for repair and/or mechanical assembly work, this is the best option: if you need to squeeze out a tightly rusted shaft from a pulley or bearing or, conversely, press them onto the shaft, then its (the shaft’s) length is limited only by the height of the ceiling in the workshop. In general, a hydraulic press with a moving table made from a jack is the best option for a garage or service station.
- Pos. B – with a power unit on a movable cross-beam. Structurally the most complex, but vibration-resistant, strong and durable, because the load on the weakest link - the movable traverse - is not point-based, but actually dispersed. The jack may also not be secured, but if it turns out and crashes, the consequences will be worse than if it falls off the base plate. The disadvantage is that pumping a jack that slowly creeps down is not very convenient.
Note: the base plate is a heavy, bulky, material-intensive thing. Placing a press on a slab in a workshop or garage is not always possible. Therefore, the frame of homemade presses is most often placed not on a slab, but on a lower fixed cross-beam, structurally similar to the upper one (see below). This reduces the vibration resistance of the press by approx. twice, but for amateur conditions this is acceptable.
A manually driven screw press (pos. D) allows you to create a force of up to a maximum of 1.5-2.5 tf. In working with metal it is used when this is sufficient, in the following. cases (see also video):
When pressing force less than the specified values is sufficient:
Video: manual screw press for the workshop
How to calculate the location of eyelets on a curtain
The distance between the eyelets should be from 15 to 20 cm. The greater the distance, the greater the curtain wave. It depends on the type of fabric and its length. The distance from the edge to the first hole is approximately 3-5 cm. The number of eyelets on one curtain should be an even number.
Tip : You can figure out in advance what the finished version will look like by pinning the eyelets with needles.
Installation on grommet tape
- Eyelets
- Grommet tape
- Iron
- Scissors, pencil
- Sewing machine
Eyelet tape helps install accessories without problems and is sold in any sewing store.
Having installed the back part of the grommet on the tape, you need to mark the holes on the curtain fabric. We sew the tape along the edges, cut out the marked holes in the curtain and completely close the eyelet, snapping the second (front) part. The curtain is ready to be installed on the curtain rod.
There is another type of adhesive-based grommet tape. It is initially glued to the curtain fabric using a hot iron, and then holes are made and eyelets are inserted into them.
Also, the eyelet tape can be installed in a pre-prepared wide hem.
Advice:
- cut holes larger than the intended circle by 2mm - this will allow the grommet to secure well;
- if there is no grommet tape, you can glue the joints of the grommets with ordinary adhesive fabric for strength;
- first install the grommet on a separate piece of unnecessary material for testing.
Installation on adhesive fabric
- Eyelets
- Adhesive fabric
- Iron
- Scissors, pencil
- Sewing machine
If it is not possible to purchase eyelet tape, you can use another method of attaching eyelets.
Fold the fabric over the top of the curtain, taking into account all allowances, twice. Consider the size of the eyelet and the distance of indentation above and below it (on average 3-4 cm on both sides). For strength, you can wrap it together with thick fabric or an adhesive base. You can use both. Tape holes on the back of the fabric before cutting. To avoid shifts and folds, pin these areas. Be sure to iron the fabric where the eyelets meet.
Self-installation without special tools
You can install the eyelets yourself, without special tools. It is important to smooth the material well before installation.
What else is needed:
- sewing threads matching the tone of the main material;
- sewing needle;
- scissors;
- a piece of chalk or soap for marking;
- roulette.
You can install wooden or plastic eyelets yourself without using special tools.
Algorithm of actions:
- Place about 3 cm down from the top edge of the curtains. Make markings (how to determine the optimal distance between the fittings, you can read later in the article) with chalk or soap.
- Attach the eyelets to the fabric and trace along the inner diameter.
- Use scissors to carefully cut holes.
- Remove all protruding threads and fabric fibers.
- The crumbling material can be carefully hemmed.
- Place the lower parts of the fittings under the canvas, and place the upper parts on top. Press the ring with your fingers until you hear a slight click. Repeat with all holes.
In order for the curtains to slide well, the eyelets must be at least 1.5 cm wider than the rod. Paper folder staples, cords and ribbons, on the contrary, must be narrower than the holes in the rings.
Calculation of the distance between eyelets
The distance between the rings depends on the texture of the material on which they will be attached. The thicker the fabric, the further apart the rings are placed . The exception is paper. Here, the distance between the eyelets depends on the location of the staples in the folder, which will pass through the hole.
For attaching eyelets to tulle or other thin fabric, a distance of about 16 cm is considered optimal. On coarse and dense material, the gap should be about 20 cm. Particular attention should be paid to the rule for calculating the distance between the rings when installing them on thick curtains.
The same spacing will contribute to the formation of even and beautiful folds on the curtains.
It is also important to calculate how many rings will need to be installed.
To do this, you need to use the formula A = (b - 2x): 18 + 1, where:
- A – number of holes;
- c – curtain width;
- x is the distance between the center of the first or last eyelet and the edge of the curtain.
It is recommended to place the outer rings 3-7 cm from the edge of the curtain. This way they will look beautiful and the fabric will form an even wave.
Using grommet tape
Eyelet tape is needed to strengthen thin fabrics where the rings are fixed. If the base material is dense enough, then you can attach the eyelets without compaction.
The tape is a strip of fabric with finished edges. One or both sides are impregnated with a special glue, the fixing properties of which are activated at high temperatures.
How to attach ribbon to a curtain:
- Measure the width of the tape and place a point down from the top edge of the curtain, doubling the measurement result.
- Fold this part of the material in half, wrong side inward, and iron well.
- Apply the tape to the edge of the resulting fold, with the glue side down.
- Iron.
- Wait for the fabric to cool, cut off the excess tape on the sides.
- Use a sewing machine to stitch the top edge of the tape to secure it more securely.
For curtains that cannot be ironed, you can purchase grommet tape that matches the color and simply sew it to the top edge of the curtain. Transparent but dense ribbons are sold for tulle.