Cabinet or modular furniture is often equipped with drawers, which are designed to store various small items. They can have different sizes, but their main feature is that they can easily be pulled out and pushed back in if necessary. For this purpose, furniture guides are used, which can be presented in several types. They differ in the installation method and operating principle. Their main task is to ensure smooth and quiet use of the drawers. At the same time, they must be reliable to guarantee long service life and ease of use of the furniture.
Design features
To properly install such runners on furniture, you first need to understand what the structure consists of.
There are 2 main types of ball guides:
- double row;
- four-row.
Their design is identical. Yes, and installation is carried out the same way. But in terms of operation, two-row ones differ from four-row ones. The first type is more affordable and can withstand a load of no more than 35 kilograms.
Ball type guide design
If you are counting on a long service life, as well as a large loading capacity of the boxes, it is recommended to choose 4-row products.
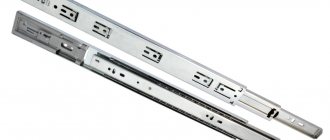
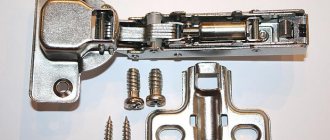
Structurally, the ball type guides consist of 2 metal profiles that contact each other using ball rolling elements. The balls themselves are usually made of steel. But there are also options made of nylon. They are distributed in the recesses of the cradle as evenly as possible.
The length of the profile, as well as design features, allow the drawer to be completely pulled out from the cabinet and chest of drawers. To ensure that the box does not go beyond the permissible limits, the runners are often additionally equipped with clamps (stops) or closers. This is especially convenient if the fittings will be attached to a computer desk.
What's inside the ball guides
Advantages and disadvantages
Many people decide to use ball guides because they have a wide range of objective advantages. Namely:
- wide extension range;
- large selection of accessories;
- the presence of closers and stops that increase work safety;
- full extension, which gives access to the entire depth of the drawer;
- Possibility of use on different types of furniture;
- the use of high quality metal and components (especially from manufacturers such as Boyard);
- easy and silent sliding;
- no need to mill grooves for installation;
- relatively small size with a solid load capacity;
- collapsible design;
- possibility of installation by yourself.
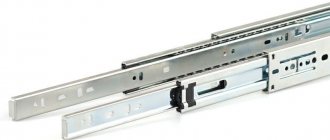
Full extension ball slides
One of the main competitors is the concealed slides.
As for the shortcomings, everything is relative.
If you take high quality products, as well as from a reliable manufacturer, then the only disadvantage in this situation can be considered only a higher cost. This is compared to roller skids that are noisy, short-lived, and lack the ability to fully extend.
If the ball guides turn out to be of poor quality, then you should expect not the most reliable operation and rapid failure.
What you definitely shouldn’t do is choose roller guides for drawers when it is possible to install ball runners.
Ball type guides
Pros and cons of designs
In addition to the advantages described above, which are characteristic of both two-row and four-row systems, extra-long extension ball fittings have the following advantages:
- A wide range of extension values, which depends on the specific standard size of the product and starts from 150.0 millimeters.
- A variety of colors of non-ferrous metallization, up to antique bronze or gold;
- The presence of a closer makes the operation of these devices absolutely safe.
- Full extension systems, unlike other types of ball guides, provide full inspection of the interior of the drawer without dismantling the holders.
- Possibility of use in special-purpose furniture - workbenches, drawer racks, in various designs of dishwashers, refrigerators and ovens.
- A wide range of full extension guides equipped with additional devices - clamps, facade regulators and other quite useful and ergonomic technical details.
Of course, like any design, this type of furniture fittings has certain, sometimes quite specific, disadvantages. The main disadvantages (besides the high cost) of full extension devices are:
- the impossibility of fixing the extended element in an intermediate position in standard designs;
- demanding maintenance;
- difficulty in matching the color of the furniture - most guides are not painted, but anodized;
- more complex and time-consuming installation, requiring precise markings and careful installation.
What you need for installation
Now to the question of how to install ball guides for drawers.
To install the runners that will guide and open the drawer completely, you will need to arm yourself with:
- pencil;
- tape measure or long ruler;
- level;
- screwdriver or screwdriver;
- awl (optional);
- drill and thin drill bit.
If installation is planned on a wooden structure, then it is better to pre-drill the holes for the self-tapping screws with a thin drill. This will prevent the wood from cracking.
For ordinary furniture made of chipboard and MDF, such manipulations are usually not required. Just carefully screw in the screws. You can first make a precise and small recess using an awl.
Now you can install. The installation scheme itself is not particularly complicated, but it requires accuracy, attentiveness, and a sequence of actions.
Ball guides
Calculation of drawer dimensions
To install the ball slides correctly, let's check that you have detailed the drawer itself correctly.
Width
According to the technological dimensions of furniture design, an assembled box without a front in width (between it and the side of the product) should have gaps of 13 mm on each side . This is exactly how much the thickness of the “telescope” will take on.
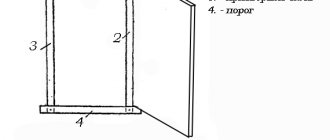
See the diagram for box dimensions:
Length
Dimensions of telescopic guides for retractable structures from 250 to 800 mm in increments of 50 mm: 250 mm, 300 mm, 350 mm, 400 mm, 450 mm, 500 mm, 550 mm, etc.
Ideally,
the depth of the drawer should be equal to the length of the guide . Also remember to leave at least a 10mm gap between the back of the dresser and the back of the drawer.
However, there are situations when it is necessary to deviate from this condition. For example, if the internal depth of a cabinet, cabinet or chest of drawers is not 500 mm, but slightly less, let’s say 495 mm. In this case, if we take a 500 mm box, it won’t fit, but if we make it smaller, 450 mm long, the arm won’t rise, because at the same time we lose 35 mm of usable space:
- 35 mm (loss) = 485 mm - 450 mm (rail length)
- 485 mm = 495 mm - 10 mm (distance between the back wall of the drawer and the chest itself)
In such situations, it is worth considering the option of a 495mm drawer with 450mm slides. Of course, it won't go all the way out due to the shorter guides, but that's not a big deal. But the capacity has become larger; during use, the housewives will appreciate this!
Height
The height is usually made based on the needs of the person who will use it. The height is usually 80-250 mm.
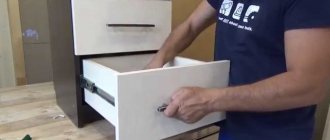
Step two. Fastening the fittings to the drawer
See also
Hanging chest of drawers for a bedroom in a modern interior, photos, ideas
The axis is ready. Now the runner is applied to the marking.
To disconnect the guides, simply press the special locking bar. After this, the design is easily divided into 2 components.
How to disassemble the guide
Place the guide piece so that the front edge is flush with the drawer front. It is important to prevent the runners from sticking forward. Otherwise a gap will appear. And we definitely don’t need him.
Regarding fastening, the following recommendations can be given:
- The skids come with factory adjustment holes to aid in proper installation. There are holes for adjustment up and down as well as forward and backward. Made in the form of a vertical and horizontal oval, respectively;
- Using these holes, align the runner so that the marking line runs exactly through the center of these ovals;
- Now insert a self-tapping screw into the hole, which is located horizontally. You can first make a hole with an awl. This way the self-tapping screw will fit accurately and evenly;
- The same adjustment holes will be located in the part of the runner that is at the back of the drawer. Here you need to mount it in a vertical hole, allowing you to adjust the height of the box.
Mounting holes in the guide
In the future, if you need to adjust the position, this will be done extremely simply.
To adjust, unscrew the screw from the hole that is responsible for horizontal or vertical movement. Move the runner and secure it again.
The end result is that you have secured the element to the drawer through 2 adjustment holes on the front and back.
Installation of ball telescopic guides
On the side of the drawer, horizontally, strictly in the center, mark a line and screw one half of the guide along it.
Now we need to mark a similar horizontal line on the inside wall of the chest of drawers.
I took the exact distances and dimensions from the drawing of my chest of drawers; you can use the drawing of your furniture product, approximately as shown in the figure:
That is, we mark 417 mm from the floor on the sidewall and mount the telescope at this height.
This completes the hardest part of the work; now we screw the two halves of the guides strictly along the line to the drawer and to the side and move it into place.