Professional builders know that installing interior doors requires more careful compliance with all the requirements of the instructions for their installation than when installing an entrance door, where various mistakes can be hidden under the slopes. You won't be able to pull off this trick on interior doors. The slightest errors in calculations, both when taking the parameters of the opening and block, and when cutting down risers and crossbars, inevitably lead to a negative result, which, in most cases, cannot be corrected.
To prevent such a situation, we will analyze in detail how to assemble the door frame of an interior door at home, and then install it in the doorway. There is nothing complicated here. All you need is patience and attentiveness.
Door frame components
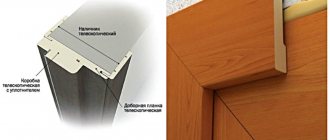
First of all, you should familiarize yourself with the structure of the interior door frame:
- hinge beam - this is the part on which the hinges are cut and the door is hung
- the false beam is the part that meets the door. The counter part of the lock crashes into it.
- lintel - upper “ceiling” beam
- threshold - lower part
Thus, in order to assemble the door frame, you need to correctly connect all its parts. But before you start, you need to decide on the dimensions and choose the appropriate material. Doors should look aesthetically pleasing and be easy to clean.
Requirements for an interior door frame
The frame is the basis of the door block, which must correspond to the established height, width and thickness. It should provide support and full coverage of the structure.
The door leaf must correspond to the purpose of the room, incl. ventilation requirements. For example, a steam room in a bathhouse requires maximum thermal insulation. Therefore, all connections of individual elements of the door block must be sealed.
In the bathroom, on the other hand, it is necessary to ensure good ventilation to prevent mold from forming in the room. Gaps are specially left between the box and the canvas. Good ventilation is also provided for rooms in which gas equipment is located.
Therefore, in any case, it is important to know how to correctly make the calculations, prepare the necessary materials and assemble the box for the door to the room with your own hands.
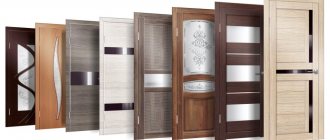
Choosing material
I don’t have a definite answer here, since the choice depends on your preferences and budget. I will give examples of the most common materials used for door frames.
MDF doors
MDF is a wood fiber board. The doors are cheap, but they look good. The advantages include lightness and environmental friendliness. The disadvantages are reduced impact resistance, poor noise insulation and short service life.
Laminated solid wood
Glued board or "euro-timber".
These doors are not made of solid wood, but of parts glued together under high pressure. The joints on them are practically invisible. The doors are quite durable and cost a little more than MDF. Price and quality are acceptable.
Solid wooden doors
Doors are much more expensive than glued ones. Strong and durable. The disadvantage is incorrect processing by the manufacturer, as a result of which the wood is excessively saturated with moisture.
Doors made of chipboard and fibreboard
Wood-fiber or wood-pressed boards. These doors are very cheap as they are made from leftover material. The advantage of these doors is good mechanical strength and fairly good sound and sound insulation. The disadvantage is low moisture resistance, as well as the presence of a volatile substance in the glue, which has a detrimental effect on health. Another aspect is the complexity of installation, since the screws in such doors do not hold well.
In addition to those described, there are also plastic, glass, aluminum, and veneered ones. Doors with honeycomb filling, laminated, etc.
The choice of material is up to you, but it should be appropriate and practical.
Proper sizing is the key to success!
The standard sizes of door leaves are
- height 2000 mm
- width 600 mm, 700 mm, 800 mm and 900 mm
All other sizes that go beyond the scope are usually custom-made items. (I mean single canvases, not swing ones)
You need to add 70 mm to the size of the door leaf - this is the standard width of the door frame. If the dimensions of the door frame are different, then the size will naturally change up or down. And we also add 6 mm - this is the technological gap between the leaf and the door frame.
Now you need to check how the door frame fits into the doorway. If it needs to be expanded, then we are not in a hurry to break everything at once. We soberly assess the situation - we may have to strengthen the opening with lintels. If you need to reduce the opening, then we fill it with bricks, or “sew on” bars - it all depends on the situation.
IT IS IMPORTANT TO KNOW:
To help you understand what size doorway is needed, look at the formula:
Door leaf size + door frame size + 6 mm tech. gap + 60 mm (30 mm on each side for mounting foam and wedges that will be needed when installing the box)
Usually the dimensions of doorways are controlled at the construction stage, but in older private houses (like mine) there are “hard” discrepancies.
The next important dimension is the gap from the floor to the door leaf. Before calculating it, you need to check the level of the floors for the width of the door “swing”.
You can do this in two ways:
- Using a hydraulic level
On the side walls of the opening we place marks at the same level. We measure the distance from each mark to the floor plane. The difference that you get when measuring should be added to the minimum height of the posts so that when opening the door does not rest on the floor. If you still “miss” this moment, then you can eliminate it only by trimming the door leaf, and this is still a “handjob” :(
2. Using a laser level
If you are the happy owner of a laser level, then everything becomes much simpler. We set the level and, using a construction square, determine the curvature of the floors. The obtained values are taken into account when setting sizes.
The minimum gap is 10 - 15 mm, depending on what kind of floor covering is planned. But it is better to immediately lay linoleum, or carpet, or laminate, and then carry out the installation.
See the table of correspondence between door blocks and openings.
And here is another table of typical door frame sizes
Assembling a door frame without a threshold
Let's look at assembling a door frame with your own hands using an MDF frame as an example. We will connect the upper parts at 45°, as this is the most aesthetic way.
1.First of all, you need to trim the parts of the box. This is done in order to eliminate irregularities or manufacturing defects.
IT IS IMPORTANT TO KNOW:
If you have to use hand tools, it is better to use a fine-toothed saw or a hacksaw. Start making cuts from the veneer side so that chips, if any, remain on the invisible side.
2. We “saw” the loop beam and the vestibule at 45°. It is best to do this with a miter saw, but if you don’t have one, you will have to work with a miter box. To avoid unevenness when cutting, the miter box must be secured. We use a hacksaw with a fine tooth.
3. Next we move on to the most difficult part - “sawing” the top of the box - the lintel. You need to clearly set the size and not miss the corners. You can use a tape measure, but there is an easier way. To do this, we apply the lintel to the top of the door and mark the marks “in place” with a sharp pencil. To maintain the technological gap, you can use packaging cardboard - its width is just 3 mm.
4. Mark the height of the loop and false beams. I told you how to find out the required height a little higher. This is the height of the door leaf + the top gap of 3 mm + the bottom gap. If the floors are level, then 10 mm is enough. When opening, the door leaf should not catch or rest against the floor. You should not create a very high gap - 10 - 15 mm is enough for normal air circulation. If the room is damp, then larger values are allowed.
IT IS IMPORTANT TO KNOW:
If there is a difference where the doors are installed and there is no way to correct it, then the height of the racks may be different. The highest point of the difference is taken as zero.
Next, we cut off the racks according to the marks.
IT IS IMPORTANT TO KNOW:
We constantly and meticulously check all the applied dimensions before washing down. If the box turns out to be smaller than the canvas, you will have to buy a new beam.
5. After all the components have been sawed down, we assemble the MDF door frame together, having previously drilled holes with a drill of a smaller diameter to prevent the frame from splitting. For connection we use 50 cm wood screws. It is more convenient to carry out work on the floor, placing cardboard or other material under the box.
IT IS IMPORTANT TO KNOW:
When you tighten the door frame, press its parts as tightly as possible, since the screws will stretch them.
Well, this is approximately the result you should get.
Finishing touches
There is very little left before the work is completed.
- We use polyurethane foam to seal the gaps between the wall and the frame of the interior doors, both from the inside and from the outside.
- If necessary, we install additional strips by selecting grooves for them in the hardened foam.
- We install the platbands, having previously cut off the frozen foam where it interferes. The platbands are placed on silicone glue, which is applied to the frame, and secured with nails with reduced heads.
- Do not forget about the decorative design of all the details that are in plain sight.
If you follow the advice of experts and try to work carefully, you will be able to install doors with a frame with your own hands even with the simplest tools.
Assembling a door frame with a threshold
The easiest way to assemble. The fact is that the threshold is usually mounted at 90°.
The threshold is mounted on the entrance or “entrance” doors, separating the cold room from the living room. In addition, the threshold gives the door frame additional strength.
Preparing the doorway and checking the floor level are absolutely identical to assembling without a threshold, but further steps have their differences.
So, here are the step-by-step assembly instructions:
1. File the lintel to its original dimensions. The length of the lintel will be equal to the length of the door leaf + 6 mm for the gap. You need to make two such blanks - this will be the threshold. Do not forget to trim the workpieces, since the factory cut may not be even.
2. On loop and bevel beams, it is necessary to remove the thrust quarter.
To do this, we connect the end of the vertical post and the horizontal one and put a mark with a sharp pencil.
IT IS IMPORTANT TO KNOW:
The size must be transferred with maximum clarity so that there are no gaps. Repairing them in the future is not problematic, but it will ruin the aesthetic component of the doors.
We make a cut to a depth of a quarter with a hacksaw or jigsaw. Be extremely careful not to touch the work surface. It is not possible to fix the “jamb” on MDF doors.
Then, using a chisel or a utility knife, carefully remove it. We repeat the operations for all angles.
IT IS IMPORTANT TO KNOW:
If you use a chisel, then under no circumstances turn it over with its top sharpened side down. When carrying out work, the working part will crash into the material and all the work will go down the drain. The same rule applies when inserting loops.
3. Connect the box. We also drill holes and tighten them with self-tapping screws. The only difference is that galvanized screws are used for the threshold if it is the threshold of an entrance door. They are less affected.
Step-by-step installation process
To secure the assembled frame in the opening and install the doors yourself, you must perform the following steps:
- Install the frame into the opening. To keep it in place, insert temporary spacers made of cardboard or foam plastic between the box and the wall.
- Prepare wedges that will be necessary for final installation and alignment of gaps. For them, you can use waste beams sawn at different angles.
- We begin to wedge the product. First, place the wedges directly under the hinges. They will prevent deformation of the beam when we screw it to the wall. Drive one wedge into each upper corner. To prevent the structure from moving, two wedges will be required from each corner. They are inserted from opposite sides so that the narrow parts intersect.
- Next, we check the position of the frame and each of its elements with a level. The box should be flush with the wall.
- We fasten the sidewall.
- We carry out the final installation of the cover part after we hang the canvas on the hinges. To ensure that the frame holds firmly while we screw the hinges and install the sash, we can partially foam the gap along the fixed side and in two or three places on the hinged part.
Tip: Before foaming, you need to clean the surface from dust and moisten it with water from a spray bottle. These measures can significantly increase adhesion.
- While the foam dries, we install hinges and other fittings on the canvas, then put it in place.
- We wedge the hinged part of the door when the door is in the closed position. Then we secure it and foam the cracks around the perimeter.
Another important condition in order not to disturb the geometry of the frame during the installation process is the use of spacer wedges that correspond to the width of the box and are inserted across it.
The final stage of installation of the frame and door is the decorative design of the opening with platbands.
Door frame tenon connection
One of the ways to assemble door frames is a tenon joint. It's not as common as 45° and 90° assemblies, but it does exist.
The joining of parts occurs through tenon joints (see picture)
Usually the achieved rigidity is quite sufficient, but galvanized nails can be added to enhance the strength characteristics.
I washed down the box elements at an angle of 45º
To connect individual elements of a box with a round cross-section, their end parts are cut at 45º. To make the same cut, you need to use a special miter saw or miter box.
If you don’t have a special tool, you can use a protractor and a ruler to cut the workpieces to the required angle. Markings are first applied to the end part of the beam with a simple pencil, then the workpiece is cut along the lines.
When connecting two workpieces together, the screws are screwed in at an angle.