Beautiful paintings and memorable photographs can be a wonderful addition to the interior of any apartment or house. For decoration, you can use a frame made with your own hands. They should emphasize the advantages of the canvas and the photograph, highlight them and become a continuation of the composition. Next we will tell you in detail how to make a frame for a picture or photographs with your own hands.
Making picture frames is an exciting activity that reveals the designer's talent.
Design features
The main aspect that must be observed when making a frame with your own hands is the design and intended purpose of the room where the product will be placed. When choosing a color scheme, it is important not to overdo it. Since shades that are too bright and saturated will be uncomfortable for visual perception, the finished frame will also not be able to fit into the interior.
The canvas in such a frame will lose all its advantages, fade and lose significance.
Additional Information! Try to focus your design on the content of the photograph or painting, as well as its parameters. The more colorful the picture, the smaller and more inconspicuous the frame should ultimately be.
If this has already happened, don’t worry, you can make adjustments to the shape, color and design at any time. This possibility is the main advantage of making a frame with your own hands. Using various available means and design options, it will be possible to transform the picture that was planned to decorate the room.
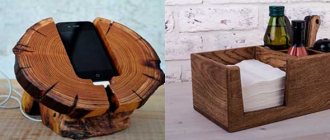
For small images and photographs, there are many interesting ideas for using scrap materials.
Another method is to place the canvas at a non-standard angle, changing the lighting, or near certain furniture to create a single picture. By making and correcting mistakes or trying different placements, you will achieve excellent results.
Material selection
There are no special restrictions on the material. The only thing that remains unchanged is the base on which the decorations will be glued. It should be dense, strong and not get wet from glue. Thick cardboard and, of course, wood work well for the frame. Moreover, the wooden frame itself is already a completed craft. It can be varnished and will be appropriate for any interior. You can decorate the product with any available means. This could be pasta, pebbles, clothespins, buttons, beads. But do not forget that the chosen material should complement the picture. So, for example, shells will go well with a seascape, and a frame of pasta with the addition of cereals will be perfect for the kitchen.
Let's look at the two main materials from which frames are most often made - wood and polyurethane foam.
What elements can be used to make a frame?
You can make your own picture frame from the following available materials:
- tree;
- textile;
- thick paper or various types of cardboard;
- plastic and polyurethane elements;
- gypsum.
Before you make a picture frame with your own hands, you should build a clear design concept.
The presented options are not the entire list of resources that can be used in decorating a picture frame and stand for it with your own hands. Based on the resource you choose, you may need the following tools:
- jigsaw, hacksaw, scissors;
- measuring instruments;
- markers, pen, pencils;
- elements for connection - small nails, specialized glue;
- miter box;
- varnish, stain, paint;
- finishing accessories.
It is important to remember its purpose to frame the image and serve only as a background for revealing the idea of the composition.
IMPORTANT! It is important to maintain harmony in the combination of framing materials with the image. In this way, a single whole is created, which will turn into an excellent design product for decorating the room.
Below is more detailed information about the manufacturing process depending on the chosen base.
Tree
This material is rightfully considered a traditional option for decorating artwork. In most cases, wood framing is made in neutral shades. The shape is given in a simple manner, without complex additional structures, but this process still requires certain knowledge and skills.
The easiest way is to use wooden slats of the required dimensions. According to the dimensions of the image, four blanks are prepared, which are equal in pairs.
To fix the canvas, it is necessary that the frame overlaps the inside of the picture by 5 millimeters.
A more labor-intensive project includes a DIY photo or canvas frame that features glass. For this option, you will additionally need to make a back wall using thin plywood. The external dimensions of the finished product must necessarily be slightly larger than the glass and the photograph itself. If you do not have the necessary knowledge to work with glass elements, we recommend ordering a ready-made sheet from a workshop.
Having calculated the thickness of the glass and the painting, you should deepen the inside of the blanks by this value. Most often, this figure is 2-5 millimeters. Next you need to cut the planks at the correct angle; to do this, use a square and a miter box. Be sure to treat the resulting sections with sandpaper, then connect them with glue in the form of a square or rectangle. The glue will need about 4-5 hours to dry completely.
ADVICE! We recommend strengthening the connection of the workpieces from the inside with a wood stapler.
After final drying, you can begin decorating. Paint or varnish is suitable for this.
Subsequent layers should be applied only after the previous one has dried.
First of all, glass is placed in a wooden frame prepared with your own hands, then it is turned over with the main part down and then the canvas is laid out on the glass. Thick cardboard and plywood must be placed on top of the painting. If the calculations were made correctly, then the backdrop is glued along the entire perimeter of the product. To improve the connection, you can nail small nails in the corners of the framing element.
Polyurethane ceiling plinth
If you have a polyurethane plinth for the ceiling, then you can make a white frame with your own hands from these scrap materials. First of all, take measurements of the workpieces. Next, use a hacksaw to cut the baseboard into 4 parts at sharp angles (45 degrees).
It is important to do this perfectly evenly.
We place special Titan glue on each side of the cut and connect it. A clamp will help make the connection stronger and more durable. Treat the upper surface of the joining area with acrylic paint.
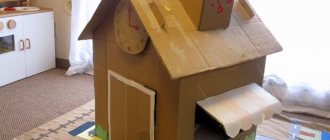
Cardboard
The most affordable and inexpensive material for framing is cardboard. The process with such a basis takes little time and effort, and children and teenagers can handle it.
You can use part of the packaging box, that is, corrugated cardboard.
First, cut out a cardboard base (rectangular or square), inside of which there should be a window for the picture. Dimensions are determined based on the size of the photograph or painting. In most cases, the frame width is more than 4 centimeters. Next we prepare the back element of the product, which is similar in parameters to the base.
Additionally, you will need a stand if it was planned that the DIY cardboard frame for the picture would be placed on a bookshelf. To do this, cut out a rectangular leg with dimensions of 7*17 centimeters, sharpen it at the end, and bend it about 2 centimeters on the other side.
Next, all the elements are glued together one by one with PVA glue and then you start decorating.
Paper
If you have wallpaper scraps or plain colored sheets, you can make your own frame from paper or cardboard. The process is similar to using corrugated cardboard.
Be sure to use thick paper, so the product for framing will last even longer.
About frame design
A picture frame should highlight the image in its surroundings and draw attention to it. In some cases (see below), the frame aesthetically coordinates the image with the surroundings, but in no case is it an integral part of the composition semantically, i.e. The meaning of the image should remain the same with or without a frame. Therefore, the “hyperdesign” of picture frames (see figure) is only permissible in one single case: if the semantics of the picture are so weak that without a frame it escapes the viewer’s attention altogether. Simply put, if the picture is a product of bad taste and without a frame, it is not worth more than a fleeting glance. This does not concern the purely physiological aspects of its perception, but then we should no longer be talking about the art and artistic value of the image - “interestingness” can also be different. Such reasoning may seem sophisticatedly aesthetic, but quite specific ones directly follow from them, incl. technical requirements for the picture frame.
Picture frames that distract the viewer from the meaning of the image
Baguette profile
Even ancient cabinetmakers figured out the easiest way to concentrate the viewer’s attention on the picture. To do this, a sufficiently wide baguette for the picture should rise smoothly from the image carrier outward. This is also a physiological way of attracting attention, but without “switching on” base instincts. Since primitive times, it has been common for man to peer into all sorts of holes: after all, there may be edible prey, water, or danger lurking there. Children do not immediately lose their original spontaneity of perception of the world, which is why they are tempted to look into wells, caves, utility hatches, drainage pipes, etc.
However, a hole that is too deep suggests something more dangerous than useful - what you need in it is difficult to access, and the danger may turn out to be too big and biting or poisonous. Therefore, the same old-time masters, through trial and error, determined the optimal camber of the sides of the baguette: the tangent to the envelope of its profile at its lowest internal point should form an angle of 15-40 degrees with the image plane. the wider the baguette is compared to the picture, the larger this angle can be, but there is no more or less exact formula, this is a matter of taste and skill of the master. Such a frame forms around the image something like the eyepiece of a large telescope, through which the viewer examines another world - in the picture.
Note: a correctly profiled baguette also performs, so to speak, an aesthetic and protective function - it softens or completely eliminates glare and natural shadows in the picture under oblique lighting.
As for the outer edge, there are 2 options. If the picture is placed on an aesthetically favorable background (not overly bright and variegated), then it is better to make the outer edge of the baguette also beveled at an angle, generally approx. twice the size of the internal one, pos. 1 in Fig.:
Correct and incorrect profiling of a baguette for a picture frame
If the picture needs to be highlighted more strongly against the background, then one of the options is a baguette hanging slightly from the outside, pos. 2, so it will obscure the brightly lit background directly next to the picture, and the background on the shadow side will not “clog” the image so much. In industrially produced baguettes, a manually labor-intensive, but in every sense optimal solution is used - a concave profile of the outer edge of the baguette (see profiles of MDF baguettes in the figure above).
In any case, it is unacceptable, firstly, any overhang of the inner edge of the frame over the image (positions 3 and 4 in the figure) - a shadow edging on the picture will sharply reduce its visual appeal. Secondly, the straight high outer edge of the frame (item 5) - the picture “in a box” will receive some added utilitarianism, most often inappropriate. The only exception in this case is deep modular compositions. They don’t look good at all in wide “flattened” frames, and then you still need to make a “box”, but paint or trim the outside so that it blends better into the background.
Picture in frame with “milk”
The “milk” in the frame of the picture is more akin to the “milk” of a shooting target than to the milky shot in cinematography. In our case, “milk” is a semantically empty field between the outer edge of the image and the inner edge of the frame. Simply – the inner frame of the picture.
Most often, a frame with “milk” for a picture needs to be made if the backgrounds of the picture and the surrounding ones are close to each other in brightness and color tone, on the left in Fig. If the picture as a whole is light, then its internal frame can be dark to pure black or light to white; if it is dark, then only white.
Examples of paintings in frames with internal framing
In the center in Fig. - an infrequent, but interesting and difficult case to solve aesthetically. An additional fragment (a blue vase) that perfectly harmonizes with the main semantic elements had to be placed near the so-called Golden Ratio Zone - the area in the image that most attracts the eye. To “drag” the viewer’s attention to the daisies, the author found a non-standard solution - he painted a narrow slatted frame to match the vase. According to the physiology of visual perception, the viewer’s attention in this case is in the position of Buridan’s donkey, but the “carrot” under his nose – a bouquet in a vase – prevents him from dying of hunger between two identical armfuls of hay. However, without the “milk,” the frame and the vase would have formed something semantically common, which the artist did not intend and which would have spoiled the painting. The internal frame of a contrasting blue, but much duller and paler tone solves the problem - the blue elements do not tire the eyesight, but the vase, due to the fact that it is almost in the golden ratio, is not lost from view. In general, this is the same case as mentioned above - the frame emphasizes the meaning of the image without changing it.
The second case (on the right in the figure) is even more complex and subtle; This is already the highest aerobatics of image framing. What is obvious about it is that a ceremonial portrait without a magnificent frame is no longer a ceremonial portrait. If the picture depicted a white woman, there would be no need for “milk”: powder her face, put on jewelry, and a bright light main semantic spot is exactly where it is needed according to the rules of the central vertical composition. The “milk” tone in the overall image tells the viewer’s subconscious that the frame here is only a symbol of etiquette, and the essence is expressed in the lady on the canvas. But why exactly in the tone of the image? And why is it made quite monochromatic, and not in contrast to the color of the model’s skin? These are, unfortunately, too complex questions for detailed analysis here. Just look closely at the same picture next to it, on a white background. Even from a small-scale JPEG it is noticeable that the character’s facial expression is somewhat different here and there. And if on white we see just a posing model, then in a frame with “milk” to match the color of the skin on the face, a certain hidden essence is revealed. And no photoshopped photos - just copied to the clipboard and placed next to it on white. This is what the internal framing of a framed painting can mean.
Material for “milk”, and not only
Front (smooth) side of rough fiberboard
The inner frame of the picture is in the center in Fig. above (probably together with the subframe) seems to be made from rough fiberboard. Its smooth side is just the right tone and finely textured, like wood that is always pleasing to the eye, see fig. on right. White fiberboard for the backs of furniture is no worse than ordinary “milk” for paintings; Any fiberboard can be easily painted or covered with textured self-adhesive. According to its mechanical characteristics, fiberboard is suitable for the manufacture of almost all elements of the load-bearing part of a picture frame. Fiberboard does not generate dust, does not stain anything, does not emit toxic fumes, and can be cut with a mounting knife. It’s a little difficult, really - to cut through a 4-mm slab, you need 3-5 passes with a fresh, never-used blade. But no dust, no sawdust or shavings, no noise or rumble. In general, fiberboard is an excellent material for a picture frame, which is what we will now do directly.
How to make a picture frame yourself from improvised materials?
Making home decor is not a simple process, but it is fascinating and allows you to add your own unique twist to the interior of any room. After the first successful experiment, any craftsman will not want to stop there.
A do-it-yourself picture frame for a wall made from scrap materials can highlight the content and also make it more comfortable and unusual.
From buttons
Many needlewomen are interested in how to make photo frames with their own hands using buttons. These accessories add brightness and flair to the finished product. You can decorate buttons on a base made of paper or cardboard; to do this, you need to additionally cover them with fabric or apply paint. Then you start gluing the multi-colored mosaics.
We recommend placing larger buttons first, and then filling the space with smaller ones.
From old newspapers
Newspaper baguettes are used for the base. To add colorful shades, the ideal option is to use color prints.
To decorate the details, you should lay out sheets of newspaper on the table, roll them into a tight tube, gluing all the paper layers together.
ATTENTION! Try to roll all the parts with the same density. This will make it easier to connect them.
For each side of the frame, you need to prepare about nine blanks. The number depends on the selected width of the baguette. After 24 hours, the adhesive will dry and you can start cutting at the correct angle (45 degrees) on both sides. For a more correct procedure, use a protractor or miter box.
The parts should be connected at right angles using glue and a tongue-and-groove system. Use toothpicks for the tenon; the groove can be made with an awl.
Use putty to cover cracks in corners.
The finished product must be primed with a mixture that consists of 1 part water and 2 parts PVA and white paint (water-based or acrylic). All components are carefully mixed with the gradual addition of water. The end result should be a mixture with the consistency of liquid sour cream. This solution is applied in 2-4 layers and dried.
To secure a photo or canvas in a DIY newsprint frame, use small nails or stationery tape.
Made from natural materials
An excellent product will be obtained if you use twigs or thin tree branches. For reliable fixation, use organza or thin rope.
If desired, all elements are additionally glued with a glue gun.
First of all, you need to take 4 bunches of twigs with the same thickness, place them perpendicularly and tie them with organza. You can preserve the natural texture of twigs and twigs by covering all elements with colorless varnish.
Another way is to decorate the base of wooden picture frames with your own hands, namely with dry wooden branches. To do this, you need to take a frame with wide brims, well-dried sticks and a hot glue gun. First, break the branches into elements with a length equal to the width of the base. Next, lubricate the frame with hot glue and place wooden blanks over its entire area.
After drying, the accessory can be used for its intended purpose.
For lovers of green decor, the ideal option would be to use dry moss. The process of decorating with them will take a little time, but the result will delight you with its colorfulness. The moss is placed over the entire area using glue, so you can give a second life to the old base for pictures and canvas.
Using decorative tape
Decorative tape is an easy and affordable way to modify an old frame or one you made yourself from cardboard parts. To do this, you should gradually apply strips of tape in the sequence suggested by your imagination. Excess elements are cut off with scissors.
The process only takes a few minutes, but the result will liven up any room.
3D Yarn Frame
To make your own frames on the wall from scrap materials, for example, yarn, you will need a base with smooth edges, PVA, multi-colored threads and scissors.
During design, it is necessary to apply glue and wind the yarn in stages, that is, in small sections.
Gradual decoration will ultimately result in a higher quality product.
ADVICE! For a creative approach, you can string beads and rhinestones onto the thread.
From pallets
Wooden pallets are the easiest way to make a frame with your own hands. All parts are available to everyone, regardless of income. The number of pallets is calculated based on the required frame size. You can fasten the elements using small nails, a wood stapler, or special glue.
Be sure to use two parts for horizontal stripes, this will make the product even more original.
Using wine corks
How can you decorate picture frames with wine corks yourself? It's quite simple. The material must be cut into small rings up to a centimeter in height, then you paint them in any shades and attach them to the base with a glue gun.
After drying, you can place the canvas or photograph.
Eco-frame made of cereals and grains
To decorate the finished bases, numerous eco-elements are used - cereals, grains, shells, sea pebbles.
Such accessories can be left in their natural form or painted to match the interior.
All elements are placed on the adhesive base in random order, sorted in a certain way or creating a pattern.
From magazines and newspapers
Multi-colored clippings from magazines and newspapers can be used as components for quilling. Small blanks are glued and twisted in a circle.
Such blanks can be mounted on a cardboard or paper base.
With their help, it is possible to make a stand for frames. Let's see how you can make this frame stand? It is important to choose a thicker magazine sheet and cut a rectangular leg. On one side it is pointed to be placed on a flat surface. The second part is wrapped to apply glue and connect to the frame.
Preparing tools
As the main material, you can use various wooden products, for example, plywood or parts of pallets. You can easily make frames or other products from them. After choosing the design of the future frame, you need to prepare working tools.
Preparing tools
Table. Tools for making a wooden frame.
| Position name, photo | Description |
| Wooden elements | Various wooden options will work, such as popsicle sticks, unnecessary slats, or part of a pallet. Alternatively, you can buy ready-made wooden baguettes and make an elaborate frame out of them. |
| Fasteners | You can use wood glue or special finishing nails to join individual pieces of wood together. If the structure is very large and reliable fixation is needed, then these types of fastening can be combined. |
| Saw and miter box | Using these tools, you can cut pieces of wood at a certain angle, which is very important when creating a frame structure. The resulting joints are of the highest quality, which has a positive effect on the appearance and reliability of the frame. |
| Clamp | If you plan to seriously engage in the manufacture of frames in the future, then a clamp will allow you to obtain ideal quality products. It is needed to press the parts of the structure while gluing them, thereby maintaining the ideal geometry of the wooden craft. |
Note! Be sure to buy paints and varnishes to process the finished structure. For this purpose, acrylic paints, stains, impregnations, varnishes or other wood compounds can be used to give the frame an elegant appearance.
Master class: birch bark photo frame
Summarizing
Making photo frames and canvases with your own hands from cardboard, as well as other available materials, is an exciting and exciting process. Here we have described in detail how to make a frame and stand for pictures and photographs with your own hands from cardboard, ceiling plinth, wooden parts and popular methods for improving such projects.
Experiment, and a decent result will not keep you waiting.
Idea 5 – Popsicle sticks
A non-standard alternative to a paper frame would be a composition made from popsicle sticks or ice cream. To get an unusual accessory, we do the following: take two sticks and place them parallel to each other at a distance, perpendicularly and tightly glue the remaining sticks.
If you take into account the above ideas and algorithms, you can safely display all the photographs in the family archive on open surfaces.
Numerous frames will not clutter up the interior, since each frame will be spectacular, non-standard and original.
DIY polymer clay jewelry: master classes with photosDIY decorative candles: master classes with photos
Decorating a vase: ideas and master classes on how to make a vase with your own hands (80+ photos)
Photo frame sizes
The first frames appeared long before the advent of photographs and the ability to take photographs. They were used to frame pictures. The artists chose the sizes of the canvases to their taste, and the owner himself ordered a frame for the finished painting. In those days, painting a picture was not a cheap pleasure, and the design led to additional considerable costs.
With the advent of cameras, manufacturers of photographic products came to the conclusion that standardized frame and photograph parameters significantly reduce the cost of production. This made photography more accessible. The sizes of photo frames were also standardized according to the size of the printed photos.
Most Commonly Used Photo Frame Sizes
Standard sizes of photo frames now mainly depend on the sizes of photo cards printed in a photo salon or studio.
What are the sizes of photo frames:
- B7 is a well-known size for small photos - 9x13 cm. This size is more suitable for photos in an album, although small photos can be used in multi-frames or modular ones, depending on the designer’s idea.
- A6 is also one of the most used standards for photos - 10 cm by 15 cm. This is ¼ sheet of the classic A4 paper format.
- B6 – photo size 13x18 cm, the largest of the common variants of classic photography. This format is large enough to place a photo of this size on the wall; from a distance you can already see the details.
- A5 - the size of the photo and photo frame, respectively, appeared largely thanks to the same standard A4 sheet, since A5 is half of it and is equal to 21 by 15 centimeters. It is convenient to print this format yourself on a printer at home or at work. Photo frames of this size are most often found.
- A4 - as in the previous case, we are actually talking about two slightly different standards - 20x30 cm and 21x30 cm. This format is widely used because not only in a photo salon you can print photos in this format. At home, many people print out certificates, thanks, and diplomas, which are then placed on the walls of apartments and offices.
Popular photo sizes of standard A
All of the above are standard frame sizes that are widely used for photo cards that match the parameters.
Custom sizes
Selecting the size of the photo frames discussed above will not be difficult; they are often used and therefore in demand. You can find them in any large office department or in a photo salon. Things are a little more complicated if the dimensions of the required frame differ from the standard, or are shaped like an oval or circle. Or you need a large photo frame. They either have to be ordered online or made individually.
For photos of standard large sizes, frames of sizes A3, A2 or A1 are used, depending on the size of the photo, poster or painting. These parameters correspond to standard sheet sizes of paper and cardboard. So: A3 is 30x40 cm, A2 is 40x60 cm, A1 is 60x80 cm.
In addition to the A and B paper standards, there is a relatively rare group of SRAs. These sizes are a cross between standards A and B. For example, SRA0 is a size of 90x120 cm, and SRA3 is 30 by 45 cm.
Custom SRA size
Unpopular sizes C and B
Rectangular shapes of photographs and photo frames are considered familiar and common. But the square frame is already considered non-standard, and finding it is more problematic. A frame with this shape looks unusual and original, and placing it in the interior is a little more difficult than a rectangular one.
Square photo frames look more unusual than rectangular ones
Round and oval frames are mainly used for portraits. They are reminiscent of the photographic traditions of the past. The very absence of angles in the photograph evokes in viewers associations with something vintage.