If you want to add a touch of uniqueness and originality to your interior, make a chair cushion with your own hands. You will make a unique and useful thing, and your home will become more comfortable and warmer!
Soft new cushions for chairs with your own hands
Pillows can be sewn from new fabric or give a chance to an old blanket, an out-of-fashion knitted blouse, or a sweater. A cover for a stool or chair seat can be crocheted or knitted.
Knitted seat cushion for an original stool
The manufacturing process will take a little time - 2-3 hours is enough. What is needed for this?
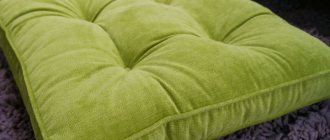
DIY small round chair cushion
ABC of style
What does the interior style depend on? Each direction has its own characteristics, thanks to which the design idea and the main design idea can be easily guessed. To give the atmosphere freshness and lightness, it is important to be able to correctly complement the design with small details and place accents with the help of interior accessories.
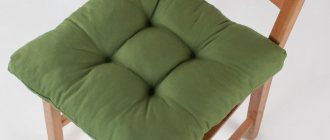
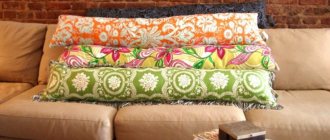
These pillows look great inside
Textiles are especially important in home decoration. Undoubtedly, buying any product today will not be difficult, but if you strive to achieve exclusivity in design, bright and comfortable DIY chair cushions are a quick and easy way to get what you want.
Some general recommendations:
- Choose the right fabric. Remember that a soft cover for a stool with your own hands is not only beautiful, but also functional. Preference should be given to a material that combines excellent wear resistance, resistance to friction and paint fading.
- We select a color scheme. It would seem nonsense, but a pillow can become a full-fledged participant in a decorative composition if you choose the right shade and prints. For example, if you want to add unusual colors to your design, a pillow of a certain color will subtly evoke the desired associations.
- Combine chair covers with other fabrics in the room. This could be curtains, tablecloths, sofa upholstery, napkins. You can highlight an elegant accessory by using different decorative techniques or by choosing fabric with an unusual pattern.
- Several chair cushions made using the patchwork technique, made by yourself, will complement the design of the dining room, kitchen or living room in an original and unusual way. Vintage-style accessories with light scratches, buttons, antique lace and other distinctive details will give the interior a light, casual effect. If you master the art of knitting, you can decorate the product with a beautiful three-dimensional pattern. These cushions are especially suitable for garden furniture.
When choosing fabric, style, finishing method, it is important to remember functionality. Stones, beads, beads and other voluminous decor will decorate pillows, but such products are not practical in everyday life.
You can sew useful and original textile furniture with your own hands, this will save the family budget and decorate the room with style and elegance.
Useful tips
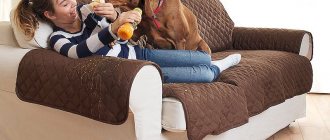
Do-it-yourself chair cover: how to sew soft covers for chairs and armchairs (130 photos and videos) Sewing a chair cover is quite simple, but nevertheless there are several important rules that will help you significantly save time and avoid many mistakes when working with fabrics:
- Calculate the dimensions. Once you have made all the necessary patterns, you will need to calculate the required fabric consumption. Check your measurements carefully and don’t forget about seam allowances and all other details of the cut. It is advisable to sew with a margin, because if the product shrinks after washing, you may simply not be able to put it on the chair.
- Train on cheap material.
If you haven't tried sewing before, try your hand at toy furniture. As a practice, you can sew a full-size cover, but use cheap old fabric, such as an old sheet. This way you can not only practice cutting and sewing, but also experiment with style and decor. - Don't forget about the fasteners. The product should be tightly fixed to the chair, so use reliable ribbons so that you can tie them around the legs of the chairs. For universal models, choose longer ribbons, since the height of the legs may differ for different furniture and this must be taken into account.
- Don't use too expensive material. If you are sewing a product for work areas like the kitchen, you should not buy too expensive fabric. Expensive jacquard is also not suitable for a dining room, because food can leave permanent stains, and expensive materials are unlikely to withstand treatment with stain removers. To avoid spending extra money on dry cleaning, use cotton or an inexpensive blended fabric.
By following all the advice of professionals and practical recommendations, you will be able to make practical and beautiful covers without much effort. And by using your imagination, you can turn them into real works of art, decorating them with unusual decor or embroidery.
With the help of the right materials and colors, you can refresh the interior; you just need to know how to properly sew chair covers with your own hands. Such products will hide all external scratches and defects, but you will still be able to enjoy the comfort and durability of your favorite chair.
Stages of work
When working, you must follow a strict sequence of actions. If the stool is square, measure the length and width of the seat; if it is round, measure the diameter. The pattern must take into account the necessary seam allowances - up to 2 centimeters on all sides, at least 1.5 cm. The height reserve and seam allowance in the filler are approximately the same. The step-by-step instructions are as follows:
- Creating a template (it is possible to use a ready-made one, adapting it to specific seat sizes).
- Cut a circle or square from the filler to the desired length and width.
- Sewing elements and edge processing.
- We sew in an elastic band.
- Attach the cushion to the seat cushion of the chair.
Characteristics of the “growing” Kidfix chair, advice on selection and assembly
The nuances of the seam depend on the type of fastening. If you make a cover for a stool with your own hands in the shape of a square, the cords are sewn to the end, gathers are formed along the bottom of the circle, and an elastic band is inserted. Step-by-step instructions for the first option:
- Place the lining with the right side facing the main fabric.
- Insert the laces and hand stitch them to the seat.
- Sew on the machine, leaving the bottom part untouched.
- Turn the finished product upside down.
If the seat is round, the sequence of actions will be slightly different. The elastic is attached to the fabric from the inside. When sewing, it is carefully held, and the product itself is slowly rotated in a circle. The cover is stuffed with foam rubber (polyester filling), placed on a stool and straightened out so that there are no folds or distortions anywhere.
The final stage of sewing chair cushions is decorating the product. The most common option is to trim the edge with decorative braid. Even small tassels or fringe made from thick woolen threads will look original. For decoration, you can use an applique of a patch of any color.
Build a model based on the dimensions of the chair seat. Cut out a template from cardboard.
Finished products Place the filler between two blanks in the fabric
Mark with a ruler and pencil, this will make it easier to sew the seam. Secure with clips. Quilt the product according to the marks. Trim the raised edges according to the pattern. Mark the places of the bonds. Sew around the perimeter for easy basting.
Baste the binding, leaving ties on both sides
Fixed angles
Ready place Secure the product to the chair
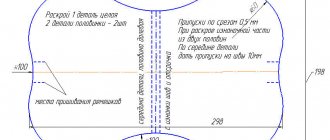
Making a pattern
There is no universal pattern that can be used to sew covers for any chair. Therefore, you will have to arm yourself with a measuring tape and build an individual sketch. There are two main approaches to making patterns. Traditional - taking measurements and drawing a drawing on paper or tracing paper. For this you need the following dimensions:
- Seat - depth, overall width (as well as along the outer edge and closer to the back), thickness.
- Backrest - total height, distance from the floor and seat to the top edge, width of the top and bottom, thickness.
- Legs – height (distance from the floor to the top edge of the seat).
This is enough for a standard chair. Additional measurements are taken if the design has some features. The main ones:
- rounded parts;
- legs made at an angle outward (in all directions, only back or only forward);
- The upper part of the back is concave.
Sometimes it is difficult to take into account all the subtleties, so it will be much more reliable to use the second method. This is a pattern that is built on fabric (an old sheet or a piece of non-adhesive interlining). Sequencing:
- throw the fabric over the chair, press it, repeating the shape, pin off the excess fabric with pins;
- Use a marker to draw boundaries and folds;
- remove the layout, remove the pins, cut out the parts along the drawn lines.
When the sketch is ready, you need to calculate the approximate fabric consumption, for this:
- lay out tailor's tape (1.5 m) on the floor or table;
- combine the approximate layout of the pattern parts;
- calculate how much fabric of different widths is needed: from 0.8 to 1.6 meters.
It is important not to forget about the reserve for allowances, hems and making ties. On average, a simple case will require 1.5–2 meters
In order not to spoil the main fabric, when sewing a chair cover with your own hands, it is recommended to sew a test product from unnecessary material, try it on and, if necessary, make corrections to the pattern.
How to make a knitted round chair cushion
Each of us is free to decide whether to sew a cushion on a stool or, for reasons of preference, make a knitted version. In the second case, a soft item for interior decoration and increased comfort is crocheted or knitted. To make a round chair cushion with your own hands, focus on a circular pattern.
Such items are often made in the form of thin bedding for benches, plastic or wooden chairs, or on the back of a chair.
Note! If you prefer knitting, it won't be difficult to create colorful seats using the patchwork technique. To do this, the product is made by connecting multi-colored rhombuses, squares, etc.
Making soft knitted items from pompoms is not difficult. For their manufacture, remnants of any colored thread, pre-wound on a template or fingers, are suitable. To get a fluffy ball, the base needs to be tied in one place, cut out and ruffled. Well then, the pompoms are tied at the same distance to a plastic mesh base, curtain fabric or crocheted weave. Alternatively, knitted pillows can be brushed at the corners.
Additional Information! Stool seats look especially good if they are knitted with molded threads that look like “fur” or “grass”. Also, the density and pattern of knitting is at your discretion.
Crochet
A stool seat can even be knitted from leftover yarn. The needlework algorithm, which is described below, allows you to create a soft stool with a minimum of cost.
Round form
It is best to make a round seat with an ornament - small flowers with 6 petals. Necessary tools and materials for crocheting - diagram, 4.5 mm hook, a lot of black yarn, multi-colored yarn for flowers.
Flowers are knitted separately, from the center to the edges; the petals are knitted one at a time, starting with stitches from the center, then additionally tied. Black yarn is used as a background. It needs to be knitted until it forms a round shape slightly larger than the seat. An elastic band is threaded through the bottom and the cover is pulled over the stool.
The knitting pattern for a round seat will take up to 4 hours of work.
Square shape
The square shape is created in 2 hours. You will need:
- skeins of multi-colored yarn;
- more yarn of the same color for tying;
- hook 4.5 mm.
We knit from multi-colored strips of different colors: one strip is yellow, the other is blue, etc. They should be knitted with a double crochet. A stool requires 22 strips.
When the stripes are knitted, along the smaller edge they need to be knitted in one line (in two groups - 11 strips together, then 11 more), all the loops are a connecting post. Then the resulting two groups should be intertwined with each other so that a pattern of squares arranged in a checkerboard pattern is obtained. The last steps are to tie the entire structure around the perimeter, creating a large strip along the edge instead of an edging. It is better to do all binding work with gray, white or black yarn.
Selection of materials for sewing
Today, the choice of fabrics is quite large - natural, synthetic and mixed fibers are available to the modern buyer.
Each of them in practice has a number of advantages and disadvantages:
Natural fibers. These include linen, cotton, and silk fabrics. They have a rich natural pattern. The fabric is very porous, which maintains air circulation, prevents unpleasant odors from accumulating and prevents the skin from sweating.
Required Tools
To make your own chair cushion, you will need the following materials:
- fabric chosen for upholstery;
- filler;
- cord for edging;
- lightning;
- string tapes (or other fastening methods);
- decorative elements.
In addition to materials for sewing soft seats for chairs and stools, you will need the following tools:
- roulette;
- sewing machine;
- needles;
- wires;
- scissors.
When everything is ready, you can start making the pillow.
Lining design
When all the edges of the main upholstery material are attached, you can make a lining for the bottom of the chair seats with your own hands. The photo shows that it will perfectly cover all the unevenness and folds after upholstery.
This can be a simple lining of satin or synthetic fabric. Its main purpose is to hide all the unevenness and shortcomings of the upholstery work, to add aesthetics to the design and integrity of the decoration item. After finishing the work, the seat is attached back to its place on the wooden main part of the chair. Use the same fastenings - screws or bolts.
Chair cushion patterns
Preparing your pattern is the first step to sewing. For a square cushion, measure the size of the seat. There is a 1.5 cm indentation on each side. Cut out the stencil, attach it to a piece of fabric, and mark it with special chalk.
Cut 2 identical squares
For a round pillow, models are prepared in different ways. It is difficult to measure such a shape with simple tape, so place a piece of cardboard on the surface of the chair and mark it. The circle is increased by another 1.5 cm.
Next, apply a stencil to the fabric and cut out 2 parts
master class and pattern, diagrams, photos and videos
DIY folding chairs made of wood, drawings
A DIY chair cushion will become a decoration and a bright contrasting element that can dilute the painfully familiar interior. And the main thing is that the financial costs will be much less in comparison with ready-made accessories of all kinds of well-known brands.
With ties
Step-by-step master class with photos:
1) First you need to make a pattern. For this purpose, tracing paper is suitable, which needs to be wrapped around the seat, folded along the edges and made notes.
2) Fold the paper in half and cut along the outline.
3) Place the required filler on the pattern (foam plastic, padding polyester, foam rubber, holofiber, etc.) and cut the workpiece according to the shape. Attach the resulting piece to the fabric and cut out two identical elements, adding 1.5 cm to the allowances. And you also need to cut the edging along the length of the seam, adding 5 cm to it to connect the ends.
4) Sew the piping and attach the facing to the top element. Place the 2 pieces right sides together, pin and stitch, leaving a small area at the back for the base filler. Trim seams and corners and turn to the other side.
5) Mark the places for attaching the ties. Cut out two strips measuring 60x3 cm, fold in half and sew to the bottom of the pillow on the inside of the piping.
6) Iron the case, insert the filler into the hole and carefully tuck it into the corners. Fold the seam allowances inwards, align the edge of the gap and close it with a blind seam.
7) Decorate the seat with buttons covered with the same or more contrasting material. Ready!
Using patchwork technique
Materials: sewing machine, multi-colored pieces of fabric, large button, foam rubber, threads, thin batting and scissors.
Finished pillow size: 40 cm.
Cut out 12 isosceles triangles from the scraps with a side length of 20 cm.
Sew the pieces in pairs, getting six elements, and then three. The remaining halves are also connected to each other.
This will be the front side of the pillow. Fold it in half and cut out the same piece from thin batting. You sew them together.
Cut out the bottom front side. Now it’s the turn of the stripes for future ties. After you have cut them out, fold each one lengthwise, iron it and stitch it.
Sew the finished ties onto the sides, and on the pillow itself, place a seam around the entire perimeter, leaving only a small hole. You turn the product inside out, stuff it with foam rubber and close the gap manually. Next, take a button, cover it with one of the colored pieces, place it in the very center and sew it on. Happened!
With embroidery
Tools and materials: sewing machine, denim scraps, needle, terry filler, fabric thread and yellow bias tape.
1) First you need to prepare embroidery according to the following scheme:
2) Measure the dimensions of the required chair. Connect the scraps into 2 identical squares, not forgetting about the allowances.
3) Sew bias tape along the edge of one of the pieces, placing the seam on the wrong side. Place the filling inside, close the top with the second element and sew it up. Finish the edge on the remaining sides, and sew ties made from the same binding in the corners. That's all!
Very soft
Select the fabric for the base. Here we get a square with a side of 32 cm (2 cm for allowances). Using chalk, you need to draw it out like a grid into 25 small squares of 6 cm each.
Now choose the shreds. These could be leftovers from old clothes, past crafts, or some recently acquired pieces. Moreover, they do not have to be the same; the main thing is general stylization.
Cut out 25 squares with a side of 11.5 cm from the pieces. Arrange them in the required order. You can even make a diamond pattern or diagonal stripes in the middle.
Now you begin to sew the squares in rows, so you get five blanks. Place the first strip inside out on the main square and face out. Pin it so that the assembly lines and those drawn earlier coincide, taking into account the allowances extending beyond the mesh edge.
Close the spaces along the edges of the attached strip. And now the most difficult stage - forming neat folds. Next, cut the prepared filling (sintepon, foam rubber, cotton wool or something similar) into small pieces and put them in these pockets.
Sew at the top. Continue to make the remaining five rows in the same way. You can also cut out a new fabric for the lower base, because a lot of threads and seams will stick out from the previously used one, and sew the blank to it. All that remains is to finish the edge using tape. Voila!
Video selection
Knitted pillow
Crochet pattern for a soft chair cushion
Both knitting and crochet are suitable for knitting. If there are any threads left, they should be used here. Knitwear, preferably tightly knitted. Model it however you want. The corners are decorated with tassels.
Chair cushion “Chess”
Knitted cushions for a chair or stool in brown melange color
Selecting fabric and filling for the seats of chairs and stools
At the very beginning, you need to choose the right material from which the pillow will be sewn. For it, it is worth taking durable and wear-resistant materials, such as rep, teak or satin. In the case where the furniture is planned to be used outdoors (in cold conditions), it is better to use felt fabric or old jeans.
Pillows for chairs
Additional Information. Cushions can be made not only for chairs and stools, but also for armchairs, sofas and other furniture. The only difference will be the size of the product.
After determining the color of the future craft, you will need to choose a filler for it. In this case, you should pay attention to the following characteristics of the material:
- Elasticity.
- Resistance to deformation.
- Durability.
- Environmental Safety.
Based on the given criteria, it is recommended to choose holofiber, padding polyester or foam rubber. The best option would be latex.
Filler
Sewing a cover for a stool with a fold
The stool seats often fly off and do not hold well without additional fasteners. You can create additional fasteners, but rarely such small details can be successfully made with your own hands. It's better to try a folded pillow.
A fold is a small “extra” piece of fabric that can be placed next to the seat of a chair. The edges of this area are adjacent to the bottom of the wooden seat; Equipped with an elastic band for a perfect fit to the chair.
For such a seat, you will need foam rubber with a cover (you can make it quilted or simply cover the foam rubber with fabric) and a strip of fabric to match the cover, which will be used for fastening. You can take a ready-made case and add a holder, or you can sew it from scratch.
A strip of raw cotton or cotton is attached to the perimeter of the stool cover. It should be wide enough to allow about a third to be glued to the sides of the lid, with the rest lying below. The strip is roughly sewn to the cover, first folded in half and sewn in half. You need to leave room to put the elastic on.
When the strip is already sewn to the sides of the seat, you need to thread the elastic and finally sew it. Machine processing can be used for strength.
Crochet seats: knitting patterns
These are perhaps the most common seats of all the options that you can make with your own hands. There is one caveat: they can only be knitted if you know how to crochet or want to learn. That is, while almost every woman can sew a cover, not everyone can crochet chair seats.
The most common knitting option is the granny square. This is a simple pattern that can be knitted from any yarn (leftover skeins will also work). Look at the crocheted chair seats in this photo: it’s all a granny square, but with different yarn color combinations.
Two squares are knitted according to the pattern, then three sides are sewn together. A zipper (or buttons) is sewn onto the fourth. A flat pillow is placed inside (which you can also make yourself: a fabric cover + filling). This seat can be washed, because the zipper is unfastened and the cover is removed.
Grandmother's square, diagrams
A square seat is crocheted simply: either with the same granny square, or according to the classic square pattern (can be crocheted with or without double crochets).
Idea: knit several small squares according to any suggested pattern, and then combine them into a single fabric of the desired size. You will get a beautiful crochet seat on a stool.
Round covers are knitted a little differently, according to different patterns. Not easier, not more difficult, just using different schemes:
Decoration
Whatever option is chosen for making pillows, they can later be decorated with additional decorative elements. But here it’s worth thinking about what this piece of furniture is needed for. If the pillow is needed only as a room decoration, it can be decorated with beads, beads, sequins and much more. If it is to be used for its intended purpose, it is better to discard such items.
You might find it interesting. Fantastic models of women's vests - sew them yourself
Applications
To ensure that nothing causes discomfort when sitting in a chair, it is necessary to decorate the pillows with materials that are not too bulky. These can be various applications, fringe or buttons. The latter not only decorates the product, but also prevents the filler from moving in clumps.
Buttons
It is best to trim buttons with fabric. The color is chosen as a pillow or under it. After this, the surface of the product is marked so that the decorations are located at an equal distance from each other. In the indicated places, the buttons are tightly sewn to the pillow.
DIY pillows
Therefore, it is clear that sitting on stools with your own hands is quite simple. It is enough to stock up on the necessary materials and patience. And ready-made decorative elements will decorate and subsequently update the appearance of the apartment.
Knitting covers for stools
In almost every home there are stools in the kitchen, faceless and unattractive. You can add a bright personality to the stools and fit them into the color scheme of the kitchen by tying covers on them. Knitted stools create comfort, coziness and a cheerful mood in the room.
To knit covers, you can use a three-dimensional crochet pattern made from “popcorn” elements, which is a cone of columns. The knitted pattern of cones will make the stool seat lush and original in appearance.
For knitting covers, it is better to use thick acrylic yarn and a thick hook. Choose yarn colors to suit your taste.
In the example, the covers are connected to square stools. To knit a square, make additions at its corners by knitting two elements from one arch. You can knit a cover for a round stool using the rules of addition for knitting a circle.
Description of knitting a cover for a stool:
To start knitting a square, cast on a chain of 8 chain stitches. and close it into the ring of the connection art. To knit the first row, make 3 chain stitches. lifting, tie 4 tbsp. s/n from the ring.
Now form the first bump, to do this, remove the hook from the working loop and insert it first into the 3rd lifting loop, then again into the working loop. Pull the working stitch through the first one and the group of stitches will come together into a knob called “popcorn”.
Next *knit 4 chain stitches, 5 stitches from the ring. s/n. Insert the hook into the top of the first stitch, then into the working loop, pull the working loop through the top of the first stitch.* Repeat from * to* 2 more times, complete the row - chain 4, joint st. to the top of the first bump.
To knit the second row, make 3 chain stitches. rise. In the second row, knit 2 cones from each arch, 4 chain stitches between them, and make 3 chain stitches on the sides of the square. The first bump consists of lifting loops and 4 tbsp. s/n, and all the following cones from 5 tbsp. s/n.
In the third row of corner arches, knit 2 cones, 4 chain stitches between them. On the sides of the square there are 3 air points, a cone from an arch, 3 air points. Finish the row of joints. to the top of the first bump.
Knit all subsequent rows using the same principle. From the corner arches, knit 2 cones, 4 chain stitches between them, and on the sides of the square from each arch, knit one cone through 3 chain stitches.
Come up with the color of the square yourself. A case with a bright center and transitioning to darker colors towards the edges looks good.
To transition colors, after finishing a row, fasten and cut the thread, and to knit the next row, attach a thread of a new color.
Having knitted a square along the seat of the stool, knit 2 rows of cones without adding in the corners, and in the last row knit cones through 2 chain stitches. Having thus narrowed the cover at the base, pull it over the stool, fixing the corners along the seat.
Knitting pattern for a square of cones:
Original model using the “Biscuit” technique
Seats made using the biscuit technique are very popular. They look impressive and last a long time. Making such a pillow for a table is not difficult. Step-by-step algorithm of actions:
- Measure the seat taking into account seam allowances (5 cm on all sides).
- Cut out the main part of the product, guided by the numbers obtained.
- Cut the fabric into many squares of the same size.
- Place the pieces in front of you on your work surface.
- Sew so that they form several rows stretched horizontally.
- Sew the top lines, forming even folds along the sides of the square.
- Sew vertically.
- Fill the finished pockets with holofiber or synthetic down.
- Apply a new portion of parts face down onto the bottom of the seat with your own hands for the chairs of the resulting row, draw a line.
- Add foam or synthetic pile filling.
How to choose an orthopedic chair cushion based on shape and material
In addition, the process of making a chair cushion with your own hands is repeated several times, depending on the size of the seat. The final stage of work is to sew a braid or lace along the edge. The second option will look especially good in a Provence style kitchen.
Each craftswoman can make furniture at her own discretion. As a result, you should have an original DIY chair cushion that resembles a patchwork quilt. It is better to choose a light fabric decorated with floral motifs.
The preferred shape of this type of kitchen seat is square, since the product consists of a large number of parts of the same size. The threads should be the same tone as the fabric so that they are not noticeable. The recommended type of fastener is thin laces at the corners. This model will look especially good on classically shaped wooden chairs with a curved back, but will also fit perfectly with regular stools.
Do-it-yourself soft seats for chairs and stools are sold in any home textile store. However, a handmade product has its own unique charm, and this fact cannot be underestimated. During manufacturing, care should be taken to ensure that the color of the selected material is in harmony with the color of the furniture and the decoration of the room.
Prepare a strong base for the chair seat Cut the base fabric into squares of the same size Sew rows of 5 squares Baste the pieces to the base fabric
Sew along the markings, forming “pockets” from squares. These are cages. Fill the finished “pockets” with holofiber or synthetic fluff. Fasten a new row of squares. Sew from the inside.
Turn over Fill the pockets again with putty We continue to work by analogy with the previous lines 4 finished rows The seat is completely finished Sew a satin ribbon around the perimeter for decoration
Variety of models
They can be whole or separate. The second subtype can consist of several parts or be connected with Velcro. There is a wide variety of half-cases. They are intended mainly for seats, but at various special events and ceremonies you can see options only for the back. Products are also classified according to the method of planting. On sale you can see covers that do not stretch, but are simply placed on the chair, and if the model is also designed for the back, then the second pillow is attached to the chair with ties or straps. This is the so-called free variety. “Dense” models fit over the entire chair from top to legs and hold tightly to it. Euro covers are tight at the top and looser at the bottom. The covers may have a comfortable seat, but there are options without it. Such capes perform only decorative and protective functions.
Pillow care
All items that come into contact with people in one way or another require sanitary and hygienic procedures. Benches will be no exception. It is noteworthy that proper care of them extends their service life and maintains their attractive appearance and shape. The appropriate procedures depend entirely on the design features and type of filler.
Bright decorative pillows have a great effect not only on the mood, but on the entire room as a whole.
In some cases, washing is allowed (by hand or delicate machine wash). If light and plain products can be placed in water with a temperature of 40 degrees, then the presence of bright and combined shades forces the use of extremely cold water. Some products can only be dry cleaned by a professional dry cleaner.
Dry the product in a horizontal position. This is the only way to prevent the filler from churning. When opening the seat, do not allow folds. The item must be turned upside down from time to time. Ironing is not recommended.
To change the mood and dynamics of the interior of the room, just change the blankets to decorative pillows and you will get new unforgettable experiences from the comfort and relaxation zone.
If you follow all the instructions regarding sewing, operation and care, things will delight us with comfort and aesthetics for a long time. In addition, making cushions for stools and chairs does not require any special skills. It is also important that DIY projects boost self-esteem and serve as a great opportunity to decorate your home without spending extra money.
How to decorate
Each housewife has her own ideas for decorating. Some people decorate with buttons, others with fringes. You can also sew on various laces, beads or rhinestones and make patterns out of them. The most original ways were to decorate with plant prints, lace or embroidery and appliqués.
Knitted roller under the neck or for hugging
Decorating a pillowcase with plant prints
Decorating with floral patterns involves transferring prints of fresh leaves or grass onto a pillowcase, creating combinations and patterns. To implement this idea you will need:
- Freshly picked plants;
- Natural light fabric;
- Scissors and hammer;
- Parchment.
Tools
The process itself involves laying the plant on a cloth and covering it with baking parchment. Next, it is hit firmly and evenly with a hammer, which allows the plants to secrete juice, which is absorbed into the fabric and leaves a pattern on it. Such pillows require careful care. Pillowcases should be washed in warm water with a delicate cycle and detergent.
Stuffing process
Lace, knitting and embroidery
This method is quite labor-intensive, but it will give the products a unique appearance and aesthetics. Knitted pillows have a certain advantage over sewn ones. Firstly, they are embossed, and secondly, all the seams are very easily masked in them. Knitting such a product yourself, of course, takes a long time, but making it from an old sweater is as easy as shelling pears.
Embroidery on pillows also requires skills and knowledge of what exactly you want to depict with threads. It could be any patterns, flowers, or just chaotic straight or broken lines. It's even easier with lace. You just need to buy them or detach them from old products and attach them to pads. Lace can be made from old tulle.
Newborn pillow
How to properly sew an applique onto a decorative pillow
Also quite an interesting type of jewelry. Pillows with appliques can be used not only for decoration, but also for sleeping due to the fact that this decoration sits very tightly on the cover or pillowcase. The step-by-step algorithm of actions here is something like this:
- Prepare a pattern and cut out the base of the pillow with seam allowances;
- Cut out appliqués of the required size from decorative material;
- Pin and baste the applique using a decorative stitch or overlock stitch on a sewing machine;
- If desired, attach decorative braid;
- Sew both pieces of the pillowcase to complete the pillow.
Decorative pillows from old pants
In conclusion, I would like to say that sewing a pillow with your own hands is not so difficult. After completing any master class on sewing pillows, even a novice craftswoman will be able to learn how to make both simple pillows for sleeping and sofa decorative items, pillows and crib bumpers for babies and newborns.
Requirements for a homemade pillow
Regardless of the shape, size and type of accessory, a handmade pillow must meet certain requirements:
- For sewing, use only high-quality materials.
- Features a removable cover that is wash and shrink resistant.
- No toxic paints when decorating the pillow.
- The fabric used for sewing must have sufficient porosity.
- No sliding surface.
A big plus will be the presence of orthopedic properties that allow increasing blood flow to the pelvic organs and unloading the venous bed of the lower extremities.
Design and construction
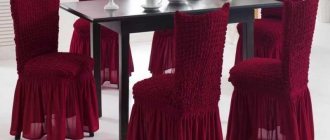
Your products will be shaped like the seats. If these are stools intended for the kitchen, then it is better to sew not cushions, but capes with elastic that can be easily removed for washing.
Such covers for stools are very practical: they can be removed and washed, which is important for the kitchen.
If the seats are made with your own hands, then you can choose any textiles and filling. These are unnecessary scraps, foam rubber, tapestry with a large pattern and other materials.
The seats can be decorated in one color or use an ornament.
The latter looks quite stylish and interesting if the color scheme is matched to the interior.
Preparing the ties
First of all, you need ties to prevent the pillow from slipping off the seat. But sometimes they can be used as product design elements. Beautiful ribbons, laces, cords and just strips of fabric are suitable for tying ties.
Strings
After completing the preparatory work, select the master class you like on sewing a pillow, and then follow all the steps according to the instructions. It is worth considering the simplest manufacturing option, which even a novice needlewoman can handle.
Where can it be used?
It's amazing how a simple covering of furniture can radically change the appearance of the entire room, hide a boring color or defects in the upholstery, and add a bright accent to a boring interior. The use of these accessories on chairs in a children's room, kitchen or dining room is especially popular. Sewing covers is much cheaper than changing upholstery or furniture. You can’t do without them during special events, for example, when decorating interiors during holidays and wedding ceremonies.
These covers will decorate your interior
DIY cases
Today you can find furniture covers of various colors and styles in many stores, and order the tailoring of the desired model in any studio. But it’s much more interesting to make them yourself, choosing the right fabric and deciding on the style of the future product. This will also help save money, especially if you are decorating several pieces of furniture at once.
The cases are distinguished by their beauty and possibilities of use, as well as ease of manufacture. Even a not very experienced craftsman can sew such an accessory on his own.
The ability to radically change the look of an entire room
How to make large flowers from corrugated paper with candies with your own hands. Step-by-step master class + 75 PHOTOS of luxurious bouquets
Mounting options
To prevent the seat cushion you made from sliding on the chair, it must be fixed. There are several mounting options.
- For square chairs, it is enough to sew 4 small elastic bands in the corners of the cushion.
- The round one is fastened with an elastic band around the perimeter, for which a drawstring is sewn to the product.
- You can attach the seat cushion to a chair with a backrest by connecting 2 laces at the corners and tying them in a knot under the seat. They are usually made from the same material as upholstery fabric.
- The easiest way to attach it is with regular Velcro, which is attached to the edges of the pillow.
All fastening options are selected taking into account the type of finished product.
Drawstring With elastic around the perimeter
Velcro
Fabric and patchwork bedding
Thick fabric can be used to create bedding. For example, jeans, a drape coat, a tweed jacket and other old things.
If you have at least the slightest idea about patchwork, you can connect different types of fabric with each other. The main thing is that the individual pieces match each other, otherwise the product will look ridiculous.
To soften the bedding, you need to sew a thin piece of foam rubber, felt or padding polyester to the underside.