Making things with your own hands is fun and interesting. This also applies to sewing all kinds of products. Every housewife wants to decorate herself and her sofa or home with homemade design elements. One of the simplest solutions is to create decorative pillows. With their help you can logically complete any interior. The most important thing is that when making pillows you do not need special sewing skills, extensive experience or extensive knowledge. Even a beginner can create a pillow.
Today we will tell you how to sew a pillow, how to make pillow patterns with your own hands, and patterns for decorative elements. Thanks to this knowledge, you will be able to sew a beautiful pillow yourself without wasting time.
Maternity and breastfeeding pillow
How to choose fabric, filling and accessories
Before sewing a beautiful product for decoration, including a pillow, you should carefully consider its filling and the material from which it will be made. It is important to choose fabrics that will be as easy to care for as possible. Moreover, the material should not become electrified during use and attract dust. Ideal for this would be:
- Silk, satin and similar materials;
- Satin, flannel, calico fabric and linen material;
- Fabric used for upholstering furniture or chairs.
You can use the same material as when upholstering furniture.
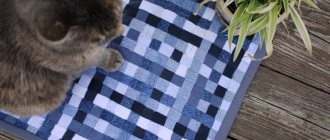
For a more budget-friendly and original option, you can use old clothes or parts of them. The pillow will be in a patchwork style and no one will even guess that it contains old T-shirts, sweaters and pants.
Square decorative item made of silk with an oriental motif
Filler
If you have no idea what to stuff your future product with, then you need to familiarize yourself with the list of popular materials. You should choose those compositions that will not begin to clump after a certain time. Based on this, padding polyester and cotton wool disappear immediately. You should also not use feathers or down for these purposes, as these materials do not hold their shape well and are suitable for sleeping products.
Fillers
The most preferred options are:
- Holofiber, which can maintain its characteristics for 10 years of operation;
- Silicone, or rather its granules. Ideal for children's products. They are practical in that they can be taken out to wash the pillow and put back in;
- Natural materials such as hop cones, buckwheat husks, aromatic herbs.
Natural filler
Accessories
To sew a decorative pillow yourself by hand or on a machine, you will need threads of a certain color and number. Usually from 40 and above. In order to embroider on the product you will need floss. If the base of the pillow is knitted, then use almost any yarn. If the product cover is removable, it may require buttons or a zipper.
You might be interested in DIY sewing trousers with elastic bands for women
Floss threads will be an excellent pillow decoration
How to decorate decorative pillows, ideas and tips?
You can decorate an interior pillow:
- embroidery or braid with embroidery;
- decorative sewing;
- bows and flowers made from ribbons;
- lace and openwork inserts:
- elegant draperies, decorative ruffles, puffs;
- applications made of foamiran, velvet or other suitable fabric;
- ornaments made of beads, buttons, rhinestones;
- decorative silk cords, tassels, fringe;
- inserts made of gabardine fabrics, etc.
Some ideas for beautiful design of decorative pillows:
What tools will you need?
Tools are prepared in relation to what the design element will be made of and what shape it will be. If you want to knit a base, then, of course, you will need knitting needles or a hook and yarn. For decoration the following will come in handy:
- Needle, thread, sewing machine;
- Paper, tracing paper or cardboard for the diagram;
- Chalk or soap, a special pencil;
- Scissors.
It is important that the color of the pillow matches the overall design of the room.
Uncover
I determined the pillow size that would be most comfortable for me. Since I had a piece of foam rubber available, I took it as a basis.
I cut out a square of foam and started taking other measurements. I decided to make the edges outer, so I needed to cut two squares of fabric larger than the foam itself. I took enough batting to cover the workpiece on both sides.
How to sew a sleeping pillow with your own hands
A hand-sewn pillow will meet all the quality standards of a housewife and will save money on purchasing store-bought analogues. After preparing the appropriate filler and accessories in the form of needles, threads and fabric for the bedspread, you can begin to work. First, you need to determine the size of the future product. Standardly it is 70 by 70 cm, and according to the European standard - 70 by 50. If you deviate from these standards, you will also have to sew a pillowcase yourself.
The process of sewing a decorative pillow in the shape of a flower
The step-by-step sewing instructions are as follows:
- The canvas is laid out on a flat table or on the floor. The fabric is measured. For example, if the future pillow is 50 by 50 cm, then you should measure 50 by 100 cm. Draw marks and lines with chalk, add 2 cm allowances to them on each side. The result will be a cut of 54 by 103 cm;
- Fold the rectangle in half and iron. Pin future seams with sewing pins and baste;
- Sew along the lines marked earlier for the seams. Previously, this was done by hand, but now machines are used;
Decorative item from an old sweater
- Sew the corners, making small roundings. Leave 10 centimeters of unsharpened space on one side. Overcast the napkin and secure the seams by cutting the threads;
- Turn the base inside out and straighten all the corners, ironing them;
- Fill the product with the selected filler through the gap left without a seam;
- Sew the seam in any way, making it hidden. Beat the product with your hands.
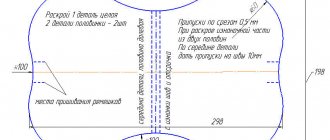
Breastfeeding pad pattern template
Constructing patterns for various types of pillowcases
The most popular pillows have dimensions of 50x70 cm. Traditionally, the cover or clasp is located on the smaller side of the pillowcase. Since the product is quite simple, there is no need to make patterns. Sewing patterns are built directly on the fabric from the wrong side.
Above is a simple pillowcase with a scent for a 50x70 cm pillow. The canvas will consist of two parts of 70 cm, a small part of 5 cm and a 22 cm wrap. 1.5 cm strips are provided on both edges of the part for processing.
On the smaller side, it is recommended to allow 2.5 cm allowances for seams. The result will be a solid rectangle with dimensions of 170x55 cm.
Pillowcases measuring 70x70 cm are created in a similar way. Only one of the sizes changes.
The pattern includes two parts of 70 cm, a small part of 5 cm and a 22 cm wrap. On each side, 1.5 cm is provided for processing the edges. On the smaller sides there is another 2.5 cm allowance. The final rectangle measures 170x75 cm.
Pillowcases with a zipper are cut out without unnecessary elements in the form of a smell. Below is an example of a product diagram for a pillow with dimensions of 50x50 cm.
Pillowcases for decorative pillows are created in the same way. The only differences are in size, since such products are often smaller than regular sleeping pillows and usually have a square shape.
How to sew a pillow from leftover fabric
If there is no suitable fabric, but you don’t want to go to the store or your wallet doesn’t allow it, then you can use scraps and scraps of old things or materials that are left over after upholstering furniture. The general instructions are:
- Development of a diagram and order of arrangement of elements on the front side of the pillowcase;
- Cutting leftover fabric according to the pattern;
- Sewing elements and decorating them with lace, braid and other elements.
Sewing a pillow from leftover fabric is easy.
Another way is to use stencils and acrylic paints on the fabric. After sewing the cover, the design is applied to the front part with a pencil and then painted over.
Important! Drawings with black outlines look interesting. Such products can be presented to family and friends, depicting their hobbies or names on them.
Small pillow painted with acrylic paint
Arrangement of pillows in the interior of the room
Usually the location of the pillow determines its name. A handmade sofa cushion will look great not only on the sofa, but also in a chaise lounge, ottoman, or wicker chair.
Note!
Pillow for pregnant women - TOP 160 photos + video reviews of pillow designs for pregnant women. Properties and purpose of the pillow. Types of fillers and coversSofa decks: TOP-130 photos and videos of sofa deck design options for a sofa and armchair. Features of application, choice of color and material of manufacture
Envelope blanket - TOP 150 photos + video reviews of baby envelope blanket designs. Types of safe fabric materials, colors and prints of blankets
Sofa cushions can have a classic rectangular shape; they are usually called “dumkas”. Cylinder-shaped pillows are quite hard and densely filled with filler. They are used as armrests and headrests, very rarely for sleeping.
Such pillows are decorated with all kinds of folds and complex weaves of fabrics. The front part of the pillow can be finished with embroidered multi-colored beads or embroidered satin stitch patterns.
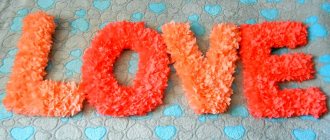
Sofa cushions in the shape of letters are gaining popularity among young housewives. The front part of such pillows can be made of shaggy material in combination with satin fabric, which will be in harmony in color.
Padding
Read more about stuffing. First of all, you need to look at the properties of the filler itself, since this is the main characteristic of the future pillow. You can stuff the product with padding polyester or knitted tape, cotton wool and other materials that are quite cheap. In cases where stuffing is required specifically for a decorative model, it is important to approach the process of choosing filler more seriously.
You might be interested in this Basic rules for forming a chest dart
Appearance of holofiber
The main properties that the material must have:
- Sufficient elasticity. When pressed, the product should quickly restore its shape and not leave dents if people sleep on it;
- Breathability. All materials, including those from which the base, cover and padding are made, must allow air to pass through well and allow the skin to breathe;
- Hypoallergenic. All these materials must also be safe for human health and not cause allergies or skin irritation;
- Easy to care for. The pillowcase, cover and pillow itself should be easy to wash and machine washable.
Sintepon
By type, padding is divided into three categories:
- Artificial material;
- Natural material of plant origin;
- Natural material of animal origin.
Hop cones for stuffing
Artificial padding
Artificial materials have a number of properties that put them on the same level as natural ones. Moreover, they also have their own distinctive characteristics. This composition does not allow dust mites to develop and will not cause allergies. Synthetic materials are easier to wash and dry quickly.
Foam pillow
The most commonly used artificial paddings are padding polyester and holofiber. The first option is budget. Sintepon is used not only for this, but also in the manufacture of clothing.
Important! A significant disadvantage of padding polyester is that it quickly falls into clumps and does not recover its shape well. If such a pillow is actively used, then tubercles will quickly appear on it, and its surface will become hard.
Pillow in the shape of a scops owl
That is why the best choice would be holofiber, a non-woven material consisting of interwoven polyester fibers. The space between the fibers has a porous structure and is filled with air, which makes holofiber light and warm. In addition, the composition has the following characteristics:
- Removal of moisture and water;
- Air permeability;
- High service life;
- No static electricity;
- Easy to care for and easy to machine;
- No smell.
Toy pillows in the form of cats
Vegetable stuffing
Plant materials are often used to form decorative pillows or sleep products. Among the most popular options:
- Dry herbs and algae;
- Leaves of herbs such as mint or lemon balm;
- Hop cones;
- Buckwheat husk.
Herbs can also be used as a filler
. Important! In many cases, such stuffing will be beneficial to health, will add some originality to the product and a pleasant smell of herbs, which will spread throughout the room.
Cotton is also often used. A pillow stuffed with cotton will be hypoallergenic, and harmful organisms and insects will not breed in it. If you stuff the cotton correctly and take care of the pillow, you can extend its service life.
Product with cotton
Animal stuffing
Down and feathers from birds (chicken, geese, swans, ducks) are considered traditional for animal stuffing. The pillows are light, soft, and quickly take shape after deformation. One drawback is that it is not advisable for people suffering from dust mite allergies to sleep on them. The thing is that over time, microorganisms can develop in such stuffing that can cause suffocation attacks in allergy sufferers. But this can also be avoided. It is enough to properly care for the item, constantly wash, dry and air it.
Sheep wool padding
In addition, you can stuff the pillow with camel or sheep wool. It will become not only comfortable, but also therapeutic, because camel hair helps people suffering from radiculitis get rid of symptoms. This material also has disadvantages: heavy weight and rapid rolling.
You might be interested in: Creating a pattern and sewing a bag with your own hands
Important! You can also use unnecessary pieces of wool yarn or an old fur coat. It can be cut into pieces and distributed evenly over the base. Such a pillow will collect a lot of dust, so it should be washed or knocked out more often.
Camel hair pillow
A little history
Initially, pillows were used by wealthy representatives of the ancient nobility in order to preserve the integrity of intricate hairstyles of complex shapes for several days.
The first devices were not intended for comfortable lying on the bed; they mainly served as a device for conveniently supporting the head during night sleep.
Representatives of eastern countries often used processed marble or porcelain for this. It was placed under the cervical vertebrae while lying down only to preserve the hairstyle. Representatives of the ancient nobility often spent time lying on soft mattresses and attached great importance to comfort.
Pillows, in the form that have survived to this day, were invented by the nobility of Ancient Greece. They were filled with aromatic herbs, down, and feathers. Thus, this attribute became mandatory even for warriors of the Roman army seasoned in military campaigns.
How to decorate
Each housewife has her own ideas for decorating. Some people decorate with buttons, others with fringes. You can also sew on various laces, beads or rhinestones and make patterns out of them. The most original ways were to decorate with plant prints, lace or embroidery and appliqués.
Knitted roller under the neck or for hugging
Decorating a pillowcase with plant prints
Decorating with floral patterns involves transferring prints of fresh leaves or grass onto a pillowcase, creating combinations and patterns. To implement this idea you will need:
- Freshly picked plants;
- Natural light fabric;
- Scissors and hammer;
- Parchment.
Tools
The process itself involves laying the plant on a cloth and covering it with baking parchment. Next, it is hit firmly and evenly with a hammer, which allows the plants to secrete juice, which is absorbed into the fabric and leaves a pattern on it. Such pillows require careful care. Pillowcases should be washed in warm water with a delicate cycle and detergent.
Stuffing process
Lace, knitting and embroidery
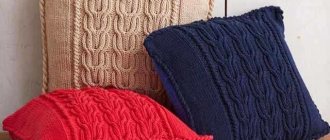
This method is quite labor-intensive, but it will give the products a unique appearance and aesthetics. Knitted pillows have a certain advantage over sewn ones. Firstly, they are embossed, and secondly, all the seams are very easily masked in them. Knitting such a product yourself, of course, takes a long time, but making it from an old sweater is as easy as shelling pears.
Embroidery on pillows also requires skills and knowledge of what exactly you want to depict with threads. It could be any patterns, flowers, or just chaotic straight or broken lines. It's even easier with lace. You just need to buy them or detach them from old products and attach them to pads. Lace can be made from old tulle.
Newborn pillow
How to properly sew an applique onto a decorative pillow
Also quite an interesting type of jewelry. Pillows with appliques can be used not only for decoration, but also for sleeping due to the fact that this decoration sits very tightly on the cover or pillowcase. The step-by-step algorithm of actions here is something like this:
- Prepare a pattern and cut out the base of the pillow with seam allowances;
- Cut out appliqués of the required size from decorative material;
- Pin and baste the applique using a decorative stitch or overlock stitch on a sewing machine;
- If desired, attach decorative braid;
- Sew both pieces of the pillowcase to complete the pillow.
Decorative pillows from old pants
In conclusion, I would like to say that sewing a pillow with your own hands is not so difficult. After completing any master class on sewing pillows, even a novice craftswoman will be able to learn how to make both simple pillows for sleeping and sofa decorative items, pillows and crib bumpers for babies and newborns.
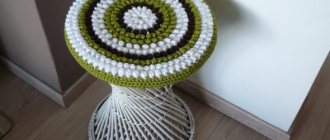
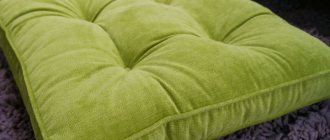
About buffs
Puffs on a suitable fabric, smooth and glossy, are another matter. When done correctly, they can be vacuumed and hand washed without any problems. And making all this splendor is not as difficult as it seems. First you need to learn how to read the diagrams for assembling puffs (assembling them, as sewing makers say).
As an example, diagrams for assembling simple puffs are shown in Fig. below. All puff patterns are built on an orthogonal-diagonal grid, the module of which (the side of the square) is 2-7 cm, depending on the size of the product and the density of the fabric. The grid in the diagram can be shown explicitly, as on the right in the figure, or its nodes can only be marked with dots, as on the left. The mesh is applied to the back of the workpiece with a textile marker in a mirror image.
Further, areas that are contracted (collected, assembled) into a buffer are marked either with converging arrows (on the left) or red lines (on the right), and those that are not contracted are marked with simple thin lines. The puffs can be assembled either with one thread or separately. The first method is for the lazy, because... a web of threads is formed from the inside. In any case, each puff is assembled with at least 3 stitches 4-5 mm wide, unless otherwise indicated in the notes to the pattern.
Examples of puff patterns for pillows
Then, the assembly sequence. It is produced in horizontal or vertical rows, again, unless otherwise indicated in the description of the pattern. In the case where the rows are indicated explicitly (on the left), they are displayed in numbering order and the buffs in the row are also assembled by numbers; here – Row 1 1-2, 3-4, etc., then Row 2 and so on. In the absence of an explicit indication of the rows (on the right), the puffs are assembled simply in numerical order; according to the diagram on the right - 1-2, 3-4, 5-6, 7-8, etc.
Try to assemble any scrap of fabric into puffs according to these entry-level patterns, and you will see that it will take little time, even if you assemble one at a time. And then watching a selection of master classes on making pillows with puffs that are much more spectacular and complex won’t seem like a nightmare: