Living room and bedroom, kitchen and relaxation area on the balcony - there are many rooms in the house that can be made more comfortable with the help of beautiful sofa cushions. Buying decorative pillows with a design that matches your interior style in stores is not a problem. But you must admit, it’s much more interesting to sew or knit them yourself. We have prepared seven simple master classes on making sofa cushions of various shapes. Photos, step-by-step explanations and stylish decor ideas will help you understand the nuances of the work.
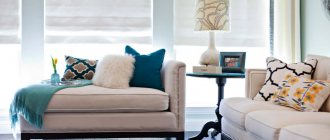
Sofa pillows in the interior
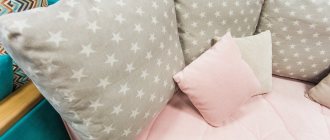
The classic interiors of modern living rooms and bedrooms will be stylishly complemented by square and rectangular sofa cushions, as well as cushion cushions with original decor.
In terms of patterns and colors, they do not necessarily have to match the upholstery of furniture or curtains. Non-trivial interior solutions and eclecticism (a thoughtful combination of several styles) are in fashion.
For example, sofas can be decorated with many (designers advise choosing an odd number) bright decorative pillows that differ, and even contrast, in colors and textures. They do not violate the harmony at all - on the contrary, they look stylish and interesting. You can arrange multi-colored pillows in one row, in tiers or in groups. Such a colorful composition will look especially good on long, corner and modular sofas.
In high-tech and loft settings, combinations of several sofa cushions that differ in shape will look stylish. For example, oval, triangular and rectangular on one sofa or chair. It’s good if prints or other decorations “echo” each other in shades or thematically. To prevent sofa cushions from looking like a foreign detail in restrained avant-garde interiors, it is better to choose an interesting but laconic decor.
The trend in interior fashion includes decorative pillows with abstract and geometric patterns, with inscriptions, with appliqués, as well as plain ones. You can safely combine different types of prints in one composition. For example, small and large ornaments, a checkered pattern with stripes or polka dots, floral motifs with abstract patterns. However, in order for the overall interior to look stylish, the individual decorative details of the sofa cushions must still be in harmony with each other.
A good solution for vintage and oriental interiors would be unusually shaped sofa cushions. For example, “tablet” pillows, polyhedrons, cushions with elegant and romantic decor: tapestries, rich embroidery, hemstitching, tassels, fringe, lace trim, spectacular draperies.
Beautiful sofa cushions of non-traditional shapes are suitable for a child's room: ball pillows, knot pillows, toy pillows made of bright textiles, artificial velor, fur of a wide variety of rich and cheerful colors. By design, they can complement the main theme of arranging a nursery or become an interesting contrasting accent in the interior.
Methods for decorating pillows
The easiest way to decorate is to use different colors. You can make several pieces that differ from each other, you can combine different colors in one. For a room with a set of furniture: a sofa, armchairs, you can play with colors, changing them for each item.
For children's rooms, cartoon colors would be an interesting option - you can make several options with different characters from the same cartoon. You can use several plots.
Use different colors
More complex decoration options are:
- applications;
- knitting;
- embroidery;
- creation of reliefs.
Despite the complexity of implementation, many note that each time it becomes easier to use these techniques. With their help you can create beautiful compositions for different interiors.
Applications
Applique is a good and simple way to decorate. You can choose any design for it, come up with it yourself, or find a ready-made template on the Internet. The only caveat is that you should not opt for images that are too cluttered and contain a lot of detail. If you make the slightest mistake, you can completely ruin the product.
Rules
- Flowers made from ribbons look appropriate on things in bed colors. Satin ribbons are best suited for creating such compositions, from which you can easily make different petals.
- If the design is more complex than regular flowers, you may need a fabric appliqué technique to implement it. It involves the same thing as working with colored paper, only fabric is used instead. The necessary figures are cut out of it, then glued and sewn to the product.
- To create a fabric appliqué, you don’t have to buy new fabric; it’s not cheap, especially high-quality one. You can use old unnecessary things instead.
- You can complement the appliqués with other elements: beads, beads, sequins, buttons.
Applique is a good and simple way to decorate
Some needlewomen never throw away worn-out clothes; they give them a second life - cutting out large and small parts. If you collect them for a while, by the time you sew, the elements for the applique will be selected.
Form, fragments
The more complex the shape, the more difficult it is to sew and care for it. However, it is the products of the original shape that look unusual. If you are good at sewing square and rectangular pillows, you can try moving on to more complex ones.
Positive cartoon characters
Technologists distinguish four main forms:
- Square . It is considered a classic option, suitable for sofas, armchairs, and ottomans. A product of this shape is also practical - it is comfortable to lean on or sit on.
- Rectangular . It is also a classic option, used for furniture of massive sizes. Rectangular pillows can balance large dimensions and give an aesthetic appearance to the largest sofa.
- Round . The main disadvantage of this form is the difficulty in creating a pattern and sewing. When a product with right angles is sewn, it is easy to manipulate the seams and create bends, but with a round shape it is more and more difficult. However, round decorative pieces are a good way to smooth out the sharp, straight lines of sofas with a strict design.
- Oval (roller). The main place for using pillows of this shape is decorating leather sofas.
The original shape looks unusual
An interesting design option is to create geometric fragments that change the overall shape of the pillow. This addition looks especially good on corner sofas.
Knitting, embroidery
Not all needlewomen know how to knit or embroider, so decorating can be an excellent opportunity to learn a certain skill. We can definitely say that decorating pillows in this way is a labor-intensive task that requires a lot of time and effort. Nevertheless, rave reviews from family and friends will fully justify all the costs.
A fully knitted cover looks most original when, instead of fabric, a cover is knitted into which the padding is inserted. If there is no time or opportunity to make such a model, you can simply knit a separate element, for example, a braid, which will act as an ornament. Such a pillow will become a mute witness to the fact that the owner of the house has “golden hands.”
Knitted option
As for embroidery, absolutely any technique can be used when decorating pillows. Cross stitch looks beautiful, however, it is done on a special fabric, canvas, which must be taken into account when choosing fabric for the product. You can embroider the design separately and then sew it onto the finished pillow.
Embroidery using the satin stitch technique, which is applied completely to the entire pillow, looks especially beautiful. Mastering this type of embroidery is not easy, but the result will justify all the efforts.
Relief
Relief decor can be made with various elements:
- fringe;
- frill;
- puffs;
- 3-D applications;
- weaving.
Each option has its own characteristics and design features:
- Braid . Adds originality to any product used to create an interior. On pillows, wool braid looks especially beautiful, successfully combined with satin and velor.
- Decorative brushes . In most cases, their manufacture requires linen, satin, or silk thread. Brushes are an essential element used when sewing pillows made of velvet, silk, and other “noble” materials.
- Bows . The simplest element of decoration is to just take the fabric and tie it in a knot in the form of a bow.
Can be a wonderful gift for any occasion
Cushion sizes
There are no special requirements for the size of sofa cushions. Select them in accordance with their purpose, your vision, desire, room interior style and furniture size. The larger they are, the larger and more noticeable decorative pillows can be.
If we talk about classic square and rectangular decorative pillows, then the standard ones - 40 x 40 cm, 40 x 45 cm, 45 x 45 cm - will look best on spacious soft sofas, beds and armchairs.
Furniture with hard metal and wooden backs can be made more comfortable with the help of large pillows - for example, 50 x 50 cm, 60 x 60 cm or 50 x 70 cm, and volumetric bolsters. They can be sewn from durable curtain fabric, velor or vinyl.
Small decorative pillows are well suited to compact home furniture - small sofas, couches, armchairs, ottomans: 30 x 30 cm; 35 x 30 cm, 30 x 20 cm, as well as not too long and voluminous cushion cushions.
Pillow decor options
It is not necessary to attach various decorative elements immediately to the pillowcase. You can make it from simple cotton fabric, and sew various covers as decorations.
Removable covers are decorated in the following ways:
- wide stripes of multi-colored fabrics that can be placed on the surface in any order;
- accessories - some needlewomen prefer to embroider covers with beads, multi-colored buttons, and pin brooches;
- felt appliques - various figures made from such material always look impressive.
Pillow embroidered with buttons
How to fill a sofa cushion
Natural fillers: feathers, down, wool, bamboo fibers, etc. are not a very good choice for sofa pillows. They do not hold their shape and volume well; moreover, they quickly accumulate dust and are difficult to maintain regularly. Therefore, it is better to choose durable, comfortable and practical synthetic materials as padding. Fortunately, modern manufacturers offer them in more than sufficient assortment.
Sofa cushions can be filled with:
- holofiber;
- tinsulline;
- struttofiber;
- elastic padding polyester;
- dense foam rubber;
- polystyrene balls/granules.
The choice of material depends on whether you want to sew sofa cushions for comfortable relaxation or plan to use them for purely decorative purposes. In the first case, delicate and soft fillers are suitable for stuffing: holofiber, tinsullein, etc. In the second case, more elastic foam rubber and padding polyester are used.
From the history of pillows
The making of pillows has a long history. The first products appeared among the ancient Egyptians, only they were used not for comfort and coziness, but as a headrest in order to preserve hairstyles, so such objects were made of wood and metal.
Hard wood pillows
The Greeks were the first to start making soft goods. They were the first to learn how to create all kinds of comfortable pillows, and also decorated them with beautiful embroideries.
Such products were also known in Rus'. Craftswomen worked to create unique pillows, embroidered them with characteristic patterns and even gave them a magical meaning.
The pillows featured various flowers, animals and even people's names.
How to sew a sofa cushion
Sewing sequence for a classic square sofa cushion
What to prepare:
- thick fabric;
- chalk for patterns;
- cutting knife;
- scissors;
- “zipper” (40 cm long);
- filler (sintepon, foam rubber or other).
How to sew a pillow:
Step 1. On thick paper, draw a simple pattern - a square 40 x 40 cm. Before cutting, measure 2.5 cm from each side (allowances for seams and zipper). The pattern can be drawn with chalk or thin dry soap directly on the fabric.
Step 2. Cut out the fabric for the sofa cushion cover. It’s better to do this by folding the fabric in half, then you won’t have to stitch one side. In this case, there is no need to take into account the seam allowance on the fold side.
Step 3. Fold the fabric face to face. The folded area can be ironed for convenience. We fasten it on all sides with tailor's pins or sweep it away. Sew the sides of the sofa cushion cover using a sewing machine. The seam pitch is 2.5 mm.
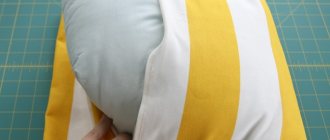
Step 4. Turn out the finished cover. Using scissors or a pencil wrapped in fabric, carefully straighten the corners. Let's attach the zipper. To ensure an even seam, the zipper grosgrain tape can be pre-basted to the edges of the cover using large stitches. We will stitch one side of the fastener with the zipper open, the other with the zipper closed.
Step 5. Straighten and iron all the seams on the front side. We will re-stitch along the edges of the seams until the zipper stops, that is, we will make a backstitch. This is necessary so that the edges of the fabric sections do not fray, and the wrong side of the pillow cover is neat.
Step 6. Turn the cover inside out and straighten the corners. Let's lay additional lines on both sides of the zipper. The machine foot should move close to the teeth of the fastener. Then the finishing seam will be perfectly smooth.
Step 7. Iron the decorative pillow cover. Fill it with filler to the desired density. Close the zipper and shake the pillow several times so that the filling is distributed evenly.
In this way, you can sew both the inner cover for the filling (nappernik) and the outer decorative cover of the sofa cushion. The following video tutorial from Natalya Kasyanik will help you visualize the intricacies of sewing a classic decorative pillow of a square or rectangular shape.
Product assembly
Next, using a flexible measuring tape, measure the circumference of the pillow and cut an even strip of fabric of the same length, 20-25 cm wide. This will be the side of the product, which will add additional volume to the pillow. Its color can be contrasting (third in fact) or a matching pattern. Using needles with a head, baste the edges of the top of the pillow and the side, first stitching the side seam.
There is probably no need to remind you that this procedure is carried out with the front layer inward and a zipper is used in order to then turn the workpiece inside out. You need to do the same with the second circle, forming a finished pillowcase for a round pillow with your own hands. Don't forget to overlock the edges! Then, using simple teak fabric, you need to cut out two circles with a diameter ten centimeters larger and sew along the circumference, leaving a little space to put the padding polyester inside. Stuff this pillowcase, keeping in mind that after a couple of weeks of using the product, the padding polyester will shrink more tightly. You may need to add stuffing to give the pillow a fuller look. When the density is satisfactory, manually sew up the remaining edge and put the finished colored pillowcase on top, padding it with your hands to evenly distribute the padding polyester.
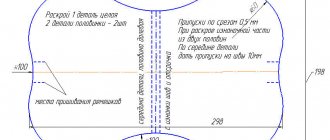
Patterns and diagrams of sofa cushions
Pattern of a square sofa cushion
Pattern of a figured pillow using the patchwork technique
Pattern of the pillow-toy “Bird”
Pattern of a children's horseshoe pillow
Pattern of a decorative sofa cushion
Where to begin?
Before sewing a round pillow, you need to think through all the key points step by step so as not to be disappointed when something doesn’t go the way you wanted.
So, what you need to decide:
- Appearance of the product.
- The material from which the pillow will be made: fabric for the inner and outer pillowcase, padding polyester for stuffing and finishing materials, if they are needed in this model.
- Pattern (pattern) made of paper.
- Equipment: scissors, threads in color, zipper for fastening, equal to the diameter of the pillow. And, of course, a sewing machine, an iron and small needles with a head for fastening parts.
Sofa toys pillows step by step
Owl pillow toy
What you will need:
- white and yellow fleece/felt;
- blue cotton fabric with polka dots;
- blue cotton fabric (plain or with a bright print);
- narrow blue ribbon;
- small black beads or buttons - 2 pcs.;
- a piece of openwork lace;
- pattern paper;
- pencil and chalk;
- pins;
- cutting knife;
- filler.
How to sew a toy pillow:
Step 1. Draw the owl pattern, enlarging it to the desired size.
Step 2. Cut out the patterns. We attach them to the fabric with tailor's pins. Mark the seam allowance with a dotted line; 1 cm is enough.
Step 3 Carefully cut out: two main parts of the toy pillow (body with head and ears) from blue fabric; four pieces for wings made of blue polka dot fabric; two white fleece mugs for eyes; one yellow fleece triangle for the owl's nose. In addition, you will need two parts for the bow: a rectangle and a square. We will cut them out of fabric with polka dots. Dimensions - optional, proportional to the size of the pillow.
Step 4. Iron all the details. We attach the eyes, beak, wings and lace strip to the owl’s body using a decorative “zigzag”. Using a glue gun, attach buttons or beads - the pupils of the bird.
Step 5. Place both parts of the body face to face. With pins. We will lay a regular stitch along the contours, with an indentation of 1 cm. We will leave a section of 3-4 cm (at the bottom, between the owl’s wings) unstitched, for filling the pillow. To ensure that there are no ties on the material, we will make notches on the ears and other convex areas of the toy.
Step 6. Turn the pillow inside out and straighten the corners. Let's iron it. Carefully and evenly fill with filler to the desired density. Let's check whether the ears and other protruding parts are well filled. Let's sew up the hole.
Step 7. Let's make a voluminous bow. Fold the square in half (you should get a wide strip) and iron it. Fold the rectangle face inward. Let's sew (with an allowance of 1 cm), turn it inside out, iron it, and gather it in the middle into a beautiful gathering. Secure with the prepared strip.
Step 8. Attach the bow to the owl's ear. We will glue another decorative bow, made from ribbon, onto the owl’s body, above the lace.
Pillow-toy “Cat”
What to prepare:
- cotton fabric the color of baked milk (with a soft print);
- plain cotton fabric - pink and dark beige;
- brown fleece;
- dublerin/non-woven fabric;
- dark brown buttons - 2 pcs.;
- pattern paper;
- chalk or thin marker;
- brown floss;
- tailor's pins;
- iron.
How to sew a toy pillow:
Step 1. Download the pattern. If necessary, we will increase it to the required parameters. Carefully cut out all the elements of the drawing.
Step 2. Lay out the paper parts of the toy on the fabric. Attach with tailor's pins. Mark a 1 cm seam allowance with a dotted line.
Step 3. Sequentially cut out from cotton fabric the color of baked milk: one half of the kitten’s body; four parts for the front legs; two parts for the tail. From brown fleece: the second half of the body; four parts for the rear legs. Made from pink cotton fabric: four pieces for the cat's ears. Let's make a decorative heart from light beige cotton.
Step 4. To make the pillow-toy durable and last longer, we seal the parts of the body with double rubber. To do this, place the cut out elements inside out on the adhesive side of the dublerin. Secure with tailor's pins. Let's cut exactly along the contour. We will remove the pins.
Step 5. Fold the parts of the cat’s body made of fabric and dublerin in pairs. Iron them thoroughly so that they stick together completely. Glue or sew a heart on the front part with a decorative zigzag.
Step 6. Fold the blanks of the cat’s ears, tail, and paws in pairs (facing one another). Let's lay the lines along the contours. Leave small holes for filling. Along the edge, use curly (or regular) scissors to make frequent notches or teeth.
Step 7. Turn the sewn parts inside out, straighten all the corners and protruding parts, and iron them. Fill evenly and tightly with filler. We attach them with pins to the front (cotton) part of the body. Sew with a zigzag stitch twice. Using chalk or a thin marker, draw the cat's face.
Step 8. Place the fleece back of the cat on top. Align, secure with pins or baste. Let's sew a line along the contour, connecting all the elements. To stuff and turn the toy inside out, leave a small unstitched area between the hind legs.
Step 9. Turn the toy pillow right side out. Let's iron it. Distribute the filler evenly and tightly inside. Let's sew up the hole.
Step 10. Let's finish the job. We sew the front legs by hand. We decorate them with buttons.
Step 11. We beautifully embroider the details of the face on the finished children's pillow “Cat” with brown floss.
Original decorative pillow “Knot”
What you will need:
- elastic knitted fabric with beautiful patterns or plain;
- cardboard tube from foil or paper towels;
- a thick knitting needle or similar device;
- filler (preferably synthetic winterizer);
- glue gun/textile glue;
- ruler;
- chalk;
- scissors.
How to make a beautiful knot pillow:
Step 1. Cut the knitwear into strips. The optimal width is 17 cm, length is 2 m. If the length of the fabric is shorter, we will connect the strips with a glue gun or fabric glue.
Step 2. Let's make knitted blanks for voluminous tubes. Place each strip of fabric wrong side up. Apply glue along one of the sides along the length. Fold the strip in half and quickly fasten the sides together. Let's smooth out the unevenness.
Step 3. Turn out the glued blanks. This is easy to do using a cardboard tube. We will pull one end of the fabric through the tube, turn it inside out on the opposite side, and put it on the tube. Stretch and gather the fabric into a tight gather, turn it right side out. There is no need to remove it from the cardboard tube.
Step 4. Fill the blanks with padding polyester. To do this, place the filler inside the tube. Using a knitting needle or other suitable object, push the padding polyester into the knitted piece and press it lightly. Distribute the filler evenly.
Step 5. We will tie a beautiful voluminous knot from the resulting soft tubes. This is convenient to do on the floor. Place two blanks (you need knitted tubes 2 m long) perpendicularly, crosswise.
Step 6. Alternately bend the ends of the knitted tubes with a loose loop in the following order: first - the top one, then - the left, bottom and right. We will pass the right one from above into the first loop (the one that was formed when bending the upper end of the fabric tube). Carefully tighten the knot.
Step 7. At the next stage, we perform the same actions almost in reverse order. First, just as before, we will make a loop from the upper end of the tube, then from the right, lower and left. We will pass the left end into the first loop. Let's tighten it and straighten it beautifully.
Step 8. Let’s finish the job by repeating the steps we performed in step six. It is more convenient to tighten the finished knot from the wrong side. Carefully straighten the loops. We fix the edges of the tubes inside the pillow or, for reliability, sew them on.
Popular styles
Popular design styles for rooms in a house or apartment are so diverse that no two rooms are decorated the same way. The idea of decorating pillows should be consistent with the overall design of the rooms. The styles that are popular today are unique; even a beginner can make a pillow in them.
Patchwork
The Patchwork style involves combining patches; literally the word means “working with patches.” The main idea of the work being performed is originality, because the patches sewn together are not selected according to any compatibility criteria. As a result of combining different pieces, beautiful, unique things are obtained.
Patchwork was popular earlier, then it was eclipsed by styles implying restraint, measuredness, and the former eccentricity was left behind. Today, when a hobby has become not a craft that allows you to earn a living, but a handicraft, patchwork has returned to fashion - bright and extraordinary.
Patchwork style
Patchwork style pillows can be of completely different sizes, shapes, and designs. The first thing to do is to select scraps that can be different, but match each other in color and density of material (for ease of stitching). Decorative pillows made from sewn scraps of old jeans look especially original.
Provence style
Provence is a popular modern style that came to us from the design of ancient French villages. Its main features are:
- natural motifs, patterns;
- light colors close to natural;
- “favors” in the form of various small details;
- high-quality, natural materials;
- naturalness.
Provence - a popular modern style
Pillows in the Provence style are identified with lightness and naturalness, as a result the impression should be created that they are a native element of the interior. It is this French design style that is associated with relaxation and comfort. Therefore, decorative pillows in Provence always look appropriate.
Oriental
The oriental style of decoration involves the use of geometric and other ornaments. They can be on the fabric from which the pillows are made, or they can be embroidered on top of it. Oriental patterns include rhombuses, triangles, and other patterns.
The oriental style of room interior design is considered luxury and is used mainly in rich homes. If the room is decorated in any other way, then they will not be able to combine. The oriental style of decorating pillows involves the use of “rich” colors - gold, silver .
Oriental style
Tip Pillows decorated in oriental style will be an interesting gift option for residents of that area or people who follow their traditions.
Shabby chic
The shabby chic style is suitable for romantics who want to create an atmosphere of tenderness and love around themselves. The main elements of this style are:
- hearts:
- ruffles;
- small bows;
- roses.
This style is reminiscent of vintage, especially suitable for decorating a room for young girls.
To create accessories in the shabby chic style, light, pastel-colored materials are suitable, which will be used to decorate bedrooms and children's rooms. Such a gift will be a good sign to your lover. All ruffles, roses, and other decoration elements can be created with your own hands by mastering the techniques of knitting and embroidery.
Shabby chic style suits romantics
Chinese
Chinese room design includes pillows with a specific pattern: Chinese painting. Fringe and tassels in the same shade as all the furniture in the room would look appropriate at their corners. Chinese style is distinguished by a variety of colors, there is variety, brightness, and colorfulness in everything.
Furniture made in the Chinese style can be used for sitting on the floor. If you take a gentle, romantic Provence or shabby chic design, you are unlikely to want to put them on the carpet. Chinese type pillows will be an excellent option for those who like to preserve their national traditions.
Using Chinese or other similar themes when sewing is necessary for those premises used by people of the corresponding nationality. In other cases it will look out of place.
Option with Chinese painting
Baroque
Baroque is one of the most popular. The literally translated Italian word means “pompous”, “elite”. The main way to use any piece of furniture made in this style is to create an emphasis on the luxury and wealth of its owner. escortstars Sewing appropriate decorative accessories is necessary only for a suitable setting.
A prerequisite for decorating a pillow in the Baroque style is the use of exclusively natural materials. Down or feathers are used as filling. The fabric of the cover is also rich - velvet, natural velor, cotton.
Black is considered a rich shade. When sewing furniture and various home accessories, you can use this and other dark shades.
Baroque looks out of place in children's rooms, so it cannot be considered universal. Attempts to impress, to decorate the whole house in such a theme, turn out to be unsuccessful.
Baroque style
Loft
A loft is considered suitable for freedom-loving people and bright personalities. It came from America, where there are still many residential premises, especially private houses and dachas, in this style. At first glance, it may seem nondescript and cheap, but behind this apparent simplicity lies wealth and chic.
The peculiarity of loft decorative accessories is the restraint of shades; gray, olive, and blue are often used. As for the ornament, it can be absolutely anything – from bright printed inscriptions to discreet minimalism. Upholstered furniture made in a loft usually has a classic shape; pillows are also sewn square or rectangular.
For freedom-loving people and bright personalities
Country
Country is a derivative of Provence, but has its own advantages. Preferred country shades:
- pink;
- light green;
- blue;
A popular pattern is small flowers. You can create decorative accessories in country style using appliqué, a variety of colors, embroidery, knitting, and relief.
Pillows made in a country style look especially suitable in the kitchen or dining room. The soft corner around the table often has a monochromatic structure, so you need to be able to add variety with the help of decorative pillows. The main features of country items are unobtrusiveness and naturalness, which must be taken into account when choosing a color.
advice is especially suitable for the kitchen; it can include: a soft corner with pillows, a tablecloth, curtains, even dishes.
Country style
Scandinavian
Not only decorative pillows, but also rugs, carpets, and other interior elements can be made in the Scandinavian style. It is popular due to the climatic characteristics of our region - in autumn and winter, you want to create warmth, comfort, even artificial ones are empty. An excellent option would be to add Scandinavian style elements to the interior of your house/apartment.
Furniture made in a Scandinavian theme is distinguished by its comfort, gentle, light colors. The main shade of accessories is white; it is also used to create sofa accessories. Their distinctive feature is restraint; if there is an ornament, it consists of several colors; if there is fringe, it is monochromatic and short.
Scandinavian style
Thus, decorating pillows is an important part of the overall look of the room, which can be done in the desired style.
DIY large sofa pillow
It’s not difficult to make a decorative sofa pillow of impressive size with your own hands. The sequence of work is the same as in the manufacture of standard products. It is also not difficult to enlarge the details of the finished pattern to the desired parameters.
Are you planning to update your sofa and make a real furniture cushion from upholstery textiles yourself? Please note: the work requires certain skill and knowledge of a number of nuances. In addition, you will need special tools. A video tutorial from Natalia Mikhailova will help you visualize the process of making a sofa cushion with a beautiful decorative drawstring clearly and in all details.
How to choose pillow fabric?
To make pillows, it is recommended to purchase only natural fabric, because they should not only be beautiful, but also functional, and therefore pleasant to the skin.
Table No. 1. Types of fabrics for making pillows
| Fabric, illustration | Description |
| Cotton | This is the most suitable fabric for making a pillow base, because it does not cause allergies and has a fairly budget price. In addition, cotton material does not require any special care. |
| Silk | This is a very pleasant material that will be comfortable to lie on. By the way, silk pillows have a beneficial effect on the condition of hair and facial skin - they do not become electrified and do not leave “crumpled” marks. The only drawback is the difficulty of care - you need to wash silk delicately. |
| Linen | Pillows made from this fabric can be especially appreciated in hot weather, because linen has cooling properties. In addition, it does not require special care, is very pleasant to the skin, and hypoallergenic. |
| Wool | A pillow made of this material will come in handy during the cold season. At the same time, wool has not only warming, but also healing properties, but it requires special care - woolen products can only be washed in a washing machine on a special cycle. |
Important. Often, separate covers are sewn onto pillows, which can be removed and washed if necessary. They are made from various materials, we will look at the most popular of them.
Washing sofa cushions
Table No. 2. Popular fabrics used for sewing covers
| Fabric, illustration | Description |
| Batiste | This is a natural and at the same time very delicate material made of thin threads. It is often used to make pillowcases for children's pillows. |
| Teak | This is a very durable, natural fabric. Its main advantage is considered to be good wear resistance. |
| Satin | Durable material that better allows oxygen to pass through, making it useful to sleep on such a pillow. |
| Satin jacquard | Essentially this is the same satin, but with unusual decorative patterns. The material is characterized by good strength, wear resistance and at the same time has a truly noble appearance. |
| Percale | Durable fabric with a perfectly smooth surface. For greater strength, the threads are pre-treated with a special natural adhesive. |
| Twill | Dense fabric made from wool threads. Thanks to this pillowcase, the pillow looks voluminous. |
Separate covers are necessary not only for pillows, but also for upholstered furniture. You can read about how to sew stretch covers for upholstered furniture in our article.
Crochet sofa pillow, diagram with description
Decorative pillow-cushion
Crocheting this colorful cushion pillow seems difficult only at first glance. Even inexperienced needlewomen can make it in just a couple of free evenings according to the scheme. You will need only three parts (one rectangular and two round), multi-colored decorative “bumps” and high-quality, fairly elastic filler.
Scheme of the main blade for the cylinder:
How to knit:
Diagram of the side elements of the roller
How to knit:
Pillow assembly sequence:
Step by step process
Step-by-step instructions on how to sew a round pillow:
- Cut eight segments from each type of fabric. There should be 16 pieces in total.
- Sew two together in different colors. Be sure to iron the seam. This will guarantee that the pillow pattern will turn out without distortions.
- Sew three parts of the resulting segments, consisting of two colors, making sure that the fabric pattern (or color, depending on what was chosen according to the model) changes one by one. Be sure to pin pieces of fabric so that they do not move when sewing. The result should be two semicircles. Finish the edges with an overlocker and press all seams again.
- Sew two semicircles into one, and connect the other two using a zipper, sewing it in the center. It is important to remember that you need to stitch it in a fastened state, so that when finished it does not turn out that it is not fastened. It is important to constantly check the accuracy of the product's assembly.
- It is recommended that each part (a circle and two halves with a zipper) be additionally reinforced with non-woven fabric or double-lining, cutting out equal parts and ironing them with a hot iron. This will make the seams stronger, which will have a positive effect on the durability of the product.
- When two full circles are ready, it remains to decide what to do with the middle of the round pillow: sew it with a button, as if additionally centering the pillow, or cut a small circle from the fabric and, bending the edge by 1 cm, sew it exactly in the center, using a zigzag stitch with with a narrow step.
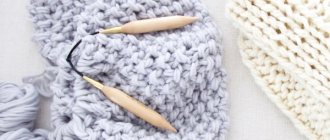
Knitted sofa pillow, diagram with description
Set of knitted sofa cushions
What to prepare:
- yarn (acrylic/wool blend 80 m/50 g) - apricot, vanilla, terracotta 250 g each;
- ready-made sofa pillows - 3 pcs. (two square and round, corresponding sizes);
- standard knitting needles No. 4, No. 5;
- circular knitting needles No. 5;
- "zippers" - 3 pcs. (L - 40 cm).
The approximate yarn consumption is calculated for sofa cushions of the following sizes: square - L - 40 cm, B - 40 cm; round – D – 40 cm.
Knitting patterns:
Ornament No. 1
Ornament No. 2
Sequence of work:
How to do cutting
Using the pattern below, make a cardboard template. Applying it to the selected segments, outline the contours with chalk or other marker. When cutting on all sides, leave 1 cm at the hem of the fabric. The resulting sectors are sewn together in pairs.
Smooth the edges on the back side and immediately iron them. To make the joints between the patchwork part of the pillow and the sidewall look more impressive, you can insert a border of a contrasting color when stitching.
As you can see, sewing round decorative pillows is not at all difficult. Even a novice master can handle it. The main thing is to act carefully and follow the instructions given in the article. Happy endeavors!
Knitted pillowcases for sofa cushions, ideas with photos
Knitted sofa cushion “Clock”
Stylish interior pillows knitted using the patchwork technique
Elegant sofa cushion made of Bruges lace
The final chord for the round pillow
It’s good to accent round home items with your own hands with additional small details: buttons, fringe or frills.
You can also use braid with small pompoms, narrow matching lace or any other accessories that will harmonize well with the overall look of the pillow. This creative process is one of the most interesting stages, giving the opportunity to create and express oneself through needlework.
Decorative pillowcases for sofa cushions, ideas with photos
Set of interior pillows with elaborate embroidery
Decor of sofa pillows with romantic puffs
Sofa cushion with bright voluminous felt applique
Other ideas for interesting decor of interior pillows can be found in videos from leading popular handicraft blogs on YouTube. We wish you exciting creativity!
Volumetric heart made of roses
A handmade pillow can be a wonderful gift. Armed with imagination and a thread and a needle, you can even turn it into a unique Valentine’s card. We offer you a step-by-step master class on making an unusual pillow with a voluminous heart.
To work you will need:
- ready-made pillow of the desired size;
- fabric for roses, which does not require overcasting the cut;
- scissors;
- needle and thread.
Cut circles with a diameter of approximately 8 cm from the fabric; they may be slightly crooked and slightly different in size. This will only add volume and realism to the flowers.
Take the circle of fabric by the middle, gather it, forming folds as in the photo. Secure the workpiece in the desired position with a couple of stitches.
Sew another circle of fabric from the bottom, forming a voluminous bud.
Continue sewing circles onto the rose until you get the desired size flower.
Prepare the remaining roses using the same scheme. Their number depends on the size of the flower heart.
Sew the flowers to the pillow starting with the outline of the heart.
Place the pieces tightly together so that there are no gaps between them. A magnificent heart is ready to conquer and conquer hearts.
This designer pillow will decorate the room of a capricious fashionista or become the highlight of your living room. And she will lift your spirits just by looking at her.
Stage three: design of the top and bottom edges
The peculiarity of the design of the upper side of the curtains in the presented project is that the fabric is folded wide in order to string the product onto the cornice pipe.
You need to do the following:
- fold the fabric;
- fix the position of the material by ironing the fabric with an iron;
- repeat the hem so that the cut of the fabric is inside;
- place fusible tape;
- iron the fabric.
This will create a hem that isolates the cut of the fabric. The next step is to create a large hem into which the cornice pipe will be inserted.
You need to do the following:
- bend the material;
- iron the fold line;
- place hot-melt adhesive tape between the layers of fabric;
- iron the product with an iron.
The hardest part of the job is done. All that remains is to decorate the bottom edge of the curtains. The hem is made in two layers and fixed with adhesive tape.
A student at the Vietnam Police Academy shared how she takes care of her facial skin.
It’s good to wash often: myths about shampoo and hair care that only harm
"Dad is offended." Agata Muceniece about her relationship with Priluchny after the divorce
Results
Decorating pillows can be a fun and creative activity for the whole family. When making such wonderful products for the family hearth, you can involve even the little ones - entrusting them with the easiest stages of work.
The finished product will be a joy not only for you, but also for your loved ones, who will feel their contribution to creating a homely atmosphere.
Creative ideas can be drawn from completely different sources and resources, the main thing is to competently implement them and do not hesitate to ask advice from more experienced craftsmen on forums or in real life in order to avoid minor mistakes that can cost you all your planned work.
Create with joy and be happy!
Video lessons and master classes on knitting a pillow cover
Watch good video tutorials on knitting pillows.
Cushion Cover for Beginners
Knitted on the basis of a “granny square”. There are a lot of options for color combinations. The pillow is double-sided, you can turn it with the light side or the dark side. The pattern is knitted from the center. Yarn Pekhorka Children's New 50g/180m.
Why do we recommend this video for beginners? The granny square pattern is simple; you only need to know how to knit double crochets and chain stitches.
The video should load here, please wait or refresh the page.
Benefits of homemade pillows
If necessary, the craftsman has the opportunity to select an individual design, as well as use any fabric for the cover and decoration. In addition, the following advantages can be noted:
- A great hobby after a hard day.
- For girls, sewing is a good opportunity to practice basic sewing.
- When working on creating pillows, fine motor skills of the fingers develop well, and abstract and figurative thinking begins to form.
- Mothers and grandmothers can make baby pillows from natural materials with their own hands. Such accessories will allow your baby to maintain healthy sleep and good mood.
Thanks to the painstaking work of craftswomen, beautiful pillows (sofa, foot or floor models) will appear in the house.
Finishing touch
Now all that remains is to sew the cover. Baste the pieces along the stitching lines and sew them by machine (by hand). You can put a cover on the pillow.
If you plan to decorate the pillow with embroidery, applique or other decorative elements, it is much more convenient to do this before starting to sew the parts.
You don't have to come up with a design yourself. You can easily look through existing photos of a pillow cover in catalogs or various collections and repeat the model you like.
An IKEA cushion cover can be the perfect boost to develop your own design skills.
- 90 photos of new sets of curtains and bedspreads for the bedroom
- Thin mattress: advice on choosing from experts. 104 photos of modern mattresses and their applications
- Women's dressing gowns - modern models and materials. 105 photo ideas for selecting dressing gowns
Materials and tools for work
For the master class you need to prepare the following set of materials:
- Threads, needles, scissors.
- Sewing machine for line stitches.
- Working material for sewing a cover.
- Patterns.
- Chalk.
- Filler (batting).
Also, great attention should be paid to the organization of the workplace: a tabletop with wide edges, a chair and the level of lighting.
Note!
- DIY satin ribbon bows - step-by-step instructions for creating unusual bows + detailed diagrams with photos
Do-it-yourself furniture restoration: step-by-step master classes on restoration at home (120 photo ideas)
- Do-it-yourself rack: step-by-step instructions with photos and descriptions on how to make an unusual rack
Stage two: design of vertical sides
Despite the fact that the fabric is used across the entire width, the edges need to be processed. In the presented project, the edge of the material is “fluffy”, that is, there are threads behind the production edge. You can simply trim them, but the product will look more neat if you bend the edge.
You need to do the following:
- bend the edge;
- fix the position of the material by ironing the fabric with an iron;
- insert fusible tape into the formed hem;
- iron the material, thereby gluing the layers of fabric with tape;
- repeat the entire process on the other side;
- cut off excess adhesive tape.
There is no need to double fold the vertical sides of the curtains.
“We are still friends”: Derevianko commented on the breakup with his wife
Lost weight: what Sofia Tarasova sacrificed for the sake of “VIA Gra” (new photos)
Why French children behave well: eight ways to raise them
Preparing patterns
Today, on various web resources and practical needlework magazines, you can find a wide variety of patterns for sewing pillows of all sizes and shapes. But if desired, the master can independently think through the future design of the accessory.
In this case, the drawing must show the dimensions, main details of the future cover, and the presence of auxiliary elements (inserts, modules).