Today, the decoupage technique is gaining increasing popularity, which consists in decorating household items by pasting them with various designs, ornaments and other materials.
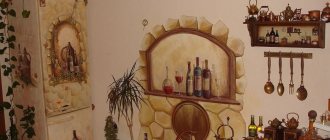
Kitchen jars for cereals, decorated using decoupage technique
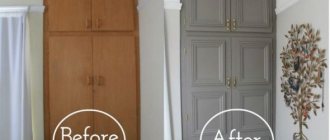
This allows you to refresh the appearance of outdated furniture and give it uniqueness. In addition, decoupage does not require significant financial costs, and the options for an updated design are limited only by the owner’s imagination.
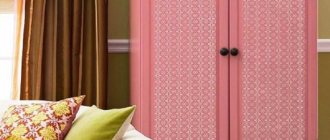
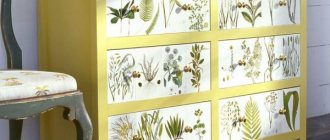
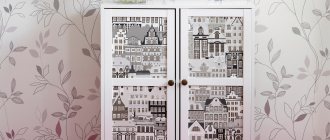
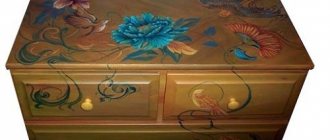
Beautiful chest of drawers decorated using decoupage technique
History of development
The history of decoupage or DIY magic
Many experts believe that the development of decoupage as one of the art directions takes its origins in Germany at the end of the 15th century. At the same time, they first began to use such a technique in China in the 12th century.
This technique was called design for the poor, since very fashionable imported items from China and Japan were available to few and were simply copied
Due to poverty, the peasants could not afford to buy good furniture, so they tried to make their home cozy on their own. To do this, they cut out various pictures from thin paper and pasted them onto interior items.
“Paper mosaic” technique - many details depicting parts of plants were cut out of paper, painted and glued onto a base, mostly black
The decoupage technique reached its greatest peak in popularity in the 12th century, when Europe was swept by the fashion for oriental luxury. However, furniture in Japanese or Chinese style was very expensive and not everyone could afford it. Therefore, the craftsmen cut out individual fragments of oriental patterns, gluing them to the surface of the furniture. To prevent the fake from being noticeable, the design was covered with several layers of varnish.
Vintage drawings for decoration using decoupage technique
Nowadays, decoupage has again become popular. The development of industry and the emergence of new materials allows craftsmen to bring to life the most daring ideas. It should be noted that today folk craftsmen are divided into two camps - some use ready-made pictures when decorating, others prefer to color black and white drawings themselves.
Decoupage - creating home comfort with your own hands
Decorating an old stool
For many, it will not be difficult to find an old, tattered, but still strong stool. These things often sit somewhere in a dark corner of a closet, garage or attic. It’s high time to throw them away, but I can’t help but think they might come in handy during the next repair. This master class, demonstrating the decoupage of a stool, will allow you to move it from a dark closet to one of the central places in the interior of the kitchen, hallway, nursery or bedroom of any modern home.
The product has a simple, uncomplicated design and is convenient in many ways. It is easy to carry thanks to a special hole in the seat. It has a strong and practical surface, which, in addition to its main purpose, can be used as an original stand.
Preparatory stage
The result of the work will be a stool in the shabby chic style - beautiful, sophisticated, but with a noticeable antique charm. Prepare the necessary materials and tools:
- old wooden stool;
- decoupage napkins with floral patterns;
- paraffin candle;
- sponge;
- white and black acrylic paints;
- patination paint;
- acrylic lacquer;
- sandpaper with medium and fine grain;
- hard brush;
- PVA glue;
- brush.
If the stool needs repairs, you will additionally need: a hammer, nails, a jigsaw, putty, a wooden board.
Description of work
- Before aging and decoupage the stool, put the old piece of furniture in order. Repair and replace damaged parts. Then carefully sand the surface with sandpaper, remove everything unnecessary: remnants of old paint, varnish, dirt. Next, wipe the wood and degrease it. Fill the largest cracks and holes from fasteners with putty. Don't overdo it - after all, "shabby" means "shabby." After the filler has dried, go through the sandpaper again.
- To create a distressed effect on the wood, start painting the stool with black acrylic paint. This color will appear in areas where the base paint is damaged. You can cover not the entire surface with black pigment, but only the places that are subject to the greatest abrasion (where we plan to artificially create abrasions).
- After the paint has dried, take an ordinary paraffin candle and carefully mark three places of future scuffs on the stool. As a rule, these are the ends of the seat, the edges of the legs, and a little of the surface of the seat itself. Remove pieces and crumbs of paraffin from the stool. We recommend using a brush or a brush with hard bristles.
- Paint the chair with white acrylic paint in two stages. You can begin applying the second layer only after the previous one has completely dried. It is two layers of the substance that will provide an even, rich color.
- Start aging the surface of the chair. Black paint will show through the abrasions. A layer of paraffin will make it easier to remove the main top layers. Take medium-grit sandpaper and go over all the ends. With a little force, peel off the top layers of paint until it is black. Make the abrasions unevenly so that they have the most natural appearance.
- It's time for decoupage - let's decorate our stool with flowers. Carefully separate the layer with the image from the prepared napkin. Next, we cut out or tear out the floral motifs we need for decoration.
The torn edges of the motifs look more natural on the surface. Since the design does not have a smooth edge, it is easier to adapt it to the main background of the product.
- Since the napkin is thin, we lay it on the surface and, using a soft brush with a small amount of decoupage glue (or PVA), with light movements from the center of the motif to the periphery, attach the design to the stool.
Attention! If you are not using a napkin or rice paper, but a thicker material with a pattern, soak it in water for 2-3 seconds. Then apply glue to the surface to be decorated and glue.
- Take a thin brush and use white acrylic paint to tint the light elements of the design. This way it will blend in with the stool and look painted on.
- Glue and decorate the remaining decoupage elements in a similar way.
- Mix some water, white and black paint. Lightly wet the sponge. Wipe it off until almost no paint remains. Using light tapping movements, add aging to the surface of the stool.
Photo gallery of beautiful chairs decorated using decoupage technique:
PreviousChairs Upholstery of chairs: from concept to result
Next
Chairs How to sew a cover for a chair with a back?
Main types of decoupage
The decoupage technique can be performed in various variations and in various ways:
- straight, or classic;
- reverse (used on glass);
- artistic (imitating painting);
- decopatch (decoupage in patchwork style);
- volume.
Decorative effects
To achieve the desired texture, different surface decoration techniques
- craquelure;
- attrition;
- artificial aging ;
- patination;
- toning;
- shading;
- gilding.
As a rule, several decorative effects are used in combination .
You may also be interested in an article on how to make a wooden chair with your own hands. You can find out how to make a highchair here.
Materials and tools
For any of the techniques, working material is required. A set of objects and tools with which decoupage is performed directly:
- brushes of various widths and densities;
- vinyl glue (can be replaced with regular wallpaper glue);
- napkins with images or printed pictures;
- felt-tip pens, paints, pencils that may be needed to complete the image;
- varnishes for surface coating.
- auxiliary elements for decoration (glitter, stickers, shells);
When using images printed on a printer, you need to make the paper with the image as thin as possible.
For this you will need scissors and tape. Place some tape on the back of the image and carefully tear it off. At the same time, he takes with him a certain layer of paper.
It is necessary to repeat the procedure until you obtain a paper base as thick as a napkin..
Decoupage can be done on any surface: wood, plastic, glass and even fabric.
Attention! To prevent your brushes and other tools from becoming disposable, do not forget to thoroughly wash them of paint, glue and varnish immediately after use.
How to make chair seats with your own hands, read this article:
We apply pictures
Prepare your pictures: napkins, magazine clippings and pages, pieces of wallpaper, printouts. As mentioned above, any paper illustrations will do to decoupage the chair.
Master class on drawing pictures:
- Cut out the necessary decorative elements from paper. For example, if you decided to decorate a chair with roses, then you need to trim the flowers along the contour and get rid of excess paper.
- Make a thin layer of the picture. If it is a napkin, then remove the extra layers; if it is plain paper, then stick pieces of tape to the back side several times and remove it. Do everything carefully so as not to damage the illustration itself.
- Pour decoupage glue into the container. If you use PVA, dilute it with a little water.
- Place a suitable picture on the desired area of the chair and cover it with glue on top.
- Apply all the pictures in this way.
Allow the illustrations to dry completely before finishing decoupaging the chairs.
Preparing the background
The paint must be applied to the primer layer. This way she will lie down better and won’t slide off. The number of colors depends on your idea. You can paint the back and seat with different paints, highlight the legs and other elements of the chair with a different shade. There are many options. Remember that the main color can be anything.
Cover the entire surface of the chair with paint, leaving the areas where the design will be glued empty. These areas should be painted with a light color (white or beige). This is done so that the drawing is better visible. After all, the work happens with a thin layer of paper, and in 99% of cases the dark paint shines through it. This makes the look different from what was intended at the beginning of the work.
After the background has dried, you can begin working with the illustrations.
Decor
Without the right decor, you won’t get the right interior in the Provence style. Even little things, if chosen correctly, can play a huge role in the atmosphere of the room. It can be:
- small pot of honey;
- wicker basket with dried lavender;
- unusual copper plate;
- kerosene lamp;
- bunches of garlic, pepper or herbs;
- small figurines of a shepherdess or hens;
- candlesticks, plate holders;
- bags with aromatic herbs;
- small pillows;
- panels depicting village life or Provence;
- large and antique (or aged) clocks, standing in the corner or on the wall;
- landscapes on the walls;
- chest for storing textiles or other small items.
Such things can be found at flea markets, souvenir or antique shops, or in the same grandma's chest.
Tablecloth
If the tablecloth is not made of the same material as the curtains, then it should at least be matched to the same color. There simply must be a tablecloth, but at the same time it may not cover the entire table, but only be thrown over the center.
It is advisable to decorate it with one of the following options:
- embroidery on the corners;
- fringe around the perimeter.
The upholstery on the chairs is also done in the same color scheme. The same fabric can be used for curtains in the kitchen set. But this is rather rare, since Provence style dishes should be visible.
Curtains
It is the curtains that help create a true rustic atmosphere of comfort and spontaneity. It is best to use natural fabrics that transmit light:
- chintz;
- linen;
- batiste;
- cotton and others.
You can also take a closer look at mixed materials, but they should look identical to natural ones, repeating the texture of linen or cotton. The advantage of mixed fabrics is easier care and long-term use.
Curtains should be light, but you can also allow yourself an unobtrusive pattern, for example, floral or checkered. If desired, they can be decorated with ribbons, bows or soft frills.
An alternative option would be Roman blinds made from homespun fabric. Natural shades will look great against the background of a rough and rough surface of a plastered wall.
Dishes
Dishes in a Provence style kitchen are important not only from a practical point of view, but also from an aesthetic point of view - it’s not for nothing that they are displayed on open shelves! However, usually a set of dishes is not a set or service; rather, it is simply a set of plates and cups that accidentally ended up here. They are not related in shape, size, or color.
Materials that can be used:
- ceramics;
- bronze;
- brass;
- copper;
- glass;
- porcelain;
- unfired clay.
Metal objects should be polished to a shine and hung or at least grouped together. The same goes for porcelain.
It would be especially chic to use objects for purposes other than their intended purpose. For example, place freshly cut flowers in milk cans or a jug. Dishes with some kind of defect, for example, a chip or a crack, are not thrown away, but left as decoration.
Lighting
Provence will never become cozy without soft and warm lighting. Of course, natural light should be in the foreground, but if there is not enough of it, then it’s worth thinking carefully about high-quality artificial light.
The chandelier in the center of the room should be in maximum harmony with the overall interior. An excellent option for such useful decor would be a massive bronze chandelier suspended on a chain. You cannot use the most modern light bulbs, for example, LEDs, in such instances.
Don’t forget about additional lighting: one lamp for the entire kitchen is no longer fashionable or practical.
You can attach several small sconces to the walls. The interesting thing is that these lamps may not be combined with each other, but are purchased completely by accident.
French women are quite thrifty housewives, so the interior may contain donated or even found items. A special position will be given to original items purchased for next to nothing on the antique market.
But it is better to refuse the popular spotlights along the perimeter of the ceiling - they are completely unsuitable here.
Historical reports
The founder of the shabby chic style is considered to be the Englishwoman Rachel Ashwell. In the 80s of the last century, when Great Britain was gripped by a massive obsession with the loft industry, the girl’s romantic nature demanded the atmosphere of traditional old England. Rachel went for a walk around the flea market, where she managed to buy a couple of cute, but outdated, little things.
Ashwell carried out the restoration of the finds through the use of various decoration techniques on them. Updated versions of junk and rubbish after processing by the needlewoman were distinguished by sophistication, sophistication and elegance.