How to easily and inexpensively update already very boring furniture with your own hands - decoupage it. This article will tell you how to make design masterpieces from grandma's chests of drawers and country chairs in a few hours.
If a typical and outdated set remains from Soviet reality, there is a simple and inexpensive way to give the old “wall” a new life - furniture decoupage.
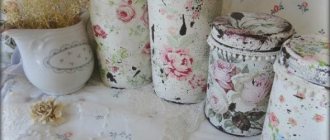
Interesting: the word “decoupage” itself comes from the French découpage, which means cutting. This word refers to the technique of decorating various objects (not just furniture) by attaching a carved ornament or design to the object, and then coating the resulting composition with varnish (for safety and durability).
Volumetric decoupage
This is the most difficult of all types of decoupage, but the result is worth all the costs. The pattern on the furniture produces a 3D effect, which should impress guests. Volumetric decoupage is done by gluing different images on top of each other, thereby creating the interior space of the picture. You can also glue lace on top, which gives the item a rough look.
Interesting: decoupage was first mentioned in the 15th century in China, where cut out pictures were used to decorate furniture. In the 17th century, decoupage came to Europe - then there was a fashion for everything Chinese and Japanese - and Italian craftsmen began to cut out images from paper, stick them on the surface of furniture and cover them with layers of varnish.
Decoupage Style Chart
| Name | What does it look like |
| Provence | This French style is usually associated with pastel colors and whitewash. It is often complemented with a floral print or cravel. |
| Simple City | This style uses old photographs or newspaper clippings (newspaper is thinner and more convenient for decoupage). Simple City emphasizes the speed and democracy of megacities. |
| French vintage | This is a simple city, but very minimalistic: images are used in two colors, the theme is more natural than urban. |
| Shabby chic | A style that strives to make the item look like an antique: angels or roses are most often used as prints, the edges are frayed, and the boundaries of the design are blurred. |
| Victorian | Characteristic features of this style: gold, blue and green paint. The Victorian style combines English traditions and the luxury of the colonies, so the main themes of the drawings are hunting, still lifes, and animals. |
Decoupage chairs with newspapers: now they look stylish and modern
How to properly prepare the surface before starting work
Before you decoupage furniture with napkins or any other products, you need to prepare the surface. To do this, you need to wash, wipe and dry the glass product and disinfect it.
Dishwashing detergent can be used as a disinfectant. To treat a tin surface, you need to use a mixture of vinegar and water, mixed 1:1.
After this, it is necessary to treat the surface with a wire brush. To work with wood, you need to prepare sandpaper and get rid of unnecessary bumps and splinters.
Decoupage furniture using examples:
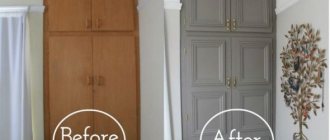
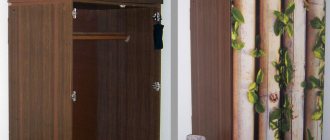
Closet
An illustrative example of how you can change a kitchen cabinet beyond recognition using the technology from this article. After whitewashing, you can also glue on a floral ornament and you will get a rustic Provence style.
Wardrobe before and after decoupage work
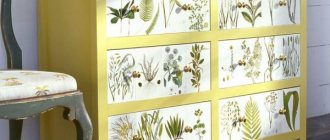
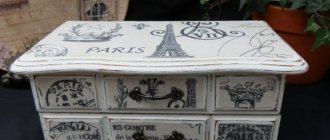
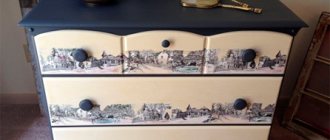
Dresser
This chest of drawers has served well in its original form, but over time it has developed pan marks and faded its original color.
Chest of drawers before decoupage
The owners of the chest of drawers painted it white and then decorated it with large red roses. Now the chest of drawers looks like new.
Nightstand
A telling example of bedside table decoupage. The varnish was already peeling off and the edges were frayed, and after painting, applying a print and craquelure varnish (with the effect of cracks), the bedside table began to look much more well-groomed and pleasant.
Nightstand before decoupage
Chair
A kitchen chair that people usually sit on every day and don’t even notice. If you decorate it with flowers and shade the paint, it will look noticeable and attractive.
Chair before and after decoupage
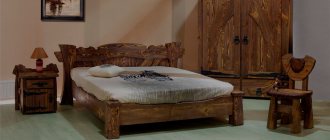
Bed
A bed is usually bought for a long time and after a certain period of use its design may become boring. Why not decorate it with decoupage roses and give this comfortable bed a second chance?
Bed after many years of service
Bed after remodeling
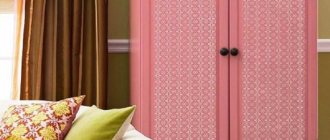
Door
Even doors can be decorated using decoupage. If the door is whitewashed, images of angels and flowers are glued on, and then varnished, you will get an interesting stylization of the 19th century.
What does the door look like before decoupage (already whitewashed)
What does the door look like after decoupage?
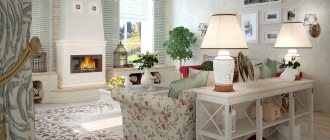
Exquisite decor in Provence style
Provence is one of the most popular techniques because it is associated not just with the village, but also with the sea, the sun, the smell of flowering plants, that is, with a wonderful holiday in the lap of nature. All this affected the aesthetics of Provence: sun-bleached colors, like in a photograph, many living and dried plants, naturalness, simplicity, uncomplicated lines. Decoupage of furniture elements in the Provence style must include one or more mandatory colors: white, cream, beige, pale lemon, terracotta, burnt orange, sunflower petal color, blue, pale green, sea wave and lavender.
Decorating an old coffee table
First you need to prepare the surface of the furniture for work. The plastic is degreased. The wooden table is disassembled and sanded with fine-grained sandpaper to remove the layer of paint and varnish.
The table is reassembled, all cracks and defects are puttied, and its entire area is primed.
After the primer has dried well, apply several layers of paint. For the effect of additional cracking, craquelure varnish is used. It is applied, then, until it dries, painted with white acrylic. After the acrylic has dried, we glue the motif (if we are not using craquelure) and cover it with colorless varnish. Can be varnished using spray varnish. This will make the application more even.
Each layer of paint must dry well so that the paint composition does not crack and stains do not form on the surface.
After the varnish has dried, you need to “pass” it with fine-grained sandpaper. This ensures stronger adhesion to the surface. Prepare napkins for gluing: cut out the desired image with nail scissors, soak in water for 15 minutes, place on a paper towel to remove excess moisture.
Decoupage occurs in one of three ways: hot (a motif cut from a napkin is glued and passed through with a hot iron without steam), dry (the motif is glued and the remaining glue is removed with a cotton swab), wet (the motif is soaked in diluted glue or varnish, applied to a multi-forum and carefully re-glue it onto the surface).
After gluing the image from the napkin, we bring it to its logical conclusion (finish drawing, add a shadow, tint, etc.) and leave it to dry.
Varnish in two layers. To obtain a smoother texture after varnishing, pour water into a container and smooth out the traces of brush lint with a wet finger while the varnish is still wet.
Simple City
Laconic and light, this style allows you to use newspaper clippings, geographical maps, and photographs in furniture design.
Note!
- Do-it-yourself wardrobe: a review of ways and methods on how to build a stylish and original wardrobe (video and 145 photos)
Do-it-yourself furniture restoration - removing chips and scratches, restoring surfaces. Instructions with photos and video tips
DIY ottoman: how to make it at home. The best ideas, master classes. Photo + video review of beautiful ottomans
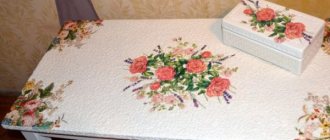
Restoring a table with colored wallpaper
We decorate the table in two monochrome colors, so it will easily fit into the modern style. For work, we will need a white primer, black and gray paint for exterior decoration, medium-grain sandpaper, brushes, a paint roller, wallpaper with 2 types of black and white patterns, dark-colored wax, and glue.
- We prepare the table: we wash it, repair defects, tighten the fittings (replace them if necessary).
Let the table dry and begin decorating.
Apply one layer of primer to the prepared surface, which will provide good adhesion and protect the paint from peeling.
Types of decoupage techniques
To decorate furniture with your own hands, images are attached to the facades in various ways.
- Standard furniture decoupage technique.
Pictures are cut out from napkins or images printed on paper. The resulting element is applied to the object, and glue is applied to it. After drying, this area is varnished with a colorless composition.
If necessary, we add the necessary details ourselves (the pictures take on a three-dimensional appearance) or “age” the resulting image.
- Reverse furniture decoupage technique. They are made to decorate glass and sometimes objects.
A picture cut out of a napkin is glued to the back side; after it has dried, the necessary elements of the image are drawn in for three-dimensionality.
- The artistic technique of decoupage is cutting and gluing.
Effect: a single image on a plane with shadows drawn and shading manually.
It is not expensive, does not require special skills, is quite fast and very beautiful!
- "Decopatch".
This is the use of various materials from which the necessary components are torn out by hand, for example, silky designer paper, material with the effect of plastic or glass surface, napkins.
In decoupage, this is a torn edge and a frank demonstration of the decoupage technique itself.
- Volumetric decoupage technique.
It is based on an imitation of a painting created on a decorated plane using images cut out of a napkin.
You don’t have to be an experienced craftsman to create such works with your own hands.
Advice from skilled craftswomen
- When decoupaging a kitchen table with your own hands for a kitchen in ethno, country or Provence style, it is recommended to select appropriate designs: wildflowers, butterflies, cats, dogs, vegetables, fruits, intricate patterns, compositions with rustic motifs.
Decoupage wall cabinets in country style
Kitchen table with butterflies
Dining area decorated with vegetable designs
- For a kitchen in a classic style, designs with luxurious paintings, bouquets of garden flowers, vines, and angels are more suitable. In addition to decoupage, you can use brushing, gilding, crackle and shabby techniques here.
Stunning stools after decoupage for a classic interior
The kitchen cabinet doors are decorated with images of angels.
You can also decoupage kitchen cabinets or a set in general in this way: cover the furniture with paper soaked in coffee. To do this, sprinkle sheets of paper with water, sprinkle instant coffee on them, rub lightly and let the paper dry. Voila! The result was very original and “tasty” furniture.
Applying instant coffee
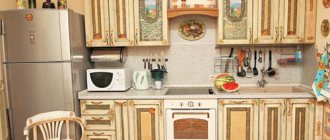
- As for decoupage in the design of a modern kitchen, newspapers, various inscriptions, bright magazine clippings, black and white photos depicting stylish objects or cities, geometric shapes, zebra and leopard colors will harmoniously fit here.
Modern decoupage
Fashionable decoupage set
Dining table decorated with magazine cutouts
Decorating the nightstand
Step 1. Prepare your chosen images, glue, varnish composition and brushes in advance.
Step 2. Prepare the surface.
Step 3. Paint with white acrylic.
Step 4. Take away the top layer of the napkin and glue the design in the right place. Remove excess glue.
Step 5. Add decorative elements if necessary.Step 6. After the glue has completely dried, coat it with clear varnish.
The technique of decorating objects is constantly being improved. Currently, designers are showing us new ideas and master classes in the decoupage technique. Once you try to change a piece of furniture, you will definitely want to do it again! Perhaps in the future this will become your favorite activity or hobby.Modern housewives are increasingly trying to throw away tired and boring furniture. However, do not rush to do this. Try to give a piece of furniture that zest that you are missing. And you will see that even old furniture can add mood and emphasize the new style of your interior.