Many people are in no hurry to part with old furniture and resort to do-it-yourself cabinet restoration. Let's talk about how to do this at home, without financial or physical costs.
Many people are in no hurry to part with old furniture and resort to do-it-yourself cabinet restoration.
Restoring an old cabinet is a painstaking task, but you can do it yourself. Many houses have old furniture, creating a nice and comfortable nest for families. This is why people came up with the idea of restoring old things so that they could take on a new look and bring joy for several more years.
Restoring furniture with your own hands is not only exciting.
Basic cabinet makeover tools can be found in every home. If for some reason you don’t have tools at home to work with old furniture, you can easily purchase them at the store.
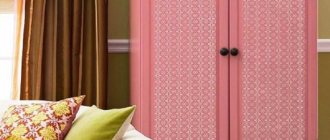
The decor of the cabinet can be fixed with patterns or pasted over with various fragments from old albums and books.
When starting work, inspect the location of your furniture, what colors and tones should be chosen.
Restoring an old cabinet is a painstaking task, but you can do it yourself.
The main advantage of restoration at home is that the bulky cabinet does not have to be taken outside its abode. The second plus is that you watch the whole process yourself and it’s easy to make any changes. About the third, as mentioned above, all tools are easily accessible.
Each master puts a piece of his soul into his products - this is not a metaphor.
When restoring a cabinet without the help of specialists, you estimate the cost of the work, which also has a positive effect on your budget.
This is why people came up with the idea of restoring old things so that they could take on a new look and bring joy for several more years.
In general, only creative people can cope with such work, since they need to choose the right tones, shapes, and more. But if you approach your work more responsibly, then, perhaps, even without much talent, you can transform your old wardrobe, which has remained necessary for many years.
Basic cabinet makeover tools can be found in every home.
Furniture restoration styles
- Art Deco
To decorate such decorations, interesting and very expensive materials are often used that will last for many years. A distinctive feature of this style are various geometric patterns. They use bright colors for the interior, which at the end of the work are diluted with lighter and softer tones.
- Decoupage
This style is mainly used only on wooden surfaces. It involves gluing cut-out figures and patterns, finishing them if necessary. A common and original way in this style is to use napkins with patterns and secure them with acrylic varnish in several layers.
- Covering with regular self-adhesive film
The name speaks for itself; various patterns are created using self-adhesive film. Stencils are often used. One of the easiest and most effective ways to restore old wooden surfaces.
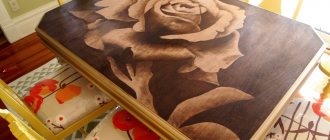
- Craquelure
This interesting method, on the contrary, emphasizes the antiquity of your furniture using a special craquelure that creates cracks on the surface. The main thing in this style is to create deeper and wider cracks; for this it is necessary to apply thicker layers.
When starting work, inspect the location of your furniture, what colors and tones should be chosen.
Let's talk in more detail about the last method.
Wooden cabinets dry out, causing cracks to form. Our job is not to hide, but, on the contrary, to give beauty and elegance to the cracks. There is a huge variety of varnishes now. It’s up to you to choose the color that suits your interior. Once you have chosen the desired color, you need to prepare for work.
The main advantage of restoration at home is that the bulky cabinet does not have to be taken outside its abode.
If you still doubt whether you made the right choice in the direction of this style, you can experiment on some small wooden things. Only the surface should be wooden and preferably antiqued, for a more convincing effect.
The second plus is that you watch the whole process yourself and it’s easy to make any changes.
Materials for decorating the surface of an old cabinet:
- acrylic paint;
- craquelure varnish;
- matte acrylic.
When restoring a cabinet without the help of specialists, you estimate the cost of the work, which also has a positive effect on your budget.
The main thing is to approach all the work creatively and then your closet will take on a newer and brighter life.
Tools for restoring the cabinet surface:
- brushes (different sizes);
- pieces of fabric without fine lint;
- container for diluting the product.
Only creative people can cope with such work, since they need to choose the right tones, shapes, and more.
To quickly dry the surface, you can use a hair dryer, but it also helps to increase cracks.
When purchasing materials, be sure to check their quality. The varnish should be quite liquid. When applying, do not shake the bottle under any circumstances, otherwise subsequent application will be of poor quality if there are bubbles.
They use bright colors, which at the end of the work are diluted with lighter and softer tones.
Do-it-yourself cabinet restoration consists of the following steps:
- replacing cabinet fittings;
- cleaning old cabinets;
- necessary repairs;
- decoration in craquelure style.
Wooden cabinets dry out, causing cracks to form.
You can check how dry the furniture is with your finger; if it sticks slightly but leaves no marks, the surface is ready.
Main stages of work
To restore an old chipboard or solid wood cabinet, it is important to do the work in stages. The master will have to take the following steps:
- Preliminary determination of the final furniture style. Here you need to look around, evaluate the color scheme of the room. Understand her general style. After all, as a result, the furniture should fit into the overall interior.
- Dismantling an old cabinet. It is necessary if the doors do not fit tightly or sag. In addition, you will have to disassemble the furniture in order to change the drawer pull-out mechanisms and check the fastenings of the shelves. If necessary, change them too. In general, disassembly means removing all moving parts.
- Minor repairs. At this stage, all elements of the cabinet need to be washed and cleaned of dirt, soot, and dust. It is important to take the old fittings and go with it to the store to purchase new ones. Be sure to stick to the style you choose for your new cabinet.
Tip: to ensure that the sliding mechanisms are purchased correctly, measure the depth of the drawers in advance.
As soon as the most difficult stages of repair are completed, you can begin decorating.
Step-by-step restoration instructions
We clean the surface of the cabinet from the old coating with sandpaper. Then we cover it with acrylic paint, the color should be such that it matches your interior, it will be the main one. If you want to preserve the color of the cabinet, then apply a clear coat of paint.
There is a huge variety of varnishes now.
The thicker the layer you apply to the surface of the old cabinet, the wider and brighter the cracks will be.
After complete drying, the next layer of coating is craquelure varnish. The thicker the layer you apply to the surface of the old cabinet, the wider and brighter the cracks will be. After applying the second layer, the surface must dry thoroughly. You can check how dry the furniture is with your finger; if it sticks slightly but leaves no marks, the surface is ready.
Once you have chosen the desired color, you need to prepare for work.
When applying the second coat of paint, you need to act very quickly and move the brush in one direction. A Soviet cabinet is covered with one layer. If you decide to create a Venetian layer of plaster, then you should apply the paint with pieces of cloth or a sponge.
Only the surface should be wooden and preferably antiqued, for a more convincing effect.
If you want to preserve the color of the cabinet, then apply a clear coat of paint.
After the paint has completely dried, a final layer of varnish is applied; it may already be matte. To quickly dry the surface, you can use a hair dryer, but it also helps to increase cracks.
When purchasing materials, be sure to check their quality.
The decor of the cabinet can be fixed with patterns or pasted over with various fragments from old albums and books. Only your imagination and interior will help here. The main thing is to approach all the work creatively and then your closet will take on a newer and brighter life. Don’t doubt your efforts, feel free to get to work and you will definitely be satisfied with the result!
The varnish should be quite liquid.
We clean the surface of the cabinet from the old coating with sandpaper.
Varieties of cabinet designs depending on purpose
Despite the apparent simplicity of the design, cabinets are presented in a variety of forms. The type, size and functionality of cabinets determines their intended use. From the point of view of restoration, floor cabinets are more complex than wall-mounted structures. Let's take a closer look at them.
Floor cabinets can be divided according to purpose into:
- wardrobes (wardrobe);
- book;
- kitchen utensil storage;
- secretaries (stationery cabinet for written work);
- sideboards.
It would not be amiss to mention built-in wardrobes, which are common both in old Khrushchev buildings and in modern apartments. These models are good because they save space. Restoration of a cabinet built into a special niche is usually carried out locally.
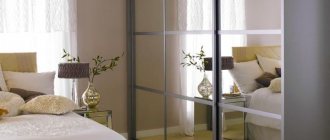
The design features of each type have developed historically and, with rare exceptions, may change slightly. It is common to see mirrored doors in wardrobes located in hallways and bedrooms. Wardrobes are equipped with doors of the leaf type or sliding on rollers (sliding wardrobes). Bookcases are usually made open. At the base of kitchen cabinets there are usually holders for cutlery.
DIY glass decor at home
In many homes you can find a cabinet with glass doors.
It is considered an excellent item for implementing design at home, since glass is a decorative element that can be easily processed. Today there are two popular ways of finishing it:
- liquid glass painting technique;
- decor without the use of paints.
In addition, craftsmen often use a combination of glass with metal, polymer clay, plasticine and other materials. In order to make the glass look unusual, you will need to prepare sea salt, unground coffee beans, glue, and acrylic paints. Coffee beans, as a rule, are glued either in a specific order or randomly. It is preferable to apply the composition to the bottom and top of the glass.
Cabinet doors will also look stylish if you decorate them with sea salt. To do this, coat the outer part of the glass with glue, and then apply salt and wait until it dries completely.
Glass is decorated in no less original ways using plasticine. Before you start designing, you will need to draw design templates and select its color. Then a picture is formed from different shades of plasticine. Such decoration will fit well into the interior of children's rooms; it will help to unusually complement the marine theme, where sea salt turns into drops of water, plasticine into fish and algae, and shells serve as the seabed.
As for the broken glass finish, it is considered a real masterpiece and will decorate the doors of any cabinet. Broken pieces of material are glued using special glue.
Before applying the patterns, you will need to prepare glue, broken glass and acrylic paints, and the order of applying the decorative elements is thought out in advance. First of all, cover the working surface with a thin layer of glue, fix the decorative pieces and wait until it dries completely. Then the resulting ornament can be painted with acrylic paints and varnished.
Updating chipboard cabinets
Furniture made from particle boards loses its attractiveness over time, no matter how carefully it is used. You can restore the beautiful appearance of products and add fresh colors to the interior by painting old chipboard cabinets
It should be taken into account that chipboard does not absorb paint well, since the furniture is covered with a moisture-repellent laminated layer.
In addition, if the condition of the cabinet fastening elements is unsatisfactory, it is recommended to replace the fittings and further strengthen them. How to paint an old chipboard cabinet:
- All removable elements are removed from the furniture so that an empty frame is left for painting.
- Using coarse sandpaper, remove the layer of old paint (if any) and varnish.
- The surfaces must be rubbed carefully so as not to damage the base. The cabinet is swept with a dry rag to remove dust.
- Corners, edges, joints and protruding elements are treated with fine-grained sandpaper.
- Water-based acrylic paint is a better option than painting chipboard. The color scheme is chosen according to your taste.
- Before painting, a chipboard cabinet must be primed so that the paint is less absorbed into the material.
- The primer is applied in a thin, even layer and the composition is allowed to dry - usually acrylic primers dry in no more than 12 hours.
- Apply several layers of paint with a roller or brush (preferably a brush), each time drying the coating before painting.
- When the furniture is painted to securely fix the coating, after complete drying, the chipboard cabinet is treated with varnish, and the product is assembled using new fittings.
When painting furniture, choose only high-quality tools that do not leave lint on the painted surface. The more layers of paint are applied, the richer the color of the decorative coating will be. You need to repaint with a brush in one direction - from top to bottom, apply the paint with a roller in a cross-shaped motion.
On video: detailed instructions for updating an old chipboard cabinet.
How to restore?
Any antique cabinet requires a little restoration, which will significantly improve its appearance.
You can restore the wardrobe yourself if you use the advice of experts:
- A metal brush is used to treat decayed wood, after which the dead tissue is removed.
- The fine dust formed in this case is washed off under running water.
- Sometimes there are holes from nails, some unevenness and cracks in the wooden elements of the cabinet. All this must be cleaned with a spatula. It is necessary to apply several thin layers of putty to match the wood. Each layer must dry before applying the next.
- Then dry all layers in fresh air for 1-2 days. Do not dry wood in the sun.
- Sometimes there are metal parts in furniture that have become covered with rust over time; such places should be treated with a special solution.
- The restored surface can then be painted or decorated at your discretion.
- A self-adhesive film that imitates wood, stone, or metal is perfect.
Useful tips
It’s a pity if you have to throw away old but high-quality furniture, especially wooden ones. But such products can be updated and used for more than one year
To choose the right decoration method, it is important to take into account the material and degree of wear of the old cabinet
Natural wood
Previously, wooden furniture was made of very high quality. Before updating, remove dust with a dry cloth. Then check the fasteners and if they are broken, they need to be repaired or replaced. It would be nice to treat the inside of the cabinet with an antibacterial agent; a more budget-friendly option is simple vinegar. It will destroy the unpleasant odor.
Then the choice of decoration method is made.
Toning. First, all surfaces are leveled using wood putty, matched to the color of the cabinet. After the layer has dried, uneven areas are sanded with sandpaper. Treated and even surfaces are treated with a special structuring tinting for wood. Choose a decorative tinting color darker than the original shade of the cabinet. This treatment will completely transform the appearance of the product.
Aging. Furniture made from natural wood can be “aged”. The antique-worn effect of the cabinet surface is achieved as follows: light wood tone is painted in any dark shade depending on the color palette of the room. Then, after the paint has completely dried, you need to rub several fragments with a candle, after which light paint is applied, for example, beige, white, cream. When the second painted layer is rubbed with sandpaper, abrasions will be visible through some light areas. which are darker. When decorating a dark cabinet, make craquelures. To do this, apply craquelure varnish to the surface. After it dries, small cracks form, which are highlighted using dry pigment or oil paint of the desired shade.
Painting. This option involves pre-painting with furniture paint of a light shade. After drying, the cabinet fronts are painted with acrylic paints. If you do not have drawing and painting skills, you can paint the cabinet using a stencil.
If the cabinet is in good condition, it will be possible to use the same decoration options that are used in the design of wooden products, excluding tinting. A cabinet in poor condition requires replacing the doors.
Dark polish. In our country, the iconic model of such a cabinet was extremely common. The decor of this product is very difficult to modernize, since the synthetic dark varnish, previously used for polishing furniture, is almost impossible to remove. In addition, other decorative materials do not stick to it. Here you need to make a strong-willed decision and replace all the doors if they are in poor condition. A well-preserved cabinet can be repurposed in one of two ways:
New fittings
An important stage in the reconstruction of old furniture is the replacement of fittings. First of all, you should pay attention to the condition of the hinges. They need to be replaced if they are rusty or damaged. The location of the hinges is changed if pieces of material are torn out at the places where they are attached. The resulting holes are sealed using putty or sawdust mixed with PVA glue.
It is also necessary to check the condition of the guides in the cabinets. If necessary, they can be replaced with higher quality fittings. The extension system can be roller or ball. The second type of guides is considered more reliable. They ensure silent drawer opening.
The last stage is replacing the handles. They should be chosen taking into account the design of the furniture. Handles can be completely metal or combined - with ceramic or glass elements. For antique furniture, bronze fittings are suitable.
Decor
Furniture is painted in one or more colors. Another decor option is patterns. They are applied using a stencil or masking tape. An interesting effect is created using lace. It is fixed on the surface of the furniture and then covered with spray paint.
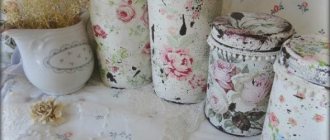
Many different materials are used to decorate old furniture. You can decorate the closet using self-adhesive film, decoupage cards, fabric, and decorative plaster. Wallpaper is also used to update furniture.
Pasting with film takes the least time. Another advantage of this method of decoration is a large assortment of designs. The film can imitate the texture of wood or be produced in the form of panels. Experts recommend buying material with a protective layer, as it will last longer. The film is not only glued to the cabinet body - it is often used to decorate the interior space and drawers.
Master class on cabinet restoration using self-adhesive film:
- Remove all dirt and loose elements.
- Degrease the cabinet surface with white spirit.
- Cut the film with a margin of 2 cm.
- Carefully glue the sheets to the surface of the furniture, moving from top to bottom. The backing paper should be pulled slowly with tension to avoid wrinkles.
- The bubbles resulting from the gluing process must be pierced with a needle and then straightened out.
Decorative plaster
There are a lot of decorative materials on sale that can be used in furniture reconstruction. Interesting results are obtained when using different types of plaster. There are compositions for creating a craquelure effect, simulating marble stains or wet silk.
Features of working with decorative plaster:
- It is recommended to apply the composition to already restored furniture.
- To imitate the texture of stone or fabric, the cabinet should be painted in a shade close to the color of the decorative plaster.
- The craquelure effect is created by contrasting coloring.
- To apply decorative plaster, use a brush, spatula or trowel.
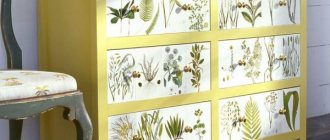
Decoupage cabinet
You can also restore an old cabinet with your own hands using decoupage. The easiest way to decorate already repainted furniture in this way.
For decoration you will need:
- decoupage napkins or cards;
- scissors;
- PVA glue;
- acrylic paint to match the cabinet finish;
- varnish;
- brushes and sponge.
Work order:
- Cut out the elements necessary for decoration.
- Apply glue to the surface of the cabinet.
- Separate the top layer from the decorative elements. Glue them to the cabinet and straighten them with a damp sponge.
- Apply glue over the decor. Let the PVA dry.
- Apply a small amount of paint along the contour of the decor using a sponge.
- Cover the dried surface with varnish.