The bed is the main place of rest and relaxation in any home. And, of course, it should be not only comfortable, but also beautiful.
Like any other furniture in the apartment, the design of the bed can become very outdated over time. But if the bed itself is still capable of performing its main function well, in this case it is not necessary to throw it away and buy a new one.
To radically change the design of such a piece of furniture, you just need to change the headboard. You can also repair a bed in this way with your own hands.
Minimalism
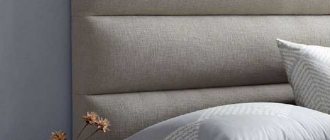
A minimalist headboard can also make a bed design look very attractive. A lattice of horizontal slats installed behind the bed, among other things, is a very fashionable element in 2021. Assembling such a headboard with your own hands, of course, will not be difficult.
We offer an interesting alternative: learning to raise a child without the word “no”
Twitter CEO's first tweet sold for $2.9 million
Scientists have determined the date of emergence of the coronavirus COVID-19 in Wuhan
How can you improve the look of a double bed?
You can update the appearance of a double bed in several ways:
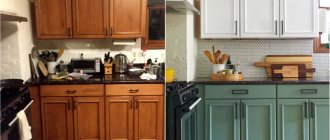
- Plaster and paint . You can radically transform a double bed in a simple way: level the surface with plaster and paint it in the desired shade. The restoration method is suitable for any straight model.
- Renew the varnish layer . The bed is disassembled, the parts are sanded, and varnished in several layers. When the product is dry, it is polished.
- Gilding is applied . Gilding is used to update the shabby surface. It will turn an ordinary bed into a luxurious bed and disguise minor flaws. You can cover the entire bed with gold or paint only individual parts.
- Upholster with leather . If surface damage cannot be masked with varnish or paint, the use of eco-leather will help out. It can be used to cover the back and side panels. Before covering, a sheet of foam rubber must be laid to soften it. The legs are painted the same color as the upholstery material.
- Artificially age the surface . The bed is covered with craquelure varnish or stain, then sanded. This processing method allows you to hide furniture defects and transform a shabby look into a vintage one.
The video shows one of the options for restoring an old double bed:
Below you will find useful tips and tricks for assembling, restoring and repairing a bed:
- How to assemble a single, double, wooden and children's bed, install a gas lift mechanism or seal an inflatable one?
- Is it possible to build a bed into a wall or closet, or combine two single beds into one large one?
- How to increase the size of the bed or eliminate squeaking?
Lattice wall
The lattice headboard of the bed can be not only horizontal, but vertical. To make it you will need boards, planks and stain. A lattice headboard made of slats, if it is vertical, can have a significant height and be a separate independent element of the bedroom design. You can build an entire wall behind the bed with your own hands.
Cycling shorts and an oversized jacket: trendy minimalist looks for this spring
Repentance and health care: what rules are necessary during fasting
A case of mother-to-infant transmission of coronavirus has been recorded in Japan.
Preparatory work
To cover the headboard, 4–5 m of fabric are prepared as standard, and the panel is decorated with 5–8 large buttons.
They are rarely placed in their natural form; more often they are covered with plain or contrasting fabric. Tools:
- stapler, tape measure (from 3 m), ruler, chalk;
- carpenter's square, stationery knife, scissors, pliers, nail puller;
- screwdriver, flat and Phillips screwdrivers, chisels;
- glue gun in tubes, brush, clamps, wood saw;
- sewing machine, basting pins, needles, seam ripper.
Materials: staples for a stapler No. 8, paper or thin cardboard for a pattern, glue, threads No. 30 - 20. Finishing is done with upholstery fabric, you need a felt pad, padding polyester or foam rubber.
The old covering is removed from the back and mattress. If it is not going to be used, it can be cut. Decorative nails are carefully removed with a nail puller so as not to break the head (if they are needed). Get rid of old foam rubber and padding polyester, remove the cotton or canvas padding on the mattress.
The procedure for releasing the base when reupholstering the headboard and removing layers when repairing and changing fabric on a spring mattress:
- The old fabric is laid out on an ironing board, and folds, creases and elongated areas are smoothed out using an iron.
- The parts are transferred to cardboard, a pattern is made from the ironed part, outlining the contours with a pencil, you can take old wallpaper, glue newspapers together so that the element fits entirely.
- The new material is laid out on a flat surface in two folds, facing inward, in order to simultaneously cut out parts for two parts of the headboard.
- The contours are drawn with sharpened chalk, making small allowances (0.7 - 1.0 cm), and cut out with scissors.
If the trim pieces do not fit on the fabric, first sew the pieces together and smooth out the seam. Then they lay out a cardboard pattern and outline the outline. A machine is used for stitching.
The connecting seams are placed symmetrically relative to the center of the entire backrest or identical parts are made for two parts of the headboard. Usually they are sewn together with a stitch seam, then along the face they are re-stitched along the edge by 0.1 - 0.2 mm.
Contrasting headboard
Usually the color of the headboard is matched to the color of the walls. But if you wish, you can also play on contrasts. A dark headboard against a white wall will look very stylish. This headboard can be assembled from any material.
It can be plywood, chipboard or wood. All you need to do is cover the headboard frame with dark, dense, high-quality fabric that will not get dirty. In addition to such a headboard, you can sew, for example, a cushion for a bedside chair from the same fabric.
Repair
As mentioned above, beds with nets are not used as often as they used to be. If you do not take into account hospitals, boarding schools and sanatoriums, then they can be seen mainly in dachas or country houses. They are often used as a safety net in case many guests come.
Due to the fact that the structures are usually many years old, sometimes it becomes uncomfortable to sleep on them. This is due to the fact that the mesh stretches during use. How to tighten them up?
First you need to find two cylindrical springs. They can be removed from some old sofa. You will also need two strong boards that will act as a support or base.
The workflow consists of several stages:
- The springs need to be attached to the boards where the longitudinal parts of the frame that holds the shell will be located.
- The resulting structure is placed directly under the shell. The distance between it and the boards directly depends on how much the bed is stretched.
- It is necessary to stretch some dense material between the shell and the boards. This could be, for example, a tarpaulin. Then tighten the entire structure with twine.
The simplest headboard
For those who don’t want to spend a lot of time replacing the headboard with their own hands, you can choose the simplest option. In this case, you will only need to process two or three wide boards, cover them with stain and fix them on the wall behind the bed. Such a headboard will cost pennies. Moreover, when you get tired of it, it will be extremely easy to replace it with any other one.
A Kremlin representative told how the Victory Parade will take place in 2021
In Russia the ending was changed: what do viewers think about the series “Heaven Can Wait”
He smiled from morning to evening: what Boris Grachevsky was like. He would be 72 now
Restoration of an iron bed
Metal beds are popular due to their high strength, reliability and durability. Fungus and insects will never grow in the frame.
The main problem with such products is the stretching of the armor mesh. Sometimes play appears at the junction of the corners and backs. Over time, rust and scuffs form.
Restoration of a metal structure should be carried out in the following sequence:
Disassemble the bed. Remove the spring block from the grooves by slightly lifting it. If the connection is tight, use a hammer, lightly tapping the frame from below.
Clean the metal from corrosion, dirt and old paint . A high-quality wash is best for the mesh; you can also use a sandblaster. The corner can be sanded with sandpaper or a belt machine.
Immediately after cleaning, treat the iron with a primer to protect it from rust. Pull the mesh. Depending on the design, the tension springs are rearranged or the elements forming the shell are bent.
Paint the iron base. The color does not matter, the main thing is that the composition is resistant to moisture and abrasion. Acrylic and latex paints are well suited for such purposes.
In some beds, the headboards are made of varnished and veneered chipboard. These products do not have the most presentable appearance, and it does not get better over time.
- Remove the mounting stops from the backrests, clean and paint.
- Remove any remaining varnish from the chipboard surface . The wash will not take such material, but a belt sander can easily handle it.
- After rough processing, polish the panels with fine sandpaper . Coat them first with an antiseptic and then with a primer.
- If there are large cracks, scratches, holes and dents, fill them with putty . After it dries, polish and prime again.
Chipboard can be painted with the paint you like. You can also cover the shields with self-adhesive film.
How to reupholster the base of a bed with your own hands: master class + tricks and tips
If the base of your bed is upholstered in fabric, and the fabric is no longer as fresh as you would like, here is a master class on how to make new upholstery.
This method is suitable if the upholstery of the bed base is worn out, dirty, or you just want to change it. For example, in our case, for a small bedroom, we wanted the furniture in it to be light. Therefore, it was decided to change the dark fabric upholstery to a new, light pink color.
All work was completed in 1 day. Here the reupholstery took a little longer than it might have, as the original dark upholstery could show through the new light pink fabric, and the base was first reupholstered with an additional layer of white fabric. If your fabric for upholstery is thick enough, you can skip the “lining” step.
How to sew a sofa cover: 3 master classes
You will need:
- if necessary - fabric for an additional “lining” layer;
- tools to disassemble and then assemble the bed base;
- furniture stapler and staples;
- if necessary - small nails and a hammer.
Bed valance skirt: master class
Step 1
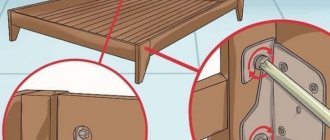
Disassemble the bed, remove the legs and other parts that will interfere with the upholstery. To avoid confusion later during assembly, you can mark the right/left parts and write down on a piece of paper at what distance from the edges of the parts the fastening points are located (holes for screws, etc.).
Step 2
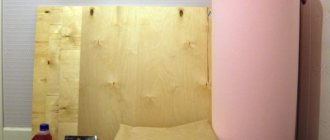
First - the headboard, the “lining” layer. Take a piece of fabric sufficient to wrap the part with a large margin (minimum 20-30 cm, the excess can then be trimmed). Wrap the headboard with fabric, inside out. At the corners, secure the folds with pins. Then remove the fabric, stitch the corners and trim off the excess.
Turn the part for the headboard upholstery right side out and place it on the headboard. Wrap the edges of the fabric, pull them quite tightly and secure with a stapler. You can start from the middle of each side, gradually moving to the edges. Ideally, two people work: one stretches and holds the fabric, the second secures the fabric with a stapler.
Step 3
Now - the outer layer of fabric. Here the excess fabric is simply neatly folded into folds, and the folds are secured with a stapler. You can do the same as in the step above, sewing up the corners and cutting off the excess.
Step 4
When finished, return the headboard fastening elements to their place.
If you use two layers of fabric, as in our case, you can, after the first layer is ready, find, by checking the notes, places for fastenings, and mark them by screwing in and out the screws. It will be easier to find these holes later.
Step 5
Tighten the side and end parts according to the same principle. The corners on these bed parts can simply be cut off (see top photo). In places that are difficult to reach/inconvenient to work with a stapler, you can use small nails and a hammer.
With benefit
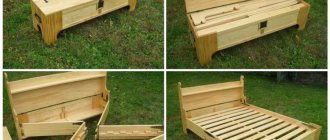
If you decide to opt for wood, consider making the headboard not only beautiful, but also functional. That is, design it with storage spaces.
This way you will have a place where you can put a book, glasses, phone, or additionally decorate the headboard with fresh flowers.
During use, wooden beds are subject to various deformations. But how quickly they arise, and what scale they will be, depends on the type and quality of the wood. Some products serve flawlessly for decades, while others already show serious flaws after 3-5 years of operation. To understand how much work you have to do, we suggest you familiarize yourself with the most common defects of wooden beds.
- Dents, chips, scratches on the surface of the product. Frequent companions of softwood: pine, spruce, alder, linden, aspen. They appear after 2-3 years of service and do not affect the strength of the structure, but because of them the bed loses its former attractiveness and aesthetics.
- Drying of wood: cracks, gaps, deformations. Quite serious defects that require immediate elimination, since they affect the integrity of the entire structure. There are several reasons for this: the use of unseasoned wood by the manufacturer, the lack of a stable microclimate in the room, and the long service life of the wood.
- Creaks and broken bases. They arise due to improper use (excessive loads, active games of children), installation of weak fastenings, and expiration of the permissible service life. They have little effect on the overall condition of the structure, but cause significant discomfort to the owners. An orthopedic base with defects needs to be repaired, since cracked lamellas no longer perform the function of supporting the spine.
- Frame damage. The most serious of the defects listed here. Failure to repair them in a timely manner can lead to bending and breakdown of the entire structure. It is almost impossible to restore a broken frame, and if you undertake repairs, you should be prepared for significant expenses.
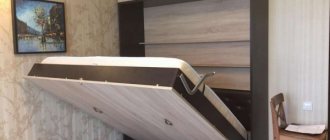
- Malfunctions of functional mechanisms. Sometimes they occur on beds equipped with a lifting mechanism or a storage system in the form of drawers. They affect the quality of operation of the stock and require urgent repairs.
Article on the topic: DIY furniture for dolls shoe stand
We have finished our review of common defects in wooden beds, and we propose to move on to ways to eliminate them. When is partial or complete restoration of a product necessary?
Elimination of defects in wooden bedroom furniture, depending on the root cause, can be partial or complete. Thus, single scratches and dents can be treated locally, while multiple scratches require updating the entire surface. There are several ways to do this.
- Covering minor flaws with polishing or special markers.
Minor damage to furniture can be repaired using tinting agents. For example, for a varnish surface, car markers are used to match the color, and for a matte surface, wax is used. It is rubbed into the damage, softened with a stream of warm air (hairdryer), and then polished. - Removing dents and chips using putty and repainting the surface.
Deep dents and scratches cannot be polished. You can smooth them out by applying wood putty, after which you can paint the entire product. - Renewing color using impregnating oils, stains, and re-varnishing.
Natural impregnating oils restore the tarnished color of wood, protect it from unfavorable external factors (excessive dryness or humidity), but they can only be used on solid wood. If the bed is made from cut wood, it can be treated with stain. This impregnation protects the wood from fungus, masks cosmetic defects, and gives it a spectacular, translucent coating of a dark shade. You can also hide visible scratches by re-varnishing the surface of the bed. However, the wood must first undergo a sanding procedure.
Regarding the drying out of wood and the resulting malfunctions, the following repair methods are used:
If the damage is inside the structure, it must be opened. To get to the defects you will need special keys and screwdrivers (hexagons, sockets, etc.). Disassembling the bed will allow you to assess the extent of the damage, make sure that it is not the mattress that is creaking, and strengthen the deformed parts. If the frame cannot be repaired, it can be rebuilt from fresh wood, enlarged, or converted into a podium, as desired.
Article on the topic: Decorating the ceiling with your own hands, furniture in Moscow
Malfunctions of the functional mechanisms of the bed require deeper specialization; they cannot always be repaired at home. So, in some situations, it is enough to lubricate the mechanism for normal functioning, while in others, it requires complete disassembly and replacement of parts. It’s up to you to decide what to do: call a specialist or carry out repairs yourself, but in any case, we recommend that you first study the features of the mechanism and then start repairing it.