How to remake Soviet furniture
Remaking old Soviet furniture with your own hands, which before and after has fundamental external differences, includes several stages:
- replacement of accessories;
- cleaning, removal of plaque, soot and dirt;
- repairs to eliminate cracks, abrasions and chips;
- decoration.
Using all your imagination, you will decide for yourself how best to use certain parts of the sets, what new purpose the table, chair, chest of drawers, etc. will have.
Padding
Reupholstery is used for old chairs, sofas and armchairs as an addition to frame restoration. For it you need to choose a fabric for the new upholstery. It can be velor, crepe, barakan, natural or artificial leather or any other material, depending on style and preferences. Also for work you will need a construction stapler, staples for it and a piece of foam rubber if the old one has become unusable.
It's no secret that over time, the upholstery of upholstered furniture loses its original appearance.
After removing the old upholstery and damaged foam, you need to attach a new one using small nails. With its help you can give the furniture the desired volume. Afterwards, the upholstery material is attached using a stapler.
Reupholstering furniture is a fun activity that does not present any particular difficulties.
Aging
This is a fairly popular method of giving old furniture nobility and elegance. The following materials can be used for aging:
- Antique wax. Suitable for wooden surfaces that have been previously cleaned, degreased and stained. After it dries (after about seven hours), wax is rubbed in, on top of which a pattern can be applied. Finally, the surface is opened with varnish.
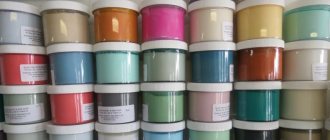
- Acrylic paint. Can be used for furniture made of any material. The required effect is achieved by combining two paints of similar shades, several layers of which are applied sequentially.
To obtain various types of aging, you can use acrylic paint, bitumen varnish, various waxes, and dry pigments.
The paint is applied with a sponge. After finishing painting, you can go over it with sandpaper.
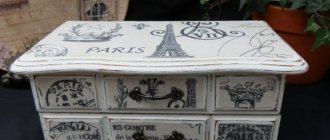
Do-it-yourself furniture restoration in Provence style involves artificial aging of surfaces.
Film
Using self-adhesive film you can decorate a wide variety of objects and surfaces. It is durable and resistant to mechanical stress, moisture and temperature changes. Before gluing, the surface is cleaned and degreased. After gluing, the film is leveled with a spatula to eliminate all bubbles.
For pasting furniture, films with a polymer-based outer layer are most often used.
Painting
This extremely popular method should only be used on furniture made from cheap wood, otherwise its value will be lost. Before painting, you need to prepare the surface:
- soften the old paint layer with a solvent;
- remove the swollen paint with a spatula;
- sand the surface with sandpaper;
- apply a layer of primer;
- After the primer has dried, carry out additional sanding.
You can update your closet, chairs, shelves, racks or kitchen facades with your own hands - just repaint them.
Next, the oil paint must be applied with light movements to create a thin layer. You should move along the wood fibers. After complete drying (after about 12 hours), the surface is sanded, cleaned of dust and covered with a second layer of paint.
Having decided to paint furniture, you should take care of selecting new fittings that will match the style of the updated product.
Remaking the book table
To update the appearance of a book-table, you can use the following methods:
- Pasting with film. You can choose any color to match your new interior. Glue should be on a dry surface, cutting with a margin. After gluing, the corners are closed using a sponge pointed at the hair dryer.
- Painting. The surface, cleared of the old coating layer, is painted using acrylic paints. If there are cracks or other damage, they are eliminated in advance using putty.
- Decoration with lace. The design is applied using curtains or tulle. The material is fixed to the freshly painted surface, after which a second coat of paint of a different color is applied over it.
- Decoupage. Can be performed either on a just primed or on a freshly painted table. It is made using a paper napkin or special paper, and at the end the surface is covered with varnish.
- Replacing with laminate. Old countertops are replaced with laminated ones.
Before you remake old furniture with your own hands, you should decide on the desired style solution. Based on this, the optimal material is selected that will give the furniture a second life.
By restoring interior items, you can save a significant amount of money than by purchasing new furniture.
Simple tips for quick furniture restoration
It is not necessary to spend a lot of time and money to give old furniture a new attractive look. So, there are quick and simple methods for updating interior items:
- Cover with clear or white varnish. Light wood can simply be sanded and then coated with a new layer of furniture varnish. For dark wood, you can use the “dry brush” technique - the surface is also sanded, and then white varnish or paint is applied on top, as a result of which the dark base appears through the finish coat.
- Just paint it. If the purpose of restoration is to change the appearance of the furniture, it is enough to repaint it. To do this, you need to remove dirt from all surfaces, sand with medium-hard sandpaper, and then apply a wood primer and paint one or two layers. If the furniture is not damaged, the result will be excellent.
- Draw an ornament. Scratches, chips and roughness on some furniture can be disguised by painting it with various ornaments. You can depict both abstract patterns and full-fledged scenes - it depends on your artistic skills. If you don’t know how to draw at all, it’s easy to find various stencils on the Internet and simply transfer them to furniture. The drawings are made with acrylic paints and secured with colorless varnish.
- Decorate with decoupage. The decoupage technique involves transferring various patterns onto furniture from old newspapers, already worn but beautiful geographical maps, from magazines, and also using special decoupage napkins. Furniture decorated with decoupage looks especially good in Provence style interiors.
The decoupage technique is very often used when remodeling furniture.
Self-restoration of furniture allows you to update your favorite interior items as you wish. This solution is suitable for those who are not ready to spend money on purchasing new furniture, or want to keep things dear to their hearts.
As practice shows, the issues of restoring pieces of furniture are quite solvable even in an apartment, and the process of work can be mastered by every person who knows how to hold the simplest carpentry tool in their hands. Simple work takes one or two days, but if it is carried out according to all the rules - the master is in no hurry, carefully follows all the instructions, then the result will be excellent, and old unsightly furniture, given a new life, will delight the eye for many years to come.
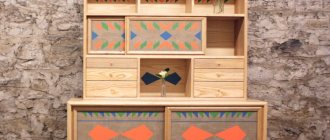
Artistic painting
With the help of drawings applied to the furniture by hand, it becomes exclusive. It is important that the resulting work fits into the interior, becoming part of the whole composition. It is easiest to paint wooden or natural veneer products, as well as MDF facades coated with acrylic.
The photo shows a refurbishment of an old but sturdy cabinet. Hand-painted furniture fits perfectly into the rustic style.
Artistic painting is a painstaking work, as it involves drawing small details. The basis for painting is a primer. It is important not to neglect surface preparation - even the most talented painting can be spoiled by a defect or crack in the base. Acrylic paints are best suited for work, and matte or glossy varnish applied in several layers to protect the finished drawing.
It is not necessary to paint a chest of drawers or a closet on all sides: individual accents on the facades look more aesthetically pleasing.
How to repurpose old polished furniture
Polished fine wood furniture made in the early or mid-century of the previous century can have a truly regal appearance. These are expensive and unique interior items. However, over decades of existence, they could wear out and lose their former shine. To return them to their previous state, you should perform some actions, depending on the nature of the damage:
- Painting. Old polished furniture can be painted, but it is better to do this with furniture made from inexpensive types of wood (pine, spruce). Otherwise, this piece of furniture may significantly lose in price, since expensive types of wood (for example, oak) are much less valuable when painted. It is best to use oil paint. Next, the paint should dry for 12 hours, after which the surface should be sanded with sandpaper.
- Varnishing. Furniture made from valuable wood species is best restored through varnishing. In this case, it is best to use standard oil varnishes. With their help, a thin but moisture-resistant layer is formed on the surface of the furniture, which protects against damage. Also, as a result of this process, the interior item will acquire a beautiful shine, which will only emphasize the appearance of this product. Modern manufacturers offer a special type of varnish called craquelure. It is used for external noble aging of the surface of furniture, giving it decorative cracks and abrasions. However, after these manipulations, such a piece of furniture will only fit into a classic interior.
However, it is best to start painting and varnishing only after you have brought the appearance and design of the product to proper condition. To do this, you need to, if possible, change the fittings to better ones, and also get rid of damage, cracks and blisters on the surface.
To do this, we carry out the following manipulations:
- If there are small stains on the furniture that you would like to get rid of, it is better to use a banana peel. Just rub it on the indicated areas. Quite ridiculous, but effective.
- To get rid of more serious stains, you will need something stronger than a banana. To do this, you will need detergent, a marker that matches the color of the furniture (you can buy this at many furniture stores), alcohol and wax. First, wash the product with a soft cloth and detergent. Next, degrease the surface of the furniture using alcohol applied to a swab. Scratches and cracks should be sketched out with an appropriate marker, and then the surface should be rubbed with wax to add shine.
- Sandpaper is not very useful for removing very small irregularities. In this case, it is best to use a manicure file.
- The swollen areas seem impossible to remove. However, you can try mixing salt and olive oil. Salt will remove excess water, and oil will restore elasticity to the tree.
Black cabinet with engraving
The story of how this bedside table was remade is a complicated one: the owner found it in a landfill and several times wanted to take it back for “disobedience.” It took 10 coats of remover to remove all the varnish from the veneer! This took several days.
After applying protective oil, flaws were revealed, and the craftswoman partially painted them over. The owner was not satisfied with the result, so the cabinet was completely painted black. Only the legs remained intact.
Using a pencil, we drew a design on the door and drilled it out with a small drill with an engraver attachment. The result exceeded all expectations!
In order not to waste time on removing the varnish, you should sand the surface to a rough state, apply an acrylic primer and paint it with moisture-resistant paint in 2 layers. In this example, "Tikkurila Euro Power 7" was used. The top of the bedside table is covered with acrylic varnish.
Self-adhesive film
This method of restoring a kitchen set has become truly popular, and all thanks to its many advantages:
vinyl film is inexpensive, so updating facades will not break your pocket; The range of self-adhesive films is huge, you can find options with imitation wood of any species, stone or leather
There are films depicting landscapes, with interesting designs, etc., with a smooth and embossed surface; Almost everyone can handle installing the film - just be careful during the measurement process and directly during gluing; vinyl film is not afraid of temperature changes and moisture, which is very important for the kitchen. It will be easy to care for such a surface; if any part is damaged, or you again want to change the situation, the film can be easily removed.
The downside is the low durability of the film, only 3-4 years, but the low cost and ease of replacement smooth out this drawback.
The procedure for gluing kitchen facades is quite simple. The main thing is to follow the following recommendations:
- choose a film of a suitable color, taking into account your preferences for the new kitchen interior. It is not necessary to take a material with imitation wood - you can take a plain, light-colored film, and then you will be able to make a small kitchen larger and make your dreams of creating a minimalist interior come true;
- It is best to remove the kitchen facades - this will make the work easier. The fittings must be dismantled in any case;
- measure the parameters of each removed facade;
- the film must be glued to a clean, dry surface, i.e. facades must be thoroughly cleaned of stains of grease and dirt. This can be done with a soap solution or using dishwashing detergent. After this, you need to remove the remaining detergents and wipe the facades dry;
- If the facades are seriously damaged, you will have to spend some time on repairs. The peeling edges at the ends must be glued. The holes must be sanded, then filled with acrylic putty, sanded again and primed. If there are large potholes, then it is better to glue a patch of plywood or veneer in their place;
- In accordance with the measurements taken, the film must be cut. Experienced craftsmen recommend adding 4-5 cm of allowance in places where the film will bend. If there is a large design on the film, then when cutting it is necessary to control that it is positioned correctly. It is better to cut with a stationery knife - this way the edge will be as smooth and neat as possible;
- Take the first piece of film, start removing the protective layer of paper and apply the film with the adhesive side to the facade. Controlling the evenness, gradually peel off the protective layer and stick the film;
- You can roll the film with a rubber roller or a plastic scraper. This removes any remaining air. It is necessary to smooth out from the center to the edges. If there are any air bubbles left, you can pierce them with a needle and roll the surface again with a roller;
- If suddenly you notice that somewhere the film is glued crookedly, then within 5-6 hours the situation can be corrected. The film can be re-glued, but not more than 1-2 times, since then the glue will simply lose its properties;
- when all the facades are pasted over, you can screw them back on;
- You can use old fittings, or you can replace them with new ones, which fit better into the updated style.
If the shelves are dirty to such an extent that no detergent can remove them, then they can also be covered with film. The operating principle is still the same. The film can be chosen to be close to the original color of the shelves.
How to decorate old furniture: veneer and wallpaper for furniture or decoupage?
Another interesting way to update old furniture is to cover its surface with the selected type of material. You can use popular self-adhesive films - with a pattern or imitating wood, wallpaper, and even fabrics or thick paper used in the decoration technique - scrapbooking. Decoupage is also an effective method, thanks to which the furniture will acquire a rustic character.
If you choose self-adhesive film, then most of the work and attention should be paid to accurately adjusting its size to the selected surface. You can use it to overlap furniture, leaving extra thicker strips on the sides and folding the excess underneath, or trimming the film just to the edge. The second important issue is the removal of air bubbles that appear under the film. Always start gluing from the top, gradually and slowly peeling away the layer of paper protecting the adhesive. How much does this type of furniture repair cost? Film prices start at 180 rubles per square meter.
You can also cover old furniture – in whole or in part, decoratively – with wallpaper. It is best to roughen the selected surface, as before painting. Then apply wallpaper glue to it (we can buy it for about 250 rubles for 200 g) and carefully glue it, smoothing out air bubbles and unevenness. You can choose any type of wallpaper, and the cheapest paper ones should be additionally secured with a layer of varnish. This way you can decorate small surfaces, for example, with thick paper with interesting patterns.
When restoring old furniture, you can also use one of the decorative arts - decoupage. You can combine this technique with a previous painting or use it to decorate furniture whose color suits you and the surface is in good condition. You will need decoupage glue (about 300 rubles for 250 g), special rice paper decors (about 100-150 rubles) or napkins with a beautiful pattern and colorless wood varnish. The composition of the decorations must be glued to the selected parts of the piece of furniture, and then carefully secured with varnish.
Decoupage of kitchen facades
Decoupage is a great way to update your kitchen set and give it a touch of Provence style. After the transformation, the facades will look as if talented artists painted them for you, but you will know that you made all this beauty with your own hands. You can put absolutely any design on cabinets and shelves, but usually they choose something related to plant and kitchen themes: images of fruits and vegetables, coffee, jars of spices and cereals, flowers, etc. Decoupage will help decorate facades with ornaments in the style of Gzhel or Petrikov painting. The main thing is to find a suitable drawing - no one limits your imagination.
Everyone can cope with the restoration of facades on their own:
- remove all doors, remove fittings;
- If the surface of the headset is perfectly flat and smooth, then you only need to wash it well to get rid of stains of grease and dirt. If there are defects, it is better to sand the surface. First use fine-grained sandpaper, and then coarse-grained sandpaper. If you have a sanding machine at your disposal, it will greatly simplify the process. If there are cracks, depressions, or pits, it is better to fill them with putty. When it dries, the treated areas are sanded again. After this, the facades can be primed, but many skip this stage;
- The decoupage technique is suitable not only for wood, chipboard and MDF - it can also be used to decorate plastic and glass facades. Preparing them for decoration is very simple - just get rid of all the dirt and grease;
- The easiest way is to use three-layer napkins for decoupage. Think in advance about which part of the façade the drawing will be located. Don't use images that are too small. Different cabinets can be decorated with pictures in the same style. The image can be glued to regular PVA glue;
- Now all that remains is to open the facade with acrylic varnish, it is better to use 3-4 layers, each applied after the previous one has completely dried. The easiest way to work is with a narrow brush with long bristles;
- All that remains is to return the fittings and install the facades.
If this is not your first work using the decoupage technique, then you can use not only special napkins. Experienced craftsmen know that fragments of wallpaper with a suitable pattern, and even maple for a kitchen table, will do, not to mention that the image you like can be printed on a printer.
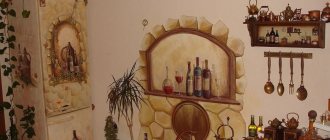
Planning an interior design in an antique style
Before you start work, you should carefully consider the design of the future room. You need to make a list of all the Soviet period items that are available.
It is welcome to draw up a drawing of each room, where you can draw a diagram of the arrangement of objects. This approach will allow you to:
- Make a list of required materials.
- Get an accurate idea of what the result will be.
- Purchase the necessary funds in sufficient quantities.
Pre-planning allows you to speed up the work process. You can purchase everything you need in advance to get started. Don't be afraid to show your imagination. Vintage items will allow you to enjoy creativity.
Using Soviet furniture you can decorate a room in a retro style
The result will give you pleasure. Your apartment will turn into a cozy nest, designed for a comfortable stay.
Methods for restoring old furniture
Almost every home has old furniture. It has not lost its functional qualities and can serve for many years. But its appearance does not fit into the modern interior.
Upgrade methods can be extremely simple and require virtually no costs, or more expensive. But the price of a can of paint or a piece of fabric is not the price of new furniture.
Here is an interesting article about what furniture is made of. But first, let's look at the 7 easiest and most budget-friendly ways to update old furniture.
We change handles and fittings
This method is suitable for chests of drawers and bedside tables. In a furniture fittings store you can buy new handles made from the most interesting materials - glass or metal. Changing the handles will transform the chest of drawers and add a bright accent to the interior space.
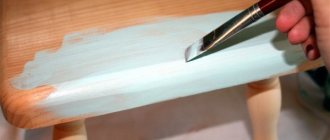
Renewing wooden chairs
A simple method for anyone who knows how to hold a paint brush. Old models of chairs that will add a touch of vintage to the interior are especially suitable. Before painting, go over the surfaces well with sandpaper and paint in 2 layers.
Decorate with wallpaper
The range of modern wallpapers is simply amazing not only with the variety of colors and patterns, but also with the riot of textures and materials. In addition to wallpaper, you can buy self-adhesive film. Before gluing wallpaper, the surface must be carefully prepared - washed and sanded. To ensure that the wallpaper sticks well, it is better to use PVA glue. This update option is most relevant for open shelves on cabinets, cabinets and walls.
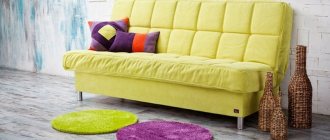
Changing the upholstery
This method is relevant for upholstered furniture. Armchairs, poufs and chairs in a new look will receive a new life and will last for many years or will become a field for experiments in updating furniture. Old upholstery must be removed very carefully so as not to damage the soft layer, but on chairs it can be easily changed. By choosing a new material in the same style as the interior, you can make the furniture the main accent in the room.
Decoupage
An interesting option for decorating old furniture, suitable for bedside tables, chests of drawers and cabinets. Before applying such decor, it is necessary to sand the surfaces and apply acrylic paint. For the design itself, you can purchase a ready-made decoupage set or use wallpaper with an interesting design.
Restoring glass
Over time, glass becomes cloudy and loses its shine. But there are several ways that will help hide this flaw and make the furniture unrecognizable. You can use special paints with a matte or frosty finish. Painting tape will help prevent the facades from getting dirty.
Removing coatings from wooden furniture
A simple method that requires sandpaper and no problems with the respiratory system or allergic reactions. It is better to carry out the work outdoors, and for additional protection of the throat mucosa, use protective equipment. After removing the paint, what remains is just an eco-style wooden surface.
colorful chair
Many houses have old chairs. They are worn out, the upholstery has become unusable, do not rush to get rid of them. They can be restored and will last for a long time. By changing their texture, you will regain their former beauty. Now there are many varieties for restoration, be smart.
Now there are many varieties for restoration, be smart.
The first step is to remove the old coating. If the seat is soft, then it is also removed. Then the surface is treated with sandpaper, the grain size can be any. How you sand will determine how the other coating will lay down. The work will be a little easier if you wet the surface. Typically, this procedure results in the old coating becoming viscous. Let the chair dry and sand again with fine-grit sandpaper.
Are you thinking about applying varnish to your chair? It is better to use a colorless primer. You can’t do without it, even if you want to paint a chair. This allows the coating to last longer and apply better. The varnish must be applied in two layers. Before the second coating, the first layer must dry.
If the seat is soft, then it is also removed.
It has become popular to paint furniture white and have the seat draped in contrasting colors. There are many options available.
- The chair will look unique if you use a stencil for decoration. The drawing can be very diverse.
- We completely replace upholstery and foam. Any fabric will do, secured with a stapler.
- Another option is to make a cover. The coating will hide flaws and shortcomings without major rework.
- You can decorate the case in different ways - to suit your taste and color.
- Needlewomen can knit or crochet original upholstery.
Use outdated things in a new way. Unleash your imagination to the fullest.
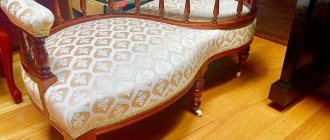
Upholstery of upholstered furniture
Over time, the upholstery of sofas and armchairs not only loses its attractive appearance, but can also sag significantly and become not as soft as before. But if you don’t want to throw away your favorite piece of furniture or don’t have the funds to buy a new one, you can reupholster it at home.
An updated sofa and a cozy armchair with a new cover will save you from having to buy new upholstered furniture
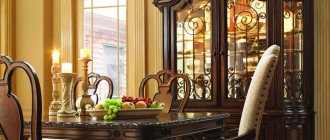
Renovated shabby chic dining room
Don't rush to get rid of old furniture. It will become the highlight of the new interior with the right approach.
A detailed master class on how to remake furniture with your own hands and photo examples are presented on our website. You will need to purchase the appropriate fabric from which the new upholstery will be made. It could be:
- barrack;
- velours;
- leatherette;
- crepe;
- Alcantara;
- leather, etc.
The choice of upholstery material depends on your financial capabilities. You can purchase it either in a textile store or in a specialized furniture store. You will also need a construction stapler and staples for it.
1 4
It is best to get rid of old upholstery. It can be secured with glue. In this case, you will need a utility knife or (if staples are attached) you will have to use a flathead screwdriver. After removing the old trim, begin installing the new one.
A small master class on replacing the upholstery of an old pouf
Cut the required piece of upholstery, place it so that the edges overlap where the old one ends, and attach it with a stapler. You can carry out such manipulations both with the soft part and with the back and sides.
If upholstered furniture has lost its volume and softness, they can be returned by replacing foam rubber. It must be secured with special small nails. If you are afraid that such manipulations are beyond your power, then you can stick foam rubber on top of the old upholstery and cover it with new one. But it is worth considering that the furniture should not lose its functionality.
Adding new volume to the seat of an old chair
You can add any volume to your product. To do this, you need to choose foam rubber of the appropriate thickness. If there is a folding mechanism, then after reupholstering it should function as before.
Transforming an old sofa after replacing the upholstery with a new one
An example of what old furniture looks like before and after this restoration option:
1 4
Budget options
You can save, that is, renew polished furniture. To do this, you need to prepare a kit: tape, a paint roller, putty, acrylic paint, an easy-to-use brush and a sanding machine.
It is necessary to remove the varnish from the surface, make it smooth, and hide imperfections and unevenness from prying eyes. To do this, use a grinding machine.
The next step is applying the primer. For best coverage, use a roller. After this, the surface should dry. It is best to wrap the legs with tape, then apply paint of different shades or colors. The result is updated, striped furniture.
An interesting option is multi-colored chairs. If you have small children, they will definitely like this option. The patchwork technique is also used. The chairs are painted with original pictures, drawn, showing all their creativity and imagination.
Required Tools
Before you begin restoration work, you should prepare the tools that will be useful for processing a wooden surface. Having the right list of tools at hand, you will be able to quickly complete the job without being distracted by searching for equipment.
Furniture scraper
A metal scraper is often used instead of a spatula to remove paint coatings. The tool effectively cleans the surface of excess paint, grout, adhesives and polyurethane foam. The presence of a rubberized handle with a textured coating makes the scraper easy to use. The fastening mechanism ensures strong fixation of the specially sharpened blade.
Foam sponge
Thanks to its high density polyurethane, the sponge helps remove dirt from any surface. It is better to purchase a foam sponge with a large area to speed up the process of cleaning the sideboard. This type of sponge has the following advantages:
- absorbs water and cleaning agents well;
- forms a copious amount of foam;
- does not leave fibers or streaks;
- It is easy to wring out and dries quickly.
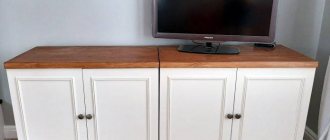
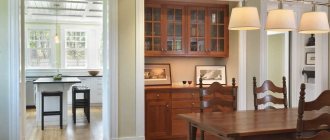
From the wall - into a stylish set
The owners of this brown “wall” took it to their dacha, and then decided to try their hand at remodeling it into modern furniture.
The chipboard covering was cracked and peeling off in places, so it was completely removed. The cabinet frames were dismantled and re-attached with Euroscrews. The parts were sanded, puttied and painted. The tabletops and legs were made from old boards, and the door layout was re-nailed.
Moldings were added to the front of the cabinet, making it unrecognizable. The result was three sets for different rooms: two bedside tables for the living room, a wardrobe for the bedroom and another set of three cabinets.
And here you can watch a detailed video about remaking a bookshelf from an old wall. The owners turned it into a TV stand.
Photos before and after
We recommend starting remodeling furniture with small items - chairs, stools, bedside tables. A sanding machine will be an excellent assistant in restoration, as it will speed up the process of removing the old coating.
An excellent solution for a modern interior would be chalkboard paint: it applies easily, is safe, and has no odor. It can be used to paint old kitchen fronts, cabinets or sideboard doors.
A makeover can turn even the most boring dresser or nightstand into a work of art.
Updating furniture is an interesting process that allows you to get an exclusive piece of furniture and realize your creative abilities.