How is old furniture repurposed?
The base remains the same, solid, but the appearance changes and becomes modern. There are many approaches to repurposing old furniture, depending on the surface material and your preferences.
How to repurpose old furniture:
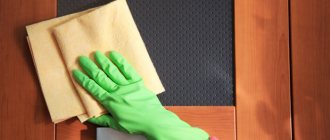
- The simplest option is to cover surfaces with self-adhesive film. To do this, you need to perform several simple preparatory manipulations. It is necessary to disassemble the furniture into blocks and wash thoroughly with soapy water to remove any remaining grease.
- Now a glass of vinegar is dissolved in a bucket of warm water and all doors and surfaces that are being pasted are also wiped with this mixture. To carry out the restoration, you need to take a self-adhesive film.
- Now there are a lot of options on sale that differ in cost and design. There are both glossy and matte options that are perfect for the kitchen and bedroom.
- After the surface is dried, it is necessary to cut the self-adhesive film into pieces of the required size. It is best to take pieces 5 mm smaller than the size of the area. This will allow the film to be well secured and will prevent it from further moving away from the furniture.
- Next, you need to remove the protective paper from one edge and apply it to the furniture. Do not rush to immediately tear off all the paper from the self-adhesive piece. This way you can get bubbles underneath, which will spoil the appearance.
- Next, using progressive movements, using a rag or roller, gradually remove the protective paper from bottom to top and press the film to the surface. If you still cannot avoid the appearance of bubbles, take a needle, pierce the bubble and, using movements from the edges to the center of the hole, expel all the air.
- Just rub the hole with a rag. When all the elements are pasted over, you need to lay cotton fabric on top and iron it with a slightly warm iron. Under the influence of temperature, the glue becomes very liquid, all bubbles and folds are smoothed out, and it is possible to achieve perfect gluing.
Old cabinet
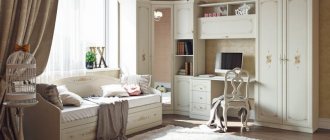
From the wall - into a stylish set
The owners of this brown “wall” took it to their dacha, and then decided to try their hand at remodeling it into modern furniture.
The chipboard covering was cracked and peeling off in places, so it was completely removed. The cabinet frames were dismantled and re-attached with Euroscrews. The parts were sanded, puttied and painted. The tabletops and legs were made from old boards, and the door layout was re-nailed.
Moldings were added to the front of the cabinet, making it unrecognizable. The result was three sets for different rooms: two bedside tables for the living room, a wardrobe for the bedroom and another set of three cabinets.
And here you can watch a detailed video about remaking a bookshelf from an old wall. The owners turned it into a TV stand.
Remaking old furniture with your own hands using modern fittings
Of course, new modern fittings will help add some zest. It can be purchased at any store that assembles or manufactures furniture. The fittings can be chrome, matte or glossy. Or antique, if you like this kind of furniture.
After this, the ends can be covered with special chrome tapes. It is also sold in furniture stores, and is often used for edging ends. As a result, you will get an updated version that will sparkle in a new way and fit even into a room with a modern renovation.
Garbage cabinet
Required Tools
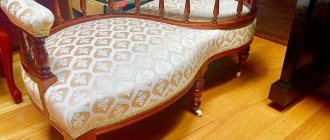
Before upholstering furniture, you need to thoroughly prepare and purchase the necessary tools.
- Stationery knife;
- Tailor's scissors;
- Hammer;
- Flat screwdriver;
- Construction stapler;
- Open-end wrenches.
How to reupholster upholstered furniture is a complex question, but if you follow the tips and rules, you will become a master in this field.
We recommend reading:
- Do-it-yourself upholstery (upholstery) of chairs: 100 photos of ready-made options and unusual designs
- Do-it-yourself furniture decoupage: review of the best techniques, original ideas and beautiful design (140 photos)
How to update furniture with your own hands - a review of the best ideas for beautiful restoration of home furniture (120 photo ideas)
Do-it-yourself alterations of old furniture: photos
There is a more economical option for remodeling old furniture - using wallpaper. It lasts for about 5 years. To do this, you need to prepare the surface and wash it thoroughly.
Options for remaking old furniture with your own hands:
- If there is a glossy varnish coating on top, it is best to coat the surface with a primer. After this, you need to soak the wallpaper with glue and press it to the surface. They are usually leveled with a foam roller, and after such manipulations they are left until completely dry.
- Please note that wallpaper is subject to mechanical stress and can be easily scratched. Therefore, they need to be top coated with two layers of varnish. It is best to try using this varnish on an unnecessary piece of wallpaper before covering the bedside table.
- The fact is that some products change their color after applying varnish. If you do not want the surface to yellow, use a clear, colorless varnish. It is usually made with a polyurethane base.
- Please note that furniture must be coated in two layers, perpendicular to each other. That is, if one was applied in width, then the second was applied in length. After this, you can change the fittings and glue decorative overlays.
Old wall
Alteration options
Dresser remodel
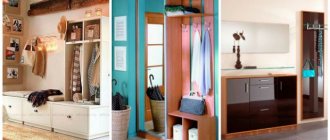
Wall for children's room
Cabinet Wardrobe
How long does it take for restoration?
You can repair and restore furniture at home as much as necessary - small items can be dealt with in one day, larger projects can take months to restore. The service life also depends on the materials used - each varnish, primer, putty or paint has a certain drying period, which must be waited. If you do not allow the layers to dry, the final result will be unpredictable.
Important point! Read the instructions carefully before using any product and follow them. Before applying the next layer, the previous one must dry for as long as the manufacturer recommends.
To prevent paint and varnish coatings from deteriorating, tightly close the containers with them in between work.
To speed up the restoration process, purchase in advance such compositions that dry quickly. Thus, there are many coatings on the market that do not require long drying. Before purchasing, it would be useful to read reviews about a particular product.
Preliminary planning, by the way, is necessary for all stages of work and acquisitions. In order not to go to the hardware store several times, even at the initial stage you need to carefully think about what tools, devices and materials you will need - you need to buy them at once and keep them on hand. Then the process of restoration work will not drag on for long.
It’s better to go to the store with an approved list of necessary purchases
Ideas for remaking old furniture with your own hands
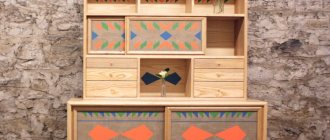
Please note that polyurethane molding can be used to update old furniture. They are sold at any hardware and repair store. To do this, you need to do some preparatory work. The surface of the furniture is sanded using a grinder with a wheel, or regular sandpaper. Next, you need to completely remove all the fittings and carefully sweep away the dust.
Ideas for remaking old furniture with your own hands:
- After this, the surface is washed, dried, and a primer layer is applied. All cracks and recesses are sealed with putty. Next, polyurethane molds are glued. Usually they are frames that are glued around the perimeter of furniture units.
- Usually the decor is placed on the door or on the bedside table. Gluing is carried out using PVA glue or liquid nails. When the glue dries, it is necessary to paint. It is made using water-based paint.
- Next, it remains to deal with the filling, that is, the middle that remains between the molds. For these purposes, you can use any suitable non-woven wallpaper.
- Products with a subtle pattern and slight shine are ideal. After everything has dried, you need to cover the furniture with two layers of varnish. The last, final stage is attaching new fittings, that is, handles. You can replace the legs with modern wheels.
Living room cabinet
Modern cabinets
Modern wardrobe
Wallpapering
It is very convenient to use wallpaper to give furniture an updated design.
This method has many advantages:
- Budget-friendly: Even if you use fairly expensive models, one roll is enough to decorate several items;
- Availability: In almost every home you can find some amount of this material left over after renovation;
- Simplicity: This decor can be done independently, without resorting to anyone’s help.
For installation it is best to use specialized glue. For surfaces that are subject to significant wear and tear, choose vinyl wallpaper. They have a denser structure and are moisture resistant.
Paper models can be made wear-resistant if you cover them with acrylic varnish for 2-3 layers. It is necessary to take into account that the shade of the coating will become a little darker or brighter.
Decoration methods are varied. You can cover the furniture completely or highlight certain parts of it. For example, cabinet fronts or the back wall of a shelving unit. If the remaining elements are painted in a single color, it will look very advantageous.
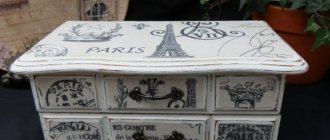
Remaking old Soviet furniture
You can upgrade your furniture and turn your old coffee table into a work of art. Oddly enough, regular wrapping paper is suitable for this. To carry out the manipulation, it is necessary to thoroughly wash the surface of the table.
Remaking old Soviet furniture:
- If it is varnished, treat it with a primer. After this, a thin layer of PVA glue is applied to the paper, applied to the surface and torn using a foam roller.
- Don't rush to trim wet pieces of paper that have come out. Wait for it to dry completely and go over it with a regular buff of sandpaper. This way, you will be able to remove excess paper very evenly and accurately.
- The legs can be painted using water-based paint. When everything is completely dry, the furniture is covered with two layers of varnish. Remember that they must be applied perpendicular to each other.
- This will provide excellent adhesion and will prevent the paper from getting wet and damaging the design. Usually such alterations last for about 5 years. You can safely place hot items on the surface and use a damp cloth for washing.
Wardrobe for children's room
Photos before and after remodeling old furniture
All the options presented above are suitable for people who do not have the skills to assemble or make furniture. Therefore, they are the simplest for the average person. If you have certain skills, you can carry out major furniture repairs. It will be possible to turn the furniture into new, while leaving the old body.
Glass conversion options:
- Indeed, many craftsmen have noticed that old Soviet-style cabinet furniture is very reliable, made of high-quality materials, and therefore can last for many more decades.
- Many even note that the quality of Soviet furniture is better than modern furniture due to the use of reliable materials. This is true. Therefore, do not rush to spend a lot of money and buy new furniture.
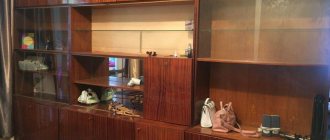
- Perhaps repurposing old furniture will allow you to update the room and save a decent amount of money. What to do with glass? The old walls have many glass doors that can be decorated using modern fittings.
- If the glass is scratched or has an untidy appearance, you can wash it thoroughly, degrease it with alcohol, and stick on a translucent self-adhesive film. Stained glass options are now available in a variety of colors.
- They will help hide the contents of the cabinet from prying eyes, while adding modernity and novelty to the furniture. Be sure to replace old hinges and hardware. Now there are a lot of modern options, chrome and matte, which are suitable for a room in a high-tech or modern style.
Below you can see before and after photos of remodeling old furniture. Thanks to imagination and the use of modern finishing materials, it will be possible to create unusual, interesting furniture for a nursery or bedroom from an old, shabby chest of drawers.
Before and after Before and after Before and after Kitchen remodel
Surface preparation
Before giving a piece of furniture a new appearance, you need to properly prepare the surface and eliminate any existing defects.
The list of necessary manipulations will depend on both the material and the decoration method.
But most often you need:
- Sand to improve adhesion and remove old coating;
- Fill cracks and chips with putty;
- Apply primer to block the base and better adhere the paint layer to the surface;
- Paint with at least 2 layers of paint;
- Protect all work with varnish as a finish; this will extend the life of the decorative coating.
When working, you may need various elements: materials with various effects, brushes and rollers of different sizes, fittings to replace old ones (handles, hinges, etc.).
It is better to think through all this before starting work, so that there are no unpleasant surprises in the process.
Converting old furniture into new one with your own hands: step-by-step instructions
Oddly enough, it is not necessary to make an updated version of the previous product from old furniture. You can even completely redo the furniture and turn it into something else. For example, you can make a fireplace from an old dressing table.
Remaking old furniture with your own hands, step-by-step instructions:
- To do this, you need to use polyurethane molding, as well as decorative stone, or self-adhesive volumetric tiles imitating natural stone or marble. To do this, you need to leave only the body, while removing the doors so that you get a box without a wall in front.
- Next, you need to use the remaining boards where the door was, leave only the frame, and remove the glass. This area around the perimeter must be covered with polyurethane molds, imitating a frame. Structural, volumetric molds are used on top, which will serve as a cornice.
- The center is also filled with artificial stone or self-adhesive. In this case, it is necessary to place a yellow light or an infrared heater inside. It is best not to use heating devices, but to use decor.
- The surface is covered with self-adhesive tape, or a decorative stone is attached to liquid nails. Now there are decorative options made from foam plastic that imitate this natural material. In the photo below you can see what it looks like. In fact, an old shabby dressing table turned into an interesting, unusual fireplace.
Fireplace
Remodeling furniture will require some materials and patience. But in the end you will get new furniture.
Craquelure coating
Craquelure was originally invented for the restoration of really old furniture. But over time it gained popularity as a decorative means to give a vintage effect.
It is not recommended to work with craquelure without experience. You need to consult with a specialist or watch training videos. In general terms, the technique might look like this:
- The surface is pre-painted with a noticeable coating: with a metallic effect, a bright or contrasting shade;
- The dried paint is coated with craquelure;
- The top is immediately painted with a different shade;
- Using a synthetic brush, they pass over the barely dry paint; cracks appear on the surface.
For some coatings, simply applying the product is enough, and cracks will form on their own.