How to convert an old Soviet wall into a modern one - photo
If you inherited an old Soviet wall from your grandmother, then you shouldn’t throw it away.
Do-it-yourself restoration will help you revive old furniture. How to do it correctly and complete step-by-step instructions are in our material. Of course, restoration work will take up some of your free time, but restoration will be several times cheaper than buying new furniture, Channel 24 reports.
Stages of remaking the old Soviet wall
Dismantling
Before starting work, you should disassemble the wall into individual elements. We are talking about all the doors and elements that are easy to disassemble. However, you should not disassemble the wall frame itself. Also, if the connection is too strong, leave it as is.
Removing old coating
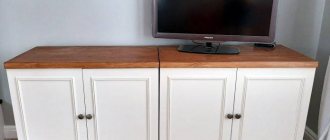
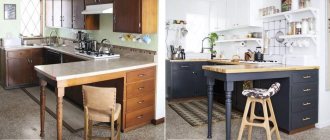
As one of the wall renovation options / photo: Pinterest
Most often, the walls are covered with ordinary wood varnish. The best way to get rid of it is acetone. In some places you will have to resort to tools to make the work look good.
Primer
Given the age of the cabinets, priming will be a necessary step. After the surface has dried and the smell of acetone has disappeared, buy a primer mixture and apply a thin layer to all wall elements.
Installation
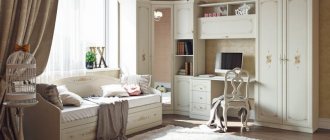
It’s better to remodel the wall to suit a specific style / photo: Pinterest
If the surface is already dry, use sandpaper to make the wall completely smooth. Once you're satisfied that you're happy with everything, put the pieces together.
Painting
At this stage you can show your own creativity. So, you can try to radically change the color of the furniture, add new elements, or even leave the cabinet in a semi-disassembled form.
Varnish
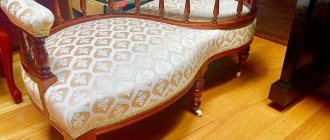
If the wall is in the living room, then you can leave only the frame / photo: All furniture
Yes, you have already gotten rid of the varnish before, but if you already like your old wall, apply a new layer of varnish to it. This way you can extend her life for many more years.
You can choose a fireplace that fits perfectly into your design using this link
Budget options
You can save, that is, renew polished furniture. To do this, you need to prepare a kit: tape, a paint roller, putty, acrylic paint, an easy-to-use brush and a sanding machine.
It is necessary to remove the varnish from the surface, make it smooth, and hide imperfections and unevenness from prying eyes. To do this, use a grinding machine.
The next step is applying the primer. For best coverage, use a roller. After this, the surface should dry. It is best to wrap the legs with tape, then apply paint of different shades or colors. The result is updated, striped furniture.
An interesting option is multi-colored chairs. If you have small children, they will definitely like this option. The patchwork technique is also used. The chairs are painted with original pictures, drawn, showing all their creativity and imagination.
How to properly restore and update a Soviet wall
In the article I will describe in detail the features of the restoration of the Soviet wall. I will consider the instructions for its repair: the necessary materials and tools; stages of restoration; cleaning the surface and priming it; repair; painting; varnish application and modern furniture decoration. I’ll tell you how to properly care for a restored old Soviet wall or sideboard.
- Features of the restoration of the Soviet wall
- Required materials and tools
- Stages of restoration
- Replacement of furniture fittings
- Surface cleaning
- Primer and putty
- Applying varnish
- Painting
- Decoration
- Step-by-step instructions for the restoration of a Soviet wall
- Rules for caring for restored furniture
Features of the restoration of the Soviet wall
Previously, the Soviet wall was an attribute of any home. It was prestigious and beautiful. But time takes its toll, and furniture loses its former appearance, not to mention changing fashionable furniture trends. But don’t rush to throw it in a landfill. There is an excellent solution - restoration or alteration.
If desired, the Soviet wall can be restored or updated, extending its life for another ten years. But you will have to work hard. After all, the process is labor-intensive.
Required materials and tools
To work you need to prepare the following tools:
- drill;
- screwdriver;
- hammer;
- pencil and ruler.
The selection of the necessary building material completely depends on the chosen restoration method.
The selection of the necessary building material completely depends on the chosen restoration method. The standard set of materials is as follows:
- primer;
- sandpaper;
- varnish or paint;
- alcohol;
- decorative elements;
- accessories.
Stages of restoration
To breathe life into the old Soviet wall you will have to work hard. Because time has hardly been kind to her. Let's consider each stage of work separately.
Replacement of furniture fittings
Most often, the fittings in old furniture become unusable. The doors do not close well or the handle has fallen off. Therefore, their replacement will be a prerequisite for restoration. Moreover, sometimes a simple change of fittings radically changes the appearance.
Old fittings must be replaced
Surface cleaning
Before proceeding with the restoration of the Soviet wall, it must be thoroughly cleaned of dirt. To do this, simply walk over the surface with a soapy solution. For heavily soiled areas, you can use a soft toothbrush.
Primer and putty
Before applying paint to the wall surface, it is recommended to coat it with a primer. If there are chips, holes and other irregularities on the furniture surface, they need to be eliminated using putty. After the primer has dried, it is important to degrease the surface with an alcohol-containing compound. Even vodka will do here.
Afterwards, you can begin to eliminate minor irregularities. To do this, apply putty with a spatula. As soon as it dries, the treated areas are cleaned with sandpaper. It is opened with one more layer of primer.
An acrylic primer mixture works best to saturate cracks and other imperfections on wooden furniture.
Applying varnish
It is better to apply varnish in a well-ventilated room, eliminating access to open fire as much as possible. The old coating must be carefully removed, without leaving even the slightest stain. Treat damaged areas with sandpaper. The varnish should be sprayed at a distance of 30 cm from the surface. The movements are wide in the horizontal direction.
When streams of varnish appear, the distance from the surface must be increased.
On average, the varnish dries in two days. This information must be indicated on the packaging. Then the surface is treated with fine-grained sandpaper and the dust is wiped off with wet wipes. The varnish is applied in several layers after the previous ball has dried. Two or three times should be enough.
Painting
It is best to paint in a couple of layers. One may not be enough. If you plan to paint a Soviet wall in several colors, you can use masking tape to make the boundaries clear. The furniture can be used for its intended purpose no earlier than after 7 days.
Decoration
It is not enough to simply varnish or paint a Soviet wall to restore it. You can turn on your imagination and use various techniques: stencil, decoupage, mosaic, applique and even coloring. It all depends on your imagination and the availability of materials.
Don't be afraid to experiment. Bright colors and intricate patterns are sure to give new life to your furniture.
It is not necessary to use techniques completely over the entire surface of the Soviet wall. This may be partial decoration. First, the furniture surface is painted and then decorated.
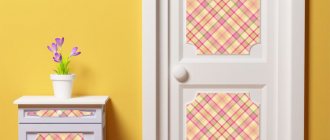
For example, decorating door corners using decoupage method. To do this, you will need suitable napkins or designs that will fit into the interior of the room, as well as a special varnish.
You can leave the facades plain, or decorate them in decoupage style
Step-by-step instructions for the restoration of a Soviet wall
Restoration consists of the following stages:
- Replacement of accessories and minor repairs.
- Surface preparation : removing old coating and sanding.
- Primer coating . Degreasing the surface.
- Elimination of chips and other irregularities using putty. Primer coating.
- Applying varnish or paint in several layers.
- Decoration.
Rules for caring for restored furniture
In order for the Soviet wall to serve you for a long time, it is important to ensure optimal conditions in the room. This is a temperature range of 15-20 degrees Celsius and a humidity of 50-65 percent.
It is better not to place such furniture next to heating elements. It is necessary to ensure a minimum distance to them of no closer than 0.5 m. Even direct sunlight can change the color of the coating. Therefore, it is recommended to periodically rearrange the furniture so that sunlight hits different parts of the wall.
If you have old furniture left in your house from your relatives, do not rush to throw it away, because it can be remade. A little imagination and simple building materials will allow you to give a second life to the Soviet wall. Moreover, this furniture can become a real highlight of your interior. And not just old and unnecessary trash. Your main weapon is imagination, paints, stickers and our article.
Black cabinet with engraving
The story of how this bedside table was remade is a complicated one: the owner found it in a landfill and several times wanted to take it back for “disobedience.” It took 10 coats of remover to remove all the varnish from the veneer! This took several days.
After applying protective oil, flaws were revealed, and the craftswoman partially painted them over. The owner was not satisfied with the result, so the cabinet was completely painted black. Only the legs remained intact.
Using a pencil, we drew a design on the door and drilled it out with a small drill with an engraver attachment. The result exceeded all expectations!
In order not to waste time on removing the varnish, you should sand the surface to a rough state, apply an acrylic primer and paint it with moisture-resistant paint in 2 layers. In this example, "Tikkurila Euro Power 7" was used. The top of the bedside table is covered with acrylic varnish.
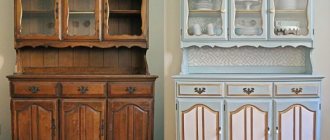
Ways to update an old furniture wall with your own hands, examples in before and after photos
The apartment has a Soviet-era wall made of high quality natural wood. But over time, the facades became warped, the fittings failed, and the appearance became unpresentable. It’s a shame to throw away this piece of furniture, so many people have a question about how to update an old furniture wall with their own hands and they study photos before and after restoration.
Required tools and materials
Before starting any work, you need to prepare everything you need - buy material, tools. The list consists of the following:
- Furniture fittings;
- Putty material for wood;
- Facades, if necessary;
- Paint or stain (preferably spray);
- Construction knife;
- Construction hair dryer;
- Screwdriver;
- Sharp scissors;
- Iron;
- Self-adhesive furniture film;
- Wax for furniture of different consistency;
- Candle;
- Spatulas;
- Rags, clamp;
- PVA glue;
- Wood varnish;
- Felt pen;
- Edge for processing ends.
This is not the entire list of materials and tools, since you can update old furniture in several ways, each option has its own specific set of necessary tools.
Types of update
If you don’t know how to update an old furniture wall with your own hands, before and after photos can be found on the Internet. In addition, we present several methods that can be used to give a second life to any furniture.
Restoration of an old wall
If old furniture is dear to you as a memory, but its appearance has been severely damaged by time - chips, creases, deep cracks have formed on the surface - it can be restored. After spending a minimum of time, you will receive an updated piece of furniture. For repair work, a standard set of materials and tools is used. For quality repairs, it is enough to perform the following steps:
- The working surface must be cleaned and washed with a solution of water and soap, and dried well - this will help increase the adhesion of the material to the wall facade;
- To rid the surface of deep scratches, they are filled with melted wax. After the fill has hardened, you need to take a felt-tip pen to match the wood, apply strokes to the wax that will imitate the structure of the wall material. This is not difficult to do; just continue an existing drawing. After this, take a clean rag and carefully rub it over the frozen wax, slightly smearing the lines. As soon as the desired result is achieved, the plane is coated with furniture varnish;
- If severe abrasions are visible on the facade, they are painted over with varnish of the desired shade from a spray can;
- If there are cracks and delaminated areas on the facade, you can update the old wall using basic means - PVA glue, a medical syringe and a fixative. You need to fill the syringe with glue and inject the required amount of the composition into the crack. Then press the split and remove excess glue. Using a clamp, press the area and leave to dry for 24 hours;
- Are there many chips on the façade? The same melted wax will help you deal with them. First, you need to use a spatula to trim the edges of the chip and fill it with wax. Once the wax has dried, buff the area well with a clean, dry rag. Then perform the same steps as when filling scratches and apply varnish.
After this treatment, the wall will not change its design, but its appearance will become much more attractive.
Work technology
Carrying out work for any type of restoration has one general technological sequence - preparation and actual updating.
Preparatory work
Before you decide to remake old Soviet-era furniture, you need to understand that such a process is only justified if it is made of wood. It is not advisable to renew old furniture made of chipboard, since the service life of these structures is not long, and perhaps the wall is no longer suitable for restoration. So, there are preparatory activities that must be carried out before any restoration:
- Clean the surface from dust and dirt, while dismantling all decor and fittings;
- The old layer of paintwork must be removed. This can be done with coarse sandpaper or a sanding machine. A solvent solution can also be applied;
- Grout deep cracks with a special material;
- Fill chips and dents with wax and sand;
- Prime the surface with a wood compound. It is advisable to use acrylic compounds that fill all microscopic cracks.
The preparation stage is very important, since the final result depends on the quality of surface cleaning.
Removing dust and dirt
We remove old paint or varnish, we erase deformations, we prime the surface
Update instructions
Before you restore old furniture, you need to decide on the design you want to get. Let's consider the most popular updating method at the moment - decoupage. The preparatory work has been carried out successfully, and restoration can begin. The algorithm for performing the work is simple and will not cause difficulties even for a beginner:
- Cut out the desired design, or take special napkins for decoupage. If you are doing the work for the first time, take pictures of medium size relative to the surface on which they will be applied;
- Apply PVA glue to the surface, you can use a blending composition. Do not coat the entire wall at once, as the glue may dry out while you are covering one area, so you need to work in stages;
- When gluing a pattern, you must strictly ensure that the edges adhere to the surface. Drawings can be pasted overlapping each other, so the decor will be voluminous and original;
- If you need to paste over a corner, the material just neatly bends around the corner, there is no need to cut anything. Smooth the picture with your fingers or a rubber spatula to remove air bubbles and leave to dry;
- The next stage is varnishing. Apply a thin layer of clear furniture varnish with a brush or lint-free roller and let it dry. We repeat the process 3-5 times;
- After the last layer of varnish has dried, you need to rub the surface until it shines; this can be done with a soft cloth. Polishing should be done in a circular motion without pressing.
In the before and after photos you can see how to update an old furniture wall with your own hands.
If you follow the instructions and apply designer methods of decorating furniture, you can get a great result that will be the pride of the apartment owners.
We cut out the elements and cover the furniture with glue
Paste stencils
Varnish
DIY old furniture decor
One of the most pressing topics for discussion in interior design is still “decorating furniture elements.” How and in what way can you update old furniture? Is it possible to decorate furniture yourself? What materials are best to decorate a furniture wall? All these questions are asked to designers every day, and every time they come up with new and interesting ideas in solving these problems.
The combination of artistic techniques with technological advances in our time provides a unique opportunity to quickly and without much difficulty create the atmosphere in the interior that is sometimes lacking. the correct selection and use of decorative elements, you can easily decorate any furniture with your own hands . The ideal solution to such problems is the use of decorative vinyl stickers.
When creating a modern interior, designers often draw patterns or designs on elements of cabinet furniture. It looks very beautiful and gives it a special exclusive look. This effect can be achieved using sandblasting artistic processing of mirror, glass or plastic surfaces. The result looks very impressive, but what to do if the budget is limited and the designer’s idea requires implementation? In this case, designers recommend decorating furniture with vinyl stickers.
The color range of stickers is varied, so there are no restrictions on the choice of surfaces for pasting. Decorative stickers are easy to use and do not require special application techniques, unlike sandblasting. Therefore, furniture decor can be done with your own hands .
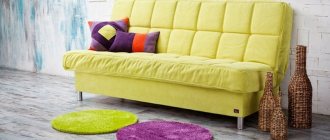
If you are a supporter of minimalism and love bright modern facades, then decorating furniture with stickers is not recommended. An interesting solution would be to add details next to the furniture. For example, a TV area made in a modern style will be perfectly complemented by characteristic elements in the form of a plant on the wall or a graphic design.
The use of vinyl stickers on the front parts of the kitchen unit is also a very interesting and original solution when designing or updating the interior.
As practice shows, ergonomically distributing space and skillfully choosing colors is not always enough for the interior to acquire the desired look; it is important to correctly place accents. Decorating furniture with your own hands using vinyl stickers will create a cozy atmosphere for you and give the interior individual features.
Removing deep scratches
Deep defects are masked using special wax putties.
You need to carefully select the color and fill the scratch with melted liquid. Then sand with a soft cloth.
A wood countertop that is swollen from moisture should be rubbed with a mixture of salt and olive oil. The composition is left for half an hour, then removed with a cloth. Salt crystals will absorb moisture, and the oil will preserve the structure of the wood.
Trading house construction blog
Surprisingly, old Soviet walls, which are already 40-50 years old, still stand in many apartments. On the one hand, it’s a pity to throw them away, since such furniture is distinguished by its good quality and quality, but on the other hand, this model is very outdated, and scratches and abrasions cover the facades. So what to do in this situation? Transform the wall so that it becomes not only more modern, but also stylish. And there are several ways to do this.
Method 1: Make a wall out of a wall
It makes no sense to rearrange such furniture from place to place or swap individual sections. But such Soviet furniture can be updated as follows:
- the entire inside should be pulled out;
- if the wall is not up to the ceiling, then use drywall to sew up the empty space;
- it is necessary to remove all the doors so that the distinction between the sideboard, wardrobe and mezzanines is erased.
A Soviet wall can be used as a storage room, dressing room or home library. Therefore, you should leave only the necessary shelves; if necessary, move them to another place, add new ones. If the shelves are placed evenly, you will get a wonderful library. In separate niches you can install shoe boxes and laundry baskets. For certain areas, you can order modern doors with a more acceptable facade.
Method 2: dressing room
You can make a complete dressing room from such a wall. To do this, all the doors are removed, new shelves are made and crossbars are installed so that you can hang various clothes. If the mezzanine does not reach the ceiling, then there is no need to seal anything, since this place can also be filled with certain things. It will be very good if the wall is long, covering the entire wall. Instead of all doors, sliding doors are ordered and they should be installed from the floor to the ceiling. With the help of such sliding doors you can close all the gaps.
Restoration of wooden surfaces
During use, small chips and scratches appear on varnished wooden surfaces. The furniture takes on a not very attractive appearance.
You can restore the condition of a countertop or furniture façade in several simple ways.
Wooden surfaces can be easily wiped with a banana peel or a special treatment product containing orange oil.
For a good effect when using an aerosol preparation, the sponge must be heated in a microwave oven for 20-30 seconds before starting work. To protect the skin of your hands, it is recommended to wear gloves.
Regular toothpaste is effective for removing light dish stains from wooden countertops. Without rubbing, apply it to the problem area for a couple of minutes, after which it is removed with a cloth.
Modern manufacturers offer special markers for wooden surfaces.
How to: Restore old furniture at home
And isn’t it easier to entrust this work to professionals?
First, let's figure out whether you need to restore the furniture yourself or is it better to entrust this work to professionals? What is good and not so good about restoration in a workshop:
+
The quality is excellent. Agree, there is no point in experimenting with “home” restoration of objects of antique value. Only professionals will be able to recreate the original shapes and coatings. At home you may not even guess.
+
Saving time and effort. It only seems like it’s done, but the craftsmen will have to tinker with your chest of drawers for several weeks. Imagine that you need to do this in the evenings after work and on weekends: it may happen that work will be a burden.
–
Complex logistics. Cabinets and sideboards will most likely have to be disassembled in order to be taken out of the apartment for delivery to the workshop. As a result, there are additional costs for delivery to the restoration workshop.
–
If the house does not have an elevator, you will have to call movers and hire a Gazelle. Of course, all these efforts can be taken on by the workshop staff, but additional services will be included in the cost of restoration work.
The deciding factor is location.
In the process of restoring old wooden furniture, you will almost inevitably have to deal with dust and unpleasant odors. For example, you can remove old paintwork either by sanding (dust) or using chemical compounds (smell). Many wood protection and covering compounds also have a strong odor. If possible, move furniture restoration work to non-residential premises. This could be a garage, utility room, loggia or balcony.
If you live in a private house, then in good weather you can work in the yard. But in this case, pay attention to the conditions for using paints and varnishes specified in the instructions: minimum and maximum temperatures, air humidity and reaction to direct sunlight.
Advice:
if the only possible option is a room in an apartment, cover all other furniture with protective film, take out textiles and carpets for a while. Cover the floor with film as well to avoid stains from chemical compounds.
You will need sandpaper of various grits, a spatula, brushes and rollers. But it will take several hours to properly sand even a small coffee table or stool by hand. Professionals use an eccentric (orbital) sander for these purposes, which is not available in every household. In addition, you may need a screwdriver, a jigsaw, or a hair dryer. It is more convenient to remove dust immediately - with a construction vacuum cleaner.
Advice:
It is advisable to buy a power tool only if you have a lot of old wooden furniture that requires restoration or if you plan to do it regularly. At the same time, all these tools are universal and are often used in other repair work. If there is construction or major repairs coming up, buy it, it will come in handy on the farm. If your plans include restoring only one piece of furniture, ask your friends for a loan, or rent them. With a good tool, things will go faster, and the result will look neater and more professional.
Where to get materials for restoration
For restoration work, you may need: paint removers, compositions for filling chips and scratches (wood putty, furniture wax, furniture sealant), paint and varnish materials (paint, enamel, impregnation, oil). It’s easy to buy finishing materials at any building materials store, but I recommend ordering goods exclusively for furniture restoration (furniture waxes, pencils, sealants, furniture edges) from online stores that deliver/send goods throughout the country.
Advice:
Look on websites for advertisements from individuals. Often people sell excess material, or the color is not suitable, and they list the goods on online flea markets. On the Internet you can also find recipes for making some materials for restoration at home.
How long will it take
Restoring furniture at home is not a quick process. Everything can take from a few days to a whole month. And it’s not only about painstaking work, but also about the peculiarities of using paints and varnishes. Putties, primers, paints, varnishes require a certain drying time before applying the next layer: from several hours to a whole day.
If you have little free time, and you take the process very seriously, carefully plan the stages of work. Often the delay occurs due to the fact that there is no specific product or tool - you won’t be running around the shops before each next stage.
Advice:
To speed up the process, give preference to compounds that dry quickly. For example, water-based paints and varnishes dry faster than their alkyd solvent-based counterparts. One of the “fastest” coatings is Danish oil. It does not require pre-priming or inter-coat sanding at all, and the second coat can be applied after 30 minutes.
Sequence of actions during restoration
1. We disassemble the furniture, remove fittings
It will be much easier to restore furniture with your own hands if you disassemble it into individual elements - you won’t have to think about how to get to hard-to-reach places. Often it is enough just to remove the fittings and hinged doors and remove the drawers. Whether to completely disassemble the frame depends on the situation. Glued elements like the box in the photo are definitely better left assembled.
Advice:
Before starting work, take a photograph of the object and the places where its elements are attached. Place the fasteners in small bags and label which elements they are intended for. This will make it easier for you to assemble the parts after restoration.
2. Remove the old paintwork
There are three ways to remove old paint, varnish or enamel: with sandpaper, remover or using a hair dryer. Choose the method that is most convenient for you and best suits your piece of furniture. You can combine methods: for example, scrape off a layer of paint heated with a hairdryer with a spatula on flat surfaces and sand it with sandpaper on uneven, rounded areas.
Repair of polished surfaces
Restoring Soviet furniture often includes restoring the polish.
Before starting the process, the problem area must be washed and degreased.
The technology and means of restoration are determined by the degree of polishing damage.
- Regular iodine is well suited for dark furniture and will completely hide small chips and scratches.
- Small scratches can be easily masked by filling them with shoe polish.
- Deep damage is treated with a homemade solution made from turpentine and wax in a ratio of 3:1.
- Stains can be removed by treating them with gasoline.
- To restore shine, it is recommended to rub polished furniture with a mixture of flax seed oil and denatured alcohol.
- White marks from hot dishes can also be wiped with a mixture of flax seed oil and alcohol.
- For old and deep damage caused by exposure to high temperatures, you should use a composition obtained by mixing drying oil and alcohol. The product is applied several times, then the treated area is polished with a soft material.
In cases where you simply need to renew the polish, you can prepare a mixture of linseed oil, vinegar and turpentine (1:1:2), or equal parts of regular beer and flax seed oil.
Creating a stylish interior with your own hands
Does your grandmother carefully preserve furniture purchased many decades ago? At the moment, Soviet furniture in a modern interior looks quite stylish, you just need to show a little imagination.
You can use existing furniture as a basis to create real masterpieces. The following items will provide excellent solutions:
- An old carpet, red was once in fashion.
- A wall that runs along the entire length of the wall.
- Sofas that were previously very difficult to buy.
- A variety of chests of drawers and sideboards.
- Soviet crystal, which was taken out only on major holidays.
You can make real masterpieces from old Soviet furniture
You can give new life to old things. Such a transformation will bring great joy to grandparents, who will be able to feel your attention and care.
Using a Soviet carpet in a modern interior
Carpets purchased in Soviet times are of high quality. They are made of wool, so they are ready to give warmth and comfort. As a rule, such an element was rarely located on the floor.
In ancient times, the carpet was treated very carefully; it hung on the wall. Currently you can use this masterpiece in the following interpretations:
- Bedroom decoration. It can be placed under the bed, protruding slightly beyond it. The result will be a luxurious podium built in oriental style.
Old Soviet carpet in a modern interior
- Living room decoration. An excellent solution would be cut carpet elements, which are made in the form of covers for armchairs and sofas. If you also cut squares that can be placed on the floor, you can enjoy the warmth and coziness.
Sofa covers from Kovar
- It is wonderful to use natural carpets to decorate a children's room. You need to cut the old carpet into specific pieces that can be placed near the child’s bed, in the play corner. Your baby will be able to enjoy the warmth, and natural wool is good for health.
Excellent solutions will come from decorative elements made from carpet remnants. You can make covers for chairs and stools. It is enough to use individual squares, which will become a wonderful decoration for kitchen furniture.
The whole carpet looks very colorful, but if you cut it into squares, you will get a stylish solution that looks very fashionable and harmonious. You can create an individual style that emphasizes your taste and sophistication.
Removing varnish coatings
In cases where the restoration of wooden furniture involves painting or decoupage techniques, the varnish must be removed.
This is done using a grinding machine or a hair dryer, removing the heated coating with a spatula.
The varnish coating must be completely removed, followed by sanding the surface to be treated.
In addition to mechanical methods of removing varnish, chemical compounds are also used. The product should be selected taking into account the information on the label.
After applying the solution, it is recommended to cover the piece of furniture with plastic wrap to avoid evaporation of the chemical solution.
The swollen varnish is removed using a construction spatula. A respirator and mask are required to protect your eyes and respiratory organs.
Craquelure technique
If you want to get spectacular “antique” furniture, you need to use the craquelure technique.
For work, different compositions are used in several stages.
- First of all, a thin layer of acrylic paint is applied to the prepared part. Metallized options look impressive.
- After drying, they are coated with a special craquelure varnish according to the principle: the thicker the layer, the more cracks.
- The next coating is done with matte paint.
After drying, the effect of a surface cracked by time appears.
Craquelure varnish can be replaced with egg white or a thick layer of PVA glue in this technological process. Given the complexity of the work, it is recommended to practice on a sample first.
Veneer repair
Furniture that is decorated with veneer can also be repaired.
Small peelings are masked using putty. The repair area is degreased, cleaned, a layer of putty is applied, and polished.
Blisters can be repaired using PVA glue. It is injected under the top layer by piercing the surface with a syringe. The repair area is covered with material and pressed down with a weight. It is effective to use a bag of heated sand as a load.
If the swollen veneer is cracked, then after manipulating with PVA glue, the cracks are filled with putty and painted over.
The adhesive veneer can be secured with a hot iron. The alcohol glue will warm up and restore its properties.