The kitchen set is subjected to heavy loads, so sooner or later the time comes when it loses its attractiveness. But this does not mean that strong cabinets that will last for many years will have to be thrown away and replaced with new ones. There is another way out: restoring kitchen furniture will help restore them to a decent appearance and save money. Let's consider methods of such repairs available at home.
Restoration of kitchen facades: different types
Facades are part of the kitchen that is constantly in sight. They primarily suffer during operation and lose their original beauty. Each type of facade has its own service life, its own characteristics of restoration and repair.
- Laminated. The base is MDF or chipboard, on which a melamine film is laid. They are inexpensive, but the coating wears out quickly. It is impossible to laminate the surface again at home, so depending on the nature of the damage, another renovation method is selected.
- Frame. The perimeter of the facade consists of MDF, and glass, plastic, chipboard or rattan is placed in the center. Not resistant to damage, but easier to repair.
- Coated with plastic or PVC. These materials make the furniture attractive and resistant to damage at an economical price. It is not difficult to restore such facades: the most common problem is the peeling of the protective layer from the base, which is solved with the help of glue.
- Wooden facades. Elite furniture consists entirely of solid wood, which is incredibly expensive. Therefore, more often only the façade parts are made of wood. For this, species such as beech, teak, oak, walnut, and maple are used. Such headsets are practically eternal with proper care; minor damage can be repaired yourself.
Attention! A selection of photos of the sets before and after restoration is presented at the end of the article.
DIY kitchen renovation ideas
How to breathe new life into old kitchen furniture? There are quite a few ways:
- Decorating with stickers will help hide minor scratches and chips.
- Covering with film will hide more serious damage.
- Painting gives a completely different look to the facades of kitchen units.
- Applying varnish is usually used to restore and protect furniture made from natural wood.
- Decoupage is the application of appliqués or raised patterns.
- The use of moldings and decorative overlays made of wood or plastic.
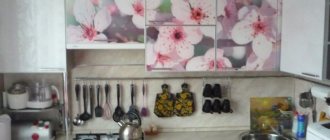
Decorative stickers
Facades covered with film
Kitchen updated with varnish
Painted MDF facades
Decoupage
Decorative furniture overlays
To achieve a better result, these methods are combined. Let's take a closer look at restoration methods and features of restoration of different types of facades.
Useful tips
Quite often, household members forget one simple truth.
MDF film does not like elevated temperatures, and therefore you need to try to insulate the material from strong heat. Otherwise, peeling will occur constantly.
Therefore, here I can highlight several practical recommendations:
- Follow the operating instructions. If you have beautiful facades with integrated handles, or any other design options, keep them away from heat sources. This is an oven and direct sunlight. This can be implemented in different ways, from placement to blinds and curtains on the windows;
- Use an aluminum profile in places where there is a high risk of peeling off. Decide for yourself which one to choose and how to paint it if necessary. There are several types of profiles. They need to be installed on the edge, thereby preventing it from peeling off;
- Choose your kitchen furniture carefully and think through the layout in advance. This will allow you to deal with a high-quality kitchen, and avoid the typical problems of cheap and poorly executed designs;
- If the kitchen receives direct sunlight, you should definitely hang curtains or blinds on the windows. In summer, facades are especially heated by direct rays of the sun.
Restoration of kitchen facades from MDF
Small chips and scratches are repaired with a furniture wax pencil. It is applied to the damaged area, and after hardening, the restored surface is sanded with fine sandpaper. The pencil is selected to match the color of the facade.
USEFUL INFORMATION: Siphon for connecting a dishwasher
Decorative stickers will update the look of the headset and hide minor defects. Before gluing them, the surface is cleaned and degreased.
In case of more serious damage, it is necessary to completely change the appearance of the furniture. For kitchen facades made of MDF, painting or covering with vinyl film is suitable.
Using self-adhesive film
A quick and cheap method to radically change the look of your headset. The range of films is huge, so you can realize any design ideas.
Tip: choose quality materials. They will cost more, but a thick or textured film will lie smoother, and small scratches under it do not need to be repaired: they will be invisible.
Work algorithm:
- We unscrew the fittings from the facades, clean and degrease the surface for better adhesion.
- On the back side of the film there is a mesh with a cell size of 1 cm. Using it, we transfer the shape and dimensions of the surface to be pasted onto the material. It is recommended to leave allowances of 1–2 cm around the entire perimeter.
- Using sharp scissors, carefully cut out the measured fragment.
- We paste the film from top to bottom, gradually removing the protective coating and smoothing it with a plastic spatula or cloth from the center to the edges.
Important! Try to avoid the formation of air bubbles under the film. If they do appear, there are two ways to remove them. The first is to carefully peel off the film before the glue sets and re-stick it. The second is to pierce the bubbles with a needle and then smooth them out with a spatula.
When applying the sticker, pay special attention to the edges: in these places, most often the film begins to lift and peel off.
Why is this happening
Let's start by examining the reasons why the film on your MDF kitchen facade has peeled off.
This can happen for several main reasons. Next, you will learn what to do in this situation, how to glue it and how to protect the film from the oven and other provoking factors.
- The glue was not applied to the entire surface. If application is done manually, the master may accidentally or deliberately make omissions in order to save money. In these areas, the film adheres less well to the surface;
- The use of cheap adhesives. Alas, everyone’s manufacturing technology is different, and you can often find beautiful kitchens made from materials that are not of the best quality. Typically, films peel off when using simple two-component polyurethane compounds;
- The glue has expired. Using such glue, the film sticks at first, but does not last long;
- Low temperature when installing film. Also, peeling can occur due to a violation of the temperature regime during the gluing process.
In reality there are quite a lot of reasons.
But even on high-quality surfaces, peeling is possible.
This mainly occurs due to the oven and on the facades adjacent to it.
Film facades
What happens is this: The housewife is preparing some dish in the oven, which is heated to high temperatures. When you take out the dish, all the heat comes out and hits the façade. As a result, the glue melts, loses adhesion to the film, and it peels off.
There is a high probability of peeling off when exposed to sunlight. Gradual heating occurs, the film burns out, the glue dries out or melts. That's it, the grip is lost, and the result is obvious.
The film is coming off the edge of the façade
To summarize, the following main reasons can be identified:
- glue deficiency;
- low quality glue;
- expired film adhesive;
- mismatch of film and glue (poor adhesion to each other);
- violation of production technology;
- insufficient temperature when gluing the film;
- weak vacuum supply;
- poorly heated film;
- improper use of facades;
- location directly next to the stove;
- exposure to sunlight.
Sometimes there are several causes at once, or only one factor influences.
The result is the same. The film has peeled off and needs to be fixed.
How can I fix this?
Coloring
It is important to remember that paint is applied only to areas that do not have external defects. Therefore, small scratches and chips are sealed in advance with wax or putty.
Acrylic paint or auto enamel is used in the work: it is more expensive, but more durable. Car spray is easier to apply, lays down more evenly, and better protects it from moisture and temperature in the kitchen.
Painting stages:
- We remove the doors and unscrew the fittings. Fixed elements that need to be protected from painting are sealed with masking tape.
- If the MDF surface is covered with film, remove it. A hair dryer will make the job easier.
- We process it with fine sandpaper, remove dust and degrease.
- Apply primer in two layers. For hard-to-reach places we use a brush, for smooth surfaces we use a roller. You can apply the primer using a spray gun. Be sure to let the first coat dry completely before applying the second.
- Apply the paint with a brush or roller in one direction. The aerosol is applied only with the use of a respirator. Surrounding objects also need to be protected.
- After the paint has dried, cover the façade with a layer of transparent varnish.
Sanding wooden elements
In many apartments there is wooden furniture, often inherited from grandparents. In terms of workmanship and artistic value, it is superior to a cabinet one, but over many years of service, the surface becomes covered with numerous scratches, chips and stains. The easiest way to make cosmetic repairs is sanding.
You will need the following tools: a scraper, sandpaper or a sander. The technique of using the scrapers is not difficult: the scraper is held with both hands and progressively moved in the direction of the wood grain. The disadvantages of rough grinding are eliminated with fine sandpaper.
The restored surface is treated with a primer. It will protect the wood from moisture and ensure good adhesion to the varnish coating. The varnish will add shine to the furniture and protect against the appearance of mold or mildew stains. It is applied similarly to paint, using a brush.
Restoration of the ends of chipboard furniture
The front surface of sets made of this material is restored using the methods described above. Other damage typical of furniture of this type, such as chips at the ends, can be repaired using melamine edges.
- In the store we select a new edge according to color and thickness. We measure the length of the required segment in advance and buy material with a small margin.
- We remove the old edging. To do this, heat the end with an iron.
- Using a chisel we remove the unevenness of the end, and then sand it with fine sandpaper.
- We put the new edge in place and smooth it with an iron. After the glue has hardened, we trim off the excess with a sharp knife and sand the joints.
USEFUL INFORMATION: Types, sizes and costs of kitchen countertops made of chipboard
Restoration of kitchen facades made of natural wood
Solid wood furniture looks great, but requires compliance with several operating conditions:
- The surfaces of wooden furniture should be cleaned with soft cloths soaked in a soapy solution. Do not use solvents or abrasive cleaners.
- Do not place hot dishes on the countertop.
- The humidity in the room should not rise above 70%.
- Minor damage and scratches must be repaired as soon as possible.
Scratches and cracks on the facades of solid wood furniture are repaired with melted wax. Chips are smoothed out with wood putty. After leveling the surface, the restored area is covered with a layer of furniture varnish.
If you need not just minor repairs, but a complete update of the appearance of the facade, replace the entire varnish coating. This is done this way:
- We dismantle the facades and remove the fittings.
- The surface is carefully treated with fine sandpaper. It is necessary to completely remove the old varnish coating. This is not always easy, especially if there are raised patterns or indentations.
- We remove varnish shavings and sawdust with a damp sponge or napkin.
- After drying, prime the surface twice, allowing each layer to dry before applying the next.
- Apply varnish with a brush or roller. We form the protective film in several layers, with each subsequent layer being thinner than the previous one. The varnish dries for at least a day in a well-ventilated area.
A different shade of wooden furniture will be given by stain or varnish with pigments.
You can change the set beyond recognition and give it a more modern look, as in the photo, by painting it.
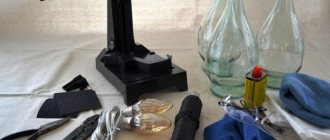
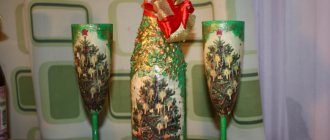
Moldings, overlays and decoupage
These restoration methods will give the kitchen set unique features: there is no limit to the scope for imagination.
Before applying jewelry, the surface for it is prepared: the application area is sanded, cleaned and degreased.
A 3D decoupage pattern is formed using a stencil: a material is applied through it to form a bas-relief. A popular option is to use wood putty. After drying, the pattern is sanded with sandpaper and covered with a protective layer of transparent or colored varnish.
Volumetric decoupage
Applying putty through a stencil
Decoupage with putty
For decoupage using napkins or decoupage cards, PVA glue is applied to the selected material. Then the drawing is applied to the cabinet door and smoothed out. After drying, apply 4 layers of matte or glossy varnish.
USEFUL INFORMATION: Which wallpaper to choose for the kitchen?
Moldings are overhead wooden or plastic elements. They, like decorative overlays, are attached with glue to a previously prepared surface. For wooden moldings it is possible to attach them to small nails without heads.
Moldings and overlays
Updating your kitchen with moldings
Moldings for furniture
Furniture decor
Door repair
A common defect in cabinet furniture is poor functioning of cabinet doors and bedside tables: they warp, do not want to close, and open spontaneously. The reasons are different: incorrect adjustment, defective hinges or magnetic latch, misalignment of the entire structure, swelling or delamination of the material.
Note: changes in the geometry of cabinets are often associated with the unsatisfactory condition of the back wall. The fiberboard sheet nailed there plays the role of a kind of retainer. If necessary, it is changed by cutting out the required fragment to size and attaching it with nails or small screws.
If the problem is in the loop, then replacing it is not always necessary: in most cases, adjustment helps. For this purpose, the design of the device has two screws: one is responsible for the fit of the door to the body, the second regulates its position in the frontal plane, moving it to the right or left.
A loop that has been torn out with meat can be put back in place using screws of a larger diameter. Another option is to drill holes, place wooden dowels in them using wood glue, and then screw fastening screws into them.
If the hinge breaks, it is replaced. Installation in old sockets is simple: mounting screws are screwed into the existing holes. It is more difficult if the hinge is installed in a new place or the door is changed. Assembly occurs in the following order:
- Sockets with a diameter of 35 mm for disc hinges are marked and cut with a milling cutter.
- A hinge plate is inserted into the slot located in the door perpendicular to the end and secured with a pair of self-tapping screws.
- The second plate is placed in the body, secured with screws through special holes in the bosses.
- Screw in the two adjusting screws to achieve the desired door position.
Details of adjusting the hinges are shown in the video.
Spontaneous opening of doors occurs when the magnetic strip is faulty. In some cases, it helps to clean the magnet and the iron plate it attracts from contamination, adjusting their relative position strictly opposite each other. If these measures do not help, then the element is changed.
And one more video: a little trick that will solve the problem of adjusting a cabinet with worn out hinges without replacing them.
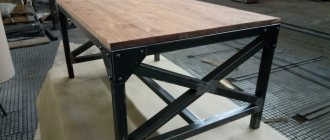
Restoring countertops and kitchen tables: interesting ideas
To refresh a countertop or table surface made of chipboard, staining, decoupage and varnishing are used. But there are other ways, such as tiling, as in the photo below.
A countertop surface improved with ceramic tiles receives many advantages:
- Not afraid of water.
- Becomes more resistant to mechanical damage.
- Easy to clean and remove dirt.
The disadvantage of this modernization is a significant increase in the weight of the countertop. But since kitchen furniture is used permanently, there is no big problem here.
The tiles are laid using regular tile adhesive. But the work has its own characteristics:
- First, we attach metal corners to liquid nails along the perimeter of the tabletop. They serve as edging for the tiles and cover the end of the covering.
- We lay the tiles: tightly and with minimal gaps. The glue dries quickly, so you shouldn’t cover the entire tabletop with it at once. It is recommended to apply it in small portions under one or two tiles.
- We wait at least 6 hours until the glue dries completely, rub the seams and cover with a protective layer of varnish.
Another original way to transform a tabletop is to create a mosaic or ornament under tempered glass. Several slats or corners are screwed to the surface, which will divide the tabletop into zones. Decorative filler is poured into these sectors: small pebbles, coins, shells, beads or sand. From above, all this splendor is covered with impact-resistant glass, which is glued on.
Interesting ideas
When updating, other methods of decoration are additionally used. They are often combined with the options above :
- Painting . The painting on the doors of the kitchen unit looks beautiful. Designers often create real artistic masterpieces on furniture. You don't have to have artistic talent to decorate your kitchen with paintings. There are many stencils sold in specialty stores.
- Stickers . This is the simplest option for decorating a headset. It looks stylish and unusual. Such decorations are sold in furniture stores and departments of decorative goods. The picture is glued using the same principle as polymer film.
- Mosaic . It is attached to putty or liquid nails. It is recommended to make a wooden frame around such a fragment. The mosaic itself is made from tiles and even broken dishes.
- Panel . In this case, the doors are decorated with stones, dry plants, shells and any other objects suitable for the interior. They are pressed into plaster, which is first applied to the door in a thick layer. The composition is coated with varnish.
Restoration of a burnt tabletop
Burnt countertops can be restored to their original appearance in the following way:
- Using a router, carefully select the damaged area. It is necessary to go deeper into the surface with ledges, reducing the area and slightly capturing intact material around the perimeter. The result is a recess that looks like a miniature quarry.
- Fill the hole with softened wood putty. It dries quickly, so we compact it into the recess in small portions.
- We cut off the protruding excess with a sharp knife, carefully sand the patch, and then polish it.
- We paint the restored area. In this case, you need to try to reproduce the color and texture of the main part of the countertop.
By combining these methods, you can restore kitchen furniture without large financial investments. This will not only restore the appearance of the old kitchen set, but also make it unique.
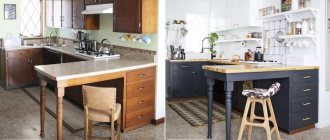
And finally, the promised selection of photos of kitchens before and after restoration.
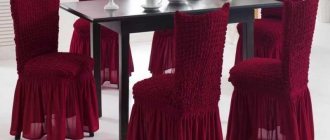
Chair repair
Damaged coverings of old kitchen chairs can be restored using the above methods. The exception is furniture with soft seats: re-upholstering them without skill is quite problematic, although possible. But there is a simple option: make a cover. In this case, reupholstery will not be required, and the appearance problem will be solved.
Loose parts are strengthened using wood glue. In exceptional cases, self-tapping screws are used with mandatory drilling of holes for them. Painting and decoupage transform an old, unsightly chair into an original and beautiful piece of furniture.
You should not throw away old kitchen furniture that has lost its outer luster. With a little imagination, you can give it a completely new appearance, adding originality to the interior of your home.