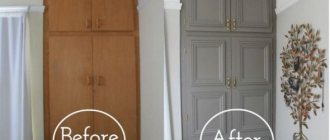
Restoration of an old sideboard with before and after photos.
Everything new is well forgotten old. Few people have not heard the saying, and it can also be correlated with the restoration of old furniture. Vintage items, also known as antiques that have seen several generations of families, are becoming increasingly popular. However, in Soviet times, many items had the same appearance, since they were mass produced but were famous for their quality.
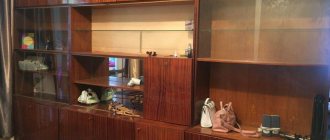
Restoration of an old kitchen cupboard
That is why most houses in the post-Soviet space are still filled with them. But it all depends on your desire: restoring your grandmother’s sideboard with your own hands will add originality to any interior.
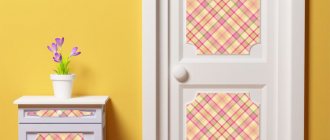
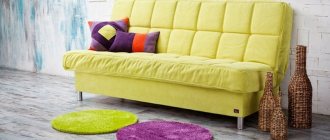
Restoration of a kitchen buffet in shabby chic style
Decoupage on a kitchen cabinet - a beautiful handmade item
Beginning of restoration
New life for an old sideboard
The desire to make a unique thing in a fashionable vintage style is not enough. Grandma's buffet or sideboard can only get a second life with enough effort. Before starting work, you need to prepare everything you need.
Buffet in Provence style after restoration
First, you should find out everything about the restoration of the selected piece of furniture and decide on the restoration technique and subsequent decoration, because simply painting the old sideboard will not be enough.
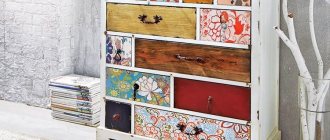
Restoration of an old cabinet with decoration of the back wall and bottom of the drawers
Overlay decorative elements
So, the moment came when the buffet began to take on a new look. For this stage I needed:
- mounting adhesive Moment Installation Instant grip MP-90;
- super-strong assembly adhesive Titeseal;
- screws;
- screwdriver
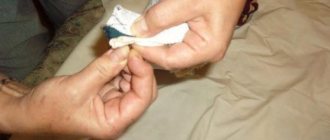
I wanted to decorate it with carved elements and paint it with chalk paint. I already had some elements in my stash, but some had to be made to order. The ones I had were made of oak, so I had to order the missing elements also from oak, although it turned out to be a little expensive. But what can you do for your “beloved child,” and the buffet has already become my brainchild, with which I not only managed to become close, but also fell in love with it. ))) I glued the decor using two types of glue: Glue Moment Installation Instant Grip MP-90 I really liked. It is quite thick and it is enough to apply it only in a few places on the decorative element. This is a very strong adhesive and immediately holds the glued object in place well. Small objects were glued with one glue, but large objects were glued with two glues and also secured with screws. For example, on elements such as “grape leaves” I first applied Moment Installation Instant Grip MP-90 in several places in order to fix them well on the door, in other places I applied Titeseal glue with a gun - it is more liquid and easier to apply. thin curls of a decorative element. Then I additionally fixed them on the inside of the door with three screws each. The size of the screws was selected taking into account the thickness of the door and the cover element. The glue that came out around the edges was removed with a toothpick and a knife. The doors of the chest of drawers are decorated with decorative elements.
Photo 57 Photo 58
Necessary tools for restoring old furniture
- Sandpaper and solvent
Sandpaper of different densities
Types of solvents for cleaning surfaces
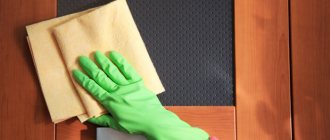
Any old piece of furniture is first of all covered with a factory layer of paint and varnish; it is possible that earlier they also tried to change or restore it. Therefore, it is necessary to rid the buffet of any old covering. Coarse sandpaper is needed for sanding and cleaning all surfaces. It’s easy to ruin wood by simply trying to peel off the top layers with sandpaper, which is why a solvent is needed; acetone is ideal. It is applied with a brush over the entire surface, special attention should be paid to the carved parts. Another way is to soak a rag or cloth and cover the sideboard for a few minutes. The layer of old coating will come off on its own, and the buffet can be cleaned with a simple cloth.
- Tools
Multifunctional Household Hand Tool Set
It is better to process furniture in a disassembled state, so you will need a lot of tools. It is possible that the buffet will only require cosmetic repairs. But sometimes you may need to tighten loose doors or secure legs. You need to have a set of screwdrivers and wrenches, a hammer, etc. on hand.
- Accessories
Antique furniture fittings for an updated buffet
Updating the sideboard will also entail installing new fittings - handles, fasteners, etc. All this can be easily found in specialized stores or made to order in workshops.
- Additional materials: wax and putty to remove unevenness; primer for surface treatment.
- Brushes, sponges and rollers for painting.
- Paints and varnishes (acrylic and oil paints, varnish, stain).
- Masking tape, PVA glue.
Additional materials for do-it-yourself buffet restoration
The doors of an old cupboard are often glazed, so you will need tape to protect them from paint. You will need glue if the furniture has already begun to delaminate.
Painting and varnishing
It was decided to paint the sideboard with chalk paint. For this purpose I bought English interior chalk paint. At this stage I needed:
- synthetic brushes of different sizes;
- flock rollers of different sizes;
- contour paste (baguette paste for restoration work) “TAIR”;
- sponge for applying paste;
- spray varnish Rust-Oleum Painter's Touch, 2x ultra cover clear - matte.
I'll tell you a little about this paint. I’ll say right away that the paint is quite expensive, but taking into account many advantages over other paints, I chose this one, and as it turned out, I was right - painting the buffet turned out to be not so expensive. Why I liked this paint: It took me less than 2 liters to paint the entire buffet from the outside and inside with all the shelves and drawers in 2 layers. I bought 2 liter cans and still have some paint left. Photo 59 In my work I used synthetic brushes and flock rollers of different sizes. I tried different rollers, but I liked the flock ones for this paint the best. First, I painted all the decorative elements with brushes, and then I painted the buffet itself with a roller. Flock rollers. Photo 60 Painting. Photo 61 The next stage of painting was gilding the decorative elements. But since my new fittings were the color of antique bronze, I had to decorate the elements to match the color of this fittings. Therefore, what I ended up with was not gilding, but something like bronzing.))) So, I took contour paste in the color “antique bronze”
I would like to draw your attention to the fact that “TAIR” also sells just “contour” in the same tubes, but in my work I used exactly contour paste, also known as “baguette paste for restoration work.” You can buy it at Leonardo, but, unfortunately, sales consultants cannot always distinguish “contour” from “contour paste”
I won’t go into details, I’ll just say that you can use several shades of paste at the same time and get amazing effects. Contour paste (baguette paste for restoration work) “TAIR”. Photo 62 I’ll briefly tell you how I applied the baguette paste. She applied a small amount of paste to a sponge, rubbed it in a circular motion on a disposable plate, evenly distributing the paste on the sponge, and then, barely touching the convex parts of the applied decor with this sponge, highlighted the relief. Photo 63 After painting and decorating, the buffet was coated with two layers of matte aerosol varnish Rust-Oleum Painter's Touch, 2x ultra cover clear. About 8 of these cans were required for the entire buffet. Photo 64 Well, we have reached the final stage. There is very little left to do - put the glass back in, put in a new mirror that I ordered from the workshop, install new fittings and assemble the buffet. I will not describe all these operations, because everything here is simple and there is nothing to describe. I did this in one day. Of course, the men helped me assemble the buffet itself and drag it into place.))) HURRAY! The buffet, which had a completely run-down and outdated look, has been transformed. Painting, decorative elements for furniture and new fittings changed its appearance and gave it new stylistic shades. Photo 65 Photo 66 Photo 67 Photo 68 Photo 69 I am very glad that I completed my task. “Resuscitation” and “plastic surgery” were carried out in a hurry - the client was not only alive, but also returned to duty in a new look. I am sure that it will delight us for many years to come and serve faithfully for its intended purpose. I apologize that the post turned out to be long and long-lasting, but I did not break it into parts. To everyone who was patient and read to the end, thank you very much - I wrote this for you!
Recovery technique
Buffet “Malachite Box” after restoration
Restoration begins with cleaning the surface and restoring problem areas. Before starting work, the furniture is disassembled: all fittings are removed, shelves and glass are removed (if it is removable). If you cannot remove the glass, cover it with tape or paper. In general, there are no special rules or methods for restoring old furniture.
- Deep restoration
The next step is to remove the old coating. It is better to do the cleaning outdoors - dust, dried paint and pieces of varnish will be difficult to remove later. After cleaning, you should thoroughly wash the buffet, degreasing the surfaces.
We process the surface with a grinding machine and remove the old coating
The sideboard needs to be inspected for unevenness or delamination, and then the cracks need to be puttyed and then sanded. If necessary, additional parts are restored - handles, legs or chipped edges. Most often, they use other similar furniture or cut it out of wood. Next comes priming. Only after all repairs and preparatory work have been carried out can you begin painting.
Putty on small cracks and then sand again
It is better to start painting from the main surfaces, and then move on to decorative elements (crown or carved sides). The paint is applied in two layers, but for simple aging of the wood, one thin layer will be enough.
We apply special paint for wood
- Decoration
Decorate the updated surface in decoupage style - this is the easiest way. To do this, select napkins or fabric with a pattern that matches the idea. The design is cut out and glued to the side of the sideboard. In this simple way you can get vintage furniture with an original pattern.
Artistic processing of old facades using decoupage technique
Painting is also used. Thin brushes and multi-colored colors are selected for it. The ornament is either drawn or outlined using a stencil.
DIY stencil painting of furniture using an airbrush
The finishing touch of decoration is varnish. It is applied in two layers after the glue or paint has completely dried, depending on the chosen decoration method. After the work is completed, assembly can begin.
Varnish on wood
An antique sideboard after restoration in a classic design
How to make a wardrobe or chest of drawers from a sideboard
The difference between a wardrobe and a sideboard is, perhaps, not so much external as functional.
A sideboard is usually understood as a cabinet in which dishes and kitchen textiles are stored. Personal belongings are stored in the closet. The top doors of sideboards traditionally have glass. The bottom of this piece of furniture consists of drawers. Cabinets are often made entirely of wood, although glass and stained glass are also used here.
- If you need to convert a sideboard into a cabinet, you can replace some of the glass elements with wood, or made of plywood, chipboard, etc.
- Another option is to transform the glass from transparent to colored and non-translucent using a special film.
- Also, most likely, you will have to change the color of the sideboard so that it fits seamlessly into the living room.
- It’s not uncommon lately to see master classes on converting old unnecessary sideboards from the Soviet era into multi-colored cabinets for children’s games.
- The chest of drawers is a vertical series of drawers. It is installed in bedrooms and living rooms, allowing you to store personal items and clothing out of prying eyes. If the lower part of the sideboard consists of drawers, depriving this item of the top, you can get a chest of drawers. In some furniture models, individual elements can be detached from the overall structure without problems, in other pieces you will have to use a saw.
So, as you can see, there are many ways to give old furniture a second life. The main thing is to have a desire to work with your hands, as well as a good imagination.
Are you wondering how to make a cabinet out of a sideboard? Then watch the following video, where a wardrobe will be made using the example of an old sideboard-chest of drawers:
Caring for restored furniture
New life for an old sideboard with your own hands using the decoupage technique
Restoring an old sideboard has minor drawbacks, which, however, are no different from caring for new furniture. The surface should be carefully washed when dirty, ideally with clean water and a soft cloth, so the sideboard will not be scratched.
White buffet with old grandma's dishes
It is not recommended to place old refurbished furniture in areas of high humidity or heat generation. Next to the stove in the kitchen, near a radiator, or even just near a window, the condition of the paint can quickly deteriorate. You should also not leave the buffet on the veranda.
Unusual design of a Soviet buffet in the old Russian style
Restoring a sideboard with your own hands begins with inspection and repair, after which you can begin decorating the surface. This way you can give an old sideboard a completely new life and update your home interior.
Restored old furniture allows you to update your interior at minimal cost
Do-it-yourself restoration of a buffet in Provence style
Advantages
Restoring furniture yourself has a number of advantages.
These include the following:
- Saving money on purchasing new products. A restored wooden sideboard can last for many years, while buying antique furniture will cost a lot of money.
- To decorate wooden furniture, you can use available materials, especially for cosmetic repairs.
- Restoration allows you to restore the original color, eliminate chips, cracks, stains and other defects that appear due to negative external influences or during long-term use.
Photo gallery with the best do-it-yourself restoration work on buffets:
PreviousFurnitureInteresting ideas for creating furniture with your own hands
Next
FurnitureWe make our own original furniture from pallets
Step-by-step master class
Before you restore an old sideboard, prepare the necessary tools and materials:
- Water-based matte primer
- Acrylic paints: dark ivory, light ivory, pink, sienna (natural), green, yellow and magenta
- Slowing Medium
- Matte water-based varnish for decoupage
- Wax varnish-gel (flatting)
- Glue for decoupage
- Transparent cooking film
It’s easy to update a buffet with your own hands; to do this, follow the step-by-step master class:
Start by preparing the base: polish the wood surface using progressively finer sandpaper, working in the direction of the wood grain.
Thoroughly clean the surface of dust, apply 2-3 layers of matte primer with a soft brush and leave to dry; clean the surface of each layer. Using a dry and clean foam roller, apply 1 coat of dark ivory paint to the entire surface of the sideboard (the roller does not leave strokes like a brush).
When the work is dry, apply a coat of light ivory paint diluted with retarding medium in a ratio of 1:10. Using a size 50 bristle brush, remove some of the paint in long, criss-crossing strokes, this will allow the paint underneath to show through, creating an aged effect.
Both colors will be mixed into one shade with a hazy effect.
For a DIY Provence buffet, on lightly primed transparent cooking film, apply a layer of pink acrylic paint diluted with a retarding medium.
Place the film diagonally on the cupboard door and, using gentle pressure, transfer the paint layer to the wooden surface. Pull sharply and remove the film, creating the effect of marble veins
Be patient and repeat this technique, covering the entire surface to be decorated.
Use a sea sponge to tamp the paint, creating transitions of color tones. Using a writing brush, use natural sienna paint to highlight the marble veins. Using a stiff bristle brush, lightly paint the typical “holes” on a marble surface onto the wood surface. Leave to dry, then coat the work with a protective layer of matte decoupage varnish.
Start decoupaging your buffet by carefully cutting out your chosen decoupage pattern and immersing the piece in water for a few minutes. It is necessary to moisten the paper with water in order to soften it, this way you can avoid the formation of folds and air bubbles during gluing.
Apply glue evenly to the back of the cut out piece and stick it onto the surface of the sideboard. Use a damp sea sponge to remove excess glue.
Using a synthetic brush with a pointed tip, apply your chosen paint next to the pasted pattern, creating a bright spot. Using a dry sponge pad, begin to create a haze of color, brightening the color close to the decoupage pattern and gradually weakening its intensity as it moves away. Start with a lighter paint and create a hazy effect where the different colors meet.
First, think over and put together the composition and only then finally glue the parts. Create harmonious compositions in accordance with the decorated base.
To decoupage a buffet with your own hands, cut out all the small paper parts and secure them with a reusable rubber profile that does not leave marks on either the wooden surface or the paper.
Using a glass jar, draw a false handle using light pencil lines.
Take a sharp-tipped brush with paint thinned with retarding medium and draw a fake pen by tracing a pencil outline.
Create a "tramré I'oeil" effect by gluing two cute paper mice on top of a false hole painted with different shades of brown paint, alternating dark and light areas.
To get a more realistic effect, paint cracks at some points on the surface of the furniture using brown paint diluted with a retarding medium. Cover the work with a protective layer of flatting.
General information
Materials and tools:
- a spatula, allows you to remove old varnish or paint coating, also using a tool to apply and distribute finishing materials on the surface.
— A furniture scraper is a tool used to remove varnish, paint, and grout. The presence of a rubberized handle will make using the tool as comfortable as possible. And the fastening mechanism allows you to firmly fix the specially sharpened blade.
— Foam sponge, removes dirt from any surface thanks to the high density of polyurethane.
Advantages:
— absorbs water and cleaning agents;
— forms a large amount of foam;
— leaves no streaks;
- easy to squeeze;
- dries quickly.
— Brushes and water-repellent varnish. Large brushes are used to paint the main area of the buffet; brushes with a smaller diameter are used for areas in hard-to-reach places. After painting, a fixing layer is applied - a water-repellent varnish.
— Wax, acrylic or stain. The listed products are used to restore the color of wood and improve its appearance. Most often, an oil-based stain is chosen, which gives the wood the most natural shade. In addition, stain is absolutely safe for health.
— Clamps, devices with a clamping mechanism used to hold products during operation or when gluing individual parts. Clamps allow you to secure the tree in a stationary state, which facilitates further work.
— Glue and solvent for varnish coating. You can remove the old layer of varnish not only with a spatula and scraper, but also with the help of a special solvent. Glue will be required if the sideboard begins to delaminate or if some elements are not securely fixed.
— Vernier calipers, used when calculating dimensions and determining the required angles.
— Fittings, during restoration it is necessary to change the fittings.
— An electric jigsaw helps you easily cut wood and make curved cuts.
Vintage sideboards for the living room (10 photos)
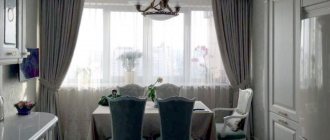
A bright sideboard can become the heart of your living room. Use the upper open shelves to store your favorite tableware, porcelain collection or luxury alcohol. The lower shelves are useful for tablecloths, sofa cushions and other accessories. Candlesticks, decorative vases and photo frames will look great on the dividing tabletop. But unlike the kitchen, here it is better to avoid an excessive amount of things and limit yourself to only your favorite items.
Also read: An alternative to a sideboard and buffet - a showcase cabinet in living room design
Decorative elements
If the main covering of the buffet is in good condition (or, for example, you want to preserve the charm of antiquity, while only slightly updating the appearance of the item), you can add various decorative elements. The easiest way is to apply designs on the doors or walls of the buffet. For this, it is most convenient to use ready-made stencils (even a person who does not have any special talent for drawing can use this method).
However, some rules must be followed:
- Clean the area where the design is applied from dust and dirt, and coat with varnish.
- Place the stencil in the desired location and secure it.
- Dilute the paint to medium thickness (too thick or liquid composition will not work).
- The coating must be applied with a sponge in a thin layer 1-2 times.
- After the paint has dried, cover the finishing area with protective varnish.