You can breathe new life into an old cabinet with your own hands and make furniture that will organically “fit” into the interior using the decoupage decorating technique.
You can breathe new life into an old cabinet with your own hands and make furniture that will organically “fit” into the interior using the decoupage decorating technique.
The principle of decoupage is gluing paper drawings to any household items to create a certain style. Decoupage refers to a type of work called upcycling - the artistic design of old things, creating new high-quality objects from them.
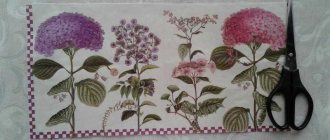
It is most convenient to use napkins - the softness and thinness of the paper allows you to carefully create a beautiful ornament on furniture, creating imperceptible transitions from the general surface.
There are a lot of offers to buy new furniture now, but don’t rush to throw out your old, comfortable cabinet - it is possible to transform it with the help of decoupage even for those who have never made or repaired furniture with their own hands. By selecting materials and using your imagination, you can decoupage a cabinet with your own hands in any style - classic, Provence, country, modern.
Applying several layers of varnish will help soften the transition between the plane of the main canvas and the picture.
Ideas for decoupage
In addition to special designs for decoupage, you can transform your closet using any available paper media:
- napkins;
- color pictures from magazines;
- wallpaper;
- colorful printables.
Remove all elements from the frame: handles, doors, unscrew the hinges, pull out the drawers and, preferably, remove the facades from them - they are carefully processed separately.
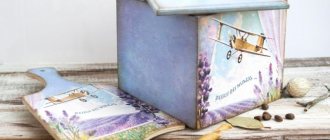
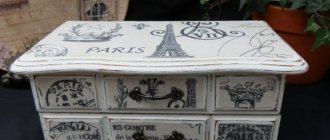
It is most convenient to use napkins - the softness and thinness of the paper allows you to carefully create a beautiful ornament on furniture, creating imperceptible transitions from the general surface. Napkins sold in regular stores are suitable for creating cabinet decor in any style - you just need to choose the appropriate pattern. A large selection is provided to create a Provence style - cozy, romantic, sophisticated images of flowers and plants, executed in pastel colors on a light background, will create comfort and fill you with tranquility.
Use coarse sandpaper or an abrasive mesh to rub the islands previously treated with paraffin.
Denser textures are first thinned using sandpaper. Applying several layers of varnish will help soften the transition between the plane of the main canvas and the picture.
Applying several layers of varnish will help soften the transition between the plane of the main canvas and the picture.
Wallpaper is suitable for those who are just starting to master the technique of decoupage furniture. You can create a unique decor with them by using several different types on one plane or by decorating the protrusions of the facades.
The most difficult thing to prepare for decoupage is a polished cabinet - paint does not adhere well to polishing, so it must be thoroughly cleaned with coarse sandpaper.
Decoupage of an old cabinet is not limited only to paper materials; you can use beads, sequins, and other decorative items.
It is torn off, not cut off, so that the transitions between the pattern and the plane of the cabinet are invisible.
Results
Today you learned about what decoupage is, its main types and techniques. Thanks to the proposed master classes, you can effortlessly master this incredible way of decorating objects and update the interior of your apartment.
Did you like the article? Subscribe to our Yandex.Zen channel
May 22, 2022
Accessories, Design
If you want to express gratitude, add a clarification or objection, or ask the author something, add a comment or say thank you!
Preparation
Preparing a cabinet for decoupage is the most labor-intensive process, accompanied by dust.
Moving from the center of the napkin, use a brush to carefully straighten the paper, pressing lightly, avoiding soaking and wrinkling.
To work you will need
- Abrasive meshes: significant surface irregularities are processed with coarse-grain, then medium-grain, fine-grained and polished for finishing.
- Grater for attaching the mesh.
- Dry rag, sponge or brush.
- Wood putty.
- A rubber spatula is soft and will seal all the holes and cracks.
- Roller.
- Primer – acrylic can be used for all types of finishes.
- Respirator.
- Acrylic paint.
- Roller.
- Narrow brush.
Periodically it is necessary to moisten the pattern with diluted PVA glue.
Base requirements
The preparatory stage for creating cabinets using the decoupage method is choosing a base, most often wood or chipboard. Wooden products look harmonious with inserts of papier mache, tin or glass. You need to be especially careful when using a plastic base, as the technique may simply not be suitable.
When choosing a basis for decoupage, you should adhere to the following rules:
- The wooden surface is treated with sandpaper to level it well. If there are grooves, they are filled with a special wood putty, after which they are sanded until the surface is smooth;
- glass products must be thoroughly washed and dried so that no lint remains. It is important to degrease the surface before starting work;
- Tin items can be cleaned well with water and vinegar mixed in a 1:1 ratio. If the tin has rusty stains, they can be easily cleaned with a brush or a wire brush.
Furniture preparation
Remove all elements from the frame: handles, doors, unscrew the hinges, pull out the drawers and, preferably, remove the facades from them - they are carefully processed separately.
If you plan to paint on artistic elements on furniture or add any voluminous decorations, then this must be done after the glue has dried.
Remove the old coating with a brush (the rag will push dust into the cracks), put on a respirator and sand the surface of all parts. After each treatment, remove dust.
You can not only admire the closet, but also fully use it.
Degrease with acetone or white spirit.
Putty: rub over large flaws, remove unevenness, then level the surface with a thin layer, treat with abrasive mesh No. 100-120, for painting No. 180 and higher.
Do-it-yourself furniture decoupage work is painstaking, but the result will bring pleasure.
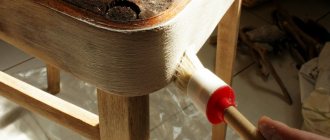
Apply a primer - improves the adhesion of the surface to adhesive and coloring materials, promotes a uniform color tone.
Before gluing the wallpaper, you need to separate the backing layer of the paper, then they will become thinner and fewer layers of varnish will be required.
After the primer layer has completely dried with acrylic paint, paint the corners with a brush and large surfaces with a roller.
The pictures are cut out, smoothing the transition to the surface of the parts is ensured if they are applied with several layers of varnish.
To create the look of antique furniture, after the first layer of acrylic paint, coat several places on the surface of the cabinet with a paraffin candle. Then prime the cabinet again. Use coarse sandpaper or an abrasive mesh to rub the islands previously treated with paraffin.
. If you use a napkin as decoration for decoupage, carefully tear the paper around the design.
The most difficult thing to prepare for decoupage is a polished cabinet - paint does not adhere well to polishing, so it must be thoroughly cleaned with coarse sandpaper.
The most difficult thing to prepare for decoupage is a polished cabinet - paint does not adhere well to polishing, so it must be thoroughly cleaned with coarse sandpaper.
Exquisite decor in Provence style
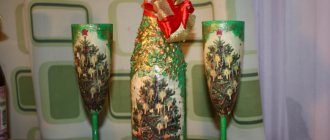
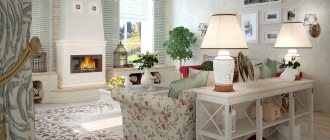
Provence is one of the most popular techniques because it is associated not just with the village, but also with the sea, the sun, the smell of flowering plants, that is, with a wonderful holiday in the lap of nature. All this affected the aesthetics of Provence: sun-bleached colors, like in a photograph, many living and dried plants, naturalness, simplicity, uncomplicated lines. Decoupage of furniture elements in the Provence style must include one or more mandatory colors: white, cream, beige, pale lemon, terracotta, burnt orange, sunflower petal color, blue, pale green, sea wave and lavender.
Decoupage process
To attach the drawings you will need the following materials and tools:
- PVA glue;
- water;
- two brushes for painting - one thin for painting, one wider for gluing;
- napkins;
- acrylic lacquer;
- acrylic white paint;
- colors for paint.
After the primer layer has completely dried with acrylic paint, paint the corners with a brush and large surfaces with a roller.
Apply PVA glue, slightly diluted with water, to the prepared cabinet using a painting brush in the places where the pictures are located. If you use a napkin as decoration for decoupage, carefully tear the paper around the design. It is torn off, not cut off, so that the transitions between the pattern and the plane of the cabinet are invisible. The pictures are cut out, smoothing the transition to the surface of the parts is ensured if they are applied with several layers of varnish.
Learn how to decoupage a cabinet with your own hands
Moving from the center of the napkin, use a brush to carefully straighten the paper, pressing lightly, avoiding soaking and wrinkling. Periodically it is necessary to moisten the pattern with diluted PVA glue.
Preparing a cabinet for decoupage is the most labor-intensive process, accompanied by dust.
Before gluing the wallpaper, you need to separate the backing layer of the paper, then they will become thinner and fewer layers of varnish will be required.
Decoupage of an old cabinet is not limited to paper materials; you can also use beads.
A regular stationery file will help you avoid tearing the design during decoupage:
- Place a napkin on it with the front side;
- spread with pva glue;
- attach to the surface of the cabinet;
- iron with a cloth or sponge;
- remove the file.
Wallpaper is suitable for those who are just starting to master the technique of decoupage furniture.
Apply acrylic varnish to a napkin in at least 2 layers, the wallpaper is covered with 3 layers, the effect of “aging” the cabinet can be done using craquelure varnish.
Let's learn how to decoupage a cabinet with your own hands.
If you plan to paint on artistic elements on furniture or add any voluminous decorations, then this must be done after the glue has dried.
The principle of decoupage is gluing paper drawings to any household items to create a certain style.
Dense pictures can be glued using the “embedding” method:
- coat the cabinet with 2 layers of varnish at intervals while drying;
- apply varnish 3rd time, attach a drawing;
- Using a rubber spatula, pressing lightly, press the paper into the surface;
- After drying, cover with a layer of varnish.
By selecting materials and using your imagination, you can decoupage a cabinet with your own hands in any style - classic, Provence, country, modern.
Do-it-yourself furniture decoupage work is painstaking, but the result will bring pleasure. You can not only admire the closet, but also fully use it.
What tools and materials will be needed?
Decoupage of furniture with napkins involves the use of a number of tools, as well as the acquisition of the necessary materials. The list of the latter includes:
- paper napkins . In this case, the choice can be made in favor of ordinary dining rooms or you can buy ones specially designed for decoupage. Paper handkerchiefs will also work;
- Pore filling agent - necessary for sealing cracks and crevices on old furniture, helps to make the surface perfectly smooth;
- sandpaper - for sanding;
- decoupage glue or PVA (it is better to use a special one, PVA leaves marks);
- acrylic varnish for wood , matte or glossy - optional;
- applications – images used for this technique.