Today it is impossible to do without cabinets designed to store things. These pieces of furniture are installed in residential and office, public and industrial premises. There are many types of cabinets for various purposes.
It is possible to order the design according to an individual drawing. Those who want to embody their own preferences in the product or save money can approach the issue creatively and make a cabinet with their own hands.
DIY cabinet - drawings, description, step-by-step instructions
What accessories are used to assemble furniture?
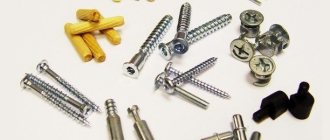
This is a very important question, because each hardware has its own technical parameters and requires special fixing technology. A large number of problems with assembling cabinets arise precisely because hardware was used without taking these features into account.
Types of furniture fasteners
Table. Types of hardware for sliding wardrobes.
| Name of fastener | Short description |
| Confirmations | The second name is Euroscrew. Used for simplified connection of most furniture elements. It is screwed into pre-prepared holes, the depth depends on the length of the hardware. Disadvantage: the part being connected has a through hole, which has a negative impact on the appearance of the furniture. |
| Minifixes | The most reliable and complex connection. It consists of two parts: a housing (eccentric) and a connecting bolt with a round head. The disadvantage is that a special Forstner drill must be used for the connection; all holes must be made with maximum precision. Advantages - the front side of the parts is not damaged, it is possible to disassemble/assemble furniture without compromising the strength of the connection. The fact is that all threaded connections in furniture boards significantly reduce their strength after each unscrewing: chipboard boards crumble, the diameter of the hole increases, and the thread can no longer reliably hold the hardware. |
| Dowels | A traditional connection that has been used for many centuries to secure furniture elements. The front surfaces are not damaged, the strength of furniture joints meets existing requirements. The disadvantage is that the connection is disposable, since it sticks to the glue and is completely destroyed when disassembled. |
| Can be plastic or metal. These fasteners are designed to secure furniture parts at right angles to each other. They are fixed with self-tapping screws and allow you to adjust the position of the elements after assembly. Excellent replacement for complex hardware. Disadvantage: corner ties must be installed only on the inside of the furniture; they cannot be hidden. |
| Intersectional ties | They are used during the assembly of complex cabinets; they connect several separate autonomous sections together. Sliding doors are rarely used in simple two-door wardrobes. |
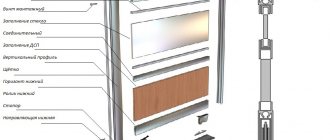
Wardrobe components
Find out what types of storage systems are in the dressing room, and also familiarize yourself with the DIY assembly process in a special article on our portal.
What tools are needed
Significant expenses in purchasing the tool will not be required. To assemble a kitchen set, a wardrobe or a hallway, you need to have the usual set of tools: a screwdriver, a hex key for confirmation, a screwdriver, various drills, a bat for confirmation, an awl, a pencil, a tape measure, a square, fine-grained sandpaper, an electric drill, a stationery knife, iron, joint knife, rubber mallet, clamp for parts.
The distance between opposite corners should be the same.
Assembling a wardrobe with your own hands is quite easy and anyone can do it simply by following the instructions.
It is unrealistic to guess what tools will be needed to assemble furniture. It depends on what kind of project it is - difficult or not.
Now you need to install the wardrobe doors.
To open a closet, you don't need to remove chairs or move other furniture.
Methods and stages of assembling a sliding wardrobe
The assembly order also does not depend on the type of furniture; all products have the same elements for their intended purpose. This means that they must be collected using universal technology. What are the assembly methods?
Horizontal
It is necessary to prepare a large area, free it from all interfering objects. First, the frame of the wardrobe is assembled. The bottom is placed on the edge, the sides and middle are baited to it in the same position, then the top is baited. The angles and dimensions are checked, if everything is normal, then the fasteners are tightened until they stop.
Assembling the cabinet frame in a horizontal position
Then the back wall is fixed, which significantly increases the strength of the structure. Legs or wheels are screwed to the bottom, and the frame is raised to a vertical position. Now it has sufficient strength to easily withstand all unusual loads that arise during furniture installation. Doors are always installed last.
The doors are installed last.
Advantages of this method:
- there is an opportunity to perform all the work independently;
- the risks of mechanical breakdowns of cabinet parts are minimized;
- work can be divided into several stages depending on capabilities, during which time the structure is not subjected to any loads;
- The process of checking the connection angles of individual parts is simplified.
Horizontal assembly greatly simplifies the workflow
There is only one drawback - you need a lot of free space in the room, it is not always possible to free it up. Especially if it is residential and cluttered with a lot of furniture.
Vertical
A more complex method, it is highly recommended to involve assistants for this assembly. With this method, the legs are installed on the bottom, then the sidewalls and the middle partition are fixed to it in a vertical position. At this time, problems arise - the parts wobble and can completely tear out the connection. We need to come up with methods for temporarily fixing them or call an assistant. The second solution is more acceptable; this is the only way to fully guarantee the safety of all cabinet elements during assembly.
You will need a helper to assemble the cabinet vertically.
After installing the frame, the back wall is fixed, and then all the internal filling is installed. The doors, as always, are installed last.
Find out how to make lighting in the kitchen under the cabinets, and also familiarize yourself with the planning principle, the choice of lamps and lighting colors, in a special article on our portal.
Prices for sliding wardrobes
Wardrobe-wardrobe
Beginning of work
Proper preparation when assembling the cabinet significantly saves time and simplifies the work.
If you carefully fold everything and take it step by step, you can avoid confusion when fitting parts. The next important point is to check the items that were brought or delivered to you - they must be free of defects, scratches and breaks. It is advisable not to take the parts out of the packaging right away, otherwise you may end up in a situation like with Legos or a mosaic: you will have to spend a long time guessing where and why this or that small part is needed, which seemed to be superfluous, but for some reason ended up in your box. The best option would be to number all the parts that will go into the work process. This way you won't get lost or confused. Some manufacturers install special stickers on parts that must fit together. Having freed up space for working with future furniture, you need to cover the floor with cardboard, film or some kind of fabric that will serve as protection (from scratches, dust, sawdust and other debris) in further work. If you plan to have built-in furniture, then you should clear a space near the part of the wall where the cabinet will be located.
Step-by-step instructions for assembling a sliding wardrobe with 2 doors
We will look at an example of assembling a specific model; if you understand the nuances well, then no difficulties will arise during the installation of other types of furniture. To carry out the work you will need a screwdriver, a hammer, a mounting knife and PVA glue. Glue will be needed only in one case - the cabinet has connections on dowels.
In addition to tools, you will also need PVA glue
Step 1 . Bring the packages into the room, find a bag of hardware and sort them. As we mentioned above, you need to understand the purpose, location and features of each type of fixation.
Fasteners must be included with the cabinet
Step 2 . Open the package with the bottom and top of the cabinet. It is shorter in length than a package with sides and an internal partition. Check the condition of the elements. This package also contains some shelves.
The bottom, top and part of the cross shelves are usually packed together
Step 3 . Select minifix connecting bolts from among the hardware. Screw them into the holes prepared by the manufacturer. Tighten until it stops, but watch the force. It must be remembered that chipboard does not belong to the class of durable materials and reacts extremely negatively to exceeding critical forces. In our case, there are six pieces of hardware, two for the sidewalls and two for the internal partitions.
There are already ready-made holes for minifixes
Step 4 . Find the bottom of the cabinet and install the legs in place. They are made of plastic and have metal inserts to increase the strength of the connection. Assemble the legs and prepare them for installation.
Metal fasteners must be inserted into the plastic body of the leg
Step 5 . Turn the bottom upside down, find the holes into which the elements are installed. If the holes are not deep enough to screw in the screws, you need to drill a little to fit the hardware.
The legs are inserted into the prepared holes on the bottom
Step 6 . Turn the bottom into working position and screw the minifix bolts into it.
Screwing in minifixes from the back of the bottom
Step 7 . Insert the eccentrics of the minifixes into the partitions and sidewalls. Make sure that the slots of the eccentrics point towards the heads of the bolts: downwards at the bottom, and upwards at the top, respectively. The elements should fit into the holes prepared by the manufacturer easily, but at the same time not wobble. If the holes are larger than required, then a big problem appears. Which? Under normal conditions, the eccentric rests along the entire lower arc of the hole, otherwise the contact area is significantly reduced. This is a very negative factor. At the lowest point, the thickness of the slab is insignificant, its strength is very low. As soon as the actual loads exceed the maximum values, the thin part of the chipboard is destroyed. The holes will have to be redone, which means additional costs and loss of time. In addition, there will be unsightly holes in the sidewall slab, which are also noticeable from the outside.
Installing eccentrics in the sidewalls
Step 8 . Connect one side panel to the bottom. Place it vertically, point the heads of the bolts into the holes and turn the eccentrics of the minifixes. Always hold the side with one hand. Do not deviate it from the vertical by more than 10–15°. If this condition is not met, mechanical damage to parts is possible. We have already mentioned that it is better to work together, but if it doesn’t work, lean the side panel very carefully and carefully against the wall. This should be provided for at the stage of assembling the bottom; place it at a distance of about 15–20 cm from the wall.
Connecting the bottom and sidewalls with minifixes
Step 9 . Replace the vertical internal partition and also attach the minifixes.
The vertical partition is also fixed with minifixes
Important. During assembly, never tighten fasteners until all parts are in the correct position. Reinforced hardware makes it possible to simultaneously hold and change the position of elements without damaging the technological holes.
Step 10 . To increase the stability of the position of the sidewall and the internal partition, connect them with a shelf. Work very carefully and hold the elements constantly. The parts are fixed with euroscrews and tightened with hex keys. In this position, part of the frame gains strength, but it is still insufficient; work very carefully.
To increase the stability of the frame, a shelf is attached
Step 11 . In the assembled section of the wardrobe, put all the shelves in place. Now they can be tightened with force and ensure a tight fit of the parts.
The shelves are secured with confirmations, which are tightened using a hex key.
Step 12 . Attach a small vertical partition and a long horizontal shelf to it. Not all cabinets have this element; if you have the same situation, then the operation is skipped.
This cabinet model has a vertical partition at the bottom
Step 13 . Put the second side panel in place, tighten all the eccentrics, they should pull the parts tightly. Now it no longer wobbles, there are two points of fixation: to the bottom and to the horizontal shelf. This situation will make the assembly process much easier.
Fastening the second side panel significantly strengthens the frame
Step 14 . Replace the top of the cabinet and tighten the fasteners. The frame is already quite stable, you can relax a little and work more calmly. Reinstall all cabinet shelves.
The top part is screwed on
Prices for cordless screwdrivers
Cordless screwdriver
Step 15 . Secure the back wall elements. In order to save materials in this version, the manufacturer used narrow strips of fiberboard; plastic inserts are inserted between them to cover the cut points. Of course, large parts of the back wall look much more advantageous, but they complicate packaging and require slabs of standard sizes, and strips can be made from waste from the production of other types of furniture. The fiberboard boards are fixed with wood screws. Screw them in carefully; the screws should land exactly in the middle of the furniture boards.
The back wall is sewn up with fiberboard strips
Important. Do not allow a situation where the self-tapping screw is screwed in at an angle and damages the external decorative coating of the sliding wardrobe.
Step 16 . Assemble the drawers, check the corners and screw the bottoms to them. It is also made of fiberboard and is fixed with self-tapping screws. Higher quality models have a plywood bottom; this material has improved performance characteristics.
Box assembly process
Step 17 . Install the supporting elements of the extension mechanism, guides, etc. on the drawers. The list of parts differs depending on the type used. Check the dimensions again, if everything is normal, then you can fix the drawer front plate and install it inside the cabinet. Please ensure that all installation dimensions are maintained exactly; the surfaces of the drawers should not interfere with the normal functioning of other cabinet elements.
Guides are screwed to the bottom of the drawers
Practical advice. Use corrugated cardboard to control the gap between the bottom of the drawer and the shelf. It has a thickness of 5 mm, which is considered the optimal parameter.
All that remains is to install a metal tube for outerwear. Fix its position using a bubble level and fasten it with wood screws. Adjust the position of the cabinet with the legs and you can install sliding doors. The process does not cause any difficulties; the specific algorithm depends on the manufacturer. Each of them makes its own minor changes, but the general engineering principles are exactly the same.
After installing the drawers, attach the clothes rail
When installing sliding doors, you should always install the inner one first, and then the outer one. Otherwise, the parts will not fit on the guide elements. Adjust the smoothness of the ride, set the limiters. If the closet is not in its place, then move it according to the furniture arrangement plan in the room.
Installation of wardrobe doors
How to work with laminated chipboard - a popular material for cabinet furniture
Currently, laminated chipboard is mainly used in the production of furniture. This is the first principle. It is wood shavings of coarse dispersion. Using the hot pressing method, it is given the shape of a sheet. In the manufacture of slabs, formaldehyde resins are used; they are an additional component. The difference from simple chipboard is the coating with a film made of paper and melamine resin. In terms of environmental indicators, it is better to use materials of class E1. Laminated chipboard boards have good compaction, due to which furniture made from them is strong and has a long service life.
Fastening the rails to the cabinet door
If you think that this material has the same composition, then you are mistaken. Based on their coating, they are divided into veneered, rough and laminated. Based on their quality composition, they can be divided into three grades: first, they use first-class sawdust (usually wood of the same species). The surface is flawless, not a single chip. The plate is decorated, laminated with film or veneer. Second grade – you can already see small defects. There may or may not be cladding. Third, there are already noticeable defects here. Such slabs are not covered with anything.
Until the cabinet is fully assembled, make sure that the attached parts do not tilt, as the fasteners may break off.
In addition, laminated chipboards are moisture-resistant and fire-resistant (withstand high temperatures). They are mainly used to make furniture frames, but are also used in the production of partitions or used as interior decoration. It is worth mentioning that laminated chipboard, due to its composition, perfectly holds nails and screws.
In order to give rigidity to the wardrobe, it is necessary to secure the back wall.
The main “steps” for assembling sliding wardrobes with your own hands are indicated in the instructions.
Furniture made from these boards has many advantages compared to other materials.
- Acceptable price indicators.
- No difficulties in manufacturing.
- Good quality.
- Significant period of use.
- Variety of colors and decorations. This will help you choose the perfect furniture for your living room, kitchen or children's room.
- Blends perfectly with other materials.
Such furniture looks great in any interior.
Another important feature of laminated chipboard is that these boards have heat and sound insulation. Therefore, they can sheathe the walls of the room.
Make sure that the holes for the shelves and hanger rod mounts match the holes on the opposite rack.
Also, if you have started remodeling an apartment/house, knowing how to assemble a wardrobe yourself will help you easily and quickly resolve the issue of moving this furniture.
We place the rails - guides
Now the most crucial moment is the installation of the lower and upper rails for the doors. The bottom rail has two grooves for the movement of rollers:
And the top is divided into two sections:
In both, you must first drill holes for screws to attach them to the base and cover.
The holes must be chamfered to allow the screw to be screwed in flush.
It is enough to make 4 holes in each plank. We fasten the bottom rail first, marking the corresponding fastening points.
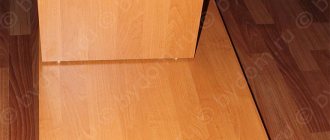
The distance from the edge of the base to the leading edge of the rail should be 2.5 cm.
To ensure that the doors do not jam and they move evenly, it is necessary to install the cabinet strictly horizontally, which can be done using a regular building level.
The longer the level, the more accurate the horizontal indicators will be.
The top rail is attached in a similar way with the only difference being that you need to drill holes in a checkerboard pattern in both compartments.
Screws from the set supplied with the cabinet are used as fasteners.
From the front end of the top cover to the beginning of the edge of the rail, the distance should be 2 mm.
We hang the doors
Before this stage, you need to check the gutters in the lower bar for the absence of debris that will interfere with the movement of the rollers, once again make sure that the planes are horizontal and check all connections for rigidity.
The door is first inserted into the top rail.
And then the end rollers need to be placed in the groove of the lower rail.
All 4 doors are installed in this way (the main thing is not to confuse the picture).
In principle, there is nothing complicated in installing a wardrobe. You just need to take a responsible approach to all stages of its assembly, and then you will not only improve your skills as a home craftsman, but also probably be grateful for preserving the family budget.
Installing internal partitions
At the lower end of the partitions there are holes into which dowels must be inserted before installation.
A dowel (chopik) is a small piece of round rod used to strengthen wooden joints.
There are blind holes in the bottom plate, which are intended for such dowels. Having aligned the dowels and holes, we install the vertical partitions in their place (an assistant will be needed here).
Aligning the structure
The alignment process consists of the following steps. It is necessary to use a tape measure to first measure one diagonal, then the second and, based on the difference in values, determine in which direction you need to “press” (move) the top of the cabinet so that its corners are perfectly straight.
Now you can wrap the confirmations to the end with force.
Rear mount
This stage can be considered the final one. The rear wall of the cabinet is usually made of HDF, the thickness of which is from 3 to 4 millimeters. It is fastened with the help of furniture nails, already supplied with the purchase of the cabinet, or special screws of small sizes 4*16 and lining corners. Of course, a more reliable and stronger option is screws with backing corners; they will securely fix the back wall and will not allow it to fail, unlike furniture nails. Therefore, when purchasing a cabinet, you will immediately be sure which components are included in the furniture assembly.
Note!
Insulate the foundation with your own hands - a step-by-step description of the use of the best materials and technologies (90 photos)
- Do-it-yourself pergola on a summer cottage: step-by-step instructions with photos and descriptions
Laying laminate flooring with your own hands: a detailed description of how to lay laminate flooring. Laminate calculation, step-by-step description and installation secrets (105 photos and videos)
We attach HDF along the entire back of the cabinet body, to its internal partitions and tightly fixed shelves, this will give the back wall greater protection.
You can assemble the back part in the early stages, when the cabinet is still lying down, but it is best to leave it at this stage so as not to spoil the thin wall.
Measurement of the room for installation
How to correctly measure the opening of a room. The measurement diagram for our opening will look like this:
| Width measurement | Depth measurement | Height measurement |
As you can see, the room must be measured at several points.
Measuring the width of the room
Take 4 measurements along the back wall:
The first one is above the baseboard.
Second – 800mm from the floor
Third – 1600 mm from the floor
Fourth - under the ceiling
Next, you need to make another series of measurements, but this time stepping back from the back wall to the depth of the cabinet. And just like in the previous example, take 4 measurements at different heights.
Measuring the depth of the room
Take 4 measurements along the side wall:
The first one is above the baseboard.
Second – 800mm from the floor
Third – 1600 mm from the floor
Fourth - under the ceiling
Measuring the height of the room
Measure the height of the rear wall every 500 mm:
The first one is against the left wall.
Medium – every 500 mm
The last one is on the right wall
Next, you need to make another series of measurements, but this time stepping back from the back wall to the depth of the cabinet.
Identification of foreign objects
Next, you need to measure the distances to foreign objects - protrusions, sockets, switches, doorways.
In our example there are no foreign objects.
We install the side racks and the top cover
Now the final part of assembling the frame is the installation of the side posts and the top cover. All three elements must be installed simultaneously.
Although this action depends on the design features and location of the fastening points on these parts. First, we install the sidewalls, fastening them at the bottom with the base with confirmations.
Then we put the lid on top, align the holes in all the parts and also tighten the fasteners. Here you need to leave a little free play, since you will need to level the entire frame.