Home » Choice
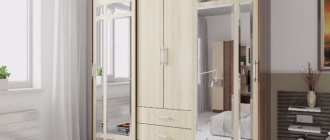
The cabinet must have two main qualities: compactness and spaciousness. Many companies offer various furniture options for storing things in an apartment. The Fortune wardrobe is considered one of the most popular and spacious.
- About the manufacturer
- Description of wardrobe Fortuna Placement
- Color spectrum
- Internal filling
- Cabinet cost
- Assembly
- Advantages and disadvantages
About the manufacturer
The furniture factory "Interior-Center", located in the city of Penza, produces high-quality cabinet furniture. Buyers value the factory’s products based on a number of parameters:
- Excellent design solutions of all types.
- Constantly updating collections.
- Compliance of materials with quality standards.
- Use of modern fittings.
- Affordable prices.
Sliding wardrobes are one of the main directions of the Interior Center factory. They are sold throughout Russia; there are company representative offices in major cities. The factory has received a large number of professional awards.
Description of the wardrobe Fortuna
Sliding wardrobes will fit perfectly into any interior. They are roomy and compact due to the sliding door mechanism.
Accommodation
- bedrooms;
- hallways;
- children's rooms;
- loggias.
The cabinet is entirely made of laminated chipboard, including the front doors. The cabinet dimensions are shown in the table.
Color spectrum
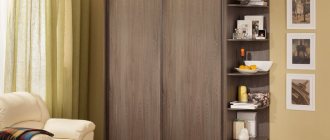
- Bleached oak is ideal for bright rooms, a common shade that can be combined with other furniture.
- Light ash with a warm shade, looks good in children's rooms and hallways.
- Dark ash with a calm, warm hue.
Chipboard color: wenge, dark shimo ash. The color combinations look bright.
Sliding wardrobe Fortuna four doors. The main advantages of the model, according to the manufacturer, are:
- decent quality;
- low cost.
The side doors are decorated with beveled mirrors. This model is popular in the market.
Internal filling
Inside the Fortuna wardrobe is divided into three vertical sections. The side sections are identical; they include an upper shelf for storing scarves, hats, linen and other things, as well as horizontal rods for hanging clothes. The height of the model allows you to store long coats and raincoats without worrying about them getting wrinkled.
The middle section includes four spacious shelves, as well as three lower drawers. They are designed for storing linen and hosiery products. The standard depth of 600 millimeters allows you to arrange all your things compactly.
There are no lower shelves for storing shoes.
Cabinet cost
This model is sold in many stores in Russia. The Fortune wardrobe is rated by the manufacturer as affordable. Its cost ranges from 9,000 to 13,000 rubles. As a rule, this amount includes delivery to the entrance. Additional charges:
- Climbing to the floor
- Assembly (10% of the cost of the cabinet, some stores charge up to 1000 rubles for the service).
Assembly
You can assemble the “Fortune” cabinet yourself. It comes with accessible instructions with detailed descriptions. For assembly you will need:
- Screwdriver.
- Hammer and nails.
- Roulette.
- Level.
- Screwdrivers.
Assembly is carried out in four stages, it takes
Stage 1. The model body is assembled. This work is done on the floor. The wardrobe is assembled lying down. The plank and cabinet walls are attached to the bottom, then the inner walls, mezzanine shelves and lid. Particular attention is paid to marking the drawer guides.
Stage 2. The drawers are assembled and the guides are attached. The cabinet is placed vertically.
Stage 3. Using nails and a hammer, the fiberboard walls are nailed to the back. Now the cabinet body can be put back in place. All that remains is to place shelves, clothes rails, and ready-to-assemble drawers.
Stage 4. The last stage is hanging the doors. This is done carefully, markings are made first.
If the owner of the cabinet doubts whether he can assemble it, it is better to seek help from professionals.
Advantages and disadvantages
According to customer reviews, the Fortuna wardrobe has both advantages and disadvantages. Among the positive qualities are:
- Capacity of the model.
- Design of facade and mirror with facet.
- Low cost in relation to characteristics.
- Color of the body and facades.
Speaking about the advantages, we must not forget about the disadvantages. And they are:
- The difficulty of self-assembly without experience, which especially applies to hanging sliding doors.
- Drawers can only be pulled out when the outer doors are fully open.
- Average quality of sliding mechanisms.
The Fortuna wardrobe is suitable for those who want to store their clothes while saving significant money. Decent appearance and acceptable quality are the distinctive features of the Fortuna wardrobe.
Sliding wardrobe Fortuna: assembly, video, photo instructions
A wardrobe, as the main piece of furniture in any room, should have a number of positive qualities. The first and most important thing you need to pay attention to is spaciousness, dimensions and harmonious combination with the overall interior of the room. produces a popular wardrobe model called “Fortune”, which managed to show itself on the positive side. When purchasing this product, the question may arise: how to assemble a wardrobe of this type? Paying attention to the instructions presented below, this will not be difficult to do.
Cabinet assembly
As practice shows, assembling the Fortuna sliding wardrobe will take you no more than two hours. The instructions will help you cope with problems, so you can even assemble it yourself, without additional help. Remember that even experienced assemblers have a mandatory set of tools with them:
A set of necessary tools
- hammer;
- screwdriver;
- nails;
- roulette;
- building level;
- screwdrivers.
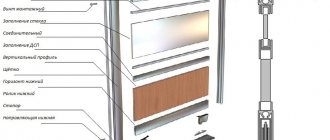
The page contains photo and video files on how to assemble correctly and step by step. First of all, you should deal with the body. Remember that any wardrobe is assembled on the floor in a lying position. The bottom is laid, and then the plank is firmly attached to it. The walls must be attached evenly and firmly, without discrepancies or loosening. The walls inside the cabinet compartments are not only of decorative importance, but also influence the strength and service life of the product.
Each of the boxes should be assembled separately. Remember that the correct location of the guide beams will determine the use of the cabinet in everyday life.
Pull-out compartments should be free of obstacles, slide in smoothly and remain firmly in place. After these steps, the cabinet can be raised to a vertical position.
Inside view of the Fortuna cabinet
Fiberboard walls are installed using a hammer and nails, which are already included with the product. Once the body is assembled, the cabinet can be placed in the location chosen for it. The last stage remains - hanging the doors. The diagram provided by the manufacturer will not help you much in this matter, since you must mark and install the loops yourself. Fortunately, modern technology allows you to do this quickly and without much difficulty.
Installing any furniture is quite an interesting and not an easy task. The Fortuna sliding wardrobe, the simple assembly of which is presented on our website, will serve you for a long time, delighting your household. The main thing to remember is that all parts must be carefully tightened, leaving no weak spots. Otherwise, over time, the furniture will become loose, and reassembly will no longer bring such a high-quality result.
The Fortuna sliding wardrobe has a fairly large number of advantages. For example, users were able to note that it has a very large capacity, which harmoniously borders on the small size of the model. A wide range of color shades allows each person to choose the most suitable option, and the attractive price will not put too much of a strain on your pocket. This model is considered the best option for couples with small children.
1 2
infomebli.ru
Tools and materials
Among all types of clothing storage products, the leading place today is occupied by the wardrobe. It is multifunctional, spacious, comes in different shapes and sizes, and does not require additional space to open the doors. That is why most people, when choosing between a wardrobe and a sliding wardrobe, prefer the latter option.
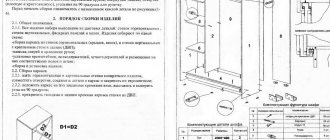
Assembling a sliding wardrobe with your own hands in the video presented is not at all difficult - all you need to do is have the necessary tools in your apartment and be familiar with the design of the product. Often, when ordering a cabinet without the services of assemblers, the company sends a document that contains a drawing of the product. This also lists all the component parts, which are numbered in order. By looking at the drawing and comparing the elements of the cabinet, you can intuitively assemble the product.
To work according to the sliding wardrobe assembly diagram, you will need the following tools:
- building level - to check the levelness of the installation parallel to the floor;
- corner;
- rubber and regular hammer;
- straight and Phillips screwdriver;
- roulette;
- pencil and ruler;
- screwdriver;
- wood drill - to make holes;
- metal drill – for installing an aluminum base.
Additional tools for assembling furniture yourself include a jigsaw, drill and sandpaper. It is also necessary to prepare all the details of the cabinet, which means checking the diagram to ensure that the number of items matches. Pay attention to the fittings and mechanisms: if there are drawers in the closet, ball guides should be included.
Doors for the product are often supplied ready-made. They are pre-installed with rollers and a strip of soft material. The door must be installed in the final phase.
Assembling a sliding wardrobe Fortuna Sport video
10 months back
Video instructions for assembling the “Fortune” cabinet: https://dekonte.ru/spalnja/shkafy-i-tumby/shkaf-fortuna We are on social networks: https://t.me/dekonte…
1 year ago
Sliding wardrobe Fortuna, step-by-step video instructions.
9 months back
Complete step-by-step assembly of a maestro sliding wardrobe with explanations, Manufacturer - furniture company BTS (BTS)
3 weeks back
Wardrobe "Fortuna" white: https://dekonte.ru/shkaf-fortuna-bely.
4 years ago
The video is in fragments, since grandma was very disturbing - I apologize! Do-it-yourself wardrobe door repair begins...
3 years ago
Furniture assembly: combined wardrobe HK 02.94. Wardrobe "Fortune". We fasten the running profile and the guide profile.
10 months back
Video instructions for assembling the “Coupe” wardrobe: https://dekonte.ru/spalnja/shkafy-i-tumby/kupe-s-zerkalom We are on social networks: https://t.me/dekonte…
10 months back
Sliding wardrobe “Fortune”: https://dekonte.ru/shkaf-fortuna We are on social networks: https://t.me/dekonte https://vk.com/mebel_dekonte …
1 year ago
Modern design and stylish execution distinguish the Fortuna wardrobe from other representatives of the family...
1 year ago
In this video, we will look in detail at the procedure for assembling a wardrobe at home, using the example of a wardrobe…
9 months back
Modern design and stylish execution distinguish the Fortuna wardrobe from other representatives of the family...
3 years ago
The video shows the Favorite sliding wardrobe Belford Oak Dimensions (H*W*D, mm) 2100*1700*578 Weight 158 Body material laminated chipboard…
1 year ago
Assembly of a sliding wardrobe 1000 - 1800 x 600 x 2400 (Vlabi) https://www.hanimebel.com.ua - Our online store https://www.facebook.com/hanimebel - Facebook.
2 years ago
Important !!! Dear subscribers and viewers of the channel, I have created a new channel dedicated to furniture assembly, homemade...
11 months back
Review of the modern sliding wardrobe from the BTS factory. If you are planning to buy a wardrobe inexpensively, then check out our...
10 months back
Triumph furniture, hostel furniture and other offices, most likely clones of the same shit manufacturer...
6 months back
MORE INFORMATION ON THE SITE! — https://chonemuzhik.ru/kak-sobrat-shkaf-kupe-svoimi-rukami.html How to assemble a wardrobe with your own hands Service...
2 years ago
Uglich Furniture Company UMKA. We have been producing furniture since 2006. Today I will show you how to assemble...
1 year ago
Find additional details on the main DEZALT website https://www.dezalt.ru/news/20170919190908/
9 months back
Do you want to buy an inexpensive wardrobe? Look at the photo and design of the Fortuna wardrobe. https://www.linetti.ru/Shkaf-kupe_Fortuna/ Hello...
sports-video.ru
Comments • 19
You don't explain it very clearly. Wasted my time. “These are the ships, this is there, we don’t know where.” The point was to record such a video.. Nonsense.
Olesya, if it’s completely unclear to you, maybe it’s better not to take on the task of assembling cabinets yourself? After this experience, we will think again whether it is worth spending the day off until the night to collect such things. It’s a pity that you wasted your 8 minutes watching this video + another 1 minute of time and energy to write a shitty comment.
How do you like the closet? Spacious?
Blat, I only came to this video because I can’t hang the doors - I don’t understand how to push the lower fasteners into the runners, and in the end they didn’t show it(
What accessories are used to assemble furniture?
This is a very important question, because each hardware has its own technical parameters and requires special fixing technology. A large number of problems with assembling cabinets arise precisely because hardware was used without taking these features into account.
Types of furniture fasteners
Table. Types of hardware for sliding wardrobes.
| Name of fastener | Short description |
| The second name is Euroscrew. Used for simplified connection of most furniture elements. It is screwed into pre-prepared holes, the depth depends on the length of the hardware. Disadvantage: the part being connected has a through hole, which has a negative impact on the appearance of the furniture. |
| Minifixes | The most reliable and complex connection. It consists of two parts: a housing (eccentric) and a connecting bolt with a round head. The disadvantage is that a special Forstner drill must be used for the connection; all holes must be made with maximum precision. Advantages - the front side of the parts is not damaged, it is possible to disassemble/assemble furniture without compromising the strength of the connection. The fact is that all threaded connections in furniture boards significantly reduce their strength after each unscrewing: chipboard boards crumble, the diameter of the hole increases, and the thread can no longer reliably hold the hardware. |
| Dowels | A traditional connection that has been used for many centuries to secure furniture elements. The front surfaces are not damaged, the strength of furniture joints meets existing requirements. The disadvantage is that the connection is disposable, since it sticks to the glue and is completely destroyed when disassembled. |
| Corner ties | Can be plastic or metal. These fasteners are designed to secure furniture parts at right angles to each other. They are fixed with self-tapping screws and allow you to adjust the position of the elements after assembly. Excellent replacement for complex hardware. Disadvantage: corner ties must be installed only on the inside of the furniture; they cannot be hidden. |
| Intersectional ties | They are used during the assembly of complex cabinets; they connect several separate autonomous sections together. Sliding doors are rarely used in simple two-door wardrobes. |
Wardrobe components
Find out what types of storage systems are in the dressing room, and also familiarize yourself with the DIY assembly process in a special article on our portal.
Instructions for assembling a wardrobe with your own hands.
Every apartment must have such a multifunctional piece of furniture as a wardrobe. It will save space in your home and organize space. Not everyone can afford to purchase it due to various circumstances. This is not a reason to refuse such a thing. For a jack of all trades, it won’t be too difficult to make and assemble it yourself.
Of course, some knowledge will be required. There is nothing complicated here as it seems at first glance. In addition, what joy and pride you will experience from the work done. After all, furniture assemblers charge quite a high fee, but you can handle it on your own.
After the decision to buy a wardrobe has been made, the need arises to assemble it correctly.
Methods and stages of assembling a sliding wardrobe
The assembly order also does not depend on the type of furniture; all products have the same elements for their intended purpose. This means that they must be collected using universal technology. What are the assembly methods?
Horizontal
It is necessary to prepare a large area, free it from all interfering objects. First, the frame of the wardrobe is assembled. The bottom is placed on the edge, the sides and middle are baited to it in the same position, then the top is baited. The angles and dimensions are checked, if everything is normal, then the fasteners are tightened until they stop.
Assembling the cabinet frame in a horizontal position
Then the back wall is fixed, which significantly increases the strength of the structure. Legs or wheels are screwed to the bottom, and the frame is raised to a vertical position. Now it has sufficient strength to easily withstand all unusual loads that arise during furniture installation. Doors are always installed last.
The doors are installed last.
Advantages of this method:
- there is an opportunity to perform all the work independently;
- the risks of mechanical breakdowns of cabinet parts are minimized;
- work can be divided into several stages depending on capabilities, during which time the structure is not subjected to any loads;
- The process of checking the connection angles of individual parts is simplified.
Horizontal assembly greatly simplifies the workflow
There is only one drawback - you need a lot of free space in the room, it is not always possible to free it up. Especially if it is residential and cluttered with a lot of furniture.
Vertical
A more complex method, it is highly recommended to involve assistants for this assembly. With this method, the legs are installed on the bottom, then the sidewalls and the middle partition are fixed to it in a vertical position. At this time, problems arise - the parts wobble and can completely tear out the connection. We need to come up with methods for temporarily fixing them or call an assistant. The second solution is more acceptable; this is the only way to fully guarantee the safety of all cabinet elements during assembly.
You will need a helper to assemble the cabinet vertically.
After installing the frame, the back wall is fixed, and then all the internal filling is installed. The doors, as always, are installed last.
Find out how to make lighting in the kitchen under the cabinets, and also familiarize yourself with the planning principle, the choice of lamps and lighting colors, in a special article on our portal.
Prices for sliding wardrobes
Wardrobe-wardrobe
General rules for assembling cabinet furniture
To assemble purchased furniture, you must follow the cabinet assembly instructions provided by the manufacturer. There are certain rules. By following them, you will assemble any item with high quality and in a short time.
- You shouldn’t take everything out of the packages at once, much less mix parts from different packs. Maintain the order.
- Read the instructions carefully so that later there are no overlaps and you don’t have to redo it again.
- Make sure the fittings and components are in place. Otherwise, you will not be able to completely assemble the furniture. The handles must match the color scheme. It is necessary that the drawer guides have a soft movement.
- Assemble one section at a time in order. You need to start from the bottom, gradually moving to the sides.
- Open the package, lay out the parts, prepare the tools.
- Mirrors and glass are installed at the final stage. This way you will avoid damage.
For assembly you need a screwdriver, a screwdriver, a hex key, and a tape measure.
If you do the manufacturing yourself, it will be much easier to assemble.
It is very important to follow the assembly sequence, otherwise you will be forced to disassemble and reassemble the cabinet in the correct sequence.
Sliding wardrobe "Maestro": step-by-step assembly instructions
How to assemble a sliding wardrobe can be read in the “Instructions for assembling a sliding wardrobe”, which is included in the package. However, there are some details that require strict adherence. A sliding wardrobe is furniture that performs many functions; now such models have become very widespread.
Cabinet Features
Sliding wardrobe "Maestro"
Assembling the Maestro sliding wardrobe takes a little time and is not particularly difficult. Installing such a product for an adult man who has a little knowledge of the instrument is a matter of one or two hours. It is recommended to watch the video instructions first.
Parameters in millimeters:
- width 170 cm;
- height 222 cm;
- 60 cm deep.
Maestro cabinet parameters
Inside, the shelves are arranged functionally and thoughtfully. There are also mezzanine shelves. Cabinets are produced covered with a pleasant soft color (wenge or ash). The front of the cabinet can be Loreto or oak. White doors create an image of imposingness and sophistication. There are large format mirrors with special bevel processing.
Inside view of the cabinet
How to work with laminated chipboard - a popular material for cabinet furniture
Currently, laminated chipboard is mainly used in the production of furniture. This is the first principle. It is wood shavings of coarse dispersion. Using the hot pressing method, it is given the shape of a sheet. In the manufacture of slabs, formaldehyde resins are used; they are an additional component. The difference from simple chipboard is the coating with a film made of paper and melamine resin. In terms of environmental indicators, it is better to use materials of class E1. Laminated chipboard boards have good compaction, due to which furniture made from them is strong and has a long service life.
Fastening the rails to the cabinet door
If you think that this material has the same composition, then you are mistaken. Based on their coating, they are divided into veneered, rough and laminated. Based on their quality composition, they can be divided into three grades: first, they use first-class sawdust (usually wood of the same species). The surface is flawless, not a single chip. The plate is decorated, laminated with film or veneer. Second grade – you can already see small defects. There may or may not be cladding. Third, there are already noticeable defects here. Such slabs are not covered with anything.
Until the cabinet is fully assembled, make sure that the attached parts do not tilt, as the fasteners may break off.
In addition, laminated chipboards are moisture-resistant and fire-resistant (withstand high temperatures). They are mainly used to make furniture frames, but are also used in the production of partitions or used as interior decoration. It is worth mentioning that laminated chipboard, due to its composition, perfectly holds nails and screws.
In order to give rigidity to the wardrobe, it is necessary to secure the back wall.
The main “steps” for assembling sliding wardrobes with your own hands are indicated in the instructions.
Furniture made from these boards has many advantages compared to other materials.
- Acceptable price indicators.
- No difficulties in manufacturing.
- Good quality.
- Significant period of use.
- Variety of colors and decorations. This will help you choose the perfect furniture for your living room, kitchen or children's room.
- Blends perfectly with other materials.
Such furniture looks great in any interior.
Another important feature of laminated chipboard is that these boards have heat and sound insulation. Therefore, they can sheathe the walls of the room.
Make sure that the holes for the shelves and hanger rod mounts match the holes on the opposite rack.
Also, if you have started remodeling an apartment/house, knowing how to assemble a wardrobe yourself will help you easily and quickly resolve the issue of moving this furniture.
Step-by-step instructions for assembling a sliding wardrobe with 2 doors
We will look at an example of assembling a specific model; if you understand the nuances well, then no difficulties will arise during the installation of other types of furniture. To carry out the work you will need a screwdriver, a hammer, a mounting knife and PVA glue. Glue will be needed only in one case - the cabinet has connections on dowels.
In addition to tools, you will also need PVA glue
Step 1 . Bring the packages into the room, find a bag of hardware and sort them. As we mentioned above, you need to understand the purpose, location and features of each type of fixation.
Fasteners must be included with the cabinet
Step 2 . Open the package with the bottom and top of the cabinet. It is shorter in length than a package with sides and an internal partition. Check the condition of the elements. This package also contains some shelves.
The bottom, top and part of the cross shelves are usually packed together
Step 3 . Select minifix connecting bolts from among the hardware. Screw them into the holes prepared by the manufacturer. Tighten until it stops, but watch the force. It must be remembered that chipboard does not belong to the class of durable materials and reacts extremely negatively to exceeding critical forces. In our case, there are six pieces of hardware, two for the sidewalls and two for the internal partitions.
There are already ready-made holes for minifixes
Step 4 . Find the bottom of the cabinet and install the legs in place. They are made of plastic and have metal inserts to increase the strength of the connection. Assemble the legs and prepare them for installation.
Metal fasteners must be inserted into the plastic body of the leg
Step 5 . Turn the bottom upside down, find the holes into which the elements are installed. If the holes are not deep enough to screw in the screws, you need to drill a little to fit the hardware.
The legs are inserted into the prepared holes on the bottom
Step 6 . Turn the bottom into working position and screw the minifix bolts into it.
Screwing in minifixes from the back of the bottom
Step 7 . Insert the eccentrics of the minifixes into the partitions and sidewalls. Make sure that the slots of the eccentrics point towards the heads of the bolts: downwards at the bottom, and upwards at the top, respectively. The elements should fit into the holes prepared by the manufacturer easily, but at the same time not wobble. If the holes are larger than required, then a big problem appears. Which? Under normal conditions, the eccentric rests along the entire lower arc of the hole, otherwise the contact area is significantly reduced. This is a very negative factor. At the lowest point, the thickness of the slab is insignificant, its strength is very low. As soon as the actual loads exceed the maximum values, the thin part of the chipboard is destroyed. The holes will have to be redone, which means additional costs and loss of time. In addition, there will be unsightly holes in the sidewall slab, which are also noticeable from the outside.
Installing eccentrics in the sidewalls
Step 8 . Connect one side panel to the bottom. Place it vertically, point the heads of the bolts into the holes and turn the eccentrics of the minifixes. Always hold the side with one hand. Do not deviate it from the vertical by more than 10–15°. If this condition is not met, mechanical damage to parts is possible. We have already mentioned that it is better to work together, but if it doesn’t work, lean the side panel very carefully and carefully against the wall. This should be provided for at the stage of assembling the bottom; place it at a distance of about 15–20 cm from the wall.
Connecting the bottom and sidewalls with minifixes
Step 9 . Replace the vertical internal partition and also attach the minifixes.
The vertical partition is also fixed with minifixes
Important. During assembly, never tighten fasteners until all parts are in the correct position. Reinforced hardware makes it possible to simultaneously hold and change the position of elements without damaging the technological holes.
Step 10 . To increase the stability of the position of the sidewall and the internal partition, connect them with a shelf. Work very carefully and hold the elements constantly. The parts are fixed with euroscrews and tightened with hex keys. In this position, part of the frame gains strength, but it is still insufficient; work very carefully.
To increase the stability of the frame, a shelf is attached
Step 11 . In the assembled section of the wardrobe, put all the shelves in place. Now they can be tightened with force and ensure a tight fit of the parts.
The shelves are secured with confirmations, which are tightened using a hex key.
Step 12 . Attach a small vertical partition and a long horizontal shelf to it. Not all cabinets have this element; if you have the same situation, then the operation is skipped.
This cabinet model has a vertical partition at the bottom
Step 13 . Put the second side panel in place, tighten all the eccentrics, they should pull the parts tightly. Now it no longer wobbles, there are two points of fixation: to the bottom and to the horizontal shelf. This situation will make the assembly process much easier.
Fastening the second side panel significantly strengthens the frame
Step 14 . Replace the top of the cabinet and tighten the fasteners. The frame is already quite stable, you can relax a little and work more calmly. Reinstall all cabinet shelves.
The top part is screwed on
Prices for cordless screwdrivers
Cordless screwdriver
Step 15 . Secure the back wall elements. In order to save materials in this version, the manufacturer used narrow strips of fiberboard; plastic inserts are inserted between them to cover the cut points. Of course, large parts of the back wall look much more advantageous, but they complicate packaging and require slabs of standard sizes, and strips can be made from waste from the production of other types of furniture. The fiberboard boards are fixed with wood screws. Screw them in carefully; the screws should land exactly in the middle of the furniture boards.
The back wall is sewn up with fiberboard strips
Important. Do not allow a situation where the self-tapping screw is screwed in at an angle and damages the external decorative coating of the sliding wardrobe.
Step 16 . Assemble the drawers, check the corners and screw the bottoms to them. It is also made of fiberboard and is fixed with self-tapping screws. Higher quality models have a plywood bottom; this material has improved performance characteristics.
Box assembly process
Step 17 . Install the supporting elements of the extension mechanism, guides, etc. on the drawers. The list of parts differs depending on the type used. Check the dimensions again, if everything is normal, then you can fix the drawer front plate and install it inside the cabinet. Please ensure that all installation dimensions are maintained exactly; the surfaces of the drawers should not interfere with the normal functioning of other cabinet elements.
Guides are screwed to the bottom of the drawers
Practical advice. Use corrugated cardboard to control the gap between the bottom of the drawer and the shelf. It has a thickness of 5 mm, which is considered the optimal parameter.
All that remains is to install a metal tube for outerwear. Fix its position using a bubble level and fasten it with wood screws. Adjust the position of the cabinet with the legs and you can install sliding doors. The process does not cause any difficulties; the specific algorithm depends on the manufacturer. Each of them makes its own minor changes, but the general engineering principles are exactly the same.
After installing the drawers, attach the clothes rail
When installing sliding doors, you should always install the inner one first, and then the outer one. Otherwise, the parts will not fit on the guide elements. Adjust the smoothness of the ride, set the limiters. If the closet is not in its place, then move it according to the furniture arrangement plan in the room.
Installation of wardrobe doors
Preparation before assembly
First you need to prepare the room. The final outcome of the case depends on this, how much time you spend on work. The important point is that nothing interferes. Make sure all materials and necessary tools are at hand.
As a depth limiter, you can use a 6 or 8 plastic dowel mounted on a drill.
With the help of a wardrobe, you will visually separate different zones in the room, for example, a working area from a relaxation area.
Assembling furniture at first glance seems simple. Many people make mistakes, resulting in defects: the doors and sashes do not fit together well, the doors can creak when opening, misalignment of the holes causes misalignment of parts, furniture does not stand securely on the floor. To avoid this, you must adhere to certain rules and instructions.
Built-in wardrobes of various models, made from natural and artificial materials, are very popular in interior design.
Some models of wardrobes can be transformed to suit the features of the room: the presence of a corridor, recesses in the wall where the wardrobe can be placed.
Main assembly steps
The wardrobe is assembled strictly according to the diagram, vertically or horizontally. The second option is better, this way you can prevent skewing of the parts being connected. If the height of the ceilings does not allow you to raise the finished cabinet, then it is better to carry out the work in a vertical position.
You can easily assemble a sliding wardrobe with your own hands if you follow the step-by-step instructions.
In such a closet you will place twice as much clothes without the expense of the enormity of the furniture itself.
The first step is to attach the base and adjustable legs to the bottom. They are necessary if the floor is uneven. Next, we begin assembling the body. We connect the sides to the base. To make the structure durable, we attach an intermediate rack and a shelf. This is necessary so that the sidewalls do not tilt. Then we screw the remaining parts and attach the lid. It is advisable not to nail the back wall, but to screw it with self-tapping screws. At this stage we put the cabinet in its place. We install guides for drawers, holders for shelves, and a bar for hangers. Check that the drawers should slide out smoothly.
You need to familiarize yourself with all the details of the product (so as not to confuse anything during the assembly process and not have to start all over again), prepare the tools and the place where the assembly and installation will take place.
This work will take a lot of your time.
Next up is door installation. First we attach the guides, then we fix the rail with screws. We insert the doors, check that they open and close smoothly. Adjust them if necessary. Lastly, glue on the sealing brushes. We attach plugs to the confirmation holes.
Do not warp the cabinet parts, keep the corners straight.
To summarize, we can say that assembling a wardrobe is not such a difficult job. Your desire, skill and ability will allow you to do this without difficulty.
After you do everything, be sure to check how the doors work (do they creak, move freely, etc.), how securely the shelves and other parts are fastened.
Be careful that until the cabinet body is assembled and the back wall is installed, all fasteners can be easily broken.
Assembly sequence
If you are interested in how to assemble a sliding wardrobe of the “Fortune” series, you need to read the instructions from the manufacturer and follow them. The assembly of the wardrobe is carried out strictly according to the diagram - vertically or horizontally. The second option is preferable because it prevents possible distortion of the parts being connected. If the ceiling height in the room is not enough to raise the finished cabinet, it is better to assemble it vertically.
The Fortuna wardrobe will fit approximately 2 times more clothes than any other furniture, and such a set will not take up much space in the room. This is the main advantage of this series.
What to do before assembly
Before assembly work, you should check whether all spare parts are included in the factory configuration. You must receive at least two boxes of chipboard, as well as a door system and boxes of hardware. Hardware and related elements are often found in a box with chipboard.
The manufacturer recommends paying special attention to the receipt of the cabinet, since many courier services and private delivery providers sometimes forget certain elements or deliver them in damaged condition. Therefore, be sure to check these points.
In the furniture industry, there are 3 connection schemes for chipboards:
- Using screws (confirmations).
- Using minifixes (eccentric ties.
- Any of the above methods, but using wooden dowels.
For each type of fastening, suitable holes are prepared on the plane and at the end of the boards. Two types of holes are used for confirmations:
- Through in one part with a diameter of 7 mm.
- Blind in the next part with a diameter of 4.5-5 mm.
For eccentric couplers, 2 pairs of holes are also selected:
- In the first design there is a blind 5 mm diameter for the minifix rod.
- In the next part there is an 8 mm hole on the end side for the clamping cylinder.
To place dowels, blind holes with a diameter of 8-10 mm are used.
How to assemble - diagram and recommendations
When assembling, the first thing to do is attach the plinth and adjustable feet to the bottom. They are indispensable in case of uneven floors. Then you can proceed to installing the housing. The side parts are connected to the base. To increase strength, a shelf and an intermediate stand are installed. In this case, the sidewalls will not tilt to the sides.
Then you need to attach the remaining parts and the cover. The back wall is not nailed, but screwed using self-tapping screws. After this, the cabinet is installed in its original place and the drawer guides, shelf clamps and hanger rod are installed.
Do not forget to familiarize yourself with all the components of the cabinet, so as not to confuse anything during assembly and not to start the process from scratch, prepare the necessary tools and place for installation.
The process itself takes a lot of time and effort.
If we are talking about installing doors, then the first step is to install the guides and then secure the rail with self-tapping screws. The next step is to check that the door moves normally on the rollers and closes softly. If any problems or difficulties are detected during the door operation, the system should be adjusted. Finally, you need to glue the sealing brushes and attach the plugs to the holes of the fasteners.
Photo: door installation - insert first into the upper groove of the guide
In most cases, sliding wardrobes are assembled in a lying position. During assembly, it is important to prevent distortion of individual components and try to maintain even angles.
After following the instructions, you should make sure that the doors operate smoothly, do not creak or have difficulty moving. You should also evaluate the strength of fixation of shelves and other parts.
What to do if you can’t assemble it yourself
If it is not possible to carry out the installation work yourself, you should seek help from experienced specialists. They will solve the task in a short time and without any difficulties. But before paying for the work, you should thoroughly check whether there are any problems with the finished furniture, fittings and components.
Assembly video
To make assembly easier, you can watch video tutorials.
